Launch and control Led FX on Windows

We control Led FX installed on Windows

Download LedFX for Windows
More details can be read here
Documentation

I will share my configuration option. It may be useful. The thing is that the integration of LedFX, as the author writes, is no longer supported by the author, maybe I misunderstood him, but not the point. I have this integration on the Home Assistant did not work, maybe it works with the LedFX addon, but I do not need the LedFX addon, since the LedFX server is running on Windows

link to the author’s message

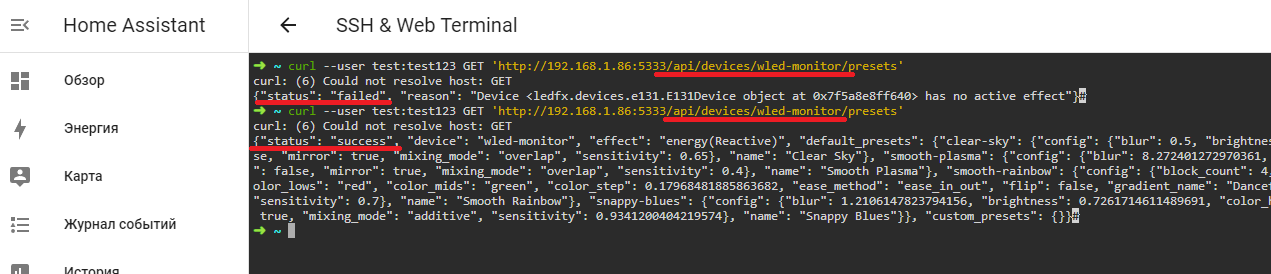
Integration does not work, although the LedFX server itself is running


We create scenes in Led FX and name them as it is convenient for us

Next, you need to find out the name of the scene. We enter it in the browser and look at the data
http://127.0.0.1:8888/api/scenes

We are looking for the lines of the names of our scenes. Your scenes can be named in their own way, but the principle of search is the same. In my case, the scenes have names like in the screenshot, and through json we are looking for the names of our scenes. We will use them to create switches

Creating switches using integration Command line Switch

For all command_off we use the same equalizer off, and for command_on we specify which equalizer we need to turn on. The status does not change quickly, I specified 10 seconds.

image

switch:
  - platform: command_line
    switches:
      ledfx_scene_visualiser_blade_power:
        friendly_name: "LedFX Visualiser BladePower"
        command_timeout : 10
        icon_template: mdi:music
        command_on: curl -L -X PUT 'http://192.168.5.27:8888/api/scenes' --data-raw '{"id":"blade-power","action":"activate"}'
        command_off: curl -L -X PUT 'http://192.168.5.27:8888/api/scenes' --data-raw '{"id":"music-off","action":"activate"}'
        command_state: curl -X GET 'http://192.168.5.27:8888/api/devices' | grep 'blade_power(Reactive)'

  - platform: command_line
    switches:
      ledfx_scene_visualiser_bands:
        friendly_name: "LedFX Visualiser Bands"
        command_timeout : 10
        icon_template: mdi:music
        command_on: curl -L -X PUT 'http://192.168.5.27:8888/api/scenes' --data-raw '{"id":"bands","action":"activate"}'
        command_off: curl -L -X PUT 'http://192.168.5.27:8888/api/scenes' --data-raw '{"id":"music-off","action":"activate"}'
        command_state: curl -X GET 'http://192.168.5.27:8888/api/devices' | grep 'bands(Reactive)'

  - platform: command_line
    switches:
      ledfx_scene_visualiser_energy:
        friendly_name: "LedFX Visualiser Energy"
        command_timeout : 10
        icon_template: mdi:music
        command_on: curl -L -X PUT 'http://192.168.5.27:8888/api/scenes' --data-raw '{"id":"energy","action":"activate"}'
        command_off: curl -L -X PUT 'http://192.168.5.27:8888/api/scenes' --data-raw '{"id":"music-off","action":"activate"}'
        command_state: curl -X GET 'http://192.168.5.27:8888/api/devices' | grep 'energy(Reactive)'

Let’s create a script for the hidden launch of Led FX via IOT Link

Here are more examples of how it is configured

If you want to see that the Led FX server is running, then specify in “visible”: true, “fallback”: true

sequence:
  - service: mqtt.publish
    data:
      topic: iotlink/workgroup/home/commands/run
      payload: >-
        { "command": "C:\\Program Files (x86)\\LedFx\\data\\LedFx.exe",  "args":
        "--open-ui", "path": "C:\\Program Files (x86)\\LedFx\\data", "user": "",
        "visible": false, "fallback": false }
      retain: false
      qos: '0'
mode: single
alias: 'Starting the server LedFX '
icon: mdi:television-ambient-light

Let’s create an Led FX addon for IOS Link so that the Home Assistant has a Led FX status sensor

It will look like this

1)First in the folder c:\ProgramData\IOTLink\Addons\ProcessMonitor\apps\ create a file LedFX.yaml

We stuff the code into the file
############################################################################
# Process Monitor
############################################################################
# Define configuration for monitoring a specific process.
############################################################################
# processes:          Process names (without .exe) to be monitored.
# windows:            Process window titles considered. Regex Accepted.
# classnames:         Process class names considered. Regex Accepted.
# configs:
#   enabled:          Enable/Disable.
#   discoverable:     Enable/Disable HA Auto Discovery.
#   advancedMode:     Enable HA Auto Discovery for advanced stats (MEM, CPU, etc).
#   displayName:      Display Name used for HA Auto Discovery.
#   cacheable:        Enable/Disable caching monitor values.
#   grouped:          Group similar processes information.
#     true:    All similar processes information (memory, cpu, etc) grouped.
#     false:   Consider only the first process found.
#   interval:         Interval for refreshing this information.
#   compareType:      Comparison used to match windows and classnames.
#     0:       Should MATCH ALL windows AND MATCH ALL classnames
#     1:       Should MATCH ALL windows OR MATCH ALL classnames
#     2:       Should MATCH ALL windows AND AT LEAST ONE classnames
#     3:       Should MATCH ALL classnames AND AT LEAST ONE window
#     4:       Should MATCH AT LEAST ONE window OR AT LEAST ONE classnames
############################################################################

# LedFx color music for WLED
processes:
  - LedFx.exe
windows:
classnames:
configs:
  enabled: true
  discoverable: true
  advancedMode: false
  displayName: LedFx
  cacheable: true
  grouped: true
  compareType: 0
  interval: 10

  1. Next, open config.yml, located on the path c:\ProgramData\IOTLink\Addons\ProcessMonitor\

  2. Find the line monitors and add LedFX: !include apps/LedFX.yaml

monitors:
  LedFX: !include apps/LedFX.yaml
  1. We save and launch LedFX, a topic should appear in MQTT Explorer, and a LedFX sensor will appear in Home Assistant through MQTT integration. Search for it in the Name of your PC Processes

Текст на русском (Text in Russian)

Управляем LedFX, установленный на Windows.

Скачать LedFX для Windows
Более подробно можно почитать здесь
Документация

Поделюсь своим вариантом настройки. Может будет полезным. Все дело в том, что интеграция LedFX как пишет автор, больше не поддерживается автором, может я и неправильно его понял, но не суть. У меня данная интеграция на Home Assistant не заработала, возможно это работает с аддоном LedFX, но мне аддон LedFX не нужен, так как сервер LedFX запущен на Windows/

ссылка на сообщение от автора

Интеграция не работает, хотя сам сервер LedFX запущен


Создаем в LedFX сцены и именуем как нам удобно

Далее, нужно узнать имя сцены. Вводим в браузере и смотрим на данные
http://127.0.0.1:8888/api/scenes

Ищем строки названия своих сцен. У вас сцены могут именоваться по своему, но принцип поиска одинаковый. В моем случае сцены имеют названия как на скриншоте, а через json мы ищем названия своих сцен. Их будем применять для создания выключателей

Создаем выключатели используя интеграцию Command line Switch

Для всех command_off используем одинаковое выключение эквалайзера, а для command_on указываем какой эквалайзер нам надо включить. Статус меняется не быстро, я указал 10 секунд.

image

switch:
  - platform: command_line
    switches:
      ledfx_scene_visualiser_blade_power:
        friendly_name: "LedFX Visualiser BladePower"
        command_timeout : 10
        icon_template: mdi:music
        command_on: curl -L -X PUT 'http://192.168.5.27:8888/api/scenes' --data-raw '{"id":"blade-power","action":"activate"}'
        command_off: curl -L -X PUT 'http://192.168.5.27:8888/api/scenes' --data-raw '{"id":"music-off","action":"activate"}'
        command_state: curl -X GET 'http://192.168.5.27:8888/api/devices' | grep 'blade_power(Reactive)'

  - platform: command_line
    switches:
      ledfx_scene_visualiser_bands:
        friendly_name: "LedFX Visualiser Bands"
        command_timeout : 10
        icon_template: mdi:music
        command_on: curl -L -X PUT 'http://192.168.5.27:8888/api/scenes' --data-raw '{"id":"bands","action":"activate"}'
        command_off: curl -L -X PUT 'http://192.168.5.27:8888/api/scenes' --data-raw '{"id":"music-off","action":"activate"}'
        command_state: curl -X GET 'http://192.168.5.27:8888/api/devices' | grep 'bands(Reactive)'

  - platform: command_line
    switches:
      ledfx_scene_visualiser_energy:
        friendly_name: "LedFX Visualiser Energy"
        command_timeout : 10
        icon_template: mdi:music
        command_on: curl -L -X PUT 'http://192.168.5.27:8888/api/scenes' --data-raw '{"id":"energy","action":"activate"}'
        command_off: curl -L -X PUT 'http://192.168.5.27:8888/api/scenes' --data-raw '{"id":"music-off","action":"activate"}'
        command_state: curl -X GET 'http://192.168.5.27:8888/api/devices' | grep 'energy(Reactive)'

Создадим скрипт для скрытного запуска LedFX через IOT Link

Вот еще примеры как это настраивается

Если хотите видеть, что сервер LedFX запущен, то укажите в “visible”: true, “fallback”: true

sequence:
  - service: mqtt.publish
    data:
      topic: iotlink/workgroup/home/commands/run
      payload: >-
        { "command": "C:\\Program Files (x86)\\LedFx\\data\\LedFx.exe",  "args":
        "--open-ui", "path": "C:\\Program Files (x86)\\LedFx\\data", "user": "",
        "visible": false, "fallback": false }
      retain: false
      qos: '0'
mode: single
alias: 'Запуск сервера LedFX '
icon: mdi:television-ambient-light

Создадим аддон LedFX для IOT Link, чтобы в Home Assistant был сенсор состояния LedFX

Выглядеть это будет вот так

  1. Сперва в папке c:\ProgramData\IOTLink\Addons\ProcessMonitor\apps\ создадим файлик LedFX.yaml и в файлик запихиваем код. Код ниже
В файлик запихиваем код
############################################################################
# Process Monitor
############################################################################
# Define configuration for monitoring a specific process.
############################################################################
# processes:          Process names (without .exe) to be monitored.
# windows:            Process window titles considered. Regex Accepted.
# classnames:         Process class names considered. Regex Accepted.
# configs:
#   enabled:          Enable/Disable.
#   discoverable:     Enable/Disable HA Auto Discovery.
#   advancedMode:     Enable HA Auto Discovery for advanced stats (MEM, CPU, etc).
#   displayName:      Display Name used for HA Auto Discovery.
#   cacheable:        Enable/Disable caching monitor values.
#   grouped:          Group similar processes information.
#     true:    All similar processes information (memory, cpu, etc) grouped.
#     false:   Consider only the first process found.
#   interval:         Interval for refreshing this information.
#   compareType:      Comparison used to match windows and classnames.
#     0:       Should MATCH ALL windows AND MATCH ALL classnames
#     1:       Should MATCH ALL windows OR MATCH ALL classnames
#     2:       Should MATCH ALL windows AND AT LEAST ONE classnames
#     3:       Should MATCH ALL classnames AND AT LEAST ONE window
#     4:       Should MATCH AT LEAST ONE window OR AT LEAST ONE classnames
############################################################################

# LedFx светомузыка для WLED
processes:
  - LedFx.exe
windows:
classnames:
configs:
  enabled: true
  discoverable: true
  advancedMode: false
  displayName: LedFx
  cacheable: true
  grouped: true
  compareType: 0
  interval: 10

  1. Далее открываем config.yaml, расположенный по пути c:\ProgramData\IOTLink\Addons\ProcessMonitor\

  2. Находим строчку monitors и добавляем LedFX: !include apps/LedFX.yaml

monitors:
  LedFX: !include apps/LedFX.yaml
  1. Сохраняем и запускаем LedFX, в MQTT Explorer должен появиться топик, а в Home Assistant, через интеграцию MQTT появится сенсор LedFX. Искать его в Имя вашего ПК Processes

I used LedFX on Windows for a while and it works fine and even built MPD Server for Windows, but then another problem arose. I would like not to depend on the computer and for the color music to work everywhere, not just on the computer. This is necessary for audio stream from a Yandex smart speaker on MPD, and Led FX, in turn, visualizes music.

Important. This post is relevant at the time of publication, possibly the author of Led FX integration this will take into account and you will not have to do the management yourself and it will be enough to install LedFX integration. To understand the problem as a whole, read here and here


1) We put the Led FX addon. This addon is located in test repositories. In the addon store, insert the following link

https://github.com/hassio-addons/repository-edge

2) In the settings of the Led FX addon, turn off SSL. If you still use the connection for all SSL addons, then enable SSL

3) Go to the web interface of the Led FX addon and create scenes there. Turn on any device, select a setting for this device and save it to the scene

Next, we check all the scenes through the browser with the command. Read more about API Postman documentation здесь

To find out the devices id, enter and search there in the lines “id”: “XXXXXXX”

http://192.168.1.86:5333/api/devices

If you need to check the scene for all devices

http://192.168.1.86:5333/api/scenes

If you need to check the scene for a specific device

http://192.168.1.86:5333/api/devices/wled-monitor/presets

4) Let’s check the LedFX management through the SSH&Terminal addon, where you need to specify a login and password to log in to the Home Assistant and in this place --user test:test123, instead of test:test123, specify your username and password

Activate the scene

curl --user test:test123 -X PUT 'http://192.168.1.86:5333/api/scenes' --data-raw '{"id":"energy","action":"activate"}'

curl --user test:test123 -X PUT 'http://192.168.1.86:5333/api/scenes' --data-raw '{"id":"music-off","action":"activate"}'

Get a list of devices

curl --user test:test123 GET 'http://192.168.1.86:5333/api/devices/'

5) If everything works successfully, we can create scene management in several ways, below I will give examples of several options

A variant using shell command. In this version, we simply send a signal to activate the scene and there will be no feedback here.

shell_command:
  ledfx_test_scene_energy: >
    curl --user test:test123 -X PUT 'http://192.168.1.86:5333/api/scenes' --data-raw '{"id":"energy","action":"activate"}'
  ledfx_test_scene_music_off: >
    curl --user test:test123 -X PUT 'http://192.168.1.86:5333/api/scenes' --data-raw '{"id":"music-off","action":"activate"}'

A variant using Command line Switch. In this version, we can turn the scene on and off and will receive feedback.

  - platform: command_line
    switches:
      ledfx_test_scene_visualiser_energy_wled_monitor:
        friendly_name: "Test LedFX Visualiser Energy WLED Monitor"
        icon_template: mdi:music
        command_on: curl --user test:test123 -X PUT 'http://192.168.1.86:5333/api/scenes' --data-raw '{"id":"energy","action":"activate"}'
        command_off: curl --user test:test123 -X PUT 'http://192.168.1.86:5333/api/scenes' --data-raw '{"id":"music-off","action":"activate"}'
        command_state: curl --user test:test123 GET 'http://192.168.1.86:5333/api/devices/wled-monitor/presets' | grep 'success'

Note that I use grep to pull out success, which serves for the status

command_state: curl --user test:test123 GET 'http://192.168.1.86:5333/api/devices/wled-monitor/presets' | grep 'success' 


Текст на русском (Text in Russian)

Какое-то время я использовал LedFX на Windows и это работает отлично и даже собрал MPD Server для Windows, но тут встала другая проблема. Хочется не зависеть от компьютера и чтобы светомузыка работала везде, а не только на компьютере. Это нужно для аудио стрима с умной колонки Яндекс на MPD, а LedFX в свою очередь визуализирует музыку.

Важно. Данный пост актуален на момент опубликования, возможно автор интеграции LedFX это учтет и не придется самому делать управление и достаточно будет установить интеграцию LedFX. Для понимания проблемы в целом, читаем тут и тут


1) Ставим аддон LedFX. Данный аддон находится в тестовых репозиториях. В магазине аддона вставляем такую ссылку

https://github.com/hassio-addons/repository-edge

2) В настройках аддона LedFX выключаем SSL. Если вы все таки используете подключение для всех аддонов SSL, то включите SSL

3) Зайдите в веб интерфейс аддона LedFX и создайте там сцены. Включите какое либо устройство, выберите для данного устройства надстройку и сохраните в сцену

Далее проверяем все сцены через браузер командой. Более подробно читаем про API Postman documentation здесь

Чтобы узнать id devices вводим и ищем там в строках “id”: “XXXXXXX”

http://192.168.1.86:5333/api/devices

Если надо проверить сцену для всех девайсов

http://192.168.1.86:5333/api/scenes

Если надо проверить сцену для конкретного девайса

http://192.168.1.86:5333/api/devices/wled-monitor/presets

4) Проверим управление LedFX чрез аддон SSH&Terminal, где нужно указать логин и пароль для входа в Home Assistant и в этом месте --user test:test123, вместо test:test123 укажите свой логин и пароль

Активировать сцену

curl --user test:test123 -X PUT 'http://192.168.1.86:5333/api/scenes' --data-raw '{"id":"energy","action":"activate"}'

curl --user test:test123 -X PUT 'http://192.168.1.86:5333/api/scenes' --data-raw '{"id":"music-off","action":"activate"}'

Получить список девайсов

curl --user test:test123 GET 'http://192.168.1.86:5333/api/devices/'

5) Если все работает успешно, то можем создать управление сценами несколькими способами, ниже я приведу примеры нескольких вариантов

Вариант с использованием shell command. В данном варианте мы просто посылаем сигнал на активацию сцены и здесь не будет обратной связи

shell_command:
  ledfx_test_scene_energy: >
    curl --user test:test123 -X PUT 'http://192.168.1.86:5333/api/scenes' --data-raw '{"id":"energy","action":"activate"}'
  ledfx_test_scene_music_off: >
    curl --user test:test123 -X PUT 'http://192.168.1.86:5333/api/scenes' --data-raw '{"id":"music-off","action":"activate"}'

Вариант с использованием Command line Switch. В данном варианте мы можем включить и выключить сцену и будем получать обратную связь

  - platform: command_line
    switches:
      ledfx_test_scene_visualiser_energy_wled_monitor:
        friendly_name: "Test LedFX Visualiser Energy WLED Monitor"
        icon_template: mdi:music
        command_on: curl --user test:test123 -X PUT 'http://192.168.1.86:5333/api/scenes' --data-raw '{"id":"energy","action":"activate"}'
        command_off: curl --user test:test123 -X PUT 'http://192.168.1.86:5333/api/scenes' --data-raw '{"id":"music-off","action":"activate"}'
        command_state: curl --user test:test123 GET 'http://192.168.1.86:5333/api/devices/wled-monitor/presets' | grep 'success'

Обратите внимание, что я использую grep для выдергивания success, который служит для статуса

command_state: curl --user test:test123 GET 'http://192.168.1.86:5333/api/devices/wled-monitor/presets' | grep 'success' 

I express my gratitude to the author of the addon Led FX. The author added the ability to turn off authorization, thus now this Led FX integration can connect to the addon Led FX. To do this, install the Led FX addon version 349fe09

1) In the configuration of the Led FX addon, click on 3 dots, select the text mode and add the line leave_front_door_open: true, then save it and we will have an activated mode without authorization

Screenshots


2) We put the integration LedFX and specify as in the screenshot.

IP adress: localhost
Port: 5333 # we specify the port that is specified in the LedFX addon


Example of how to run random effects

service: light.turn_on
target:
  entity_id: light.ledfx_monitor
data:
  effect: "{{ state_attr('light.ledfx_monitor', 'effect_list') | random }}"

Example of a sensor that displays which effect is selected

{{state_attr('light.ledfx_monitor', 'effect')}}

Текст на русском (Text in Russian)

Выражаю благодарность автору аддона LedFX. Автор добавил возможность выключить авторизацию, тем самым теперь данная интеграция LedFX может подключиться к аддону LedFX. Для этого нужно установить аддон LedFX версии 349fe09

1) В конфигурации аддона LedFX нажимаем на 3 точки, выбираем текстовый режим и добавляем строчку leave_front_door_open: true, после сохраняем и у нас появится активированный режим без авторизации

Скриншоты


2) Ставим интеграцию LedFX и указываем как на скриншоте.

IP adress: localhost
Port: 5333 # порт указываем тот, который указан в аддоне LedFX


Пример как запускать рандомные эффекты

service: light.turn_on
target:
  entity_id: light.ledfx_monitor
data:
  effect: "{{ state_attr('light.ledfx_monitor', 'effect_list') | random }}"

Пример сенсора, который отображает какой эффект выбран

{{state_attr('light.ledfx_monitor', 'effect')}}

Automation for streaming and visualization of music from this video

Automation №1

alias: 'Living Room: WLED Monitor. Yandex column. Music. Streaming. Led FX'
description: >-
  If Yandex. Column starts playing music and streaming turns on, then light
  music will turn on
trigger:
  - platform: state
    entity_id: media_player.mpd_mopidy
    to: playing
    id: 'MPD: Music streaming is enabled'
  - platform: state
    entity_id: input_boolean.livingroom_yandex_station_striming
    from: 'on'
    to: 'off'
    id: 'Switch: Music streaming is off'
    for:
      hours: 0
      minutes: 0
      seconds: 1
  - platform: state
    entity_id: media_player.yandex_station_xxxxxxxxxxxxxx
    to: paused
    from: playing
    id: 'Yandex Station: Music is turned off'
    for:
      hours: 0
      minutes: 0
      seconds: 10
condition:
  - condition: state
    entity_id: input_boolean.kitchen_yandex_station_striming
    state: 'off'
action:
  - choose:
      - conditions:
          - condition: trigger
            id: 'MPD: Music streaming is enabled'
          - condition: state
            entity_id: input_boolean.livingroom_yandex_station_striming
            state: 'on'
        sequence:
          - service: script.livingroom_wled_monitor_ledfx_random_scene_selection
      - conditions:
          - condition: trigger
            id: 'Switch: Music streaming is off'
        sequence:
          - service: light.turn_off
            target:
              entity_id: light.ledfx_monitor
      - conditions:
          - condition: trigger
            id: 'Yandex Station: Music is turned off'
        sequence:
          - service: input_boolean.turn_off
            target:
              entity_id: input_boolean.livingroom_yandex_station_striming
    default: []
mode: parallel
max: 10

Automation №2

alias: 'Living Room: WLED Monitor. Yandex column. Music. Streaming. Alice'
description: Turn on and off music streaming manually or from Yandex speakers
trigger:
  - platform: state
    entity_id: input_boolean.livingroom_yandex_station_striming
    from: 'off'
    to: 'on'
    id: 'Switch: Streaming is enabled'
  - platform: state
    entity_id: input_boolean.livingroom_yandex_station_striming
    from: 'on'
    to: 'off'
    id: 'Switch: Streaming is off'
  - platform: event
    event_type: yandex_intent
    event_data:
      room: Living room
      text: turned on the light music
    id: 'Yandex Station: Turn on the light music'
condition:
  - condition: state
    entity_id: input_boolean.kitchen_yandex_station_striming
    state: 'off'
action:
  - choose:
      - conditions:
          - condition: trigger
            id: 'Switch: Streaming is enabled'
          - condition: state
            entity_id: media_player.yandex_station_xxxxxxxxxxxxxx
            state: playing
        sequence:
          - service: media_player.select_source
            target:
              entity_id: media_player.yandex_station_xxxxxxxxxxxxxx
            data:
              source: MPD Mopidy
      - conditions:
          - condition: trigger
            id: 'Switch: Streaming is off'
        sequence:
          - service: media_player.select_source
            target:
              entity_id: media_player.yandex_station_xxxxxxxxxxxxxx
            data:
              source: Station
      - conditions:
          - condition: trigger
            id: 'Switch: Streaming is enabled'
          - condition: not
            conditions:
              - condition: state
                entity_id: media_player.yandex_station_xxxxxxxxxxxxxx
                state: playing
        sequence:
          - service: input_boolean.turn_off
            target:
              entity_id: input_boolean.livingroom_yandex_station_striming
      - conditions:
          - condition: trigger
            id: 'Yandex Station: Turn on the light music'
        sequence:
          - choose:
              - conditions:
                  - condition: state
                    entity_id: media_player.yandex_station_xxxxxxxxxxxxxx
                    state: playing
                sequence:
                  - service: input_boolean.turn_on
                    target:
                      entity_id: input_boolean.livingroom_yandex_station_striming
              - conditions:
                  - condition: not
                    conditions:
                      - condition: state
                        entity_id: media_player.yandex_station_xxxxxxxxxxxxxx
                        state: playing
                sequence:
                  - service: script.tts_yandex_station_say
                    data:
                      device: media_player.yandex_station_xxxxxxxxxxxxxx
                      volume: 6
                      message: >-
                        First turn on the music, and then you can turn on
                        light music
            default: []
    default: []
mode: parallel
max: 10

Automation №3

alias: 'Living Room: WLED Monitor. Yandex column. Music. Streaming. Turn on the sound'
description: >-
  Yandex. Column turns off the sound by default when streaming is enabled. If
  automation is enabled, then the muted sound will be turned on
trigger:
  - platform: state
    entity_id: input_boolean.livingroom_yandex_station_striming
    from: 'off'
    to: 'on'
    for:
      hours: 0
      minutes: 0
      seconds: 2
    id: 'Switch: Streaming is enabled'
  - platform: state
    entity_id: media_player.mpd_mopidy
    to: playing
    id: 'MPD: Media player is running'
condition:
  - condition: state
    entity_id: sensor.yandex_station_livingroom_silent_mode
    state: 'True'
action:
  - service: media_player.volume_mute
    target:
      entity_id: media_player.yandex_station_xxxxxxxxxxxxxx
    data:
      is_volume_muted: false
mode: parallel
max: 10

The script. Random scene selection

alias: 'Living Room: WLED Monitor. Led FX. Light-music. Random scene selection'
sequence:
  - service: light.turn_on
    target:
      entity_id: light.ledfx_monitor
    data:
      effect: '{{ ["power(Reactive)","bands(Reactive)","energy(Reactive)"] | random }}'
mode: single
icon: mdi:television-ambient-light

Текст на русском (Text in Russian)

Автоматизации для стриминга и визуализации музыки с данного видео

Автоматизация №1

alias: 'Гостиная: WLED Монитор. Яндекс колонка. Музыка. Стриминг. LedFX'
description: >-
  Если Яндекс колонка начнет играть музыку и включится стриминг, то включится
  светомузыка
trigger:
  - platform: state
    entity_id: media_player.mpd_mopidy
    to: playing
    id: 'MPD: Стриминг музыки включен'
  - platform: state
    entity_id: input_boolean.livingroom_yandex_station_striming
    from: 'on'
    to: 'off'
    id: 'Переключатель: Стриминг музыки выключен'
    for:
      hours: 0
      minutes: 0
      seconds: 1
  - platform: state
    entity_id: media_player.yandex_station_xxxxxxxxxxxxxx
    to: paused
    from: playing
    id: 'Яндекс станция: Музыка выключена'
    for:
      hours: 0
      minutes: 0
      seconds: 10
condition:
  - condition: state
    entity_id: input_boolean.kitchen_yandex_station_striming
    state: 'off'
action:
  - choose:
      - conditions:
          - condition: trigger
            id: 'MPD: Стриминг музыки включен'
          - condition: state
            entity_id: input_boolean.livingroom_yandex_station_striming
            state: 'on'
        sequence:
          - service: script.livingroom_wled_monitor_ledfx_random_scene_selection
      - conditions:
          - condition: trigger
            id: 'Переключатель: Стриминг музыки выключен'
        sequence:
          - service: light.turn_off
            target:
              entity_id: light.ledfx_monitor
      - conditions:
          - condition: trigger
            id: 'Яндекс станция: Музыка выключена'
        sequence:
          - service: input_boolean.turn_off
            target:
              entity_id: input_boolean.livingroom_yandex_station_striming
    default: []
mode: parallel
max: 10

Автоматизация №2

alias: 'Гостиная: WLED Монитор. Яндекс колонка. Музыка. Стриминг. Алиса'
description: Включаем и выключаем стриминг музыки вручную или с Яндекс колонки
trigger:
  - platform: state
    entity_id: input_boolean.livingroom_yandex_station_striming
    from: 'off'
    to: 'on'
    id: 'Переключатель: Стриминг включен'
  - platform: state
    entity_id: input_boolean.livingroom_yandex_station_striming
    from: 'on'
    to: 'off'
    id: 'Переключатель: Стриминг выключен'
  - platform: event
    event_type: yandex_intent
    event_data:
      room: Гостиная
      text: включи светомузыку
    id: 'Яндекс станция: Включи светомузыку'
condition:
  - condition: state
    entity_id: input_boolean.kitchen_yandex_station_striming
    state: 'off'
action:
  - choose:
      - conditions:
          - condition: trigger
            id: 'Переключатель: Стриминг включен'
          - condition: state
            entity_id: media_player.yandex_station_xxxxxxxxxxxxxx
            state: playing
        sequence:
          - service: media_player.select_source
            target:
              entity_id: media_player.yandex_station_xxxxxxxxxxxxxx
            data:
              source: MPD Mopidy
      - conditions:
          - condition: trigger
            id: 'Переключатель: Стриминг выключен'
        sequence:
          - service: media_player.select_source
            target:
              entity_id: media_player.yandex_station_xxxxxxxxxxxxxx
            data:
              source: Станция
      - conditions:
          - condition: trigger
            id: 'Переключатель: Стриминг включен'
          - condition: not
            conditions:
              - condition: state
                entity_id: media_player.yandex_station_xxxxxxxxxxxxxx
                state: playing
        sequence:
          - service: input_boolean.turn_off
            target:
              entity_id: input_boolean.livingroom_yandex_station_striming
      - conditions:
          - condition: trigger
            id: 'Яндекс станция: Включи светомузыку'
        sequence:
          - choose:
              - conditions:
                  - condition: state
                    entity_id: media_player.yandex_station_xxxxxxxxxxxxxx
                    state: playing
                sequence:
                  - service: input_boolean.turn_on
                    target:
                      entity_id: input_boolean.livingroom_yandex_station_striming
              - conditions:
                  - condition: not
                    conditions:
                      - condition: state
                        entity_id: media_player.yandex_station_xxxxxxxxxxxxxx
                        state: playing
                sequence:
                  - service: script.tts_yandex_station_say
                    data:
                      device: media_player.yandex_station_xxxxxxxxxxxxxx
                      volume: 6
                      message: >-
                        Сперва включите музыку, а после можете включить
                        светомузыку
            default: []
    default: []
mode: parallel
max: 10

Автоматизация №3

alias: 'Гостиная: WLED Монитор. Яндекс колонка. Музыка. Стриминг. Включить звук'
description: >-
  Яндекс колонка при включении стриминга по умолчанию выключает звук. Если
  автоматизация включена, то выключенный звук будет включаться
trigger:
  - platform: state
    entity_id: input_boolean.livingroom_yandex_station_striming
    from: 'off'
    to: 'on'
    for:
      hours: 0
      minutes: 0
      seconds: 2
    id: 'Переключатель: Стриминг включен'
  - platform: state
    entity_id: media_player.mpd_mopidy
    to: playing
    id: 'MPD: Медиа плеер запущен'
condition:
  - condition: state
    entity_id: sensor.yandex_station_livingroom_silent_mode
    state: 'True'
action:
  - service: media_player.volume_mute
    target:
      entity_id: media_player.yandex_station_xxxxxxxxxxxxxx
    data:
      is_volume_muted: false
mode: parallel
max: 10

Скрипт. Рандомный выбор сцен

alias: 'Гостиная: WLED Монитор. LedFX. Светомузыка. Рандомный выбор сцен'
sequence:
  - service: light.turn_on
    target:
      entity_id: light.ledfx_monitor
    data:
      effect: '{{ ["power(Reactive)","bands(Reactive)","energy(Reactive)"] | random }}'
mode: single
icon: mdi:television-ambient-light

1 Like

Hello,
Thanks for this very interesting solution to implement Ledfx on Hassio.
I have a few questions and I would love to have more info.
My understanding is that with the addon, it is possible to have Hassio hosting ledfx without having the need of hosting it on windows?

The question is how can we get audio input towards ledfx, specifically Spotify would be great?

  • Via a microphone (connected to my RPI? right now it is not detected by ledfx and seems to trigger error with the addon)
  • Using the pulseAudio and MPD server integration. I don’t speak russian. This seems to be what you have done in this video? But it is not very clear how you made it work?
    Is it possible to have more info how you did it !
    Thanks a lot :slight_smile:

In order for the LedFX addon to visualize audio into light music, it is necessary that it receives a sound source, and this can be anything, a microphone, music streaming via Mopidy in LedFX. It also works with the microphone, maybe you have a problem with setting PulseAudio to RPI. I don’t have an RPI, I use Synology and I can’t help you with anything

I installed two addons LedFX and Mopidy and did not make any settings, all the default settings. All I did was set up music streaming in Mopidy by this integration for yandex speakers. There, the developer implemented the ability to stream from Yandex speakers to media_player. We have Mopidy as media_player, and Mopidy broadcasts music to LedFX, and LedFX visualizes music.

Default Mopidy settings, I didn’t rule anything

The settings of the LedFX addon are also all by default, I didn’t rule anything

Important! Do not install the Mopidy addon version 2.2.0, because the Mopidy addon version 2.2.0 does not broadcast music in LedFX and light music does not work from here. Put strictly an addon Mopidy 2.1.1 от Llntrvr

To understand why you need to install the Mopidy 2.1.1 addon, read here

Thanks a lot for such a quick feedback !
I went back to previous version of Mopidy 2.1.1 as you suggested. However I still don’t see the possibility to change audio source with MPD server.

I understand that the yandex speaker is a Russian hardware? Is it possible to stream spotify to mopidy and then have it broadcasting via my RPI3B+ output jack audio connector that connected to my living room amplifier?
Today, I use the spotify addon to achieve that.
On the mopidy server it seems that its possible to also have a spotify account:


But the extension is not active.
Sorry for all the question, I’m a bit new to all of this :slight_smile: But thanks again for your help !

Yandex Station is a Russian voice assistant Alice, an analogue of your Alexa, who knows how to manage a smart home, select music for each family member and answer any questions.

You don’t need to select any source in the audio settings section, everything should work by itself. Leave just default. No need to make such a long Spotify + Mopidy + LedFX chain, use Spotify + LedFX. You will not need Mopidy for the reason that streaming does not require MPD, as in my case. My streaming requires MPD, so I use a bundle of MPD + LedFX. You have a Spotify addon, it should already broadcast music inside and the LedFX addon should hear this music. The LedFX addon doesn’t care where the source comes from, the main thing is that it goes and if there is a sound, then it will visualize. If there is no sound, then you need to deal with Pulsa on RPI. Search the forums for how to set up Pulse. I did not configure Pulse, everything is simple for me, I put a couple of Mopidy and LedFX addons and everything works without any settings, the settings are the same as the author of the addons did.

1 Like

Ok i’ll try the Pulse and will keep you informed :slight_smile: Thanks again !