Lovelace: Button card

cool, nice and complex :wink:

and yes, the main card entity can be used for that, and should be chosen wisely. I have some buttons using another entity for exactly those templating purposes.

Since the button-card is endlessly customizable, there always is an option somewhere :wink:

Thanks for the feedback. Definitely:

  • Cool - agree :slight_smile:
  • nice - far away - I need to play a bit with sizes and etc. Colors are terrible
  • Complex - if itā€™s not complex - itā€™s not so interesting :slight_smile:
    The main goals that I have for the moment, before stating the polishing design is to see if I can use template also for the buttons below - as at the moment have 4 buttons and all parameters are in all of them and its very annoying to change 4 times all of the componentsā€¦

Other problem is that Tado is a bit complex as integration - from one side - there is a climate control - where half of attributes are available and second - a lot of sensors (and binary_sernsors) - where the rest of attributes are publish - so I need a lot of variables to pass them to the card. But in general - Iā€™m really happy with the custom:button-card and plan to use it a lot into the new redesign of the dashbaord.

your card just might be able to help me outā€¦ though I am a button-card user for a long time, and have it make up half of my Frontend, I dont have many cards with embedded cards/entities.

Which probably might be what I need currently: I have a set of bigger cards representing my Rooms, and they are in a stack or swiper, depending on device(width). Clicking any of these takes me to the view of that room in the path.

Those cards have an background image entity_picture of the zone, and can be greyed if a main entity is off. Also they can have a top border turn red if motion is detected:

template is like:

plattegrond:
  template:
    - styles_menu_tooltip
  aspect_ratio: 1/1
  tooltip: >
    [[[ return variables.tooltip; ]]]
  tap_action:
    action: navigate
    navigation_path: >
      [[[ return variables.path; ]]]
  hold_action:
    action: toggle #call-service
#             service: light.toggle
#             service_data:
#               entity_id: entity

  entity_picture: >
    [[[ return "/local/images/areas/" + variables.picture; ]]]
  size: 140%
  show_name: false
  show_icon: false
  show_entity_picture: true
  styles:
    card:
      - padding: 0px
#       - background-image: >
#           [[[ return  `url("/local/images/areas/${variables.picture}")`; ]]]
#       - background-size: cover
#       - background-repeat: no-repeat

#       - border-bottom: 4rem solid transparent
    entity_picture:
      - filter: >
          [[[ if (entity.state == 'off' || entity.state == 'unavailable') return 'grayscale(100%)';
              return 'grayscale(0%)'; ]]]

What Id love to add is a significant area at the bottom, just like the real Area card, (or the picture-entity card) and have control of what I show there, mostly a single temp entity state, and a humidity entity state.
I am not using the Area card, because that is way to dangerous with clicking it, and no way to control that.

this is a single instance of a room, using the above template:

        - type: custom:button-card
          entity: light.laundry_ceiling
          template: plattegrond
          variables:
            path: /ui-sub-views/bijkeuken
            picture: bijkeuken_klein.jpg
            tooltip: Bijkeuken
          styles:
            card:
              - border-top: >
                  [[[ return (states['binary_sensor.laundry_sensor_motion'].state == 'on')
                      ? '0.5rem solid red' : 'none'; ]]]

Iā€™d envision adding some variables there for the temp and humidity entities, which then need to be placed in side the card through the template in the blurred section at the bottom of the card.

hope this makes senseā€¦

Nested custom:button-card is very easy to be create:

  • you are defining place into the grid
  • into custom_filed - you are defining entire card - with style and other parameters.

Good news is that you can use variables for the ā€œmainā€ card - to pass parameters into the nested (even entity - can be passed).

It looks like I made a typo. When I tried today - creating second template for the bottom buttons works as expected.

so what did you change? any chance you share some of that nice card yaml config?

Here is the code of template:

button_card_templates:
  tado_action_template:
    aspect_ratio: 1/1
    show_name: false
    styles:
      card:
        - background-color: dark-gray
        - border-color: gray
        - border-width: 2px
  tado_button_card_template:
    variables:
      var_name: var_value1
      var_entity: var_value2
      var_batt: var_value3
      var_temp: var_value4
      var_hum: var_value5
      var_con: var_value6
      var_valve: var_value7
      var_icon1: var_value8
      var_icon2: var_value8
      var_icon3: var_value8
      var_icon4: var_value8
      var_entity_temp: var_value9
    name: '[[[ return variables.var_name ]]]'
    entity: '[[[ return variables.var_entity.entity_id ]]]'
    aspect_ratio: 1/1
    state:
      - value: heat
        icon: mdi:radiator
      - operator: default
        icon: mdi:radiator-off
    styles:
      card:
        - background-color: |
            [[[
              return (states[variables.var_entity].state === "heat" ?  " #ff9933" : 'gray');

            ]]]
        - border-radius: 5%
        - padding: 5%
        - color: white
        - font-size: 10px
        - text-shadow: 0px 0px 0px black
        - text-transform: capitalize
      grid:
        - grid-template-areas: >
            "n n n i"   "bat con valve valve" "ctemp ctemp chum chum" "buton1
            buton2 buton3 buton4"
        - grid-template-columns: 1fr 1fr 1fr 1fr
        - grid-template-rows: 1fr min-content  1fr 1fr
        - column-gap: 2px
      img_cell:
        - margin: '-30%'
        - color: blue
        - justify-self: end
      icon:
        - color: blue
      name:
        - font-weight: bold
        - font-size: 20px
        - color: blue
        - justify-self: start
      custom_fields:
        ctemp:
          - font-size: 10px
          - justify-self: start
          - color: red
        chum:
          - font-size: 10px
          - color: blue
          - justify-self: end
        con:
          - align-self: stretch
          - margin-top: 10%
          - justify-self: end
        valve:
          - align-self: stretch
          - margin-top: 10%
          - font-size: 12px
          - color: blue
          - font-weight: bold
          - justify-self: end
        bat:
          - justify-self: start
          - align-self: stretch
          - margin-top: 10%
          - animation: |
              [[[
                  if (states[variables.var_batt].state == "on") return 'blink 2s ease infinite';
              ]]]
    custom_fields:
      ctemp: |
        [[[
           return `<span>&#127777 ${states[variables.var_temp].state} &#8451</span>`
        ]]]
      chum: |
        [[[  
           return `<ha-icon  icon="mdi:water-percent" style="width: 15px; height: 15px; color: blue;"></ha-icon><span>${states[variables.var_hum].state}%</span>`
        ]]]
      bat: |
        [[[ if (states[variables.var_batt].state == "off") 
           return `<ha-icon icon="mdi:battery"  style="width: 18px; height: 18px; color: green;"></ha-icon>`
           else return `<ha-icon     icon="mdi:battery-20"    style="width: 20px; height: 20px; color: red;"></ha-icon>`
        ]]]
      con: |
        [[[ if (states[variables.var_con].state == "on") 
            return `<ha-icon          icon="mdi:lightning-bolt"         style="width: 18px; height: 18px; color: blue;"></ha-icon>`
            else return `<ha-icon                 icon="mdi:lan-disconnect"                 style="width: 20px; height: 20px; color: red;">                </ha-icon>`
        ]]]
      valve: |
        [[[  
            return `<ha-icon          icon="mdi:pipe-valve"         style="width: 18px; height: 18px; color: red;"></ha-icon> ${states[variables.var_valve].state} %`
        ]]]
      buton1:
        card:
          type: custom:button-card
          template: tado_action_template
          tap_action:
            action: toggle
          variables:
            var_entity: climate.bedroom
          entity: '[[[ return variables.var_entity ]]]'
          icon: mdi:pipe-valve
      buton2:
        card:
          type: custom:button-card
          template: tado_action_template
          entity: '[[[ return variables.var_entity ]]]'
          icon: mdi:arrow-up-bold
          tap_action:
            action: call-service
            service: climate.set_temperature
            service_data:
              entity_id: '[[[ return variables.var_entity ]]]'
              temperature: >
                [[[ var temp =
                ((states[variables.var_entity].attributes.temperature)         
                +                   1);
                   return temp; ]]]
      buton3:
        card:
          type: custom:button-card
          template: tado_action_template
          entity: '[[[ return variables.var_entity ]]]'
          styles:
            grid:
              - grid-template-areas: '"stemp"'
          custom_fields:
            stemp: |
              [[[ const state = entity.attributes.temperature; 
                return `<span>${state}<ha-icon icon="mdi:temperature-celsius" style="width: 12px; height: 10px; "></ha-icon></span>`
              ]]]
      buton4:
        card:
          type: custom:button-card
          template: tado_action_template
          entity: '[[[ return variables.var_entity ]]]'
          icon: mdi:arrow-down-bold
          tap_action:
            action: call-service
            service: climate.set_temperature
            service_data:
              entity_id: '[[[ return variables.var_entity ]]]'
              temperature: >
                [[[ var temp = 
                ((states[variables.var_entity].attributes.temperature) -  1);
                  return temp; 
                ]]]

Here is how the card to be used:

type: custom:button-card
template: tado_button_card_template
variables:
  var_name: Bedroom
  var_entity: climate.bedroom
  var_batt: binary_sensor.va4253816064_battery_state
  var_temp: sensor.bedroom_temperature
  var_hum: sensor.bedroom_humidity
  var_con: binary_sensor.va4253816064_connection_state
  var_valve: sensor.bedroom_heating
entity: climate.bedroom

Keep in mid that Iā€™m using 2 cards in a horizontal-stack:

image

In general - card is almost ready as functionality - I just need to add one sensor from Tado - for open Window detection and then to start fine tunning.
There few main things to be fixed:

  • At the moment grid is with 4 columns - Iā€™m planning to make it 12 (as I have few rows with 3 and few with 4 items per column) - this will improve the placement of the items.
  • Second part is to fix colors in general - as the current are just to see the things
  • To improve logic behind - I have 3 states of the TVR - Off, On - Heating (current temp is below target) and On - Idle (current temp is higher than current). In all those cases few different colors will be used for background (color or picture) and for few of the buttons. Also icon colors should be changed in different case - by the sample if Max temperature is set.
1 Like

I found it out on my own: setting the triggers_update property to the time sensor (sensor.time) letā€™s my button card refresh every minute.

thats some massive work on a single button card you have there, very informative thanks

did you ever consider making life easy on yourself, and create eg a grid with button cards showing maybe 1 or 2 main entities, and when clicked, go to a more detailed subview of that same area. whihc hen would list all youā€™d need, but way easier configured?

It is exactly what I am trying to do currently, and it seems a bit better for the eye (my eyesā€¦) not having all if that info in a single button, which wil be impossible to colorize probably.

Have a main grid with overview area cards.
Click a card, navigate there and view all area info

Those will be on the detailed dashboard - where I want to have full control. On main dashboard Iā€™ll have a summary - where Iā€™ll have condensed info - like - what are the ā€œONā€ TVRs, if anyone have problems with battery or connection and turn-off all button :slight_smile:

cool.

maybe you can help me out.
currently I have a button-card template using the full canvas which gets a filter based on the state of an entity:

plattegrond:
  template:
    - styles_menu_tooltip
  aspect_ratio: 1/1
#   tooltip: >
#     [[[ return variables.tooltip; ]]]
  tap_action:
    action: navigate
    navigation_path: >
      [[[ return variables.path; ]]]
  hold_action:
    action: toggle #call-service
#             service: light.toggle
#             service_data:
#               entity_id: entity

  entity_picture: >
    [[[ return "/local/images/areas/" + variables.picture; ]]]
  size: 140%
  show_name: false
  show_icon: false
  show_entity_picture: true
  styles:
    card:
      - padding: 0px
#       - background-image: >
#           [[[ return  `url("/local/images/areas/${variables.picture}")`; ]]]
#       - background-size: cover
#       - background-repeat: no-repeat

#       - border-bottom: 4rem solid transparent
    entity_picture:
      - filter: >
          [[[ if (entity.state == 'off' || entity.state == 'unavailable') return 'grayscale(100%)';
              return 'grayscale(0%)'; ]]]

Ive set the filter to the entity_picture, because if it was set to the background, the whole button, including its entities would get greyedā€¦

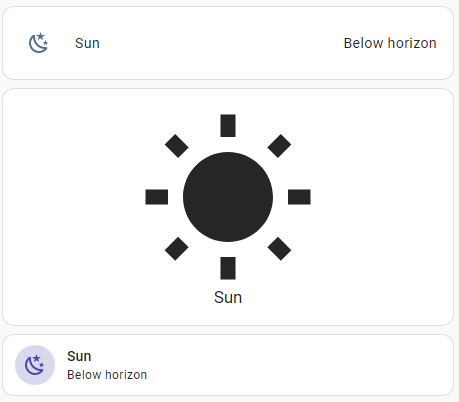
its displayed on the left button.
Next, a minimalistic-area-card, is used, with some extra entities, but they are a but small, and, Ive had to figure out some more complex templating. Because of this, its a bit more difficult to throw that inside a decluttering template (which has an extra issue resizing the button to a banner really)

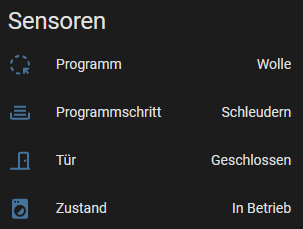
that gave me the idea to test the custom banner card, because I liked the idea of the overlay, in whihc some of these entities are displayed. its in the right. Ofc this is also not the right size, but I want that overlay section in my button-card. probably need a grid for that:

this section is in a grid: 4 columns, but that is of minor importance, other than its odd the right side card isnt squared, as the default is for grid.

      - type: custom:button-card
        entity: light.laundry_ceiling
        template: plattegrond
        variables:
          path: /ui-sub-views/bijkeuken
          picture: bijkeuken_klein.jpg
          tooltip: Bijkeuken
        styles:
          card:
            - border-top: >
                [[[ return (states['binary_sensor.laundry_sensor_motion'].state == 'on')
                    ? '0.5rem solid red' : 'none'; ]]]

      - type: custom:minimalistic-area-card
        card_mod:
          style: |
            ha-card {
              filter: {{'grayscale(0%)' if
                        (is_state('light.laundry_ceiling','on') or
                         is_state('binary_sensor.laundry_sensor_motion','on'))
                        else 'grayscale(100%)'}};
              border-top: {{'1rem solid red' if is_state('binary_sensor.laundry_sensor_motion','on')
                    else 'none'}};
            }
#           title: Laundry
        image: /local/images/areas/bijkeuken_square.jpg
        shadow: false
        tap_action:
          action: navigate
          navigation_path: /ui-sub-views/bijkeuken
        hold_action:
          action: call-service
          service: light.toggle
          service_data:
            entity_id: light.laundry_ceiling
        entities:
          - entity: sensor.laundry_sensor_temperature
          - entity: sensor.laundry_sensor_illuminance
#           - switch.tester
#           - entity: sensor.hallway_temperature
#centraal

      - type: custom:banner-card
        card_mod:
          style: |
            ha-card {
              filter: {{'grayscale(0%)' if
                        (is_state('light.laundry_ceiling','on') or
                         is_state('binary_sensor.laundry_sensor_motion','on'))
                        else 'grayscale(100%)'}};
              border-top: {{'1rem solid red' if is_state('binary_sensor.laundry_sensor_motion','on')
                    else 'none'}};
            }
        background: 'url("/local/images/areas/bijkeuken_klein.jpg")'
        heading: Bijkeuken
        link: /ui-sub-views/bijkeuken
        entities:
          - entity: sensor.laundry_sensor_temperature
            name: Temp
          - entity: sensor.laundry_sensor_illuminance
            name: Lux
          - entity: binary_sensor.laundry_sensor_motion
            name: Motion

long story short:

how can I set the grid section on my top button-card template, so it is grayed like in the banner card, using background: rgba(0, 0, 0, 0.3);, showing some (2 or 3) of the entities, preferably with an icon and not name.

what these do:

tap: navigate to are subview
hold: toggle main entity set on either card
change filter on state of main entity: off=gray, on=color
show top border red if motion is detected.

Aware I have a button with grids, like the example on button-card for the RPI with all of its entities. However, this is a very different grid on the button.

Hope this makes sense, would welcome any feedback you could provide :wink:

Guess a first step would be to add a grid to the button card for the 2 horizontal sections, where the top is as is (dont need even a title there) and the bottom section is with the overlay, and max 3 spots for an entity

how would that translate to something like:

    grid:
      - grid-template-columns: repeat(3, 1fr); 
      - grid-template-rows: 2fr 1fr; 
      - grid-column-gap: 0px;
      - grid-row-gap: 0px; 

#      - position: relative

made on https://cssgrid-generator.netlify.app

would I need

      - grid-template-areas: '"area area area" "temp humid motion"'

so it uses the top section for Area only and then the bottom section for the 3 sensors max?

2 Likes

separate post for readability:

a very small start, yet the background image only peeks throughā€¦, and the positioning of the entities is really odd. Guess my grid and properties are not correct yet:

      custom_fields:
        area: >
          [[[ return 'Bijkeuken'; ]]]
        temp: >
          [[[ return `<ha-icon icon=mdi:thermometer style='width:24px;'> </ha-icon>
                      <span style='color: blue;'>
                      ${states['sensor.temperatuur_living'].state}%</span>`; ]]]
        humid: >
          [[[ return `<ha-icon icon=mdi:memory style='width:24px;'></ha-icon>
                      <span style='color:green;'>
                      ${states['sensor.luchtvochtigheid_living'].state}%</span>`; ]]]
        motion: >
          [[[ return `<ha-icon icon=mdi:motion-sensor style='width:24px;'></ha-icon>
                       <span style='color:red;'>
                      ${states['binary_sensor.laundry_sensor_motion'].state}</span>`; ]]]
      styles:
        grid:
          - grid-template-areas: '"area area area" "temp humid motion"'
          - grid-template-columns: repeat(3, 1fr);
          - grid-template-rows: 2fr 1fr;
          - grid-column-gap: 4px;
          - grid-row-gap: 4px;
        card:
          - padding: 0px
    #       - background: rgba(0, 0, 0, 0.3); ??
    #       - background-image: >
    #           [[[ return  `url("/local/images/areas/${variables.picture}")`; ]]]
    #       - background-size: cover
    #       - background-repeat: no-repeat

    #       - border-bottom: 4rem solid transparent
        entity_picture:
          - filter: >
              [[[ if (entity.state == 'off' || entity.state == 'unavailable') return 'grayscale(100%)';
                  return 'grayscale(0%)'; ]]]
        custom_fields:
          area:
            - font-size: 30px
            - font-weight: bold
            - background-image: >
                [[[ return  `url("/local/images/areas/${variables.picture}")`; ]]]
            - background-size: cover
            - background-repeat: no-repeat
          temp:
            - font-weight: bold
            - padding: 8px
            - align-content: flex-end
            - justify-self: left

          humid:
            - font-weight: bold
            - padding: 8px
            - align-content: flex-end
            - justify-self: left
          motion:
            - font-weight: bold
            - padding: 8px
            - align-content: flex-end
            - justify-self: left

results in:

:wink: now this is a full size card, so relative scale is not very realistic, but eg I cant get the entities to align in the center (or left side as in this attempt) of the column.

main purpose of this is to overlay the entities over an entity_picture, which apparently I can not now because of the grid?

I have asked this before so sorry for reposting, but maybe after sometime someone can tell me if this is possible (or not) ā€¦ and if it is, how ?

Can a variable be used inside another?
Simplified to the ultimate scenario:

    variables:
      tv: patio_vizio
      ip: >-
        [[[ return states['sensor.vizio_tvs'].attributes.tvs.find(x=>x.name ==
        'patio_vizio').ip ]]]
      port: >-
        [[[ return states['sensor.vizio_tvs'].attributes.tvs.find(x=>x.name ==
        'patio_vizio').port ]]]
      auth: >-
        [[[ return states['sensor.vizio_tvs'].attributes.tvs.find(x=>x.name ==
        'patio_vizio').auth ]]]
      clientaddr: >-
        [[[ return states['sensor.vizio_tvs'].attributes.tvs.find(x=>x.name ==
        'patio_vizio').clientAddr ]]]

If you see that ā€˜patio_vizioā€™ string is used in all the variables.
I have tested and this does not work:

    variables:
      tv: patio_vizio
      ip: >-
        [[[ return states['sensor.vizio_tvs'].attributes.tvs.find(x=>x.name ==
        variables.tv).ip ]]]
      port: >-
        [[[ return states['sensor.vizio_tvs'].attributes.tvs.find(x=>x.name ==
         variables.tv).port ]]]
      auth: >-
        [[[ return states['sensor.vizio_tvs'].attributes.tvs.find(x=>x.name ==
        variables.tv).auth ]]]
      clientaddr: >-
        [[[ return states['sensor.vizio_tvs'].attributes.tvs.find(x=>x.name ==
        variables.tv).clientAddr ]]]

Nor does many of the other things I have tried. I assume in this case, variables.tv cannot be used inside another definition of a template (or is not resolved).

Just to be clear, I have 5 TVs and so I I could take the definition of ā€œipā€, ā€œportā€, ā€œauthā€ and ā€œclientaddrā€ and more those to anther template, it takes out 3x4 = 12 lines of code. If I expand to 10 TVs, I would love to have 10 set the TV name and one template that given that TV name, sets the other variables. And I have more variables and such.

Tell me where to place the file with the template. I create lovelace-ui.yaml. Add your code to the card and I get an error

Guys, why the button-card does not use a proper icon for the ā€œsun.sunā€?

type: vertical-stack
cards:
  - type: entities
    entities:
      - entity: sun.sun
  - type: custom:button-card
    entity: sun.sun
  - type: tile
    entity: sun.sun

image

Hi all,

I try to display the textual state a sensor on a button card. I use state_display because the state should be shown differently depending on the state of another sensor. My problem is that the state value is not translated to my language although the integration of the sensors has translations for my language. If I look to the device page in Home Assistant, I can see the correctly translated values of the sensor states:

image

But on my button card, I only see the original (english) values. I also tried to use hass.localize() as it was described further up in this thread but this also didnā€™t work.

This is how my button card looks like (simplified):

- type: custom:button-card
  entity: sensor.miele_waschmaschine_program_phase
  name: Waschmaschine
  icon: mdi:washing-machine
  layout: icon_name_state2nd
  state_display: |
    [[[
      if (states['sensor.miele_waschmaschine_status'].state != 'off')
        return entity.state;
      else
        return 'Aus';
    ]]]

Additionally I tried swapping the entities (i.e., using sensor.miele_waschmaschine_status as the main entity of the card and referencing the other one explicitly by name) with the same result. It also doesnā€™t seem to be related to the usage of state_display because even when displaying the state directly without state_display, the value does not get translated.

Only standard values like for example ā€œoffā€ seem to be translated correctly by the button card, but not the integration specific ones.

Any idea how I get the translated values of the sensor states to be displayed?

Youā€™d have to write your own template.

HA Frontend shows states in their translation set in the Lokalize project.

button-card does not use that, and uses the true state. Its what you ask it to do also, by using entity.state

if you dont want that, simply add the string you want to so show

1 Like

hey guys. Is there a way to have a color spectrum for a button card to gradually change between 2 colors over a state of a sensor? Currently I resolve the matter by having 30 style states per number but would be great if there was a simpler way?

below example of where I change the value and have this 30 times below my sensor card.

        - value: 0
          operator: <=
          styles:
            card:
              - color: rgb(0, 0, 255)
                filter: drop-shadow(0 0 1.0rem rgb(0, 0, 255))

Hi all,

A small question, but one I cannot seem to solveā€¦

I am trying to build my 'computer stat ā€™ custom button card.

It is progressing relatively well, however I cannot seem to get the value of a template sensor (a percentage calculation) inside the card, it is mentioned as [Object Object], see the card and the code for the card below:

pccard

            - type: custom:button-card
              entity: sensor.esxi_vm_linux_mint_vm
              icon: 'si:linuxmint'
              name: Linux VM
              template: esxi_stats_vm
              card_mod:
                class: hki
              styles:
                icon:
                  - color: >
                      [[[
                        if ( states['sensor.esxi_vm_linux_mint_vm'].attributes.status == "green")
                          return "green";
                        if ( states['sensor.esxi_vm_linux_mint_vm'].attributes.status == "warning" )
                          return "yellow";
                        return "red";
                      ]]]
              custom_fields:
                uptime: >
                  [[[
                    return `<ha-icon
                      icon="mdi:arrow-up"
                      style="width: 12px; height: 12px; color: deepskyblue;">
                      </ha-icon><span><span style="color: var(--text-color-sensor);">
                      ${states['sensor.esxi_vm_linux_mint_vm'].attributes.uptime_hours} h</span></span>`
                  ]]]
                cpu: >
                  [[[
                    return `<ha-icon
                      icon="mdi:cpu-64-bit"
                      style="width: 12px; height: 12px; color: deepskyblue;">
                      </ha-icon><span>  CPU: <span style="color: var(--text-color-sensor);">
                      ${states['sensor.esxi_vm_linux_mint_vm'].attributes.cpu_use_pct} %</span></span>`
                  ]]]
                ram: >
                  [[[
                    return `<ha-icon
                      icon="mdi:memory"
                      style="width: 12px; height: 12px; color: deepskyblue;">
                      </ha-icon><span>  Mem: <span style="color: var(--text-color-sensor);">
                      ${states['sensor.linuxmintpercentageramused_string']} </span></span>`
                  ]]]
                state: >
                  [[[
                    return `<ha-icon
                      icon="mdi:harddisk"
                      style="width: 12px; height: 12px; color: deepskyblue;">
                      </ha-icon><span>  State: <span style="color: var(--text-color-sensor);">
                      ${states['sensor.linuxmintpercentagediskused']}</span></span>`
                  ]]]

The code for the template sensor is below and gives a perfect readout in the template editor in Home assistant. I tried transforming into a string, but to no luckā€¦ The other sensors in the card (referring to the attributes of another attribute of an existing sensor from an integration => ESXi stats) work perfectly.

sensor:
  - platform: template
    sensors:
      linuxmintpercentageramused:
        friendly_name: "Linuxmint vm free ram"
        value_template: "{{((state_attr('sensor.esxi_vm_linux_mint_vm', 'memory_allocated_mb')|int) / (state_attr('sensor.esxi_vm_linux_mint_vm', 'memory_used_mb')|int) *100)|int}}"
        unit_of_measurement: "%" 
      linuxmintpercentageramused_string:
        friendly_name: "Linuxmint vm free ram string"
        value_template: "{{(states('sensor.linuxmintpercentageramused'))|string}}"
        unit_of_measurement: "%" 
      linuxmintpercentagediskused:
        friendly_name: "Linuxmint vm free disk"
        value_template: "{{((state_attr('sensor.esxi_datastore_ssd_linux_vm_pfsense_main', 'free_space_gb')|int) / (state_attr('sensor.esxi_datastore_ssd_linux_vm_pfsense_main', 'total_space_gb')|int) *100)|int}}"
        unit_of_measurement: "%" 

Any ideas what I am missing and how I can remediate this?

Thank you advance!

Kind regards,

Ben

add .state ad the end of the templateā€¦

${states['sensor.linuxmintpercentagediskused'].state}

see:

custom_fields:
  temp: >
    [[[ return `<ha-icon icon=mdi:thermometer
                <span style='width:15px; color: var(--state-color);'> </ha-icon>
                ${entity.state}Ā°C</span>`; ]]]
  cpu: >
    [[[ return `<ha-icon icon=mdi:server style='width:12px;height:12px;'> </ha-icon>
                Cpu: <span style='color: var(--text-color-sensor);'>
                ${states['sensor.processor_use'].state}%</span>`; ]]]
  ram: >
    [[[ return `<ha-icon icon=mdi:memory style='width:12px;height:12px;'></ha-icon>
                Ram: <span style='color:var(--text-color-sensor);'>
                ${states['sensor.memory_use_percent'].state}%</span>`; ]]]
  disk: >
    [[[ return `<ha-icon icon=mdi:harddisk style='width:12px;height:12px;'></ha-icon>
                Disk: <span style='color:var(--text-color-sensor);'>
                ${states['sensor.disk_use_percent_home'].state}%</span>`; ]]]
1 Like