Yes, you heard me right. In this post I’m going to describe how to make your own cheap Thread Border Router for just ~$5.
Steps
1. Get the materials
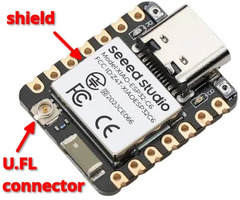
- An ESP32-C6/ESP32-H2 board with a USB port.
- Any board will work, but the Seeed Studio XIAO ESP32-C6 is recommended for the best range and ease of setup.
- ESP32-C6 boards are recommended over ESP32-H2 boards because they are both more performant and cheaper.


-
(Optional) An external U.FL antenna for better coverage.
- This is highly recommended. Even unshielded boards without an antenna can communicate across nearby rooms, but using an external antenna lets you reliably punch through multiple walls or dense materials like brick or concrete.
- Even if your board has no external antenna connector, you can still modify it to add an external antenna. See these guides: for SuperMini boards, for other boards.
- Antennas are not plug and play! In most cases, you’ll need to set your board to use the external antenna manually. If you get the XIAO ESP32-C6 board mentioned above, this can be done entirely in the software, and the instructions are available below.
- 4.5dBi - 5dBi gain antennas are fine, higher gain values don’t always mean better range.
-
A USB-C cable that can transfer data.
- Beware, cheap phone charger cables are often power-only and can’t transfer data.
2. Make the ESP board an OpenThread RCP
To turn your ESP32 board to an OpenThread RCP (Radio Co-Processor), you’ll need RCP firmware. Fortunately, Espressif provides the code, all you need to do is to compile it.
If you don’t want to compile yourself, you can also download the binary compiled by me. Continue with one of the options below:
Pre-compiled firmware
- Download the relevant file:
- For the XIAO ESP32-C6 board (set to use the external antenna): link
- For the XIAO ESP32-C6 board (set to use the internal antenna) or any other ESP32-C6 board: link
- For any ESP32-H2 board: link.
- Go to web.esphome.io. Follow the instructions to flash the firmware you downloaded.
Compile the firmware yourself
You’ll need a Linux machine or VM for these steps.
You can create a Linux container with all dependencies included with distrobox:
distrobox create --image debian:latest --name esp-idf --additional-packages "git python3.13 libusb-1.0-0 python3-venv cmake micro"
You can then enter the container with:
distrobox enter esp-idf
If you don’t want to use distrobox, you’ll need to manually install the following packages (listed are apt names):
python3.13(any version above 9 is fine)libusb-1.0-0python3-venvcmake
1. Install esp-idf toolchain
Run these commands. A fast internet connection is recommended.
If you want to compile for ESP32-H2, simply follow the comments to replace c6 with h2 in the commands.
rm -rf cheap-esp-tbr && mkdir cheap-esp-tbr && cd cheap-esp-tbr
git clone -b v6.0-beta1 --recursive https://github.com/espressif/esp-idf.git .
# If you are compiling for esp32-h2, change the line below:
./install.sh esp32-c6
2. Configure the firmware
Now we’ll configure the firmware in order for the board to communicate with OTBR over USB.
. ./export.sh
cd examples/openthread/ot_rcp
export LC_ALL=C.UTF-8 TERM=xterm
# If you are compiling for esp32-h2, change the line below:
idf.py set-target esp32c6
idf.py menuconfig
In the menu, navigate to: Component config → OpenThread → Thread Core Features → Thread Radio Co-Processor Feature → The RCP transport type and select USB, then save and quit by pressing s, then esc, and then q.
3. (Optional) Connect the external antenna
If you got an external U.FL antenna, now is the time to connect it to your board. Align it straight and press straight down until you feel/hear a soft click. Be careful, U.FL connectors are delicate.
Now, you’ll need to switch the board to use the external antenna. How to do this is entirely board-dependent, most boards have a jumper to solder to switch. Here, we provide the specific instructions for the Seeed Studio XIAO ESP32-C6 board.
Click to show instructions for XIAO ESP32-C6
The documentation states that we need to set the pin 3 to LOW and the pin 14 HIGH to select the external antenna. We can modify the OpenThread RCP example to achieve this.
In the distrobox terminal, open the program file with the micro editor:
micro main/esp_ot_rcp.c
First delete the existing file contents and then copy and paste the modified program below:
/*
 * SPDX-FileCopyrightText: 2021-2025 Espressif Systems (Shanghai) CO LTD
 *
 * SPDX-License-Identifier: CC0-1.0
 *
 * OpenThread Radio Co-Processor (RCP) Example
 *
 * This example code is in the Public Domain (or CC0-1.0 licensed, at your option.)
 *
 * Unless required by applicable law or agreed to in writing, this
 * software is distributed on an "AS IS" BASIS, WITHOUT WARRANTIES OR
 * CONDITIONS OF ANY KIND, either express or implied.
 */

#include <stdio.h>
#include <unistd.h>

#include "esp_event.h"
#include "nvs_flash.h"
#include "esp_openthread.h"
#include "esp_ot_config.h"
#include "esp_vfs_eventfd.h"

#if CONFIG_ESP_COEX_EXTERNAL_COEXIST_ENABLE
#include "ot_examples_common.h"
#endif

#if !SOC_IEEE802154_SUPPORTED
#error "RCP is only supported for the SoCs which have IEEE 802.15.4 module"
#endif

#define TAG "ot_esp_rcp"

#include "driver/gpio.h"
#include "freertos/FreeRTOS.h"
#include "freertos/task.h"

static void xiao_select_external_antenna(void)
{
    gpio_set_direction(GPIO_NUM_3, GPIO_MODE_OUTPUT);
    gpio_set_level(GPIO_NUM_3, 0);
    vTaskDelay(pdMS_TO_TICKS(100));
    gpio_set_direction(GPIO_NUM_14, GPIO_MODE_OUTPUT);
    gpio_set_level(GPIO_NUM_14, 1);
}

extern void otAppNcpInit(otInstance *instance);

void app_main(void)
{
    xiao_select_external_antenna();

    // Used eventfds:
    // * ot task queue
    // * radio driver
    esp_vfs_eventfd_config_t eventfd_config = {
        .max_fds = 2,
    };

    ESP_ERROR_CHECK(nvs_flash_init());
    ESP_ERROR_CHECK(esp_event_loop_create_default());
    ESP_ERROR_CHECK(esp_vfs_eventfd_register(&eventfd_config));

#if CONFIG_ESP_COEX_EXTERNAL_COEXIST_ENABLE
    ot_external_coexist_init();
#endif

    static esp_openthread_platform_config_t config = {
        .radio_config = ESP_OPENTHREAD_DEFAULT_RADIO_CONFIG(),
        .host_config = ESP_OPENTHREAD_DEFAULT_HOST_CONFIG(),
        .port_config = ESP_OPENTHREAD_DEFAULT_PORT_CONFIG(),
    };

    ESP_ERROR_CHECK(esp_openthread_start(&config));
}
You can save and quit by pressing Ctrl+S and then Ctrl+Q.
4. Flash the firmware
Connect your board to your computer with a USB cable and run:
idf.py build flash
If idf.py can’t auto-detect which USB port your board is connected to, you can supply the port with -p argument.
3. Set up Home Assistant
-
Connect the board to one of your HA server’s USB ports.
-
Install the Open Thread Border Router app.
-
In the app’s configuration:
- Under Device, select the option:
/dev/serial/by-id/usb-Espressif_USB_JTAG....
Don’t select the option/dev/ttyAMA..., that won’t work. - Disable Hardware Flow Control
- Under Device, select the option:
-
Start the app.
4. Share network credentials with your phone
If you want to add Matter-based Thread devices, your phone needs to know the credentials of your Thread network. Follow the instructions in step 3 here to share the credentials with your phone using the Home Assistant Companion app.
Now you have a Thread Border Router for (possibly) as low as ~$5!
This guide and others was brought to you by me being a broke student. If you want to see more low-budget guides like this, don’t support me!
Feel free to leave any questions, suggestions, or your experiences setting this up in the comments below.
Notes
- Standard advice on avoiding RF interference applies here since this is a USB-connected radio dongle operating at 2.4GHz.
- The XIAO ESP32-C6 and (probably many other boards) will still appear to work when set to use the external antenna but no external antenna is connected, but they will have worse range until you connect an external antenna. I tested it.