This guide is a summary from the This forum topic.
Introduction
A database migration can be a bit scary, so I included many screenshots for comfort.
If you have tips to improve the writing, spelling or layout of this guide, feel free to edit the article.
Background
With all the performance improvements to Home Assistant over the last year, the benefits of using MariaDB have somewhat declined. As a result, some people wanted to move back to the default SQLite database without losing too much information.
Scope
The scope of this guide is to migrate from MariaDB to the default SQLite database while preserving long term statistics such as shown in the energy dashboard.
If you don't need to preserve history, simply disabled/remove the MariaDB addon and restart Home Assistant.
This guide is not intended to discuss the drawbacks and benefits of the various database types, potential benefits of a migration, or whether or not it is worth the effort. If you want to discuss these philosophies, please go elsewhere on this forum.
Limitations
Due to memory limitations of most Home Assistant instances, migration of large databases will fail when performed on the HA hardware.
You can prune the short term statistics (while preserving long term statistics) to perform these steps on the HA hardware (as described in this guide) or you can perform the same steps on a beefy computer with plenty of ram.
In all cases, your long term statistics are preserved which is the goal of this guide.
Summary
We're going use the following steps:
- Prepare the database
- Setup SSH for remote access
- Install mysql-to-sqlite3
- Migrate the database
- Check if everything is ok.
During the migration, Home Assistant itself will be down. The OS and other add-ons will stay up and running. The migration will be done remotely over SSH.
Your MariaDB will not be affected, so in case of a failure, you can go back to MariaDB and all your long term statistics will still be there.
If you get stuck somewhere, stop for a moment and read the entire guide carefully. Some things might make more sense if you know the whole picture.
Alternatives:
Instead of performing the migration on your Home Assistant systeem, you can also migrate on an external system with plenty of ram. This approach is not (yet) covered by this guide so you will need to adapt the provided steps yourself to your system of choice.
...
Still here? Let's get started!
If you have more confidence than common sense, you don't need a backup. I'll wait here for the rest of of the people to go to settings > system > backups and kick off a full backup. We can continue with the preparations while the backup is being created.
1. Prepare MariaDB addon.

step 1.1.
Configuration > Options: Write down database, username and password.
You're going to need this later

step 1.2.
Configuration > Network: Enable Show disabled ports and set The port to access the database engine to 3306.

2. Reduce database size.

step 2.1.
Developer tools > Actions: Select Recorder: Purge with Days to keep to 1 and check the boxes on the left.
The options Repack and Apply filter are optional. They help to reduce the database size and chances of success but can take a long time. If you choose to select these options, its best to let it cook over night.

Note: this step will permanently delete your short term history. Your long term statistics will remain uneffected.
step 2.2.
Press Perform Action. It will turn green instantly, but the actual work is still running in the background.
step 2.3.
Wait a good while let it finish running in the background. In the meantime, you can continue up until step 5.
3. Prepare Terminal & SSH addon.

step 3.1.
Configuration > Options: set a Password.
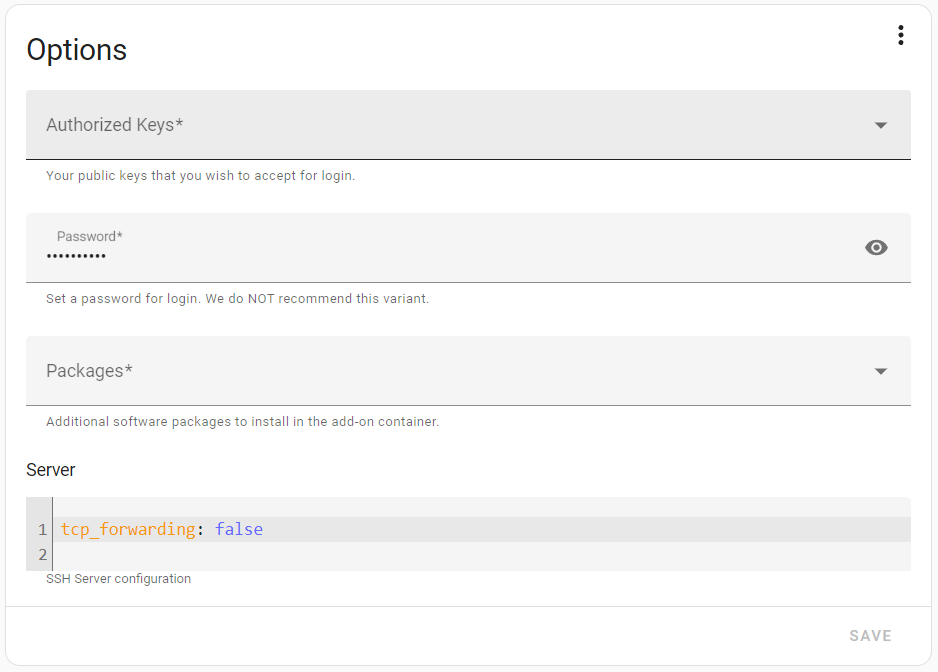
step 3.2.
Configuration > Network: Enable "Show disabled ports" and set "SSH Port" to 22.

4. Prepare Putty

You can use any SSH agent you like. This guide assumed you are using a windows system, so we're going to setup Putty.
step 4.1.
Download and install Putty using the link above.
step 4.2.
Connect to Host Name [email protected] and Port 22 (the port defined in step 3.2)

step 4.3.
A Security Alert will be shown if this is the first time you login. Select Accept.
step 4.4.
Login using the password you choose in step 3.1

Troubleshooting tips:
- Replace
[email protected]with it's IP address. For example:[email protected]. - Check the Terminal & SSH addon logs, restart the addon and try again.
- If you get an error about encryption or cipher negotiation: Reinstall Putty
5. Installing mysql-to-sqlite3

We're going to install some packages on Home Assistant. They don't take a lot of space and will not cost any performance once we're done. vi is already installed, so if you know how to use it, you don't need nano.
step 5.1. Enter the following commands in the SSH terminal
apk add nano
apk add python3
apk add py3-pip
pip install mysql-to-sqlite3
If pip install mysql-to-sqlite3 does not work, try:
apk add pipx
pipx install mysql-to-sqlite3
The last command may give a yellow warning which you can ignore.

If you used the pipx method, run pipx ensurepath to add the path to the PATH environment variable, and logout and back in to load the new path.
6. Migration time!
Remember to wait a good while let step 2 to finish running in the background`. I don't know how long you're supposed to wait, but grab a coffee and your towel just to be on the safe side.
If you haven't waited long enough, the next step will fail and you need to go back to step 2 and purge again. The only thing you'll lose is your precious time.
step 6.1.
Using the Putty SSH terminal you still have open, stop home assistant by typing the following command:
ha core stop

step 6.2.
Migrate your data from SQL to SQLite by typing the following command:
mysql2sqlite -f /config/home-assistant_v2.db -d <database> -u <username> -h homeassistant.local -P 3306 -p -V --use-buffered-cursors
Substitute <database> and <username> with the values you recorded in step 1.1
What it all means:
-f: Target database. This is the home assistant default database location.
-d: Source database. MariaDB database name you recorded in step 1.1.
-u: Username. MariaDB username you recorded in step 1.1.
-h: Host. The hostname or IP address of your home assistant. This option is not needed for all users.
-P: Port. The MariaDB port you specified in step 1.2.
-p: Prompt for password
-V --user-buffered-cursors: Has something to do with the Matrix
This will prompt you for the MariaDB database password collected earlier.
When it's done, it should look like this:
[core-ssh ~]$ mysql2sqlite -f /config/home-assistant_v2.db -d homeassistant -h homeassistant.local -P 3306  -u mariusthvdb -p -V --use-buffered-cursors
MySQL password:
2023-06-05 16:48:32 INFO     Transferring table event_data
100%|████████████████████████████████████████████████████████████████| 1/1 [00:00<00:00,  2.51it/s]
2023-06-05 16:48:33 INFO     Transferring table event_types
100%|████████████████████████████████████████████████████████████████| 1/1 [00:00<00:00,  5.13it/s]
...
2023-06-05 16:54:10 INFO     Transferring table statistics_meta
100%|████████████████████████████████████████████████████████████████| 1/1 [00:00<00:00,  5.13it/s]
2023-06-05 16:54:12 INFO     Transferring table statistics_runs
100%|████████████████████████████████████████████████████████████████| 1/1 [00:00<00:00,  4.55it/s]
2023-06-05 16:54:12 INFO     Transferring table statistics_short_term
100%|████████████████████████████████████████████████████████████████| 4/4 [00:17<00:00,  4.43s/it]
2023-06-05 16:54:42 INFO     Vacuuming created SQLite database file.
This might take a while.
2023-06-05 16:55:08 INFO     Done!
[core-ssh ~]$
step 6.3.
Update configuration.yaml by typing the following command:
nano /config/configuration.yaml
step 6.4.
Comment out the db_url line, causing home assistant to fall back to it's default database

step 6.5.
Start home assistant back up by typing the following command:
ha core start
Troubleshooting:
If you get an error at the transfering table state, your database is still to big.
2023-06-06 13:57:48 INFO     Transferring table states
Killed
Do another purge and take a nap before trying again
If you get ERROR SQLite transfer failed inserting data into table <states>: table <states> has no column named <domain> where states and domain can be other tables and columns, this usually means you already have an existing home-assistant_v2.db in your configuration folder. Delete/rename it and then try running the conversion command again.
If you get a corrupt database check out this post: Trying to migrate from MariaDB back to default SQLite. Migration completed but corrupted db
If you encountered (and solved) different issues, please add them to the guide. You can edit this post as if it is a wiki page.
7. Rejoice...
Congratulations. You made it.
The best way to check if your long term statistics is through the energy dashboard. Scroll back a few months and feast your eyes on all the glorious data you have painstakingly gathered.
You also might want to check settings > system > logs just to be sure. If there is a small inconsistency, it might be corrected on a reboot.
...or not
If you are not happy with the migration, all you need to do is uncomment the line in configurations.yaml and restart Home Assistant. You can do this from within Home Assistant if you want.

Your long term statistics will still be in there.
Final thoughs
![]() You can stop the MariaDB add-on now. Just hold of a few days before deleting it.
You can stop the MariaDB add-on now. Just hold of a few days before deleting it.
![]() Many thanks to @jyavenard for kicking off the discussion and @Nardol for providing the solution above and all the people who helped out with the various small issues to make this procedure work for most of us.
Many thanks to @jyavenard for kicking off the discussion and @Nardol for providing the solution above and all the people who helped out with the various small issues to make this procedure work for most of us.


