Has anyone tried this yet ? Seems crazy cheap. Can it be added locally so it wont access ewelink cloud or such ?
No mention of Onvif on the site or in the pdf manual. Only mentioned the Ewelink App.
I just found a youtube video where this was tested and youtuber said it has RTSP and ONVIF capability, so this wont be an issue. If they works as they should that is 
Oh, and same video shows how to add it to home assistant, butter smooth installation with rtsp.

I purchased the Sonoff CAM PT2 because it was so inexpensive and I had a small surveillance job to do in my house. I wanted to monitor my internal staircase for human traffic.
It arrive in good condition and was pretty easy to install in eWeLink and HA. I was able to enable RTSP/ONVIF on the camera and it, after reloading ONVIF integration, it was visible and able to be used.
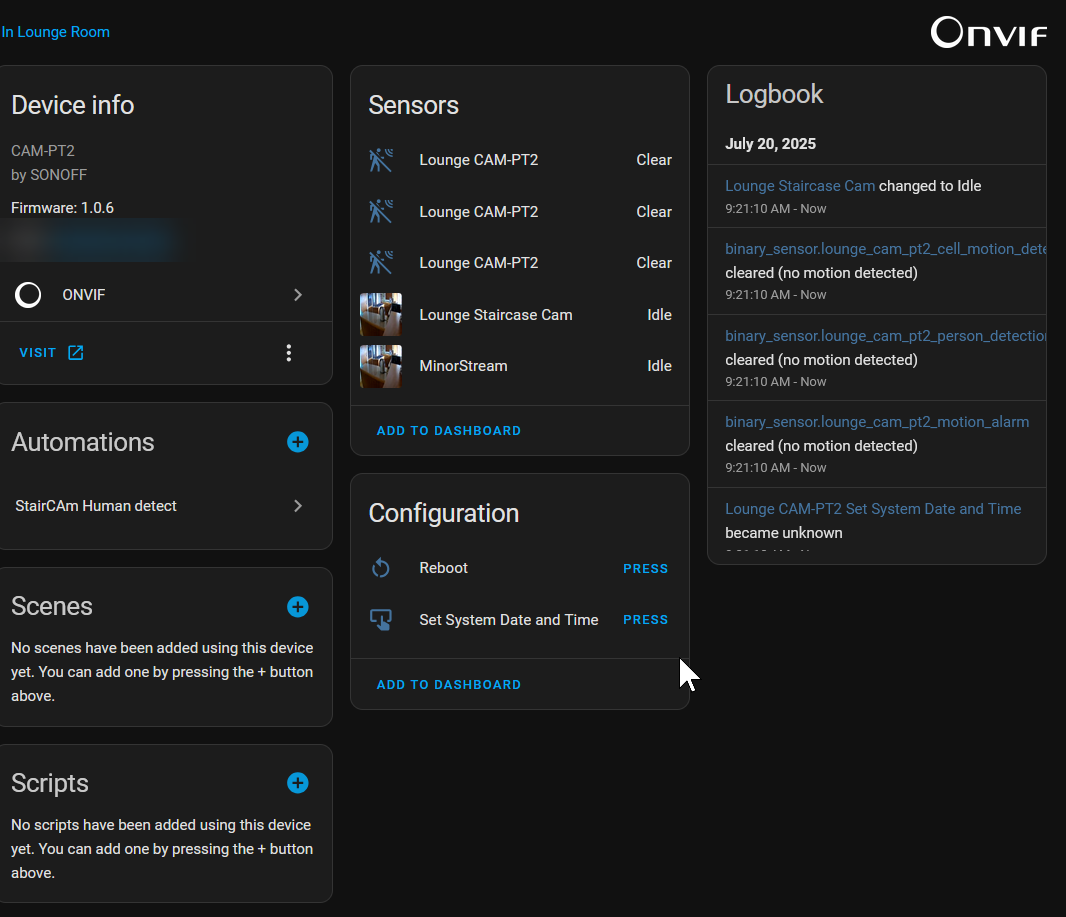
I have been able to write and automation that records 30secs of video if a human is detected to the /Media/ in HA but I only allow that to happen at night when there is minimal traffic so as not to put too many files on my HA SSD.
I purchased a 128GB Micro SD card with the camera and all the footage is recorded to that (oldest files are written over first) and not the cloud as I have not subscribed .
However there is one issue that is a lacking feature in that it does not have a Preset that you can designate as Home. I want to have an automation that returns the PT location to this preset after say 5 minutes of no human detection otherwise the camera position stays at the last human detection location.
The only way I can find to Go To presets is my using eWeLink and tapping on the preset.
This is a lacking feature in the camera.
If anyone has a suggestion or a work around I would love to hear it.
21/7/2025
Another thingI find annoying with this camera.
I don’t seem to be able to set the resolution to 1080p and it remain there. It defaults back to Auto.
I received my camera a couple weeks ago. While I can confirm the easy setup, I also can confirm @rontaylor findings regarding the presets. Thats quite annoying.
I’m not using the camera directly in Home Assistant but with Scrypted currently. I tried the option to control the presets over scripts and automations within Scrypted but with no luck so far.
Also the camera seems to move to its default home position, away from my preset occasionally, so I have to go into the app and select my desired position preset at least once a day. If you have the “follow movement” option enabled, the camera also didn’t go back to the default position, but stays where it has seen the moving object last.
One major flaw that I discovered recently is, that the camera apparently does need to have a constant internet connection. Once I block the internet connection in my router for the camera, the onvif and rtsp streams are unreacheable. The LED starts flashing. According to their help documents this means:
The device exits the network configuration state after being offline, network exception, or failing to connect to the network.
I don’t know why it would need an internet connection in order to stream via onvif/rtsp locally. For something sensible like a camera feed a constant internet connection of the device is a no go for me.
EDIT: I’ve opened a support ticket regarding the preset issue and the internet connectivity. Once I hear from them I will update you
Good to hear you open a support ticket. I did raise one as well.
I also found this
If you scroll to about half way there is some yaml code that is given to use the Pan & Tilt
I can’t make head nor tail of it as I am not good with yaml.
Later on 22/7/2025 @11:37am
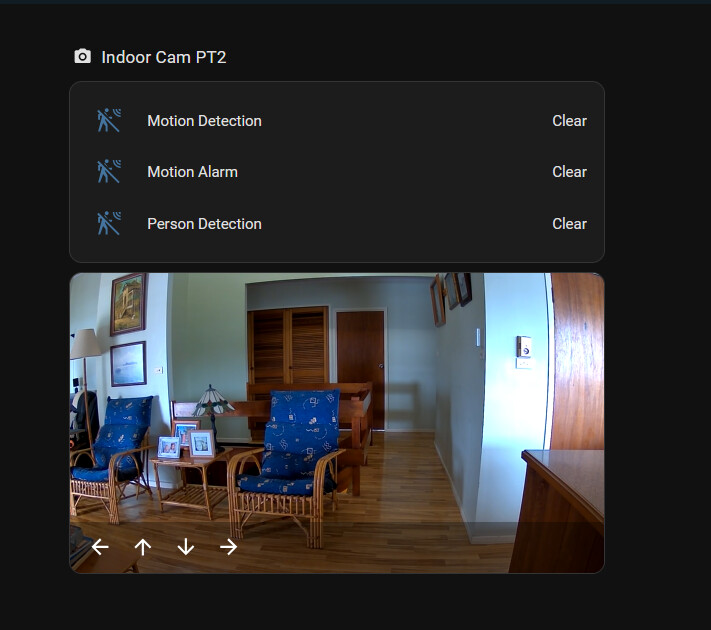
I managed to do what the above Sonoff Help document suggested and created a new dashboard as suggested. The code needed some editing to suit my camera and there are some code missing but I managed to get it working. I can now Pan & Tilt from HA but it’s slow and a bit clumsy.
The need to have the GOTO PRESET available would be much more desirable.
This is what it looks like.
If you go to developer tools → Actions I found this but it does not work on the Cam PT2 but does on my HIKVision cameras
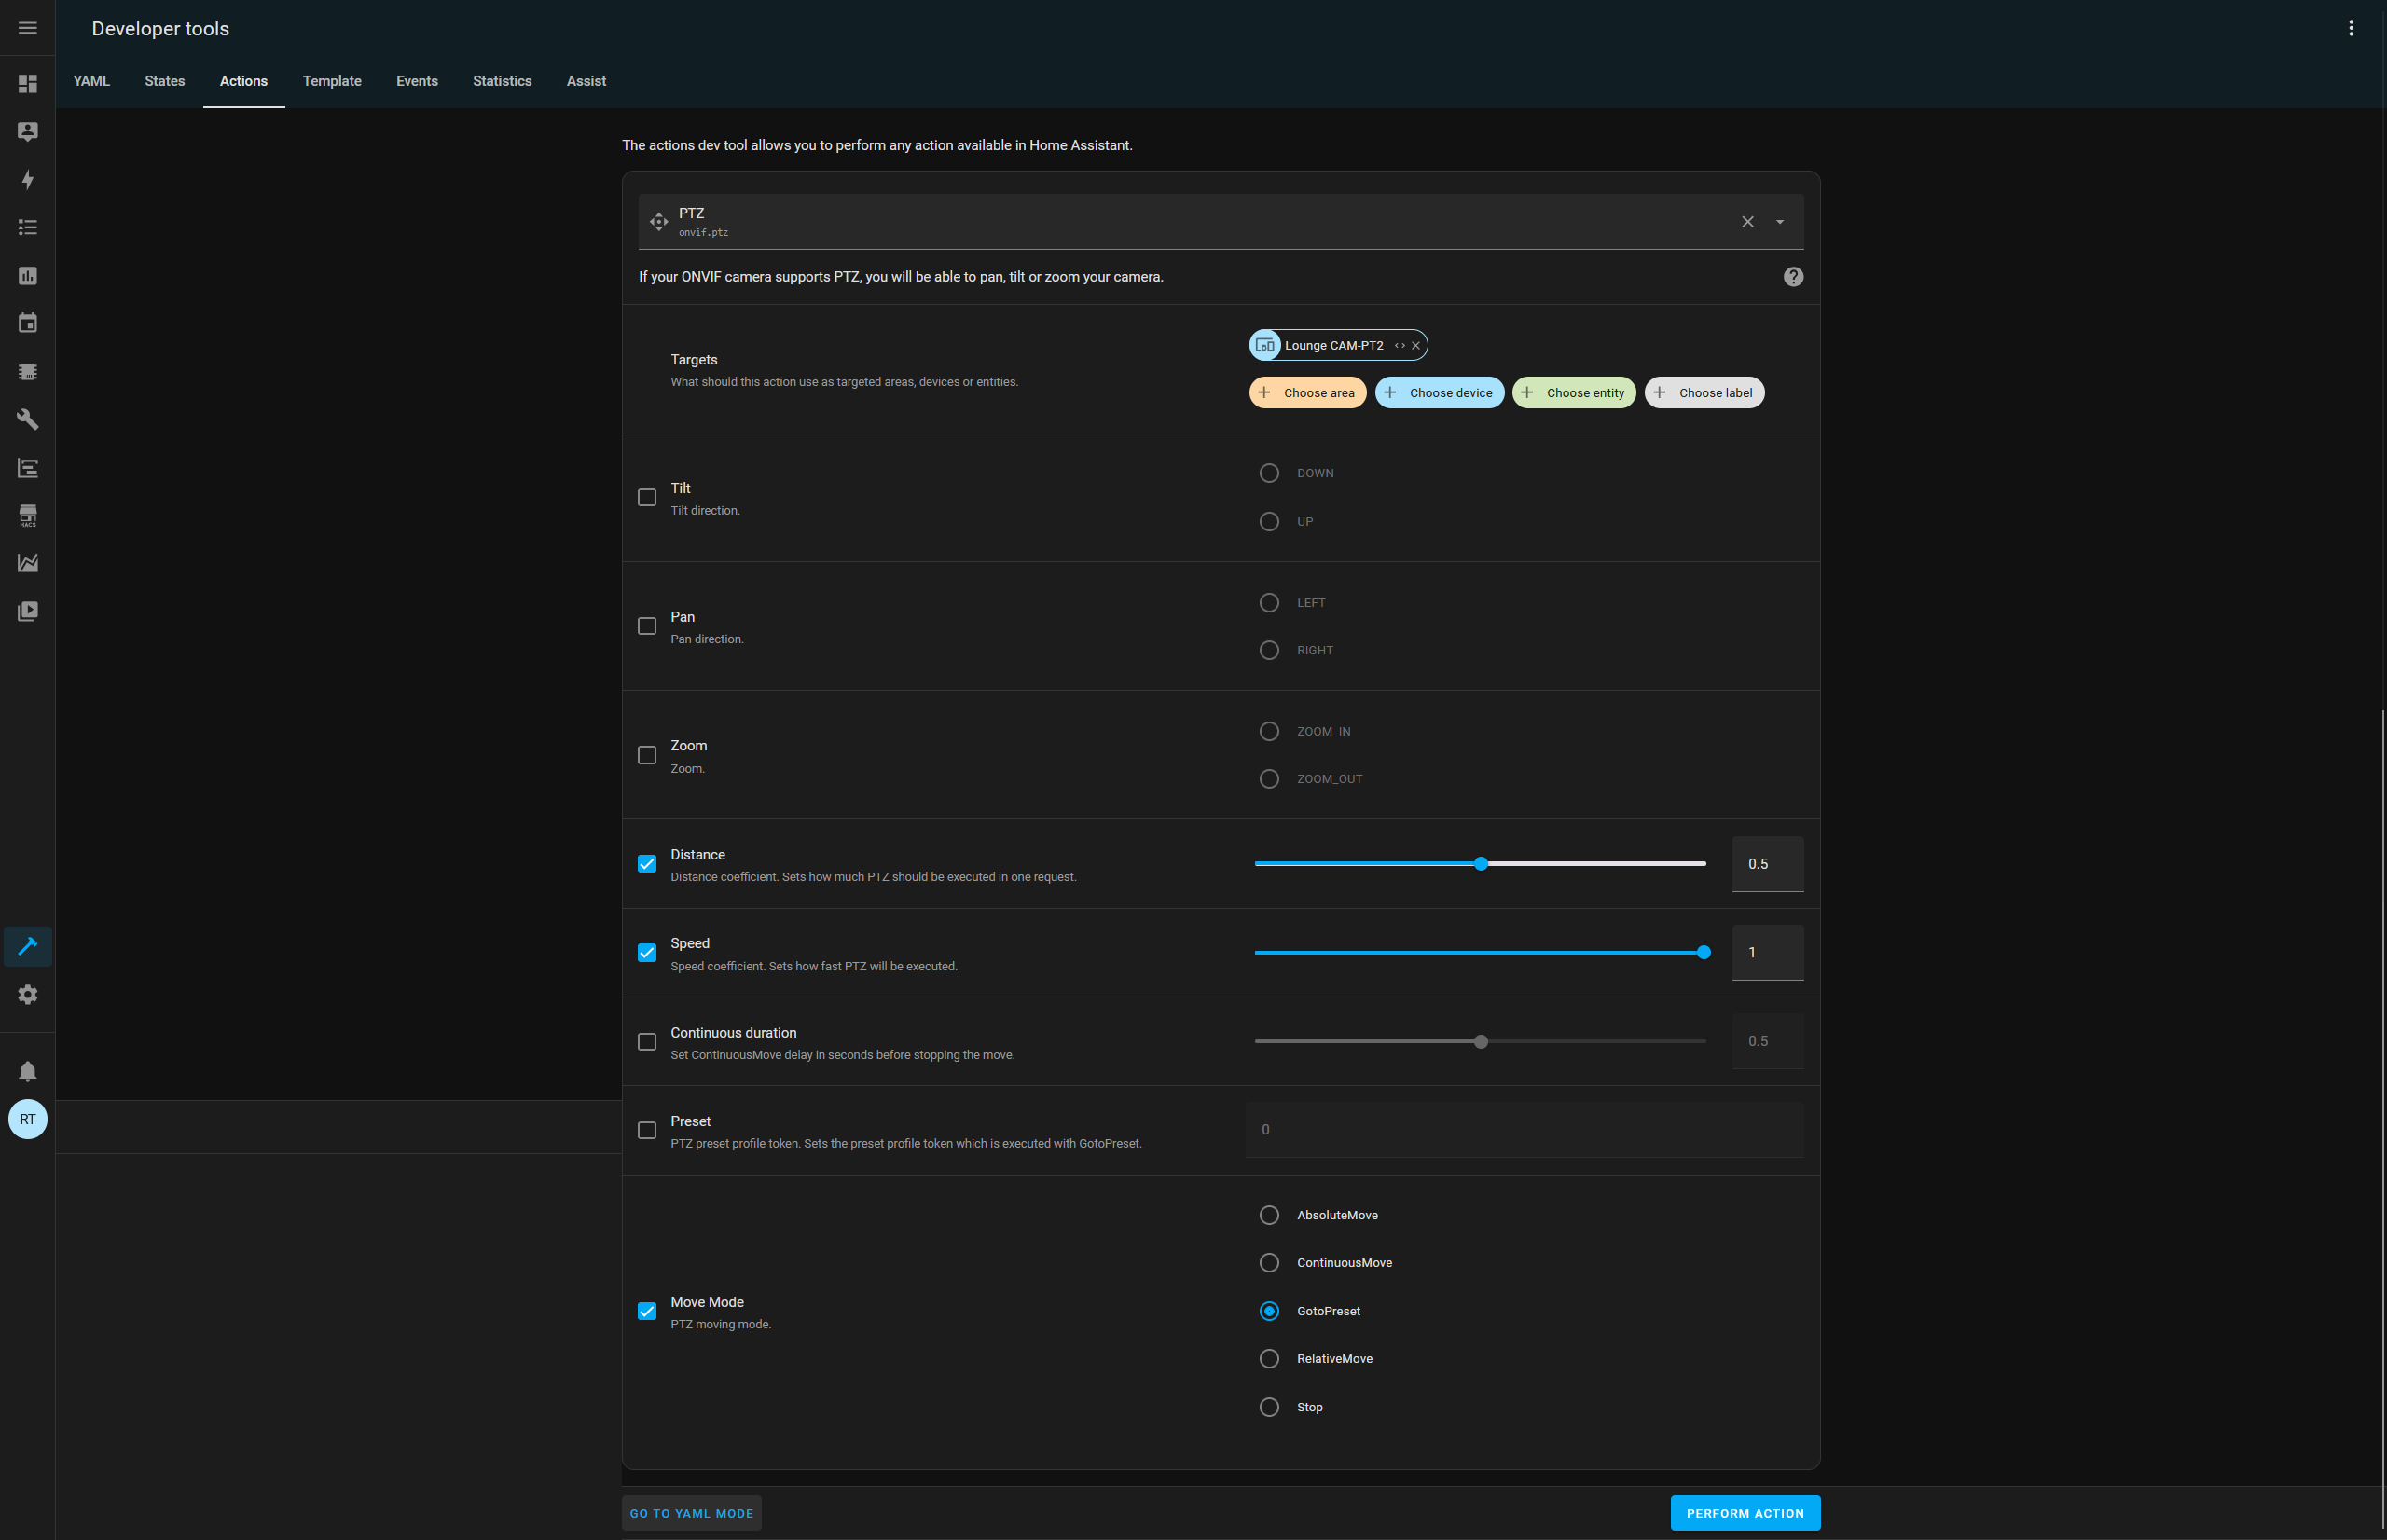
I think the firmware is buggy to say the lease
I did get a reply a couple of days ago:
Thanks for your email.
Regarding the issues you mentioned:
- The camera occasionally moves away from my set preset, so I have to go into the app and reapply my preset there (most of the time at least once a day)
- I can’t set/control presets through Scrypted
- The camera can not be used without an internet connection
For your issues, here are the replies for you:
- Could you please describe in detail how the camera occasionally moves away from its preset position? Is the PTZ turned to a position, and then returned to the original position after a while?
- Scrypted setting/controlling preset positions is not supported yet.
- ONVIF/RTSP cannot be streamed locally. This issue will be optimized in the next firmware version, which is expected to be released in early August.
Looking forward to your reply.
I’m a bit confused by the part “ONVIF/RTSP cannot be streamed locally”. That’s the whole purpose of it, isn’t it? Lets see what the future firmware update “optimizes” in this regard…
I must be blind but I don’t see anything regarding PTZ in the help document except a small remark “PTZ control: Manual configuration via script is required.”
Can someone please explain how to make PTZ in HA work?
Contains everything i needed to make PT work in HA
Sonoff site is a mess. The link didn’t work for me and opened the main page of the help center from which I could open the guide. But it was a totally different guide: How to Integrate SONOFF CAM-PT2 into Home Assistant?
All this because the site automatically selected German language for me and there is no German version of the correct guide. Only after I changed manually to English and clicked again on the link from your post the correct guide was opened.
Good catch did not know that. But it is PT working now for you??
Yes, it works now. Thank you.
Preset does not work for me either. Does anyone know if there’s a plan to make it work?
I tried something like this:
action: onvif.ptz
data:
  preset: Escada # I tried numbers like 0 through 5 as well
  move_mode: GotoPreset
target:
  entity_id: camera.cam_ptz_sonoff_sala_mainstream
A firmware update to 1.0.7 is available. I installed it today and directly blocked the internet access for the camera in order to test if the offline streaming issue is resolved.
So far it looks good. 30 min in with no internet access and the ONVIF stream is still available. Before the update it was gone seconds after I blocked the internet access. I hope it will continue to work like this!
@ericmilaneze I don’t have high hopes, but maybe the new firmware helps with that as well?
But so far the response from the Sonoff support was, that it is not supported (yet)
Hey Community!
I successfully integrated my Sonoff CAM-PT2 fully locally into Home Assistant — including Privacy Mode, PTZ, Presets, Image Settings, Audio, Motion Detection, Recording and more. No cloud required, no YAML needed!
━━━━━━━━━━━━━━━━━━━━━━━━━━━━━━━━━━━━━
THE PROBLEM WITH THE ORIGINAL FIRMWARE
━━━━━━━━━━━━━━━━━━━━━━━━━━━━━━━━━━━━━
Some control commands (e.g. Privacy Mode, Presets) are sent from the eWeLink app to the cloud, which then forwards them back to the camera. Fully local control is not possible with the original firmware.
━━━━━━━━━━━━━━━━━━━━━━━━━━━━━━━━━━━━━
THE SOLUTION: THINGINO FIRMWARE
━━━━━━━━━━━━━━━━━━━━━━━━━━━━━━━━━━━━━
Thingino is an open-source firmware that replaces the original firmware and completely removes the cloud dependency. My camera is fully blocked from internet access in the router — everything still works perfectly.
Thingino provides:
- MQTT support
- REST API (curl + API key)
- RTSP / ONVIF
- And a lot more
This allows full camera control from HA — fully local, no cloud!
Note: The “real” Privacy Mode of the original firmware (lens moves to cover position) is not replicated exactly. Thingino has a Privacy Mode that makes the image completely black. Combined with a preset (camera pointing away + microphone disabled) this is a good substitute.
━━━━━━━━━━━━━━━━━━━━━━━━━━━━━━━━━━━━━
STEP 1 — FLASH THINGINO
━━━━━━━━━━━━━━━━━━━━━━━━━━━━━━━━━━━━━
 GitHub - themactep/thingino-firmware: Open-source firmware for Ingenic SoC IP cameras · GitHub
The video in the repository explains the flashing process — pretty straightforward.
 IMPORTANT: The original firmware is written as a backup to the SD card during flashing. Make sure to save these backup files — they contain device-specific keys!
━━━━━━━━━━━━━━━━━━━━━━━━━━━━━━━━━━━━━
STEP 2 — SET UP MQTT BROKER
━━━━━━━━━━━━━━━━━━━━━━━━━━━━━━━━━━━━━
You need a running MQTT broker reachable by both the camera and Home Assistant. Mosquitto is the most common choice.
- Docker: plenty of guides available online
- Home Assistant OS / Supervised: install the Mosquitto add-on directly
Then add the MQTT integration in HA and connect it to your broker.
━━━━━━━━━━━━━━━━━━━━━━━━━━━━━━━━━━━━━
STEP 3 — CONFIGURE THINGINO MQTT SUBSCRIPTION
━━━━━━━━━━━━━━━━━━━━━━━━━━━━━━━━━━━━━
In the Thingino Web UI go to Services → MQTT Subscriptions and add a subscription:
Topic: %hostname/cmd (or a custom name like Cam01/cmd)
QoS: 0
Action: eval $MQTT_PAYLOAD
The %hostname placeholder is replaced automatically with your camera’s hostname. If you use a custom topic like Cam01/cmd, your entities in HA will be named “Cam01 Brightness”, “Cam01 Motion Detection” etc.
━━━━━━━━━━━━━━━━━━━━━━━━━━━━━━━━━━━━━
STEP 4 — ENABLE RTSP / ONVIF (optional)
━━━━━━━━━━━━━━━━━━━━━━━━━━━━━━━━━━━━━
In the Thingino Web UI go to Settings → RTSP/ONVIF Access and set a password. Then add the camera in HA as an ONVIF integration — the live stream will be available directly in your dashboard.
━━━━━━━━━━━━━━━━━━━━━━━━━━━━━━━━━━━━━
STEP 5 — INSTALL THE AUTO-DISCOVERY SCRIPT
━━━━━━━━━━━━━━━━━━━━━━━━━━━━━━━━━━━━━
This is where the magic happens. Instead of writing YAML manually, a script on the camera automatically detects all available hardware and features and registers them as entities in Home Assistant via MQTT discovery — no configuration needed on the HA side.
The script is currently hosted at my GitHub repo and still under active development. I plan to submit it as a pull request to the Thingino project directly, so the install path may change in the future — check the Thingino repo for updates.
SSH into your camera — the password is the same as your Thingino Web UI login:
ssh root@YOUR_CAMERA_IP
Then run this single command:
  wget -O /usr/sbin/thingino-ha-discovery.sh https://raw.githubusercontent.com/AsDinFlames/thingino-mqtt-ha-discovery/main/thingino-ha-discovery.sh \
    && chmod +x /usr/sbin/thingino-ha-discovery.sh \
    && /usr/sbin/thingino-ha-discovery.sh \
    && printf '#!/bin/sh\ncase "$1" in\n  start) sleep 10 && /usr/sbin/thingino-ha-discovery.sh &;;\nesac\n' > /etc/init.d/S99ha-discovery \
    && chmod +x /etc/init.d/S99ha-discovery
That’s it. All entities will appear in Home Assistant automatically and re-register on every boot.
The script dynamically detects and publishes:
- Switches: Privacy, IR Cut, IR/White Light, Status LED, Color Mode, Flip, Mic, Motion, Recording, Timelapse
- Buttons: Day/Night Mode, Reboot, PTZ directions, PTZ Presets (Load/Save/Delete)
- Sliders: Brightness, Contrast, Saturation, Sharpness, WDR, Noise Reduction, all Audio settings, Motion Sensitivity, Recording settings and more
- Selects: Anti-Flicker, White Balance Mode, Mic Codec, Sample Rates
━━━━━━━━━━━━━━━━━━━━━━━━━━━━━━━━━━━━━
KNOWN ISSUES
━━━━━━━━━━━━━━━━━━━━━━━━━━━━━━━━━━━━━
- Toggling the Mic switch more than twice crashes prudynt — use the Reboot button to recover. This is a Thingino/prudynt bug, hopefully fixed in a future release.
- Force Stereo toggle causes a brief audio glitch due to the audio thread restarting — leave it off unless you need it.
━━━━━━━━━━━━━━━━━━━━━━━━━━━━━━━━━━━━━
FEEDBACK & QUESTIONS
━━━━━━━━━━━━━━━━━━━━━━━━━━━━━━━━━━━━━
I haven’t tested every single command yet — feedback, bug reports and contributions are very welcome, either here or directly on GitHub!
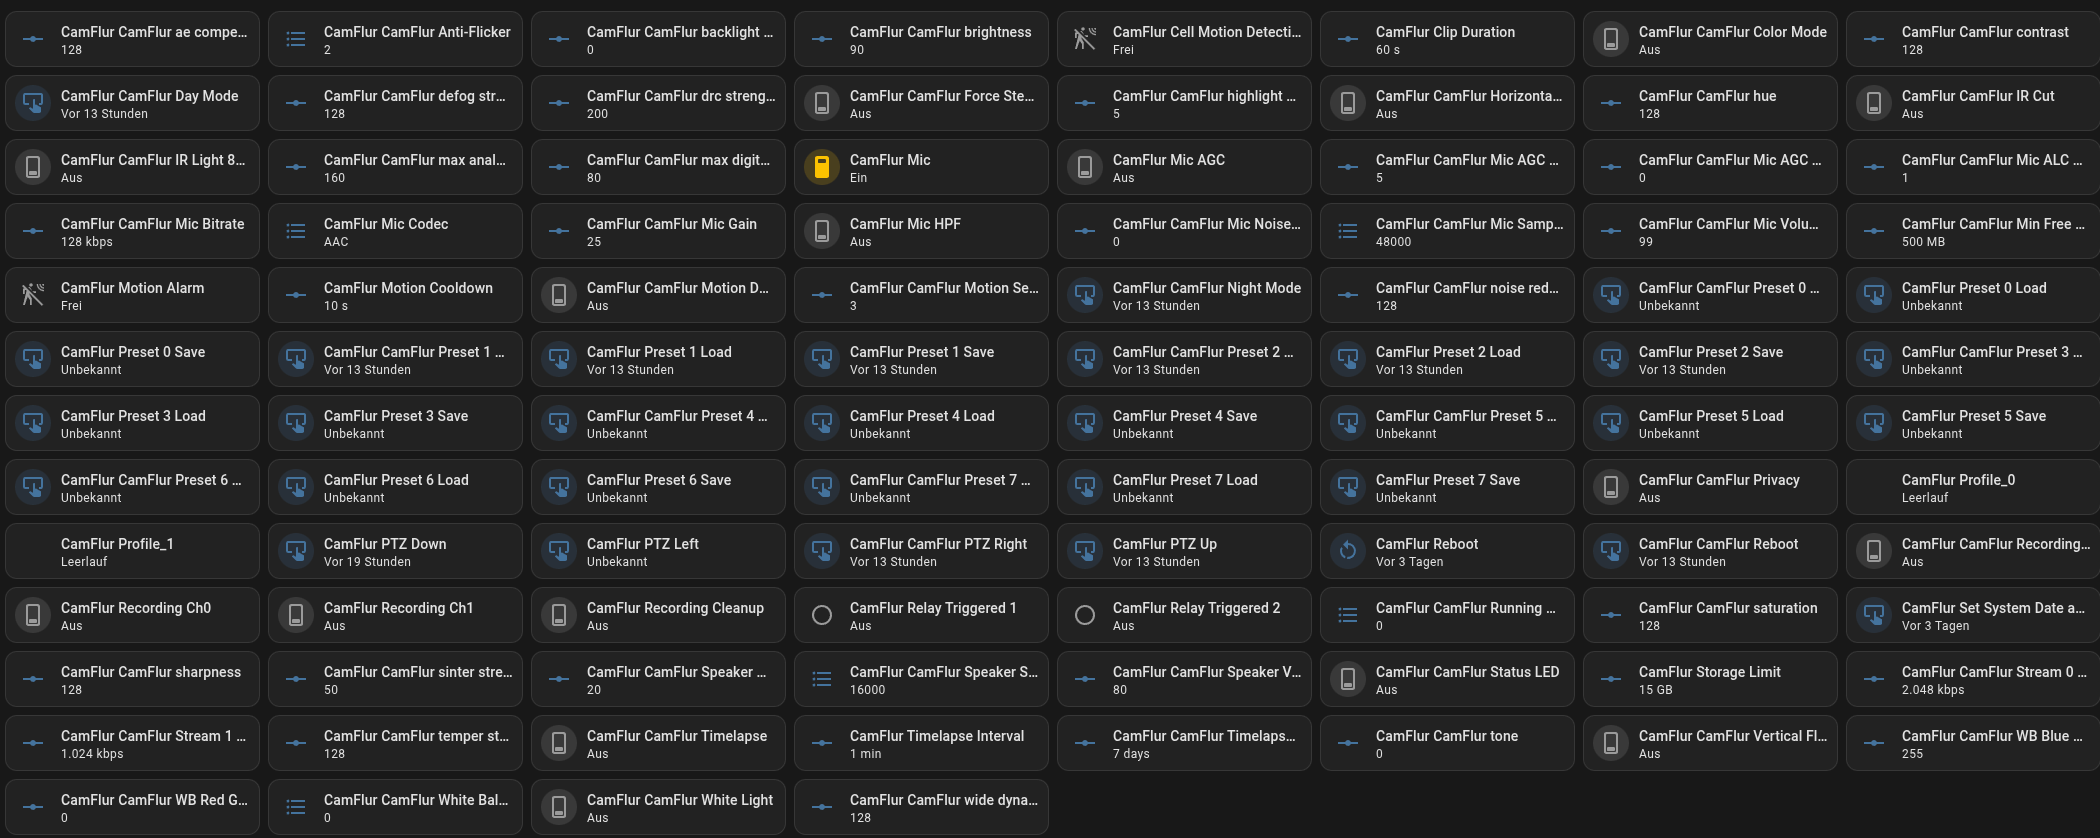
I decided to repost this, as it might look very complicated at first glance — but it really isn’t 
Prerequisites
- MQTT Broker (e.g. Mosquitto) installed via Docker or HA Addon and connected to the HA MQTT Integration
1. Install Thingino Firmware
Video guide: https://www.youtube.com/watch?v=82s4WcsuUYc
- Download
firmware.zipfrom the Thingino repo and copy it to a FAT32 SD card - Start the camera and follow the video guide
- Set a password in the Web UI (this is also your SSH password)
2. Web UI Configuration
Services → MQTT Subscriptions
- Enable “Launch MQTT service on boot”
- Connect to your MQTT Broker
- Add a subscription:
- Topic:
%hostname/cmd - QoS:
0 - Action:
eval $MQTT_PAYLOAD
- Topic:
Settings → RTSP/ONVIF
- Set a password
3. Install the Script
ssh root@CAMERA-IP
SSH password = Web UI password
curl -o /usr/sbin/thingino-ha-discovery.sh https://raw.githubusercontent.com/AsDinFlames/thingino-mqtt-ha-discovery/main/thingino-ha-discovery.sh \
  && chmod +x /usr/sbin/thingino-ha-discovery.sh \
  && /usr/sbin/thingino-ha-discovery.sh \
  && printf '#!/bin/sh\ncase "$1" in\n  start) sleep 10 && /usr/sbin/thingino-ha-discovery.sh &;;\nesac\n' > /etc/init.d/S99ha-discovery \
  && chmod +x /etc/init.d/S99ha-discovery
Done! All entities will appear automatically in HA. The camera can now be blocked from internet access.
What is the main advantage when compared to use the original firmware and only block the internet for camera IP on your router? Using the original firmware I can still have full control of it
I had no full control of my cam by blocking internet on it.
But the main purpose is always privacy. If you want your camera, watching your home, beeing able to talk to their own clouds, go for it - for me its pretty scary. But if you able to block your camera-internet-access its not a big deal i guess. But its still in your private LAN and you don’t know to which else devices its communicating in general.
I think everything is better, if it’s in your own hands / local network / declouded so you have full control and dont’t have to worrie about some vulnaribilitys in the future.
I’m trying to wrap my head around how to get the MQTT going. This is the 1st half of the step 2…
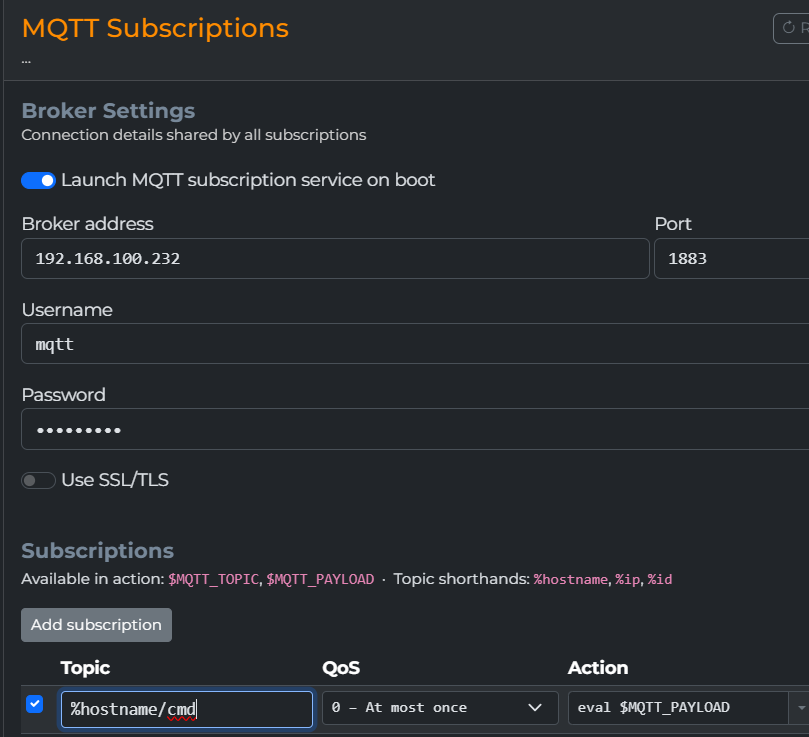
And then, in the firmware 2026-04-06, I see this is new:

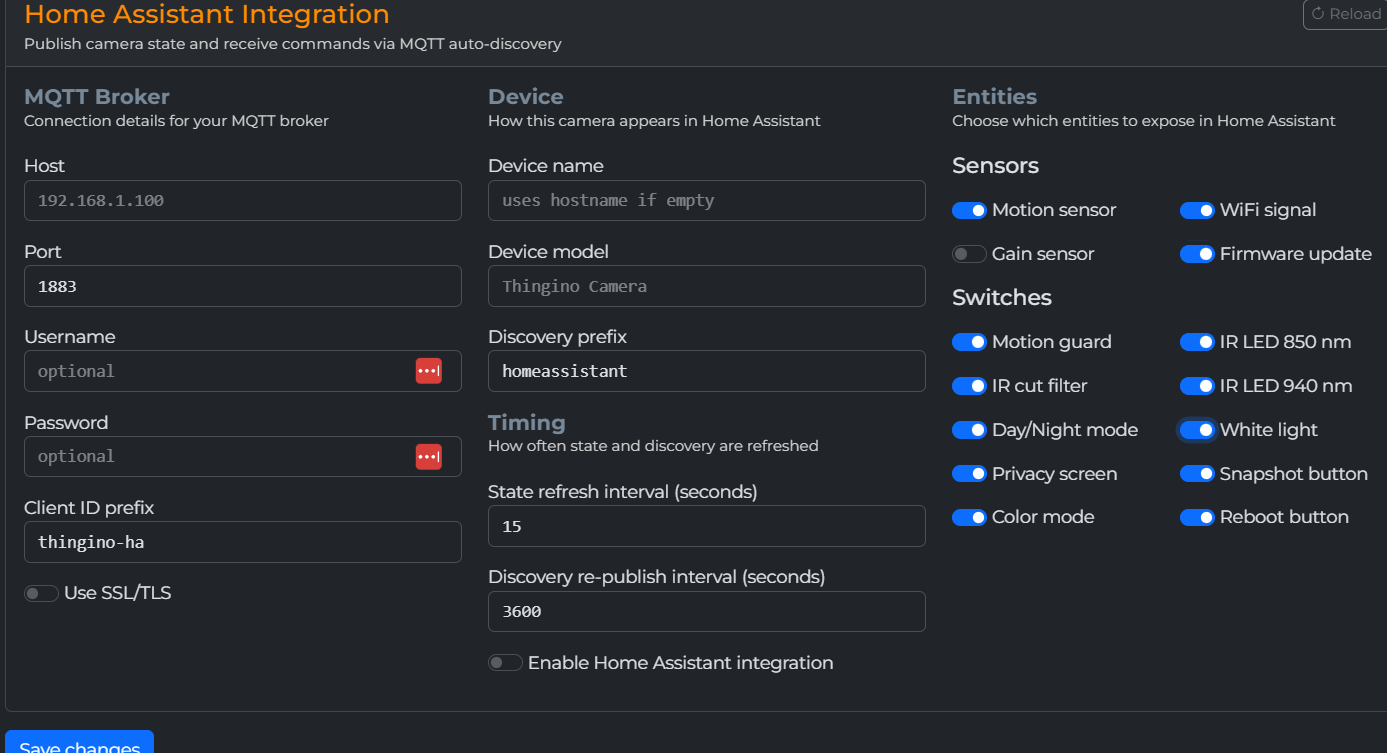
Is this essentially your script…? and it would (by default) fire the script every hour?
Does that mean I would not need to do the step #3, ie install the script, anymore?
Sry for late reply - i guess you used a newer or self builded firmware. That's fine - someone on github told me, that mqtt for HA is already integrated i couldn't found myself. This way you mentioned is not well documented right now and i don't tested it as well because it seems to be i got an older firmware installed with less options.
My script don't used that extra settings and worked without it. In my "guide" it was just "enable MQTT-Broker" and after that just procedure with STEP 3.
This settings you mentioned should make my script not relevant for you anymore. (Exept some extra settings not beeing BuildIn)
But if you dont need my script and just go with that BuildIn HA-Settings in thingino i hope you make it work! When i got more time i gonna test that and update this Topic. If you make it work - just share your conclusion to make other happy!