I have been struggling on this for a while now.
I bought an NSPanel US with the intention of flashing it with ESPHome and installing my custom UI.
I flashed it, I see it online in ESPHome, and the display is showing the factory UI.
The problem is that, no matter what I try, the logs keep showing [W][nextion:072]: Nextion is not connected! .
I tried several combinations of UART pins and baud rates, according to ESPHome website and other snippets found by other users, but none seems to work.
I cannot upload a tft file because, of coure, it throws an error as it can’t connect to the display.
This is my configuration:
Sorry for the stupid question, but I have to ask it. Have you checked that you have connected the flat cable regularly? the same error happened to me and I realized that I did not enter it correctly!
I tried your code, but no luck.
One thing I found out is that using the nspanel external componet, it works.
The only thing is that it doesn’t really suit my needs, but if I can find out what does the component do to connect to the display, I might be able to replicate it without using the whole component.
I had quite a few issues till I changed to the pins to rx/tx on esp8266…don’t ask me why, I juts read a LOT of posts where people took different pins and I started trial/error
I was using an NSPanel, so I couldn’t really change pins. I struggled on it for weeks trying literally everything I found online. No clue why it never worked.
And this happened on two separate NSPanels, so I would even exclude any factory defect.
Yep…my answer was to Giuseppe.
I am adding my nspanel setup which I largely took from marcfager’s implementation.
I remember to have first flash the panel and then upload the hdmi/tft via the HA service…it is a while ago and I am not going to play around to try and see it possibly fail on my single nspanel
But maybe it will help you. I believe you can load this regardless of all the missing sensors in HA.
You just need to alter the wifi things
# NSPanel YAML based on work by marcfager. Please check github for credits: https://github.com/marcfager/nspanel-mf
# Version 2022-01-19

substitutions:
  # Name the device and it's entities
  node_name: nspanel
  device_name: NSPanel
  tft_prefix: !secret tft_prefix

# Example config.yaml
esphome:
  name: nspanel
  comment: $device_name

esp32:
  board: esp32dev

# Wifi settings. Add these to your secrets.yaml. fast_connect must be true for a hidden ssid.
wifi:
  networks:
  - ssid: !secret wifi_ssid3
    password: !secret wifi_password3
  - ssid: !secret wifi_ssid2
    password: !secret wifi_password2
#  fast_connect: !secret wifi_fast_connect

# API. Add api_pwd to your secrets.yaml.
api:
  password: !secret api_pwd
  services:
    # Service to play a rtttl tone
    - service: play_rtttl
      variables:
        song_str: string
      then:
        - rtttl.play:
            rtttl: !lambda 'return song_str;'
    # Service to update the HMI file
    - service: upload_tft_nspanel1
      then:
        - lambda: 'id(disp1)->upload_tft();'
    # Service to control the visible page from Home Assistant
    - service: set_page
      variables:
        page: int
      then:
        - lambda: id(disp1).send_command_printf("page %i", page);
    # Service to wake up screen
    - service: wakeup_screen
      then:
        - lambda: |-
            id(disp1).send_command_printf("page 0");


# Time component that fetches time from Home Assistant and updates the display once a minute and when the display is ready at bootup (and time is available).
time:
  - platform: homeassistant
    id: homeassistant_time
    on_time:
      - seconds: 0
        minutes: /1
        then:
          - lambda: id(disp1).set_component_text_printf("Home.time", "%02i:%02i", id(homeassistant_time).now().hour, id(homeassistant_time).now().minute);
          - lambda: id(disp1).set_component_text_printf("Home.date", "%i-%02i-%02i", id(homeassistant_time).now().year, id(homeassistant_time).now().month, id(homeassistant_time).now().day_of_month);
    on_time_sync:
        then:
          - wait_until:
              switch.is_on: nextion_init
          - lambda: id(disp1).set_component_text_printf("Home.time", "%02i:%02i", id(homeassistant_time).now().hour, id(homeassistant_time).now().minute);
          - lambda: id(disp1).set_component_text_printf("Home.date", "%i-%02i-%02i", id(homeassistant_time).now().year, id(homeassistant_time).now().month, id(homeassistant_time).now().day_of_month);


# Logger. Disable the temperature sensor etc. to focus on the HMI development
logger:
  baud_rate: 0
  level: DEBUG
  logs:
    sensor: WARN
    resistance: WARN
    text_sensor: WARN
    ntc: WARN

# OTA (Over the air updates) password. Add to your secrets.yaml
ota:
  safe_mode: true
  password: !secret ota_pwd

# Uart for the Nextion display
uart:
  tx_pin: 16
  rx_pin: 17
  baud_rate: 115200
  id: tf_uart

# Functionality for the Nextion display
external_components:
  - source: github://pr#2956
    components: [nextion]
    refresh: 1h


# Configure the screen itself
display:
  - platform: nextion
    id: disp1
    uart_id: tf_uart
    tft_url: $tft_prefix/local/nspanel1.tft
    on_setup:
      then:
        # Enable 1 light page (up to 4 available)
        - lambda: id(disp1).send_command_printf("Lights.pages.val=1");
        - number.set:
            id: brightness
            value: 30
        - lambda: id(disp1).send_command_printf("page 3");
        - wait_until:
            api.connected
        - switch.template.publish:
            id: nextion_init
            state: on
        - if:
            condition:
              - switch.is_on: alarm_activated
            then:
              - lambda: id(disp1).send_command_printf("page 4");
            else:
              - delay: 5s
              - lambda: id(disp1).send_command_printf("page 0");
I was putting this in my yaml file to use an older library which worked. I will try the exit reparse button later since I just got a couple more nspanels in.
###### USE THIS ONLY FOR YOUR FIRST TFT UPLOAD
###### AND IF EXIT-REPARSE BUTTON FAILS
###### ONCE IT WORKED, REMOVE THESE LINES
###### https://github.com/esphome/esphome/pull/2956
#external_components:
#  - source: github://pr#2956
#    components: [nextion]
#    refresh: 1h
Hi all
I’ve been strugling on the same issue for a long time.
I have Done various flash process but at the end it seems the issue was an hardware one !
The connector of the screen not properly working. By reconnecting it appeared in the logs that it was working.
If you have thé same issue, try to manipulate the connector and Check the logs !
I have a simmular issue.
Everything works when flashing the NSPanel but I can not uppdate the panel.
I am stuck on the Sonoff standard screen with time and temerature at 0 in the display.
I can see the temerature sensor and buttonpresses etc in the logg for the home assistand (ESPHome)
The status is conected but the nextion display says not connected.
What can I do to fix it?
I have the tft-files in the config/www folder.
When pressing “exit reparse” and then “Update TFT display” the screen restarts but nothing more than that, no loading the screen.
I have tried to update from the development tool as well with no success.
Anyone that can help me? have spent hours/days trying to solve it and searched plenty of forums but with no success.
Having said, the second part of the message with the display showing a “Upload TFT” button was NOT the case for me! The panel just rebooted, I did twice.
So using the reparse button basically rebooted my device, I did twice as I could not execute the Update TFT display at all.
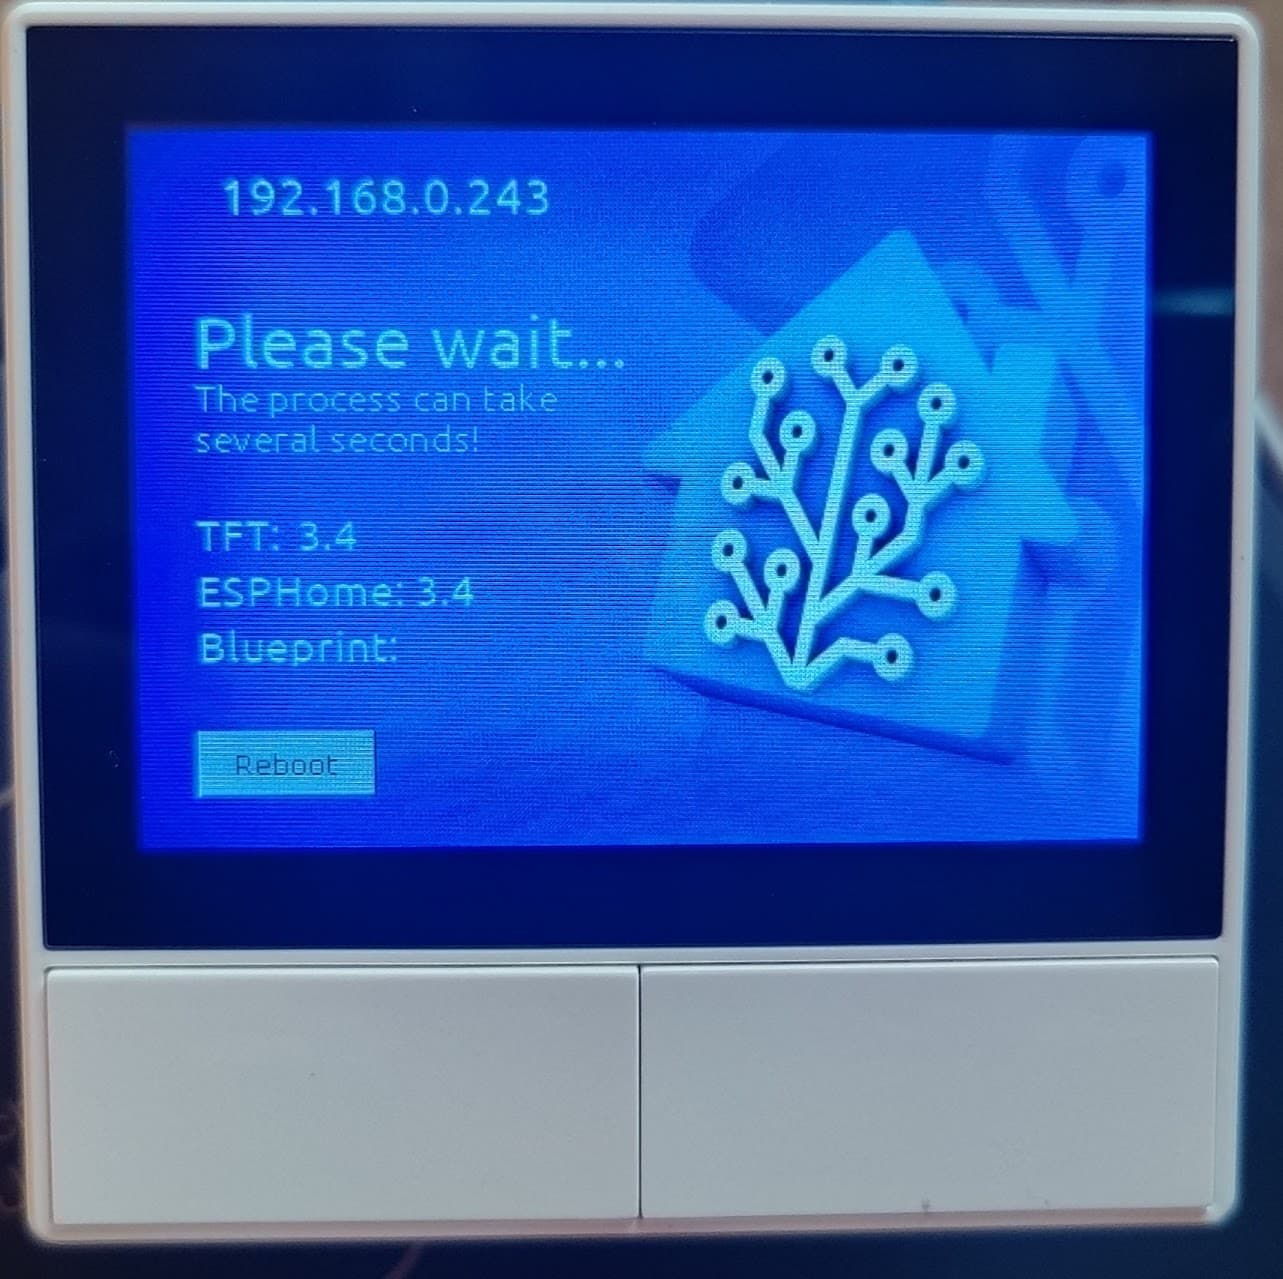
After some minutes and two reboots the exit reparse button didn’t trigger anything anymore, neither a reboot but the TFT display showed now that obviously the TFT update started and was followed with those screens:
I did some minor changes to the .yaml file and replaced my local nspanel_eu.tft file (which is in deed on my HA appliance stored!) with the Online one. I guess that was not fixing the issue but could be worth a try at least:
substitutions:

###### CHANGE ME START ######

  device_name: "nspanel"
  wifi_ssid: "@myssid"
  wifi_password: "nspanel0815"

 # nextion_update_url: "http://<hassio_IP>:8123/local/nspanel_eu.tft" # URL to local tft File
  nextion_update_url: "https://raw.githubusercontent.com/Blackymas/NSPanel_HA_Blueprint/main/nspanel_eu.tft"
##### CHANGE ME END #####


##### DO NOT CHANGE ANYTHING! #####

packages:
  ##### download esphome code from Github
  remote_package:
    url: https://github.com/Blackymas/NSPanel_HA_Blueprint
    ref: main
    files: [nspanel_esphome.yaml]
    refresh: 300s

##### DO NOT CHANGE ANYTHING! #####
The Update tooks 10mins and I was stuck in the initialization screen!
Waited another 10mins, created the BP without being able to select the deive at all and pressed the reboot button on the screen finally worked. I am confused a bit tbh.