Oil Tank Level Monitor Watchman Sonic rtl_433 Integration for RF sensors or level sensors

Hi

I have at last worked out how to integrate the Watchman sonic as a tank had both the older watchman sonic plus bullet shape sensor (like the Apollo) and also the newer watchman sonic in a cylindrical shape. I did not have the receiver and wanted to be able to remotely monitor levels.

This may be of use if you want to do the same thing. The watchman would work with other liquids I believe.

This should work on other HA versions but I’m an RPi 3 B+ running HA in a virtual environment on an older install as that gave me functionality with various Zwave and Alexa components.

I bought one of these RF SDR (Software Defined Receiver) dongles below to receive signals and these can be used to receive various devices for integration in HA, review the rtl_433 link below and they list them. They do a lot more if using other software to receive all sorts of radio signals.

https://www.ebay.co.uk/itm/SDR-RTL2832U-R820T2-USB-RTL-SDR-Receiver-2nd-Generation-USB-Stick-NEW/122113986606

You need an aerial for decent signal (note the frequency range as best to get tailored to 433mhz)

https://www.ebay.co.uk/itm/SMA-Female-Dual-Band-Gain-Antenna-For-BaoFeng-BF-888S-BF-UV5R-Walkie-talkie-New/124287534044

I had one of these but you need one if using other dongles in the Pi as there isn’t room for more than one dongle in the USB ports which are close together)

https://www.ebay.co.uk/itm/USB-2-A-to-A-1M-3-Ft-Long-Quality-Shielded-Extension-Cable-Lead-Extend-USB/310241908432

An all in one kit for the popular Nooelec dongle is here, a lot seem to use these;

https://www.ebay.co.uk/itm/Nooelec-NESDR-Mini-2-RTL-SDR-DVB-T-USB-Receiver-RTL2832U-R820T2-Tuner-UK/172866211779?epid=1858477358&hash=item283fa10fc3:g:EBAAAOSw9BJfGNJ3

Amazon also seem to sell the dongle I’m using for less and with an aerial, I note that a user review commented its been used with HA so would assume the frequency range is correct on the tuner, not sure about the antenna for range though;

https://www.amazon.co.uk/DollaTek-Portable-Digital-RTL2832U-Receiver/dp/B07DJT5NHD/ref=sr_1_1?dchild=1&keywords=DollaTek+Mini+Portable+Digital+USB+2.0+TV+Stick+DVB-T+%2B+DAB+%2B+FM+RTL2832U+%2B+R820T2+Support+SDR+Tuner+Receiver&qid=1599070308&sr=8-1

They run at around 250mA to 300mA max from what I can find and with my Aeon Stick Gen 5 at around 100mA and a USB speaker the 1.2A USB supply would suffice.

I worked out before anything blacklist the drivers for the dongle, create the file blacklist-rtl.conf in the location below;

/etc/modprobe.d/blacklist-rtl.conf

or create through this on SSH

sudo nano /etc/modprobe.d/blacklist-rtl.conf

Add the content to the file as below and save it, I gave 0777 permissions (WinSCP is great for this to explore files and change permissions with a click);

blacklist dvb_usb_rtl28xxu

Then run

sudo udevadm control --reload-rules && udevadm trigger

And reboot

Next add libraries and so on;

sudo apt-get install git libtool libusb-1.0.0-dev librtlsdr-dev rtl-sdr build-essential autoconf cmake pkg-config 

I didn’t need these as running mosquitto already but if your not;

sudo apt-get install mosquitto mosquitto-clients

Then clone the files from rtl_433

git clone https://github.com/merbanan/rtl_433.git

And run the following command to compile and install;

cd rtl_433/
mkdir build
cd build
cmake ..
make
sudo make install

Plugged in the Dongle.

Back in Putty / SSH I opened two instances, in one window ran this to publish topics from rtl_433 software;

rtl_433 -F json -M utc | mosquitto_pub -t home/rtl_433 -l -h <your ip of mosquitto server> -p 1883 -u <yourmosquittousername> -P <yourmosquittopassword>

In another Putty window I ran this;

mosquitto_sub -h <your ip of mosquitto server> -p 1883 -t "home/rtl_433" -u <yourmosquittousername> -P <yourmosquittopassword>

You should see the signals received over rtl_433 with compatible devices coming though onto the SSH where subscribed, in my case it picked up the watchman plus very infrequently and that may be faulty, possibly why there were two on the tank, or it updates differently, both sensors gave the same ID and models in the signal. On the newer watchman sensor if you hold a magnet to the dot on the side it closes a reed switch (you can hear it just), I had to wave the magnet over it a few times and the readings started coming through every second or so (this turns off after a few mins);

{"time" : "2020-08-31 16:29:28", "model" : "Oil-SonicSmart", "id" : 137449064, "flags" : 128, "maybetemp" : 15, "temperature_C" : 23.333, "binding_countdown" : 0, "depth_cm" : 73}
{"time" : "2020-08-31 16:29:29", "model" : "Oil-SonicSmart", "id" : 137449064, "flags" : 128, "maybetemp" : 15, "temperature_C" : 23.333, "binding_countdown" : 0, "depth_cm" : 74}
{"time" : "2020-08-31 16:29:30", "model" : "Oil-SonicSmart", "id" : 137449064, "flags" : 128, "maybetemp" : 15, "temperature_C" : 23.333, "binding_countdown" : 0, "depth_cm" : 74}
{"time" : "2020-08-31 16:29:30", "model" : "Oil-SonicSmart", "id" : 137449064, "flags" : 128, "maybetemp" : 15, "temperature_C" : 23.333, "binding_countdown" : 0, "depth_cm" : 73}

In the end I used this just to take signals from the watchman sonic on protocol 43 which is the one I needed, to do this I ran this command to start publishing to mosquitto;

rtl_433 -F json -M utc -R 43 | mosquitto_pub -t home/rtl_433 -l -h <your ip of mosquitto server> -p 1883 <yourmosquittousername> -P <yourmosquittopassword>

The full list of supported devices and information on rtl_433 is here;

https://github.com/merbanan/rtl_433

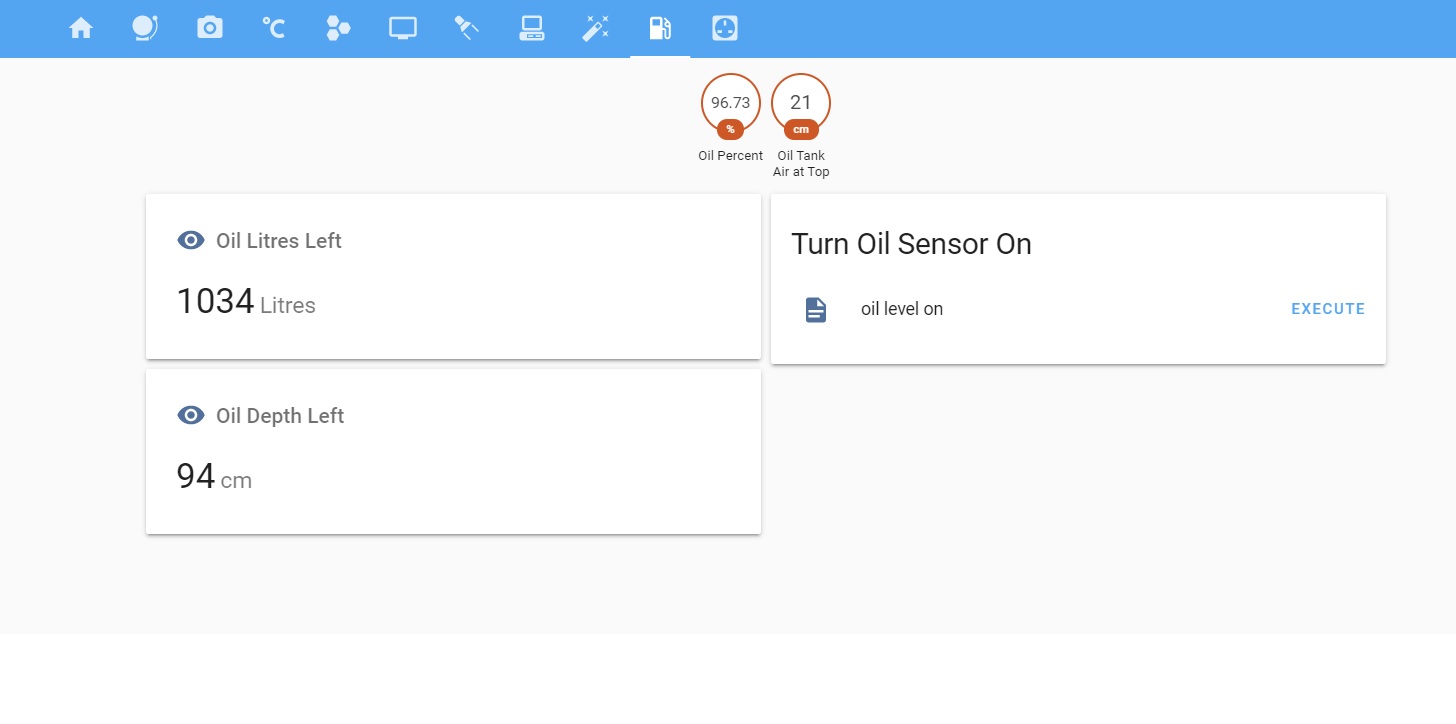
Once I knew all this was working I added sensors to detect these signals in mosquitto/HA, a bot of searching to find the calcs for 1cm of oil in a round tank and conversion from cubic centimetres, my tank is round and about 115cm fill depth. I had other tries at sensors but HA kept hanging on boot but these are working fine and updating. The oil level as if it were brimmed to the top isn’t accurate it still reads 8cm air gap when there is 0 but its more than accurate enough for me. You can pick and choose what reading were needed.

#Oil Tank Sensor
  - platform: mqtt
    name: "Oil Tank Air at Top"
    state_topic: "home/rtl_433"
    value_template: "{{ value_json.depth_cm }}"
    unit_of_measurement: 'cm'
  
  - platform: mqtt
    name: "Oil Percent"
    state_topic: "home/rtl_433"
#tank is 120cm diameter and 115cm high so approx 11.31 Litres per 1cm of fill if search online for calculator
    value_template: "{{ 115 - (value_json.depth_cm) * 11.31 / 1300 * 100 | int }}"
    unit_of_measurement: '%'
    
  - platform: mqtt
    name: "Oil Litres"
    state_topic: "home/rtl_433"
    value_template: "{{ (115 - (value_json.depth_cm)) * 11.31 | int }}"
    unit_of_measurement: 'Litres'
      
  - platform: mqtt
    name: "Oil Depth Left"
    state_topic: "home/rtl_433"
    value_template: "{{ 115 - (value_json.depth_cm) | int }}"
    unit_of_measurement: 'cm'

The json parameter above pulls the value though from that topic.

I then added a script to start the sensor reading and ran this from HA to turn readings on (I found the cron jobs and supervisor methods unreliable) and will add an automation on boot to run this automatically if needed;

oil_level:
  alias: oil level on
  sequence:
     - service: shell_command.oil_level

Then the shell command to run the command used in Putty to start the publishing readings;

oil_level: sudo rtl_433 -F json -M utc -R 43 | mosquitto_pub -t home/rtl_433 -l -h <your mosquitto server ip> -p <your mosquitto port default is 1883>  -u <your mosquitto user> -P <you mosquitto password>

Note- the -R 43 is only needed for the oil sensor sonic devices

Then added all entities on the groups.yaml, scripts.yaml, shell.yaml, sensors.yaml (how I have my configuration set up) or through the configure UI interface on HA.

I also tried the method below to publish and subscribe to topics which add the model and device ID but it had a few glitches with the sensor but may work for you, I don’t intend on listening to anything but my watchman but may be useful for multiple devices;

Turn on rtl_433 to mosquitto, publish and then subscribe in another window;

sudo rtl_433 -F "mqtt://<your ip of mosquitto server>:<your port of server default is1883>,retain=0,user=<your username>,pass=<your password>,devices=home/rtl_433[/model][/id]"

mosquitto_sub -h 192.168.1.199 -p 1883 -t "home/rtl_433/#" -u <your username> -P <your password>

The mosquitto log (see below for full logging in this file) showed;


1598889411: Received PUBLISH from rtl_433-5758ffff (d0, q0, r0, m0, 'home/rtl_433/Oil-SonicSmart/137449064/time', ... (19 bytes))
1598889411: Received PUBLISH from rtl_433-5758ffff (d0, q0, r0, m0, ''home/rtl_433/Oil-SonicSmart/137449064/id', ... (9 bytes))
1598889411: Received PUBLISH from rtl_433-5758ffff (d0, q0, r0, m0, ''home/rtl_433/Oil-SonicSmart/137449064/flags', ... (3 bytes))
1598889411: Received PUBLISH from rtl_433-5758ffff (d0, q0, r0, m0, ''home/rtl_433/Oil-SonicSmart/137449064/maybetemp', ... (2 bytes))
1598889411: Received PUBLISH from rtl_433-5758ffff (d0, q0, r0, m0, ''home/rtl_433/Oil-SonicSmart/137449064/temperature_C', ... (8 bytes))
1598889411: Received PUBLISH from rtl_433-5758ffff (d0, q0, r0, m0, ''home/rtl_433/Oil-SonicSmart/137449064/binding_countdown', ... (1 bytes))
1598889411: Received PUBLISH from rtl_433-5758ffff (d0, q0, r0, m0, ''home/rtl_433/Oil-SonicSmart/137449064/depth_cm', ... (2 bytes))


And would need to subscribe to this topic in sensors for the depth;

home/rtl_433/Oil-SonicSmart/137449064/depth_cm

I found this useful to monitor mosquito / mqtt log by turning on full logging, note that the file size can get a lot bigger so best to turn off once any debugging complete.

Adjust this

/etc/mosquito/mosquito.conf

Add log_type all

and save file

Log can be found at var/log/mosquito/mosquito.log

All these links I found helpful;

https://github.com/merbanan/rtl_433
https://www.hagensieker.com/wordpress/2019/01/15/433-mhz-signals-and-shit/
http://blog.techreverence.com/433mhz-sensor-in-home-assistant.html
https://sdr-setup-notes.readthedocs.io/en/latest/dev_rtlsdr.html
https://www.hagensieker.com/wordpress/2019/03/06/how-to-keep-rtl_433-alive-for-your-home-automation-using-supervisor/
https://github.com/mverleun/RTL433-to-mqtt
https://community.home-assistant.io/t/bar-gauge-incorrect-reading/157194
http://blog.techreverence.com/autostart-rtl_433-with-supervisor.html
https://community.home-assistant.io/t/calculations-with-sensor-values/114289/23

I found crashing an issue, sensors were problematic, information was not specific to my use and so thought it helpful to put the hours of work all in one place, enjoy.

7 Likes

Great post - really useful to see your thinking, have been looking at the same thing as have the Apollo Ultrasonic for our oil.

I’m amazed there doesn’t seem to be any smart integrations of this - would happily pay for a new one if it just connected to wifi/app so I could integrate to HA.

I’d also stumbled across the rtl_433 library which looks pretty good.

Can I ask:

  1. is this pretty stable then? (ie worth doing) - can’t tell if your last sentence of crashing, problematic sensors etc is referring to development process or the end result!

  2. How easy is this to set up - I’m a bit of a noob with all these electronics. Is it as simple as getting a RasPi set up with the usb antenna and a bit of code or is it pretty messy?

Many thanks in advance!

Hi there, thanks for the comment, it was relitively straight forward when i got there in the end. I wrote this as a reminder for me too so should work for others. Your right its really limited what integrates and oil pal has something but no integration from what i could see. im not keen on all the cloud based stuff. you can also make up a sensor with esp but i dont like power supplies and oftec regs and the sensor i used is oftec approved i believe

on questions

1/ its fine now and stable that was while experimenting, its nit quite as accurate right at top level after a fill but thats not where i need to be monitoring

2/ its simple enough with the above but i am on a pi3 virtual environment and homeassistant, im not up to date with hassio but would assume you can do it as long as the rtl_433 is possible, this will be you main learning curve with all this

for the cost of the parts and if your patient it may be worth it but i invest a lot of time (when i get it)

cheers

1 Like

@dingleydell Thank you for figuring out the gritty details to make this work, I’ve wanted to get my oil tank into hass for quite some time.

1 Like

No worries, I may update at some time when chance as when I set this up where I need to monitor I was picking up 2 other watchman’s and weather stations! I had to use an automation to prefix the device ID on all mqtt updates so I could use the ID of my oil sensor, but added bonus is I have a weather station transmitting in the area for temp/wind and so on! Also have now added a status sensor with images for ok, mid range, low and approximately how many weeks oil are left based on the oil % left.

1 Like

Hey, Great work getting it working but I have a few questions if you can offer any assistance.

Can you expand on your calculation and what some of the other values mean when setting up the sensors (what size tank in L do you have for example). Im struggling to get the values right, my tank is a 650 unit from Harlequin (Length 1,715mm, Width 670mm, Height 1,330mm, Capacity 673 litres)

I have managed to read the signals coming from my transmitter but it stops after a few mins till I go back out with a magnet, have you just left a magnet permanently next to the transmitter or did you end up doing something different?

Would you be able to post and updated sensor config please?

Thanks :slight_smile:

Hi @dingleydell - thanks for your very detailed write up! I run HA within an Intel NUC running the HA OS as an image. Installation - Home Assistant . Being a turn-key image I am not sure how to access it via Terminal etc. So … Question: Could I use a seperate RPi to receive the 433 data from my Watchman Sonic, and then forward the data to my NUC (via MQTT perhaps)? Or does your method rely on a combined system?

Also, could you expand a bit on the driver blacklisting? I didn’t understand that bit …

TIA

Hi, I would think it would work via pi and to then Mqtt to your other system, I haven’t done that so wouldn’t be sure but someone else may have. I’m now on latest HA in venv and all seems fine. Blacklisting the drivers stops it loading the default drivers for the dongle as you want the rtl_433 to communicate, it’s worked a charm till battery ran out…

Hi, was working it out and posting a template but I think that tank is bunded?? You will need the inner tank measurements and to only have the max fill height you are happy with on that internal tank, if the tank also has internal structure inside the inner tank for strength (like my replacement will have) you need to account for that and take that off too. My tank is approx. 1200L, singe skin, I’ve updated my level to 105cm rather than 115cm now. I’ve also used the trend sensor for rapid drop or fill. Can post a sensor when get time if you get all the inner tank detail. Cheers

Hi Thanks,

I think I have worked out the dimensions and got the reporting pretty much right as I’ve just had the tank filled so had something to go off, Ill keep tinkering with this to get the right.

The main issue I have at the moment is I only receive data when I have a magnet near the transmitter. Do you have one next to your permanently or am I missing something simple?

Thanks

Hi, yes the magnet creates update every few seconds, once it reverts to normal transmit mode it sends a signal every 15 mins or so to save battery. I also have email alerts at certain levels and got it feeding into a google sheets spreadsheet twice a day which was working well. Cheers

@dingleydell Success! Very happy :grinning:

Image 27-01-2021 at 20.06

I still need to calibrate my tank properly, but that should be the easy bit. The more difficult bit for me will be to get the Pi to run the rtl_433 -F json -M utc | mosquitto_pub -t home/rtl_433 -l -h <your ip of mosquitto server> -p 1883 -u <yourmosquittousername> -P <yourmosquittopassword> on power on. More reading required …

One quick note - in your instructions above, I think there should be a second sudo in sudo udevadm control --reload-rules && udevadm trigger, ie I think it needs to be sudo udevadm control --reload-rules && sudo udevadm trigger . I hope that is correct.

That’s good news, if you work out how to run on boot would be interested! I ran those commands as listed without issue but may be my setup, cheers

@dingleydell OK, I think I have now managed to get the processes to run automatically on boot / restoration of power. A very helpful friend showed me what to do, so I can’t claim the credit (or even full understanding), but it does work for me. NB: I run Home Assistant on a NUC, and my MQTT server(?) is on a different RPi again to what I am running this rtl_433 code on; if you are using a Virtual Machine things may be a bit different?

In your instructions in the first post of this thread, after the Plugged in the Dongle bit, I did the following …

  • In Terminal type export & look for a line that is similar to declare -x PATH="/usr/local/sbin:/usr/local/bin:/usr/sbin:/usr/bin:/sbin:/bin" – in my case it was declare -x PATH="/usr/local/sbin:/usr/local/bin:/usr/sbin:/usr/bin:/sbin:/bin:/usr/local/games:/usr/games"
  • Type sudo nano mywatchman.sh (change name as appropriate). In the file type (on 4 lines)

#!/bin/bash -x

export PATH=/usr/local/sbin:/usr/local/bin:/usr/sbin:/usr/bin:/sbin:/bin:/usr/local/games:/usr/games
(or whatever your PATH above is, making sure to remove the " " etc)

sleep 20
(I needed this delay to let the Pi fully boot up before the rtl_433 -F… line runs; 10 seconds was too short a delay for my machine, but you can tinker to get it right for your environment).

rtl_433 -F json -M utc -R 43 | mosquitto_pub -t home/rtl_433 -l -h <myMQTT_IP> -p 1883 -u myMQTT_Username -P <myMQTT_Password

  • Then save it and make it executable with sudo chmod +x mywatchman.sh
  • Test that it works by running sudo ./mywatchman.sh and it should be OK
  • Open a new Terminal window and type sudo nano /etc/rc.local and put 2 lines in just before the line with exit 0

cd /home/pi (see below - your path may be different?)
/the/full/path/to/mywatchman.sh & (don’t forget the &) NB: In my case, it was /home/pi/mywatchman.sh & then Save and Exit

  • Type sudo nohup ./mywatchman.sh & (don’t forget the &)
  • Reboot the Pi and it should provide the Watchman data automatically from now on

Could you share how you got your “OK 10 weeks plus high use” bit to work?

Sure, I put it in a sensor as below for oil status, based on the % sensor (or any other that suits) although I had issues displaying the mdi icon and the image so removed the mdi icon, it seemed to work with one or other though, not both and I haven’t got round to looking into it any further. The image worked for me. All the images are saved in the www folder that needs to be created in the config directory, in my case /home/homeassistant/.homeassistant/www, they are accessible from the web on that open folder. Below were the .png if you want the same ones. Added the sensor to the interface using the configure UI in Home assistant and entities card.

# state sensor to be arranged  
  - platform: template
    sensors:
      oil_status:
        friendly_name: "Oil Status"
        #unit_of_measurement: ""
        value_template: >
          {% if states.sensor.percent_remaining.state == 999 %}
            Error-
          {% elif states.sensor.percent_remaining.state | int > 50 %}
            OK 10 weeks plus high use
          {% elif states.sensor.percent_remaining.state | int > 40 %}
            OK 8 weeks plus high use
          {% elif states.sensor.percent_remaining.state | int > 30 %}
            Consider Order 6 weeks plus high use
          {% elif states.sensor.percent_remaining.state | int > 20 %}
            Order 4 weeks plus left high use
          {% elif states.sensor.percent_remaining.state | int > 15 %}
            Warning only 3 Weeks left at high use
          {% else %} 
            Alert must order now less than 3 weeks left 
          {% endif %}
        #icon_template: >
          #{% if states.sensor.percent_remaining.state == 999 %}
            #mdi:alert-decagram
          #{% elif states.sensor.percent_remaining.state | int > 25 %}
            #mdi:check-circle-outline
          #{% elif states.sensor.percent_remaining.state | int > 20 %}
            #mdi:alert-circle-outline
          #{% else %} 
            #mdi:alert-circle
          #{% endif %}
        entity_picture_template: >-
          {% if states.sensor.percent_remaining.state == 999 %}
            /local/cancel.png
          {% elif states.sensor.percent_remaining.state | int > 20 %}
            /local/ok.png
          {% elif states.sensor.percent_remaining.state | int > 15 %}
            /local/warningshield.png
          {% else %} 
            /local/highpriority.png
          {% endif %}

cancel highpriority ok warningsheild

Thanks for all the other info on auto execution of the script, I’ll give that a try.

1 Like

Right, I’m starting to do this too as fed up of checking the oil manually… I mean, walking to the utility room is far too much… :wink:

I’m thinking of basing on an ESP8266 (much cheaper than Raspi approach) and clicks in with esphome, so super simple configuration, OTA built in and integration with HA is a breeze.

I used the following tutorial to record my IR remotes in the house, but should be able to use exactly the same IR reader as an RF reader also:

I’ve got it set up near the oil tank and watching the logs to try and guess the right settings/frequencies etc - daft question, how often/what triggers the transmission? ie is it every 15 mins, 5 mins - what does the magnet point mean above?

1 Like

With my Watchman, it seems to send data once every 17 minutes. AIUI, with the magnet, you get it to send data once every few seconds for perhaps 10-15 minutes, then it reverts back to once every 17 minutes. In effect, it sort of goes in to an “engineers mode”.

Ok, so got it set up with an ESPHome RF Receiver - if I can get this working, it could be killer simple from thereon for other folks (could just create a simple component even for HA).

I’ve got it by the oil tank and can see it’s receiving an RF signal every 15 mins or so, it’s just no reading the raw data correctly (see below) - any thoughts on how to adjust this?

I’m using this: https://esphome.io/components/remote_receiver.html which should be able to pick up 433 RF also - guess I can adjust tolerance, filter for example?

[08:46:24][C][wifi:307]: Hostname: ‘ir_decoder’
[08:46:24][C][wifi:311]: Signal strength: -62 dB ▂▄▆█
[08:46:24][C][wifi:315]: Channel: 6
[08:46:24][C][wifi:316]: Subnet: 255.255.255.0
[08:46:24][C][wifi:317]: Gateway: 192.168.1.1
[08:46:24][C][wifi:318]: DNS1: 192.168.1.1
[08:46:24][C][wifi:319]: DNS2: (IP unset)
[08:46:24][C][logger:185]: Logger:
[08:46:24][C][logger:186]: Level: DEBUG
[08:46:24][C][logger:187]: Log Baud Rate: 115200
[08:46:24][C][logger:188]: Hardware UART: UART0
[08:46:24][C][remote_receiver.esp8266:059]: Remote Receiver:
[08:46:24][C][remote_receiver.esp8266:060]: Pin: GPIO14 (Mode: INPUT_PULLUP, INVERTED)
[08:46:24][C][remote_receiver.esp8266:065]: Buffer Size: 2000
[08:46:24][C][remote_receiver.esp8266:066]: Tolerance: 50%
[08:46:24][C][remote_receiver.esp8266:067]: Filter out pulses shorter than: 250 us
[08:46:24][C][remote_receiver.esp8266:068]: Signal is done after 4000 us of no changes
[08:46:24][C][captive_portal:169]: Captive Portal:
[08:46:24][C][ota:029]: Over-The-Air Updates:
[08:46:24][C][ota:030]: Address: ir_decoder.local:8266
[08:46:24][C][ota:032]: Using Password.
[08:46:24][C][api:095]: API Server:
[08:46:24][C][api:096]: Address: ir_decoder.local:6053
[09:14:20][D][remote.raw:041]: Received Raw:
[09:35:59][D][remote.raw:041]: Received Raw:
[11:05:24][D][remote.raw:041]: Received Raw:
[11:10:43][D][remote.raw:041]: Received Raw:
[11:31:20][D][remote.raw:041]: Received Raw:
[11:38:59][D][remote.raw:041]: Received Raw:

@dingleydell - I have been monitoring a tank for a while now using this, and it works great. So much so that I would like to also monitor a second tank (red diesel) which also has a Sonic Watchman. But I am not quite sure whether I need to run a second RPi to intercept the second signal, or (preferably) if not, how I find & distinguish the two data feeds.

Do you - or anyone else - have any suggestions?

Many thanks!

Hi, yes you can pick up any 433mhz from multiple devices or watchmans- I have weather station and multiple watchmans, I use this automation below to link the device ID to the mqtt updates in the automation below. If you view the mqtt updates by publishing and viewing the log shown in the original post you will see the device ID being transmitted with the signal.

- alias: 'rtl_433 demultiplexer'
  hide_entity: false
  initial_state: true
  trigger:
    platform: mqtt
    topic: "home/rtl_433"
  action:
    service: mqtt.publish
    data_template:
      topic: "{{ 'home/sensor' + trigger.payload_json.id|string }}"
      payload: "{{trigger.payload}}"
#Because the demultiplexer creates one topic per sensor, it simplifies the configuration of each sensor.

And any of your sensor parameters like this;

#this pulls json data from an automation that gives the data from the oil sonic a ref relevant to the ID as more than one in the area, see above
  - platform: mqtt
    name: "Air Gap"
    state_topic: "home/sensor137449098"
    value_template: "{{value_json.depth_cm}}"
    unit_of_measurement: 'cm'
    force_update: true
1 Like