Right, that’s this screen:

Huh. Still looking the same as mine. I guess you could verify that the GL-iNet “Clients” page shows the connection to 172.27.153.1, since that’s where the connections to 8080 should end up.
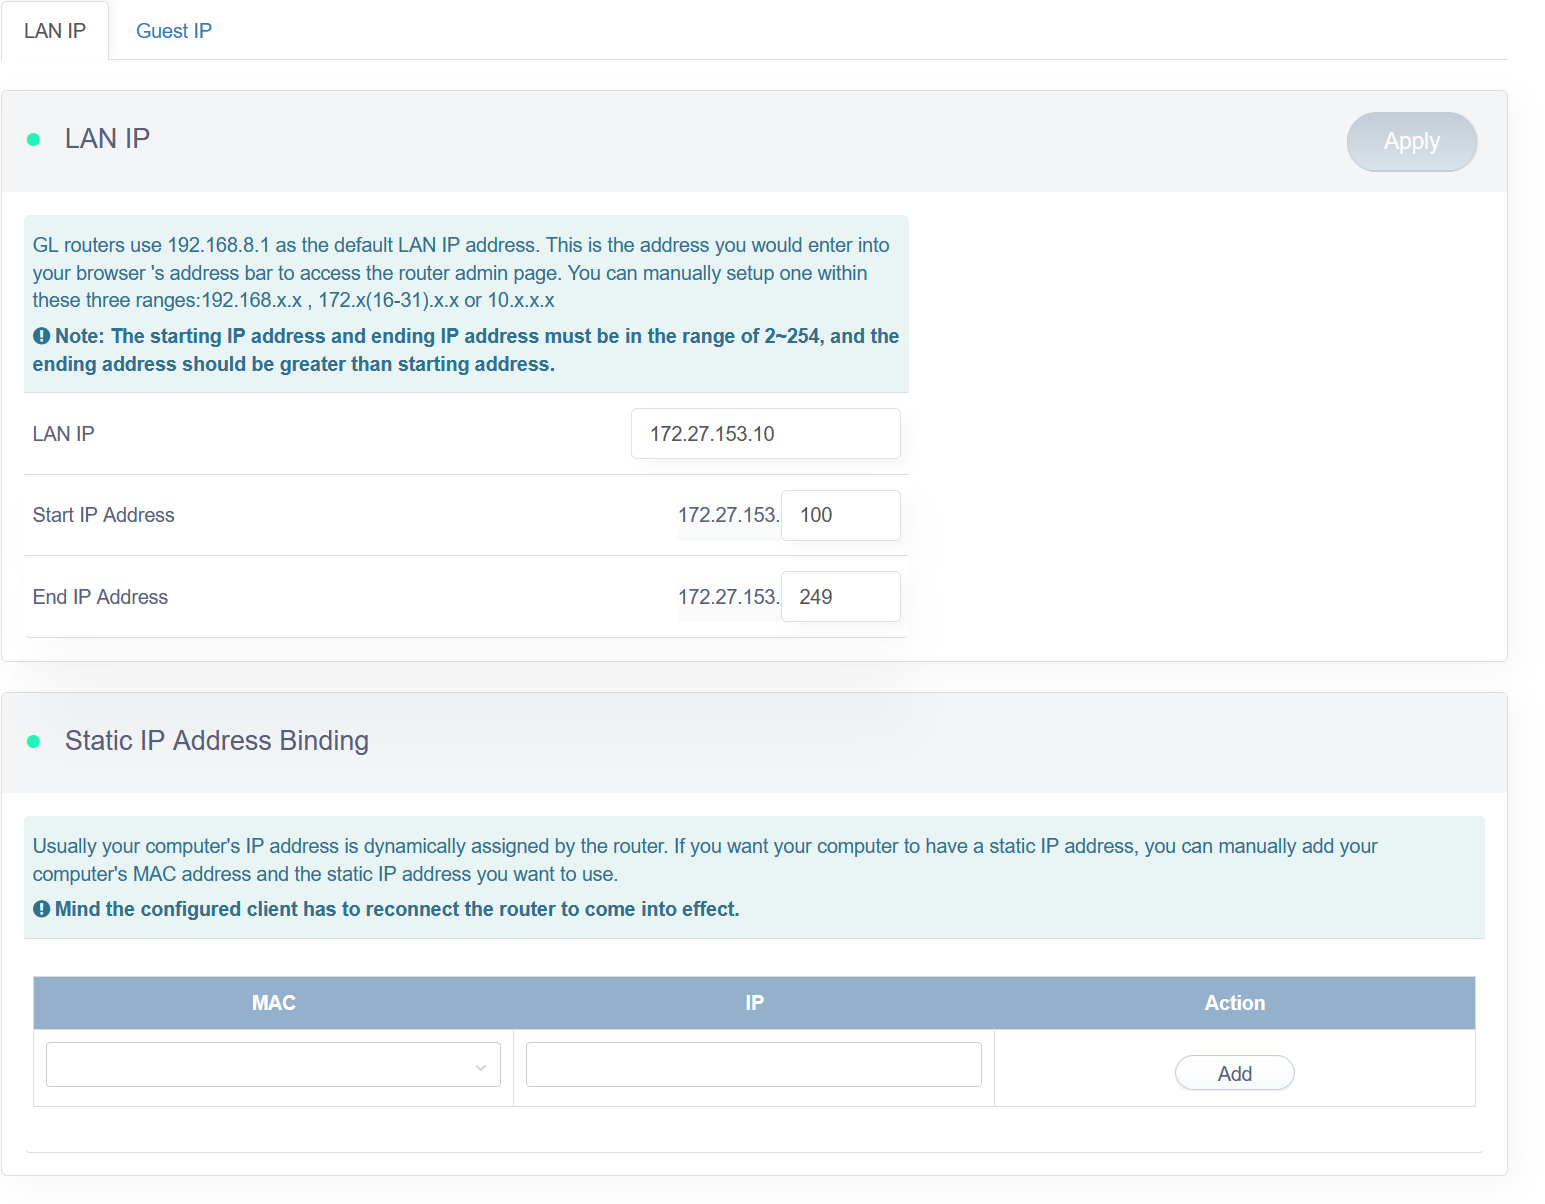
On the clients page it shows Wired Device at 172.27.153.140. Should it be 172.27.153.1? The only thing I did is change the LAN IP per the instructions as shown here:
Yes, that sounds significant! Your port forwarding isn’t forwarding to the correct address in that case. My understanding was that SunPower was always at 172.27.153.1 and did not ask the router for a DHCP address. If it is doing so (and it seems like it is), we probably need to force it to have the expected address.
You can probably do that either by changing the start/end range to have only that single .1 address (if it allows you do do that), or by using the Static IP Address Binding section below to assign that expected address to the MAC of your SunPower device (this seems like the preferred approach). If you do either of those, and then reconnect the SunPower cable, I’d expect you to see the correct address on the Clients page. And if so, hopefully this will resolve your problem and allow the forwarding rule to do its thing.
Good grief, I had the ethernet cable connected to the wrong ethernet port. Working now  Sorry to take your time on something so simple. I should have rechecked cables first!
1 Like
 Glad you got it figured out, and perhaps our exchange will help someone in the future.
I figured it out with your help for sure - thank you! I thought the client IP looked wrong, but your confirmation made me realize I wasn’t connecting to the right place on the SunPower. I also went through the steps of setting up a proxy device using an old Raspberry Pi (before I saw your post) - that didn’t work either, obviously. It made me realize that even the Pi wasn’t able to “talk” to the SunPower device. If nothing else, this post proves that the portable router method works (as does the Pi proxy) on a PS5 system installed in 2017 :). And yes, recheck the cables. First lesson.
@jporter - I’d love to try and duplicate your setup here (VLANs with Unifi, rather than a middleman router), but I’ve run into some issues.
I’ve set up a dedicated VLAN in Unifi for the switch port that I’ve connected to the SunPower LAN2 and enabled DHCP Guarding on that Network to make sure I don’t get any DHCP nonsense from the SunPower (which I don’t).
However, once I’ve done so, the SMS 2.x doesn’t get an IP address from the switch (presumably because it’s acting as a DHCP server, not a DHCP client, so it thinks that it’s 172.27.153.1 and doesn’t need another IP), and I don’t know how to tell Unifi to resolve 172.27.153.1 to that switch port. I’d ideally assign a static IP to the SMS 2.x, but it doesn’t even show up in the “clients” section of the Unifi interface right now for me to do so.
Any advice on how to proceed from here?
(note that I’m also using a SMS 2.x rather than a PVS6, which might be part of the problem, but I don’t think so – if I plug my laptop into LAN2 on the SMS 2.x I get assigned a 172.27.153.0/24 IP address and can access it at 172.27.153.1 same as with the other units)
1 Like
Hey @dan.schafer
Reading through your post I think you may be confusing a couple of concepts. The SMS 2.x has a fixed IP address and therefore as you alluded to doesn’t have a need for nor attempt to get an IP address assigned from DHCP. This is compounded by the fact that the SMS 2.x is a DHCP server itself so it wouldn’t make much sense anyways. Lastly the switch port doesn’t really concern itself with IP addresses just VLANs.
The steps for a UDM pro are as follows:
-
Create a new network. I called mine “SunPower PVS5 Management”. The UDM will need an IP address in the same subnet as the SMS 2.x. Something like 172.27.153.x where x is 2 - 249. Set “Advanced Configuration” to manual and turn DHCP server to none. DHCP guarding is not required to enabled.
-
Configure the port on your switch that connects to SMS 2.x to pass only traffic for your newly created VLAN (network). For Unifi switches this accomplished via port profiles. A port profile will be created that corresponds to the newly created network automatically. Set the port to the proper port profile.
That’s all there really is to it. The DHCP server on the SMS 2.x goes unused as both the SMS 2.x and the UDM have statically assigned IP addresses. To ensure no issues the DHCP server is turned off for the network on UDM pro. This way we don’t have DHCP servers running on both the SMS 2.x and UDM pro.
Untagged traffic should default to your “Default” network. The tagged port (via the profile) will just route over the new network. The UDM will route traffic across both networks such that traffic from 192.168.1.0/24 will have no problems reaching clients in 172.27.153.0/24.
Though it gets confused sometimes most of the time I have both my PVS5 connections showing in “Clients”. One for the management interface and the other for the LAN port with IPs of 172.27.153.1 and 192.168.1.x (DHCP assigned) respectively. Both ports are connected to ports on the same switch.


2 Likes
Thank you @jporter !
My mistake was trying to set up my new Network in a 192.168.x.x gateway/subnet, and then trying to get the SMS 2.x to somehow identify itself in that range. I didn’t realize that by configuring the Network with Gateway 172.27.153.x and subnet 172.27.153.0/24, that would set things up so that when I hit 172.27.153.1, that Network would kick in and direct me to the SMS 2.x.
After reading your explanation, it was became clear both (a) how to fix my issue and (b) why that fix works. I now have a near-identical setup to yours, and am hitting 172.27.153.1 to connect to the SMS 2.x with no issues.
Thank you for the detailed explanation, I really appreciate that you took the time to write that up!
EDIT: The only thing I changed from that setup is I had that network use netmask 30 instead of 24. I don’t know what 172.27.153.[4-255] are, but I figure I don’t want to intercept those just in case.
Everything’s working like a charm now, thank you to everyone on this thread for all of the help!
In case anyone else has an SMS 2.x, the final trickiness I ran into is that this device doesn’t appear to return JSON from most of its Commands (as it sounds like the more modern devices do), and instead returns HTML. The Scrape platform was able to get me up and running, though. The setup that worked for me:
In case the serial number was sensitive, I put that into secrets
secrets.yaml
solar_url: "http://172.27.153.1/cgi-bin/dl_cgi?lang=en-US&Command=DeviceDetails&SerialNumber=xxxxxxxxx"
Then set up a scrape sensor:
sensor.yaml
- platform: scrape
  resource: !secret solar_url
  name: solar_total_lifetime_energy_scrape
  select: "td.info"
  index: 0
  scan_interval: 60
  value_template: >
    {{ value | regex_findall_index(find="[\d\.]+", index=0, ignorecase=true) | float }}
  device_class: energy
  unit_of_measurement: kWh
  state_class: total_increasing
This gave me a float sensor that represented the total increasing lifetime energy, but it doesn’t look like you can assign unique IDs or friendly names to scrape sensors, so I added a template sensor to mirror that:
template.yaml
- sensor:
    - name: "Solar Total Lifetime Energy"
      unique_id: "solar_total_lifetime_energy"
      state: "{{ states.sensor.solar_total_lifetime_energy_scrape.state }}"
      device_class: energy
      unit_of_measurement: kWh
      state_class: total_increasing
to give that a friendly name in the UI, and at that point it plugs in seamlessly to the energy dashboard.


My panels were activated this morning, and when I finally got some time to go pop a raspberry pi into the box to see if I could connect, imagine my surprise when I discovered that my box doesn’t actually have an ethernet plug! I now remember the installers saying how cool the new boxes were that they could just do all of the setup with their phones over bluetooth. Going to have to dig around and find out what kind of network adapter plugs into that USB port. Unless someone else beats me to it, I’ll post an update when I have more info.

Oh boy, a new generation of the PVS. Exciting 
Ok, a bit more digging and I found an updated manual for July 2022 (PDF, page 4), which mentions that there are two compatible USB dongles (“no other dongles are acceptable”):
2 Likes
Oh lovely, it’s still called the “PVS6”.
Also USB1 has been removed, and USB4 has been marked as “DO NOT USE”, so it may be challenging to power a Raspberry Pi or router that is installed in the PVS box.
So far so good. I’m using an old Pi 2 B so it should stay under 2W (less than that mango router).
I can confirm that everything works with the Plugable USB2-E1000 adapter in the LAN port, and I’m able to hit http://172.27.153.1:80/cgi-bin/dl_cgi?Command=DeviceList and retrieve a list of all devices (all panels, plus PVS and 2 power meters).
Photo below for the next person who runs into one of these new PVS6 devices. Everything fits fine.

3 Likes
I’ve got the same “updated” version that you have there and wondering if anybody else is having issues with it. When I connect to the LAN port, I can see the network connection is active, but the connection to http://172.27.153.1:80/cgi-bin/dl_cgi?Command=DeviceList times out.
The weird part is if I connect to the wireless network that the PVS transmits, I can get all of the information from there just fine.
Getting the device list is really slow for me (5+ seconds), but works fine for me with raspberry pi using the instructions from Scott Grubby’s blog post.
… but I didn’t know about the PVS wifi network. How did you get the SSID/login info? It seems like that would allow keeping the raspberry pi indoors and a reliable power source (just use the raspberry pi “in reverse” compared to the other configs).
The information for the SSID/login is in the very detailed PDF by Dolf
The trick is getting it to turn on… I had to open the SunPower app & make it think I wanted to change the wireless network. Once it came up, I ended up connecting my pi to it + ethernet to my router. The gateway is 172.27.152.1, but once changing that in haproxy everything is working great! So far the network has stayed up for ~12 hours since I’ve been connected.