Remarks:
Typically, you would use a VPN such as WireGuard for remote access – it is easier, more secure, and recommended. However, certain features (for example Alexa actionable notifications) do not work over VPN, and not everyone wants to spin up a VPN every time before accessing Home Assistant remotely. Alternatively, you can subscribe to Nabu Casa’s Home Assistant Cloud and simply enable remote access in HA with no further configuration.
This guide is for you if you have IPv6-only or a dual-stack (IPv4/IPv6) internet connection and want to enable remote access to Home Assistant via IPv6 (and optionally IPv4). The focus here is on IPv6, since it does not require NAT and the FritzBox provides direct global addresses.
Note on IPv4: With dual-stack, MyFritz.net will show both IPv4 and IPv6 addresses. While IPv6 allows direct access without NAT, IPv4 requires traditional port forwarding through NAT. If you are interested in IPv4-only setups, please refer to this separate guide: Remote Access using a FritzBox & the AVM myFritz DDNS Service
This document has been tested with:
- Home Assistant 2025.11.3
- NGINX add-on v3.14.0
- Let’s Encrypt add-on 5.4.9
- FritzBox 7530, Firmware 8.02
- German Telekom VDSL
Other ISPs may require slightly different FritzBox settings. Feedback on such variations is welcome.
Prerequisites:
Your installed HA system supports add-ons. You know how to install & configure add-ons and how to edit the configuration.yaml and automations.yaml files. You also know how to add blueprints to HA. You have a myFritz account and configured your Fritzbox to use it. You know how to configure port forwarding in your router and port 80 is available. You enabled “Advanced Mode” in your HA user profile. Otherwise not all HA config options are visible.
Notes:
-
I use the domain “homeassistant.YourDomain.myfritz.net” for this guide. homeassistant is the host name of my HA instance and is listed under that name in my FritzBox network. YourDomain.myfritz.net is the domain that MyFritz.net provides to you. It usually looks like this: vwxy8m79lczikzb.myfritz.net. So obviously you need to replace this with your own configured data.
-
This solution uses 2 add-ons: Let’s Encrypt and nginx (see below for details) and a blueprint for certificate renewal.
-
Follow this guide in the order outlined below.
Step I. Enable IPv6 in the Fritzbox & configure DHCPv6
Obviously you need to have IPv6 enabled. If your ISP is German Telekom enable “Native IPv6 Anbindung verwenden” with the IPv4 options. If you use another ISP you might need to enable one of the other options. Check with your ISP.

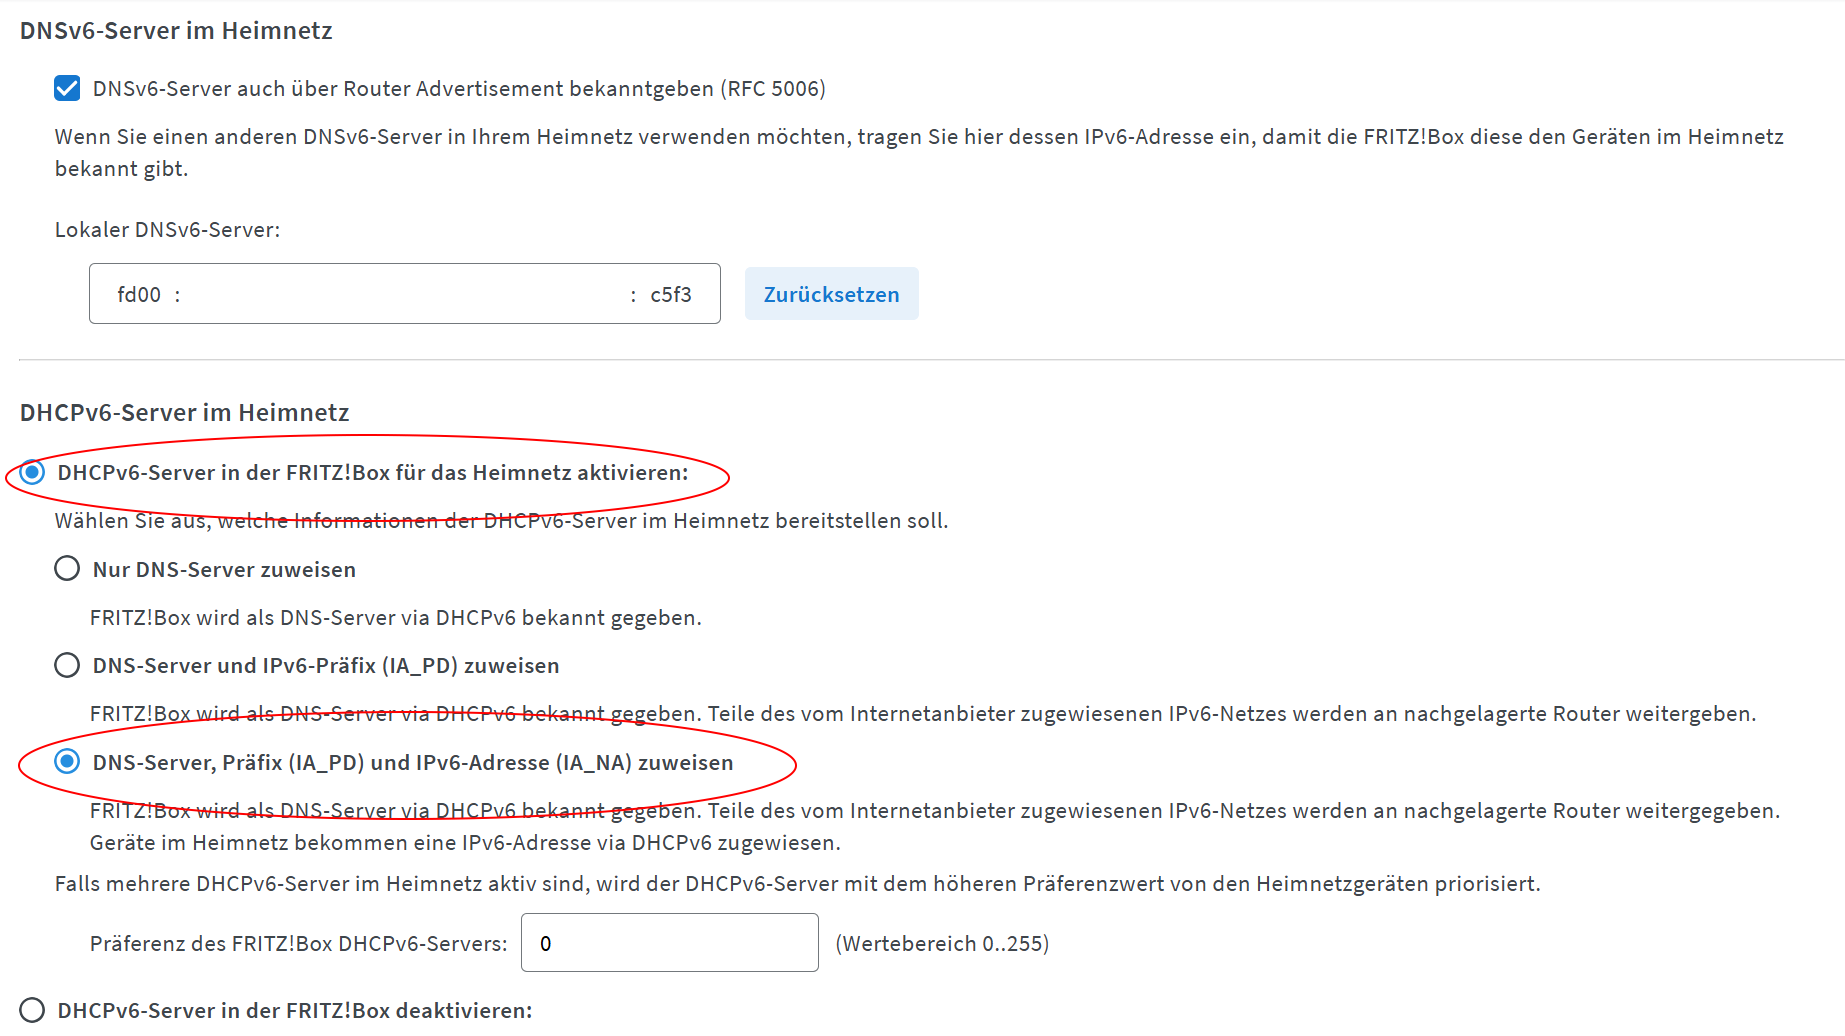
IMPORTANT: in addition, configure the following Settings in Heimnetz->Netzwerk->Netzwerkeinstellungen->IPV6-Einstellungen
- enable “DHCPv6-Server in der FRITZ!Box für das Heimnetz aktivieren”
- enable “DNS-Server, Präfix (IA_PD) und IPv6-Adresse (IA_NA) zuweisen”. This is actually an important setting
and it took me quite some time to figure that out.
Step II. Enable remote http and https access to Home Assistant (via nginx)
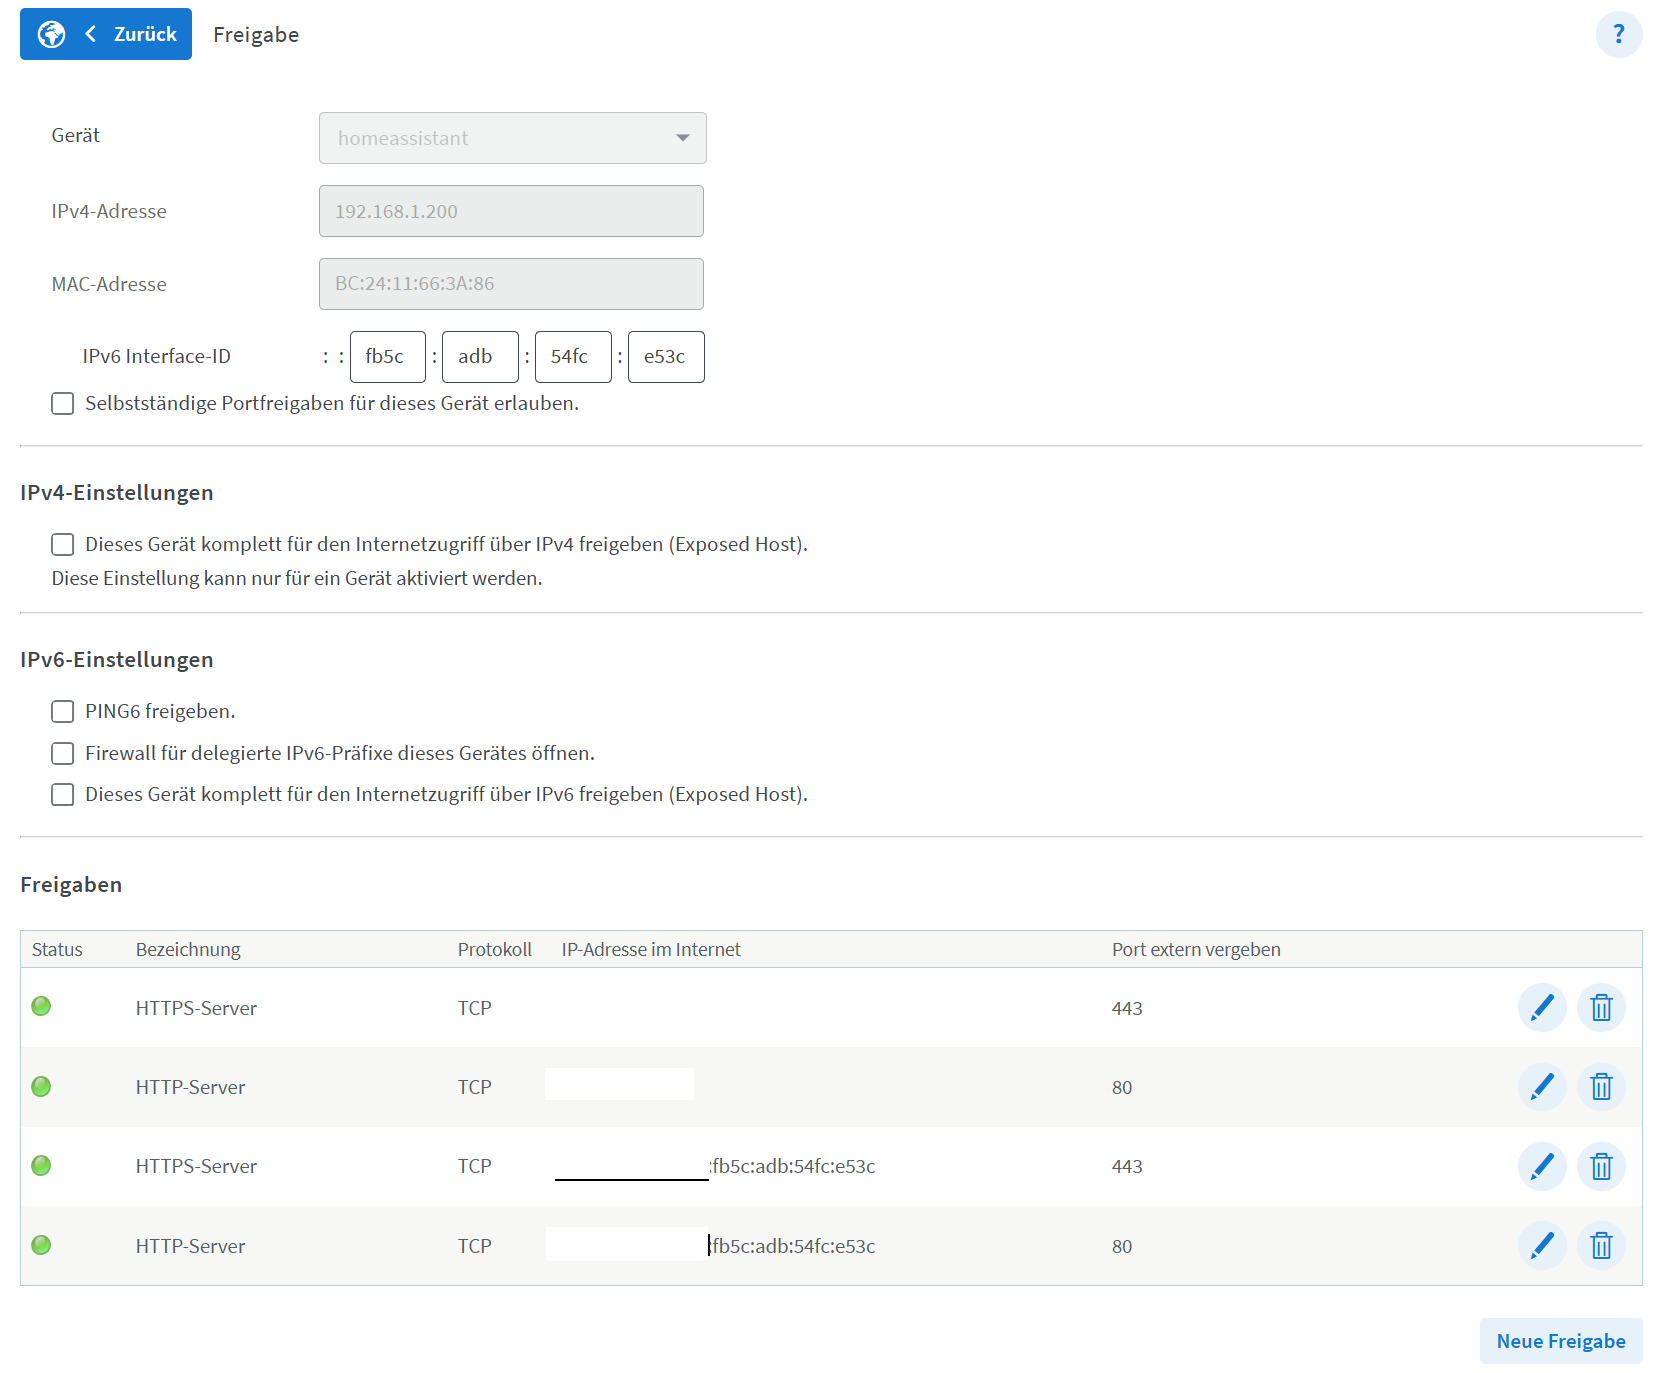
IPv6 does not use port forwarding (there is no NAT involved) but you need to open remote access to your Home Assistant host for 2 ports: 80 and 443. Let’s Encrypt requires port 80 for certificate creation and renewal. Port 443 is used by HA/nginx for HTTPS access.
Select MyFritz!Freigabe and HTTP-Server or HTTPS-Server respectively as “Anwendung” when creating these 2 entries.

VERY IMPORTANT:
You need to open these ports as MyFritz!Freigaben and NOT “Portfreigaben”. Only then MyFritz creates the corresponding DDNS entries in MyFritz.net. Also DO NOT enter any data in the IPv6 Interface ID boxes. Just leave these untouched. The FritzBox will fill this in eventually.
Step III. Verify entries in MyFritz.net (DDNS)
Login to your MyFritz.net account and verify that the 2 entries from step II have been created. If you have dual stack it shows an IPv4 and IPv6 address for each entry.
homeassistant: HTTPS-Server
MyFRITZ!-Adresse: homeassistant.YourDomain.myfritz.net
IPv4-Zugang: Your.Public.Ipv4.Address
IPv6-Zugang: Your.Public.Ipv6.Address
homeassistant: HTTP-Server
MyFRITZ!-Adresse: homeassistant.YourDomain.myfritz.net
IPv4-Zugang: Your.Public.Ipv4.Address
IPv6-Zugang: Your.Public.Ipv6.Address

Step IV. Verify that remote access works
Test if you can ping your host using the myFritz address: ping homeassistant.YourDomain.myfritz.net
Optional but recommended: ping your domain from outside your network (e.g. use a smartphone and an app that allows you to ping).
If ping succeeds then myFritz DDNS is working and HA responds.
Step V. Create certificates
Install the Let’s Encrypt add-on in Home Assistant and configure the add-on: Use http for the challenge setting. The YAML based config should look like this:
keyfile: privkey.pem
certfile: fullchain.pem
challenge: http
dns: {}
domains:
  - homeassistant.YourDomain.myfritz.net
email: YourEmailAddress
IMPORTANT: the domain must contain the hostname (homeassistant) otherwise the Internet browsers will complain and will not connect.
Leave the http challenge port at 80. This is important because Let’s Encrypt relies on port 80 being open to the Internet and you cannot use a different port for the Let’s Encrypt add-on because there is no NAT.
Next start Let’s Encrypt and check the add-on’s log file to see if cert generation was successful. If so the certification files for your myFritz domain (homeassistant.YourDomain.myfritz.net) are now in your /ssl folder. These are valid for 90 days only. Note that the add-on will stop running after the certificates are created. If you run it again it will check whether or not the certs are still valid and if not it will generate new ones and then stop again.
Later we will add a blueprint to HA to automatically run Let’s Encrypt to update the certs if needed.
Note that port 80 is open on your router but there is no service running behind it. Only when the Let’s Encrypt add-on runs it uses this port for a short period of time and then stops.
Step VI. Install & configure Reverse Proxy
This step is not strictly required but I recommend it because when the certificates change you only need to restart the proxy and not Home Assistant itself. Big benefit. The remaining steps assume that nginx is installed. Otherwise the HA configuration would be different.
Install the nginx add-on (called NGINX Home Assistant SSL proxy) version 3.14.0 or higher (includes IPv6 support).
Configure it. Use your myFritz domain and the certs we generated with the Let’s Encrypt add-on. The YAML version should look like this:
domain: homeassistant.YourDomain.myfritz.net
hsts: max-age=31536000; includeSubDomains
certfile: fullchain.pem
keyfile: privkey.pem
cloudflare: false
customize:
  active: false
  default: nginx_proxy_default*.conf
  servers: nginx_proxy/*.conf
real_ip_from: []
Use the standard nginx SSL port 443.
Start the add-on. Note: if you change certs in the Let’s Encrypt add-on you need to restart nginx afterwards to apply the new certs.
Step VII. Configure Home Assistant
- Add the following to your configuration.yaml. Note that you need to use the IP address range excatly as shown. These are the IP addresses that HAOS uses for the add-ons. I recommend to use ip_ban_enabled and login_attempts_threshold to improve security.
  http:
    use_x_forwarded_for: true
    trusted_proxies:
      - 172.30.33.0/24
    ip_ban_enabled: true
    login_attempts_threshold: 5
In Setup → System → Network:
-
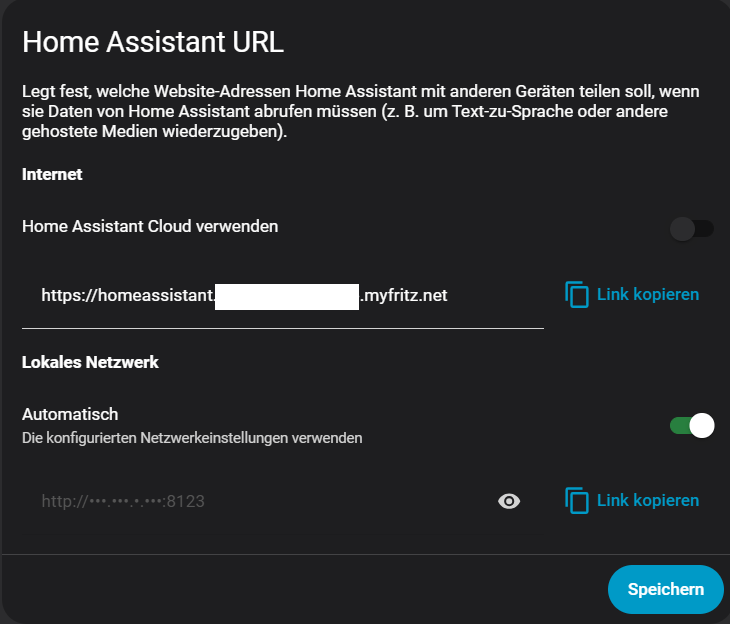
Enable IPv6 by selecting automatic. Don’t try to use static IPv6 addresses. Automatic (DHCPv6) is important because IPv6 addresses will change when you reboot your router.
-
Add your myFritz domain (https://homeassistant.YourDomain.myfritz.net) as the Home Assistant Internet URL
- Restart HA (important !)
Step VIII. Optional but highly recommended: Use 2FA for your HA users !
In HA click your user name and enable Multi-Factor-Authentication. Use TOTP and an authenticator app like Authy for example.
Do this for every HA user.
Now you should be able to connect securely to Home Assistant from the Internet using this URL https://homeassistant.YourDomain.myfritz.net
Note that when you try this the first time from outside your internal network it might fail because your DDNS Domain might not yet be visible to the Internet DNS System. It might take some time for it to propagate.
To login to HA you need a user name, password and an additional time-based one-time password (if you enabled 2FA and you should!). Note that on your internal network you can still use http://your_internal_ipv4_ip:8123 (http not https!)
Step IX. Renew certificates before expiration
Finally we add an automation to update the Let’s Encrypt certs if required and restart HA and/or nginx to pick up the new certificates. For that you can use this great blueprint from TJ-developer:
This blueprint only allows you to restart HA. The modified version of this blueprint done by “mdeweerd” allows you to restart HA and/or nginx. I used this one and configured it to only restart nginx. To use this blueprint you also must install & configure HA’s Certificate Expiry integration, which monitors SSL/TLS certificates and exposes their expiration date as a sensor. It can be intalled via the HA UI.