Simple thermostat with preset modes management

This custom component for Home Assistant is an upgrade of the generic thermostat which handles presets mode in a very simple way.

How Generic thermostat behaves with modes :

Basically, the generic thermostat handle two preset mode : AWAY and NONE. When AWAY mode is set, the thermostat will set the temperature with the away temperature defined in the yaml configuration. When NONE is selected, the temperature set is saved. Every time you set the mode as NONE, the temperature will be automatically set with the saved value. If you want to change the saved value, set the mode to NONE, set the desired temperature, and thatā€™s it.

How Simple Thermostat behaves with modes and additional feature

Define by default all the modes defined in the climate specs : https://developers.home-assistant.io/docs/core/entity/climate#presets The simple thermostat reproduce the behavior of the mode NONE in generic thermostat and extend it to all the modes :

  • Pick a mode

image

  • Set a temperature

image

  • Thatā€™s it ! The temperature is saved for this mode.
  • Reproduce the previous step to update the temperatures / set other modes

Minimum requirements

  • This implementation can override or superseed the core generic thermostat

Installation

HACS installation

  1. Install HACS. That way you get updates automatically.
  2. Add this Github repository as custom repository in HACS settings : https://github.com/dadge/simple_thermostat.
  3. search and install ā€œSimple Thermostatā€ in HACS and click install.
  4. Modify your configuration.yaml as explain below.
  5. Restart Home Assistant.

Manual installation

  1. Using the tool of choice open the directory (folder) for your HA configuration (where you find configuration.yaml).
  2. If you do not have a custom_components directory (folder) there, you need to create it.
  3. In the custom_components directory (folder) create a new folder called simple_thermostat.
  4. Download all the files from the custom_components/simple_thermostat/ directory (folder) in this repository.
  5. Place the files you downloaded in the new directory (folder) you created.
  6. Modify your configuration.yaml as explain below
  7. Restart Home Assistant

Configuration

In the following examples we are assuming that you know how to configure a generic thermostat (if not please have a look at : Generic Thermostat - Home Assistant ) and we will just highlight the differences in the configuration to apply.

climate: - platform: simple_thermostat name: Study heater: switch.study_heater target_sensor: sensor.study_temperature

If you had already configure a generic thermostat the onli changes you have to do are the following :

  • platform must be changed from generic_thermostat to simple_thermostat
  • away_temp must be removed

Even Better with Scheduler Component !

In order to enjoy the full power of simple thermostat, I invite you to use it with https://github.com/nielsfaber/scheduler-component Indeed, the schdeuler component porpose a management of the climate base on the preset modes. This feature has limited interest with the generic thermostat but it becomes highly powerfull with Simple thermostat :

Starting here, I assume you have installed Simple Thermostat and Scheduler Component.

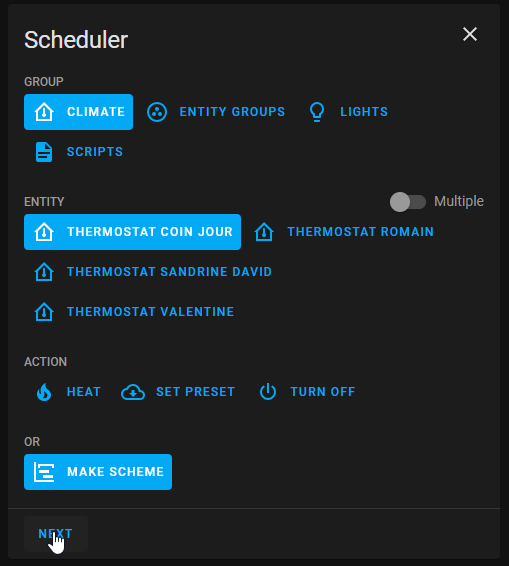
In Scheduler, add a schedule :

image

Choose ā€œclimateā€ group, choose one (or multiple) entity/ies, select ā€œMAKE SCHEMEā€ and click next : (it is possible to choose ā€œSET PRESETā€, but I prefer to use ā€œMAKE SCHEMEā€)

image

Set your mode scheme and save :

image

In this example I set ECO mode during the night and the day when nobodyā€™s at home BOOST in the morning and COMFORT in the evening.

I hope this example helps you, donā€™t hesitate to give me your feedbacks !

1 Like

Nice! I may be switching to this component. I added support for all presets in the core, but itā€™s not been merged in (https://github.com/home-assistant/core/pull/56080)

3 Likes

Not sure if Iā€™m missing something but how do you set the temperatures for the pre-sets in the config?

Hello @Tommo-101,

As defined above you do it in 2 steps :

The temperature is automatically saved for the chosen mode. Now you can start to use your thermostat only by mode. If you modify the temperature it will again save the temperature for the chosen mode.
Basically the idea is to use modes only and no temperatures anymore.

Regards,

2 Likes

Thank you soo much. This is exactly what the doctor called for !

1 Like

Thanks for this nice work. Iā€™ve set it up now and it works like a charm.

On thing that Iā€™m not sure how to implement it is the automatic away mode when nobody is at home. Enabeling the away mode ist no problem. But the returning is.

Iā€™ve set up different time schedules for my radiators that change modes during the day. I donā€™t know what to do, when I come home. When I set the mode to ā€˜noneā€™ then the thermostate would start the heating, even if the schedule says it should be in eco mode. This is even more bad if I come home in the night hours and all radiators start heating. How have you implemented this? Is there a way to trigger scheduled rules?

Best regards
Chris

Looks really nice! However, I canā€™t figure out to add your repo to HACS. It seems like he HACS GUI has changed.

I could install your addition manually of course. However, I would prefer to use HACS.

Click on the three dots at the top right.
Custom repositories
Repository; https://github.com/dadge/simple_thermostat
Category; integration
[Add]

Thanks, I hadnā€™t enabled ā€œExperimental featuresā€ so that option was greyed out. Now it works.

I am trying to create a virtual simple thermostat (so not connected to a real thermostat) and would like to add different modes to it. I found out how to do it before, but since deleted the climate entities that were set up this way. For the life of me I canā€™t recreate them now. Any tips for me? My current climate.yaml has the following:

- platform: simple_thermostat
  name: Woonkamer
  heater: input_boolean.verwarming_woonkamer
  target_sensor: sensor.tempsensor_woonkamer_temperature
  min_temp: 15
  max_temp: 25
  ac_mode: false
  hot_tolerance: 0.5
  cold_tolerance: 1

The modes are available as attributes. You will find those on the Lovelace card. Or, you can of course change mode in a script. So there is no need to prepare/setup modes in the configuration.

I tried that aswell, with this code:

type: custom:simple-thermostat
entity: climate.anna
control:
  preset:
    boost:
      name: boost
    home:
      name: thuis
      icon: mdi:fire
    away:
      name: Away
      icon: mdi:exit-run
    eco:
      name: Eco
      icon: mdi:leaf
    comfort:
      icon: mdi:sofa

But this only makes the card display the modes that are already available in the climate entity preset_modes attribute.

edit: Did a full restart and now the modes are available as attributes. So lesson learned: reloading the yaml isnā€™t enough :grimacing:

Hello,

I have a stupid A/C for an apt that Iā€™m renting out. Iā€™m using broadlink, a temperature sensor and a power sensor (linked to an input boolean for the state) as the way to control it. I wonder how I can bring this into a climate entity ?

Since even the simplest AC normally has a built in thermostat, it is not a good solution to add a new thermostat on top of the built in device. Instead you should control the AC by adjusting the setpoint. Hopefully it is possible to do this using the HA broadlink integration.

However, there might be an option to use HA thermostat if you set the AC to max heating or cooling and then let the HA thermostat toggle the main supply. A prerequisite is the AC remember the setting if you turn off the power. Another question is if the AC will survive extensive power cycling.

So ā€œsafestā€ solution is to adjust the setpoint by using the broadlink integration.

where or how can i edit the presets?
image

1 Like

Hello all,

unfortunately, this integration is no more maintained but I create a new Integration, more stable, and with awesome feature :

  • Explicitely define the temperature for presets mode in config file.
  • Unset the preset mode when the temperature is manually defined on a thermostat.
  • Turn off/on a thermostat when a door or windows is opened/closed.
  • Set a temperature when an activity is detected in a room, and another one after no activity has been detected for a defined time.

I created a new topic to describe it :

Regards,

1 Like

Im buzzled, how do i add presets ? Below is my config :

type: custom:simple-thermostat
entity: climate.enervent_temperature
step_size: 1
header:
  name: Enervent
control:
  - hvac
sensors:
  - entity: sensor.enervent_days_until_service_reminder
    name: Change Filters in
1 Like

We need to be able to adjust the presets inside the UI, is that possible at all?