Smart heating scheduler for Home Assistant (extra: multi-zones version)

Smart heating scheduler for Home Assistant

I’ve put together a heating control system for my house using Home Assistant. This completely replaces any hardware thermostat, all decisions and schedules are done in software by the system. Since it took quite a lot of work, I thought I’d share it for anyone trying to achieve something similar. It all started from the solution on this page but I wanted a more flexible approach - however it was excellent to set the base to start from. The goal was also to have all configuration available in Lovelace GUI and no need to edit config files in order to change operational parameters.

Features

  • split the days in 4 time segments, separately for workdays and free days (morning, daytime, evening, nighttime)
  • schedule different temperature levels for each time segment
  • adjust the main thermostat based on the average temperature of all the rooms
  • provide an override method for holiday/party mode
  • automatic home/away mode switching based on presence detection
  • automatic on/off switching based on outside temperature, weather forecast temperature, door/window opening sensors

Configuration layout

I have my Home Assistant config set up using splitting method which I recommend anyone who wants to have a more flexible way of setting up things. Configuration items can be separated in sub-folders based on integration types, and they can be further split in multiple yaml files, which is great because if any config has to be excluded or temporarily taken out, all it takes is to rename the extension of the filename to something else and restart Home Assistant. I share my heating control solution in this layout - I’ve only left in the configuration items related to it. This way most of the things are self-explanatory.

Requirements

  • a switch to control the heater (something like Sonoff Mini running Tasmota or ESPHome firmware)
  • temperature sensors in each room, and outdoors (for indoors I used Geeklink IR Bridge with an extra DS18B20 soldered on an punched out on the side of it - extra benefit that it can also control AC devices in the room but that’s a different story; for outdoors the same sensor on a Sonoff Dual switching my garden lights)
  • weather forecast service set up in Home Assistant
  • a device tracker integration to monitor for presence detection
  • average custom component installed
  • optionally simple thermostat card for the main thermostat in the frontend
  • optionally some door/window opening sensors, configured in a group of binary sensors, to detect when any of them is open

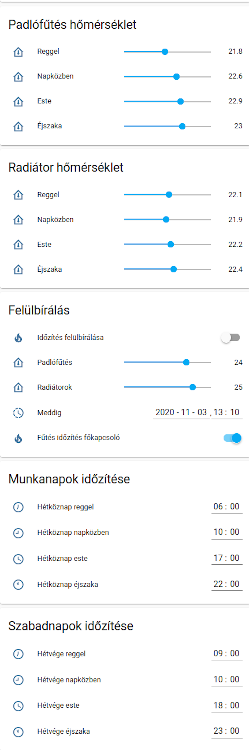
How it works from the user’s perspective

Normally the user doesn’t have to deal with the main thermostat because it’s operation is fully automatic.

Each day is split into morning, daytime, evening, nighttime periods, the starting times for these can be set separately for workdays and free days. A workday binary sensor helps with this, because not only Saturdays and Sundays can be free, but also national holidays, vacations etc. configuring this properly makes the system aware of these. So all one has to do is to set the desired temperature levels for these periods and turn on the Heating timer enable switch. As time passes, the system will automatically adjust the thermostat’s target temperature to the level corresponding to the time. With Heating timer enable turned off, this will not happen. Whenever the switch is turned on, the system immediately checks for the current time and adjusts the temperature level to the corresponding time period.

Timer can be overridden with a separate Heating override switch. It can be specified Until when (with both date and time) to hold the override and return to the timer mode. This can be useful to have a fixed temperature level set regardless of the timing, and have it finish automatically after a deadline. Note that override applies to home/away and weather on/off automations too, so with this, away mode will not trigger, and the system will continue to operate regardless of presence and outdoor temperatures.

The system will automatically switch to away mode when the presence detection reports this. The thermostat configuration has a different temperature level set for away mode, and the schedules don’t run while away.
Monitoring both outside temperature and also weather forecast temperature helps turning off the system when it’s warm enough in the environment, thus saving precious energy.

Grab the source configs from here:

Read further down for the 2-zones version, multi-zones, rooms with multiple circuits etc.

22 Likes

Thank you for sharing! It sounds like you’ve got all the features anyone could need.

I’d be using something like this if I didn’t already have smart thermostats when I installed HA.

There is one thing my thermostats do, which I had never really though of but makes some sense. They claim to adjust the cycle time of the heating or cooling system so it only cycles about X number of times per hour, where X is settable. In other words, rather than just come on and off at a temperature setpoint, it’ll run the system a little longer, or shorter, so that it’s not cycling as much, while still maintaining the desired average temperature. In practice, this seems to work because the temperature stays more stable than it did with my old “on/off” dumb thermostat, and the system cycling is more regular.

I only mention this because it’s something I never really knew smart thermostats did, and I wonder if that’s a normal feature or unique to this brand (Honeywell.)

1 Like

This is a parameter which can be set in the thermostat config. In my sample config above, it’s set to 10 minutes.

Indeed, this combined with lower cold and hot tolerance values, allows more precise temperature control. Most hardware “smart” thermostats I’ve seen have these tolerance values hardcoded to 0.5 degrees, I’ve set these in my config to 0.2.

1 Like

By the way, in your case, how long is a cycle, and how many times does it per hour?

By cycle I just mean one on-off sequence. The duration depends on the temperature; longer when it’s colder out and zero when there’s no need for heat or cooling.

I seem to recall the setting for the Honeywell thermostats defaults to six, which means six times an hour, or every 10 minutes. I think that’s just a goal; the system tries to estimate how long each cycle should last to achieve that. It doesn’t seem to stick to a rigidly timed schedule, so I assume the algorithm also factors in actual temperature change and adjusts accordingly during the day.

I think some Honeywell thermostats can also use an outdoor temperature sensor directly, and factor that into the equation. Since these thermostats are always “phoning home” I often wonder if they get some regional outdoor temperature value from the Honeywell back end.

1 Like

OK so my estimate of 10 minutes is good enough here too.

Thank you for publishing your work.

It is nearly what I was thinking about, but I’m missing a door/windows open detection.

I just had a quick look at your logic and can’t find anything like this. I think it should work to set the input_boolean.heating_timer_switch to off and the target temperature of the thermostats to the minimum and where the doors/windows are closed, turn the input_boolean.heating_timer_switch to on again. What do you think?

Could you publish your lovelace config of the sample, too? Then it would be easier to see what you did. Without translation your picture is somewhat guessing for me…

Thank you!

1 Like

That’s fairly easy to implement. Put all the door/window open-detection binary sensors in a group, and add this trigger to the automations in weather-temp.yaml:

  - platform: state
    entity_id: 'group.doors_and_windows'
    to: 'off' # 'off' when closed, turn climate on, and 'on' to turn climate off

Edit: I quickly added it, with a note that I didn’t test this scenario (but it should work).

Added it to the readme on the github link above. It will render exactly what’s in the picture posted, but in English.

2 Likes

The group is created already. I will give it a try as soon as I have some spare time.

Thank you for the lovelace config - That was the missing link for me.

Updated the package: added automations to update the thermostat target temp whenever the slider (corresponding to the correct time interval) is being touched. Same for override slider. Also refactored a bit the splitted configuration.

Added 2-zones version:


Same as above, plus:

  • 2 zones (composed of 1 heater main pump + 2 separate zone pumps/valves)
  • schedule different temperature levels for each time segment, separately for each zone
  • separate thermostat for each zone

Get from:

Fixed both versions for a timezone bug, and added follower for modifying timers (thermostats adjust immediately if timers or temp values of the time intervals are changed, no need to wait for the next cycle).

1 Like

Added

  mode: single
  max_exceeded: silent

to the time chooser automation to suppress warning messages in the log.

Hi Robi and Thanks for your amazing work! This is something I was looking for :slight_smile:

I have two zones including both one Daikin air conditionner that I can manage from HA so I will use your code as a base for the heating automation, but will manage to add the cooling automation as well.
I do have one question, since I don’t control the pump but only heating units, I have no need to interact with it.

I have noticed that the “generic_thermostat” is using a switch that is related to the “main_pump”. I do not understand how this works in order to make the change for my equipments.
May you please explain what the generic_thermostat is doing exactly ?

So far what I think is that I should replace in “pump-relation.yaml”:

action:
    - service: switch.turn_on
      entity_id: switch.main_pump

by:

action:
    - service: climate.turn_on
      data:
        entity_id: climate.leaving_room,climate_bedrooms

And same for turn_off…
What do you think?

Thanks a lot for your help :slight_smile:

My 2-zones approach handles a main pump (like a boiler or whatever heating source which has a built-in pump, which is the common heating unit for both zones) and 2 electric valves (or 2 other pumps through heat exchangers):
kép
In this case whenever you need heating for any of the zones, you also need to turn on the main pump (or boiler) - that’s why the pump-relation is needed.

If your system has the 2 zones completely independent from each other (with separate heating units) you actually need to set up 2 instances of the 1-zone system.

1 Like

Thanks for your explanation !
I get what you mean by using two instances of the 1-zone system, but how to adapt the “generic_thermostat” to climate.turn_on object instead of a switch? This my biggest concern here. I don’t know how to use the thermostat with my climate units because of the need to use a switch

I think you should read the basics of the generic thermostat. It uses a switch to turn on and off the heater, based on a temperature sensor.

You should somehow convert your climate units to switches. Disable their own factory thermostats and leave decisions to Home Assistant’s logic.

2 Likes

Thank you! I’ve managed to create switches to control my climate units and have modified the thermostat to interact with them.
I’m now waiting to see the magic hapening.
Thanks for your help :slight_smile:

For anyone in need of semthing similar on Daikin climate and heater units:

# Switch for Daikin Control
switch:
  - platform: template
    switches:
      chauffage_salon:
        friendly_name: "Chauffage Salon"
        value_template: "{{ is_state('climate.salon', 'cool') or is_state('climate.salon', 'heat') or is_state('climate.salon', 'dry') or is_state('climate.salon', 'fan_only') or is_state('climate.salon', 'heat_cool') }}"
        turn_on:
          - service: climate.turn_on
            data:
              entity_id: climate.salon
          - delay: '00:00:30'
          - service: climate.set_hvac_mode
            data:
              entity_id: climate.salon
              hvac_mode: heat
        turn_off:
          - service: climate.turn_off
            data:
              entity_id: climate.salon
      chauffage_chambres:
        friendly_name: "Chauffage Chambres"
        value_template: "{{ is_state('climate.chambres', 'cool') or is_state('climate.chambres', 'heat') or is_state('climate.chambres', 'dry') or is_state('climate.chambres', 'fan_only') or is_state('climate.chambres', 'heat_cool') }}"
        turn_on:
          - service: climate.turn_on
            data:
              entity_id: climate.chambres
          - delay: '00:00:30'
          - service: climate.set_hvac_mode
            data:
              entity_id: climate.chambres
              hvac_mode: heat
        turn_off:
          - service: climate.turn_off
            data:
              entity_id: climate.chambres
      clim_salon:
        friendly_name: "Clim Salon"
        value_template: "{{ is_state('climate.salon', 'cool') or is_state('climate.salon', 'heat') or is_state('climate.salon', 'dry') or is_state('climate.salon', 'fan_only') or is_state('climate.salon', 'heat_cool') }}"
        turn_on:
          - service: climate.turn_on
            data:
              entity_id: climate.salon
          - delay: '00:00:30'
          - service: climate.set_hvac_mode
            data:
              entity_id: climate.salon
              hvac_mode: cool
        turn_off:
          - service: climate.turn_off
            data:
              entity_id: climate.salon
      clim_chambres:
        friendly_name: "Clim Chambres"
        value_template: "{{ is_state('climate.chambres', 'cool') or is_state('climate.chambres', 'heat') or is_state('climate.chambres', 'dry') or is_state('climate.chambres', 'fan_only') or is_state('climate.chambres', 'heat_cool') }}"
        turn_on:
          - service: climate.turn_on
            data:
              entity_id: climate.chambres
          - delay: '00:00:30'
          - service: climate.set_hvac_mode
            data:
              entity_id: climate.chambres
              hvac_mode: cool
        turn_off:
          - service: climate.turn_off
            data:
              entity_id: climate.chambres

And you can then use the following switches in your thermostat:

heater: switch.chauffage_salon
heater: switch.chauffage_chambres

Since I’m also doing an automation for the climate (cooling), I would be able to use:

cooler: switch.clim_salon
cooler: switch.clim_chambres

1 Like

Thanks for the great work :+1:, only found a minor typo in overrider.yaml (sent a pull on github) and had the whole thing running smoothly! I’ve made few tweaks and still have more tinkering to do in order to fully support my heating and cooling needs. I can (try with my limited knowledge) to help others with similar setup as mine if needed:

HVAC Gree unit (not smart) controlled by IR module on ESP Easy thru curl command line from Home Assistant using MQTT retained topics for storing values. I know ESP Easy handles MQTT but after many unsuccessful attempts it was easier to simply go with curl.

My next step is creating automation for switching from HVAC heating to electric baseboard heating (unit already integrated to HA using MQTT-Zigbee) when temperature are under -10C.

Hi Robert,
Thank you sharing your solution! It sounds like it’s what I would love to use. I am struggeling with the lovelace cards. Would you mind to share your lovelace yaml as a starting point please?
Thank you!