Sonoffs Zigbee 3.0 USB Dongle Plus Firmware

For future reference, I’ll try to summarize this thread:

Two different dongles

First of all, it’s important to acknowledge that Sonoff sells two different dongles with almost the same name and almost the same housing. This thread is only about the “P” dongle. Don’t try to update an “E” dongle with the information from this thread! For completeness:

(If you follow any of the two links, the page will have a handy comparison table of both sticks.)

Different update mechanisms

Searching the internet, you’ll find different ways of updating the firmware of the Sonoff P dongle:

  • One involving taking apart the dongle and using specific I/Os to put it in.
  • One involving a GUI tool.
  • One involving some scripts.

All of these method are also referenced in this thread. I did only test the third option, so the remainder of this post will discuss that.

Updating the firmware with scripts

Prerequisites

For this approach, you can leave the dongle attached to your Home Assistant machine. I tested it with Home Assistant OS, I ran the script while logged in to HA OS via SSH. To be able to SSH to your HA machine, you need to install the SSH addon.

To be clear: I tested with a pre-installed image of Home Assistant, I believe this is called a “supervised” installation, but I’m not entirely sure about the right terminology here.

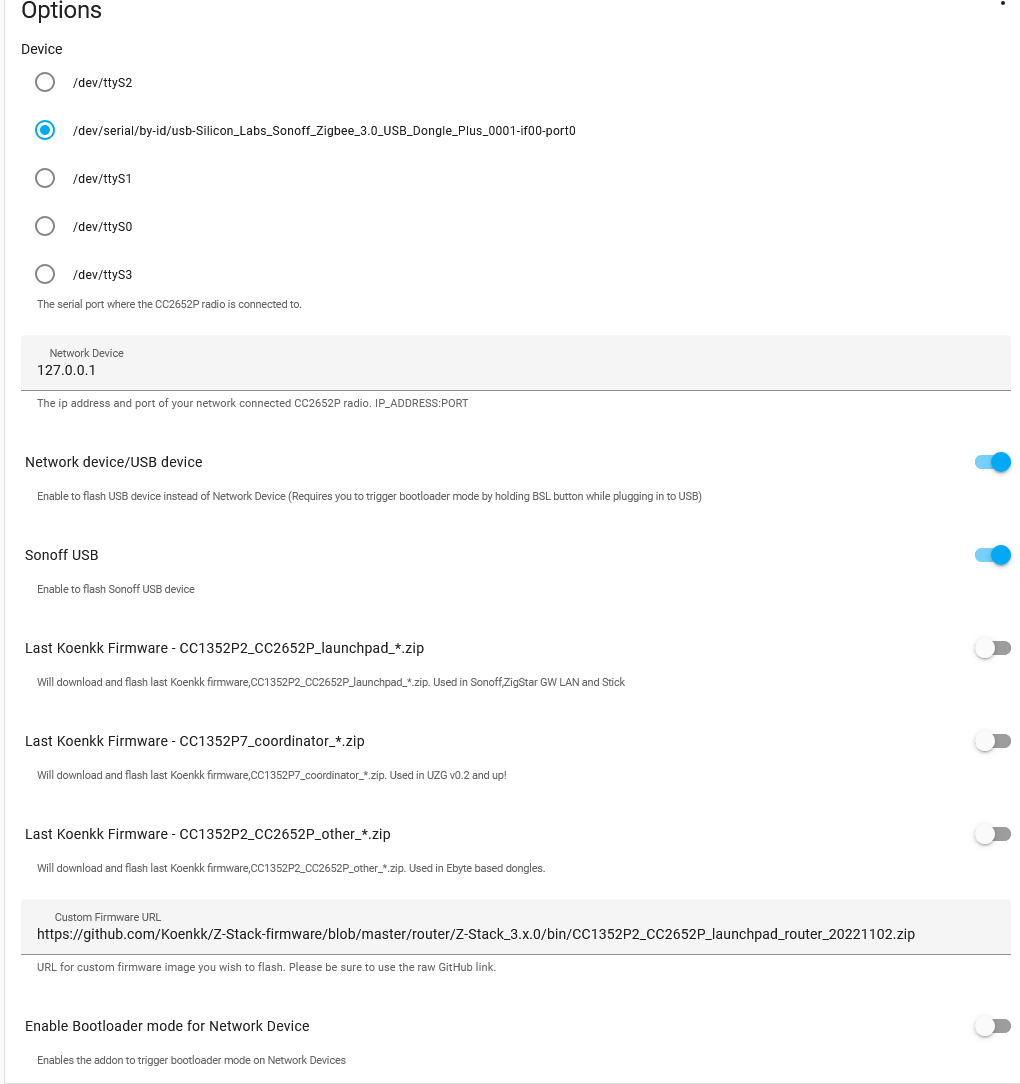
Step 1. Preparing the script

  1. Copy the contents of this file, and paste them into a new file, e.g. in your config directory. For the remainder of the instructions, let’s assume you call that file firmware_sonoff.sh.
  2. Make the script executable, typing the following command in the shell while logged in to your HA machine:
    chmod ug+x firmware_sonoff.sh
    

Step 2. Python virtual environment

  1. Create a Python virtual environment, using the following command:
    python3 -m venv ./venv-for-firmware-update
    
    This will create the virtual environment in a subdirectory of the current directory.
  2. Activate the virtual environment:
    ./venv-for-firmware-update/bin/activate
    
  3. Edit the firmware_sonoff.sh script from step 1 to use the Python version from the virtual environment. To do so:
    • replace all occurences of python with /path/to/venv-for-firmware-update/bin/python. In my case that was /root/config/venv-for-firmware-update/bin/python.
    • replace all occurences of pip with /path/to/venv-for-firmware-update/bin/pip.

Step 3. Disable ZHA

Before running the script, you should disable the ZHA integration, to prevent it from accessing the dongle during the update process.

Step 4. Run the script

Run the script with the right arguments. If you’re not sure about the arguments, run the script without any arguments and it will print a short usage message.
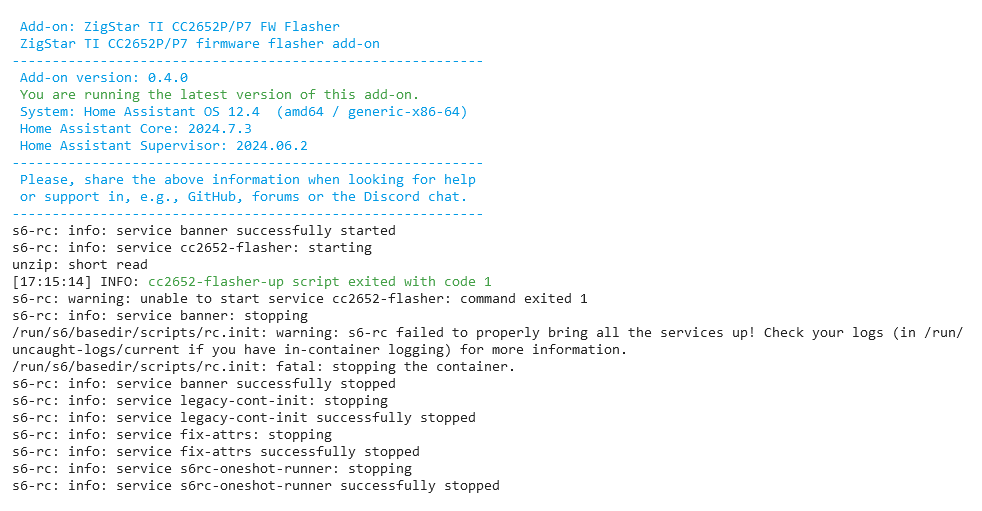
Victory!

A successful run of the script should end with something like this:

Opening port /dev/ttyUSB0, baud 500000
Reading data from /root/config/zigbee-firmware/tmp/master/CC1352P2_CC2652P_launchpad_coordinator_20230507.hex
Your firmware looks like an Intel Hex file
Connecting to target...
CC1350 PG2.0 (7x7mm): 352KB Flash, 20KB SRAM, CCFG.BL_CONFIG at 0x00057FD8
Primary IEEE Address: --8<---snip--->8--
    Performing mass erase
Erasing all main bank flash sectors
    Erase done
Writing 360448 bytes starting at address 0x00000000
Write 104 bytes at 0x00057F988
    Write done
Verifying by comparing CRC32 calculations.
    Verified (match: 0xe83aa727)

Don’t forget to re-enable the ZHA integration!

I hope this is helpful to anyone. It will at least be helpful to a future me… :wink: Let me know if anything is unclear or if I made an error in my description. (I didn’t make notes when I did all this, so I wrote this up afterwards from the top of my head…)

3 Likes

Could you add a paragraph talking about the requirements for the third method? I suppose you would need a linux machine (any kernal requirements?) and the USB dongle being connected directly to the linux…? Or are we saying all those scripts can be done inside an HAOS…?

Hi @k8gg ,

Thanks for your suggestion! I’ve done this on my HAOS machine directly. I thought I mentioned that, but I’ll see if I can make it more clear.

Best,
Bart

How is the approach if using the pre-configured image from HA for the Raspi?
SSH is limited to that environment as not everything is exposed?

Thanks

@h3rb3rt Using the pre-installed HA image is exactly what I did! You need to install the SSH addon, it will give you the access you need. Will add that to my post, thanks for pointing out this was not clear.

But why no info how to flash Sonoff V2 (E-dongle).
I was experiensing various problems - not working in HA, not working with zigbee2mqtt.

That guy was a lifesavior for me. Hope that will help for the owners of the “E” dongle that is based on a chip from Silabs: EFR32MG21

sorry for the late reply.
I tested it again but struggling with the python3 environment as python3 seems not to be present.
what do I miss ?

image

@h3rb3rt You can probably just use python, without the 3. Verify by executing

python --version

If the version starts with 3, you’re good.

hmm, I’m getting the same as @h3rb3rt with both python and python3

its just says bash: python: command not found

Figured that bit out, you need the SSH and Terminal advanced edition.

However i’m now getting a permissions issue when trying to activate the container

@bartkummel Could you post a copy of your script please, i’m not sure which bits to replace

Not sure if too late to the party but try a recursive chmod on the venv directory if you are getting permission errors:
chmod a+x -R venv-for-firmware-update

The sh script will need to be modified to include the correct firmware location from github as the script has not been updated since 2022 (and you should be checking for the correct firmware anyway)
Correct firmware per device types are listed here:

For example the wget command I had to modify was here:

 # Master branch coordinator as of 5/11/22
      if [ $2 == "coordinator" ]; then
        wget https://github.com/Koenkk/Z-Stack-firmware/raw/Z-Stack_3.x.0_coordinator_20230507/coordinator/Z-Stack_3.x.0/bin/CC1352P2_CC2652P_launchpad_coordinator_20230507.zip

Running the script with arguments is then for example (my sonoff device is at port 0):

firmware_sonoff.sh master coordinator 0

@daan_vb I’d rather not share my script: there are already too many versions of that script floating around the internet. Plus, it’s quite specific to your situation. However, if you follow my instructions carefully, you should be fine. Just replace every occurence of python with /path/to/venv-for-firmware-update/bin/python, where you replace path/to to the actual path. Same for pip. Simply use the “find and replace” function of your favorite text editor. Also, make sure to read @Mattymo s post, it might be helpful.

@bartkummel Thank you for the detailed procedure.
I only have few questions left, not related to the actual flashing.

Why do we need to upgrade firmware?
Is it better for HA than the default one?
And what are the differences with the stock firmware?

I see people flashing their hardware, but I’d like to know why before doing it.

in theory: as with all software existing: to get new features and fix issues/problems

in practise: as with all software existing: shit happens, so better be cautious with updates :wink:

I figured it out and it worked :smiley:
Thanks

Generally speaking, newer versions have better compatibility. I had some Tuya devices that didn’t connect. But after I upgraded the firmware, the Tuya devices did connect flawlessly.

But if you don’t have any problems, there might be less reason to upgrade.

Thank you for this guide!
Followed it with a few modifications, and it worked.

Had to run this command to activate the venv

source venv/bin/activate

https://stackoverflow.com/questions/45554864/why-am-i-getting-permission-denied-when-activating-a-venv

Had to manually install pyhton3 with

apt add python3

Finally there is a bug in cc2538-bsl.py that leads to the following error
ERROR: int() can’t convert non-string with explicit base```

Here is the fix that is pedning for inclusion into master, you can solve it by manualy downloading the cc2538-bsl.py and do the changes.
https://github.com/JelmerT/cc2538-bsl/pull/168/commits/24c9010a570a324a64e79452af4b17b9a5a3d88e

Then edit the shellscript firmare_sonoff.sh and replace the wget part with a cp (copy) from your local edited file.

download_serial_bootloader () {
# python script that communicates with the boot loader of the
# Texas Instruments CC2538, CC26xx and CC13xx SoCs (System on Chips)
# GitHub - JelmerT/cc2538-bsl: Python cross-platform script to upload firmware via the serial boot loader onto the CC13xx, CC2538 and CC26xx SoC.
# python script that communicates with the boot loader of the
# Texas Instruments CC2538, CC26xx and CC13xx SoCs (System on Chips)

cd $basepath/$tmp
wget https://github.com/JelmerT/cc2538-bsl/raw/master/cc2538-bsl.py
if [[ $? -ne 0 ]]; then
  log "wget download python bootloader failed"
  exit 1;
fi

}
Blockquote