Swimming Pool Chemical Dispenser

This is my first new topic, so please be gentle.

I’ve been working on building a measurement/control system for swimming pool chemicals (bleach as a chlorinator and acid for Ph reduction). I set out to duplicate RaspiPool, so a huge shout out to segalion, who provided the inspiration and information about where to purchase most of the key components related to the project.

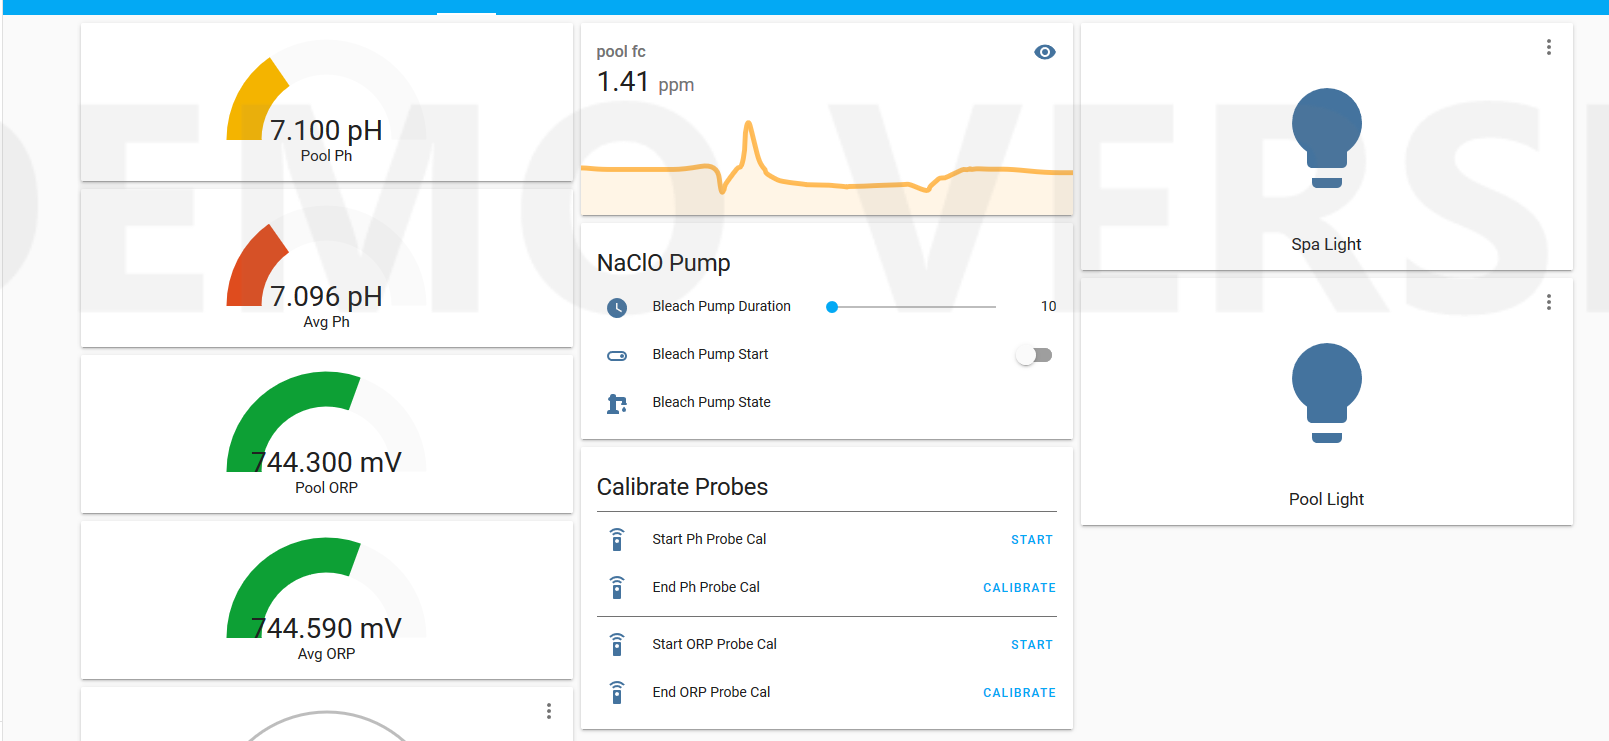
Although RaspiPool would have worked quite well, I’m sure, I have some experience with using ESP32-type modules in other projects, and I wanted something that would use this rather than a raspberry Pi. Also, I prefer to keep the “intelligence” as much as possible in Home Assistant and have a “client” device that simply accepts MQTT commands and takes appropriate action. For example, my system won’t dispense any chemicals of its own accord. It waits for an MQTT command and then runs either a bleach or (in the future) an acid pump to adjust the water chemistry. Meanwhile, during the day it is regularly taking readings of the Ph and ORP levels and communicating them over MQTT back to HA.

Very much like RaspiPool, I used Atlas Scientific Ph and ORP probes and their EZO and carrier board electronics to read the probes. My method for connecting the probes and the chemical injector is also exactly that described by segalion in his github project.

So far, the prototype system has been in operation about 3 weeks. It’s working very well. I get realistic readings of Ph and ORP and have been able to roughly correlate this with measurements of Ph and free chlorine measured with a standard pool test kit. Importantly, I haven’t had to add any bleach to the pool manually in three weeks, which is awesome.

Here’s a few pictures of the controller:

and the pump. Currently, only bleach pump is installed, but there is a cutout for the acid pump and an additional control circuit on the controller so I plan to add the acid pump soon:

And here’s a screen shot of the control screen in Home Assistant:

17 Likes

Nice job!
I’ve also been looking at raspipool but rather want to go with an esp32 like you did since a raspberry pi seems a bit overkill to me.

It looks like you made a custom pcb to control the pumps with relays and connect the probes right?

Do you mind sharing your code and config? This can be a good guide for me :grinning:

Sure, I’ll be happy to share. I’ll have to figure out how to set up a github repository, I guess. As soon as I figure it out, I’ll post it there.

And yes, I did make a custom PCB for this. Initially, I had everything on a breadboard but this became cumbersome and isn’t really a long-term solution. I’m also happy to post the gerber files if you or anyone would be interested in getting some boards made (note, this requires some skill in soldering and ordering electronic components…so not for the faint of heart).

Other things included on the PCB, but not yet implemented include:

  • Temp Sensor (my pool has a temp sensor built into the main controller, so I don’t really need another sensor, but the connection for ds18b20 is on the PCB and the code is loaded on the ESP32)

  • Connection for the output of a HX711 load sensor IC. I haven’t written the code for this yet, but the plan is to hack a cheap digital bathroom scale in order to determine the bleach quantity based on the weight remaining in the container which will be read from the bathroom scale load cells. That way you’ll know when it’s time to get more bleach.

2 Likes

Thanks a lot!
Not afraid of soldering over here so bring it on :smile:

Congrats!
I’ve wanted to do a chem dispensing system for a while for my pool.

What does the bleach storage space look like?

I’m able to buy 12% Sodium Hypochlorite (i.e. bleach) from a local pool store in a 2.5 gallon plastic container. I just drilled a hole in one of the container tops and inserted the intake tube from the pump through the hole. For me, 2.5 gallons of bleach is enough for a 2 weeks or so. When empty, I just swap in a new container and take the old one in to be refilled.

1 Like

This is not a great picture (sorry) but on the left side of the photo you can just see the bleach canister (gold in color), with the black intake tube coming out. Also visible are the sensors and bleach injector.

1 Like

Hi, @FredericMa, I will share the gerbers soon. As “luck” would have it I have discovered a small design flaw in that I tried to save a couple of bucks by using a linear voltage regulator IC instead of a switcher. I thought the current draw wouldn’t be too much for the device I chose, but yesterday the controller shut down when it became hot (I’m in Texas, so this is pretty much going to be all summer…). It restarted when it cooled off, but this is not an acceptable solution. I’m going to improve the heatsinking as a first work-around, but in case this doesn’t solve the problem I’ll update the circuit to a switching voltage regulator and share the result.

That is so cool. You made my dream.

1 Like

You have very modest dreams, then :smile:, but glad to help!

1 Like

I’m looking forward to seeing your code. I’ll wanting to do something similar. I’ve ordered an ORP sensor and want to automate my SWG. I’d really like to add the sensor to the Sonoff 4ch that I’m currently using to control power to the pump, SWG and light and measure temp with a ds18b20. I’m currently running Tasmota on the Sonoff. I wish Tasmota or ESPHome had support for the Atlas Scientific sensors using I2C. That would make it very easy to put together an all in one pool controller.

Good to know. I’m living in Belgium so on average temperatures will be lower here but better safe then sorry. :slight_smile:

@dukeneukam, I am not that familiar with the Sonoff controllers, but I think that it ought to at least be able to turn on and off the bleach and acid pumps. Whether it can be used to communicate with the Atlas sensors via either I2C or UART I don’t know. You could always use a separate ESP32 just to read the Atlas sensors then start/stop the pumps with your Sonoff.

I have created a git repo with the files for the ESP32 and a package file and appdaemon code for Home Assistant. @FredericMa I have not yet added the gerbers for the custom PCB to the repo because I’m still verifying that the switching contoller I mentioned earlier is working correctly. Once I’ve verified this I will upload the files. Here is a link to the git repo: https://github.com/smurry/pool_controller . Please note that this is my first ever attempt to create a public git repo, so please let me know if you see anything amiss.

Also, as you will notice if you are proficient at Python, I am not really a software guy. My background is in hardware development (although even that was a long time ago now), so I’ve “home schooled” myself in Python. If the code is weird, this is why…feel free to suggest improvements.

1 Like

Thanks! I’ll check it out.

Anyone in UK tried this project?

Do you have anything checking levels of bleach or is there some way the pump can sense it isn’t pumping anything and notify you?

Hi @smurry,

Thank you for sharing your development. I do think that having HA as centralized server for anything in the house and then some local controllers communicating with it throught mqtt is the best approach.

Would you mind to provide some more details about your project ? I would be interested in getting the Bill of Material and the references. I do see that there are lots of similarities with the hardware of @segalion but still it looks like there are some differences (the IP Boxes, the probes, the pumps…). It would be very useful for someone trying to reproduce your project to get a list with ALL the components.

Also, I haven’t gone deep into your code yet but I’m wondering if you tryied to adapt the logic (with notification, safe-guard…) developped by @segalion from pi to ESP32 or if you created something from scratch? I saw also on the control screen a lovelace card with calibration. Could you please elaborate a little bit more on how and how often you do that ? My understanding was that it’s a must for non-industrial grade probe.

Regarding the hardware, is there a reason why you didn’t integrate the 2 EZO chips from Atlas-Scientific (I guess it’s probably not easy to get them) or at least the EZO Carrier boards directly to your PCB ?

Some more suggestions for the hardware part. I do see also some features that might be interested to add to you board :

Thank you for you great job. Keep going.

Hi, @auredor,

Thanks for the great questions and sorry to all for a little delay in my providing additional details. It was a long holiday weekend here in the US and I spent some time out of town with my family so am just getting back to this project.

Let me answer your easy questions first, then I’ll provide more details later.

  1. BOM and parts references. I’m working on this. As I mentioned in an earlier post, I had an issue with the linear voltage regulator and replaced it with a switching regulator. The new version has been working flawlessly for a couple of weeks, so I just made what I think will be a final PCB spin and BOM update. I need to get it all tidied up so I can upload it. I will do so shortly. Sorry for the delay.
  1. Regarding the code, I didn’t borrow too much from @segalion. This is in no way a statement on his code, but I had already developed an irrigation controller based on the ESP32, and had developed a simple and reliable MQTT-based command structure. So, it was easier for me to start from this base and build rather than start from @segalion’s. As an example, the command structure for a pump is {pump id}:{command}:{argument}, so sending an MQTT command over the /pool/cmd topic of ph:on:90 would turn the ph (ie Acid) pump on for 90 seconds. This is exactly the same command structure used for my irrigation controller (zone1:on:10, etc.). It was important for me that the failure of the MQTT connection should not result in a condition where the pump (or zone valve in the case of the irrigation controller) would fail in the “on” state. So, rather than sending just “on” and “off” commands to the ESP32, I let the ESP32 handle the timing. Once the command is received, if any communications failure occurs, the ESP32 knows when to turn off the pump and it will do so without any further input from Home Assistant. If the power to the ESP were to fail, the relays are normally-open so they would shut off when the ESP loses power. When power is restored, the ESP will reconnect, but will not not turn on the pump until another “on” command is received from the MQTT broker.

  2. Calibration. First off, I should say that calibration hasn’t really been needed. Initially, I performed the calibration procedure to make sure that the probes were calibrated. They were indeed very close and I’ve re-calibrated once or twice since with the same results. At least over a period of ~2 months there doesn’t seem to be a need to recalibrate. This is with the consumer-grade probe, not the more expensive ones. Nevertheless, eventually it will be necessary to calibrate either because of drift or replacing a probe. The way the EZO boards handle this calibration is fairly simple. You immerse the probe in a calibration liquid (with known Ph or ORP value), then you wait for the readings to stabilize (typically a minute or two). Once the readings have stabilized, you send a special command to the EZO board that tells the controller that the probe is in a known-calibration liquid and that the readings have stabilized. The EZO board then determines the necessary calibration constants and saves them in its non-volatile memory. So, each probe has two switches in the “Calibration” section of the Lovelace card. “Start Calibration” and “Stop Calibration.” “Start Calibration” increases the frequency of reporting, so that it is easier to determine when the readings have stabilized. As an example, I usually report Ph and ORP at one-minute intervals. However, you need at least 3 or so readings that are consistent before you can determine that the readings have stabilized. With 1 minute reporting interval, it would take 4-5 minutes (minimum) to determine stability. So, the “Start Calibration” reduces the period between successive measurements to a shorter configurable value (5 or 10 seconds has worked well for me). There is also a timeout so that if you don’t press “Stop Calibration” after some period (I think 10 minutes but I can’t remember for sure), then it will revert back to its normal reporting interval. The “Stop Calibration” switch sends a command to the ESP32 to tell it to send the appropriate calibration command for the probe to the EZO board, which finishes the calibration. The ESP32 also knows to reset the reporting interval back to the normal value once it receives the “stop calibration” command.

  1. Why didn’t I integrate the EZO carrier boards onto the main PCB. I strongly considered this, but ultimately my decision came down to three factors: 1) I had decided to use this case to house the electronics. There is no fundamental reason for this, but I had some of these laying around from a previous project and I also already had the PCB layout in Eagle for this, so it was easy to use for me. In trying to make all the circuitry fit in this relatively small (130mm x 100mm) case, I wasn’t able to fit everything on the main board. I would have had to design some kind of daughter card for the EZO boards anyway, and since the ones from Atlas were known-good and were available quickly, this was the easiest approach for me. It adds some cost (~$22 each), but my own daughter board would have had some cost as well, so the actual differential in cost is not that much. 2) I am nearing 50 years of age, and hand soldering surface mount components is much more challenging than a few years ago, so I tried to avoid this. If I would have designed my own carrier board using through-hole components, it would have been a bigger board than the ones from Atlas which would have made the box even more crowded, and 3) The fully isolated EZO carrier boards, while they look simple, are actually non-trivial to design correctly. We are trying to measure really small voltages, so proper ground planes and isolation is not completely simple, especially if on the same board as the noisy digital electronics. Given this, a known-working solution that only cost a few dollars more made sense to de-risk the need for potentially multiple board spins to get everything right.

I like your ideas about the transducers for differential pressure. That would be a nice addition at some point. I also considered an ultrasonic level meter, but had the same concerns as you about reliability in very corrosive (or alkaline) environments. At this point, I’m not sure that the load cells are going to work either (at least not without some temperature compensation), so this may ultimately not be the solution, but if it works it is cheap and since you don’t have any sensors in contact with harmful liquid/vapor it should be reliable. Still working on this, so stay tuned if this solution works.

1 Like

Hi @smurry,

Thank you for your fast answers. Let me just comment them back.

  1. Nice. I’m looking forward to hearing from you for the BOM of the PCB and all others compenents
  2. This was my first feeling when comparing very fast the two codes. This is not a problem but I do thing that we can get useful features from both sides. Could you please confirm or not if you’re using ESPHome for ESP32 ? Also, regarding code reliability, did you implement a watchdog feature to avoid the ESP32 system to hang with a turned-on pump ?
  3. Good news. I was a little worry with the accuracy of “cheap” probes.
  4. I understand all your valid points but I’m only 40 :wink:
  5. Since my previous comment, I did think another way to “sense” the empty tank. It might be not very accurate but enough to get an idea on when it’s time to refill the tank and moreover very cheap. You can estimate it based on the correlation between the pump flow and the turned-on pump time, can’t you ? I think that @segalion did that way:
automation:
- alias: bleach_every_hour
  id: '1554367517425'
  initial_state: true
  trigger:
  - platform: time_pattern
    minutes: 1
  condition: []
  action:
  - service: input_number.set_value
    data_template:
      entity_id: input_number.bleach_tank
      value: " {{ ( states('input_number.bleach_tank')|float - ( states('sensor.bleach_on_last_hour')|float * states('input_number.bleach_speed')|int * 6 / 100 ) ) | round(2) 

More details in his yaml file : https://github.com/segalion/raspipool/blob/1834e490b5a977efe0c389213b8ce8b69f3fa70f/packages/raspipool/bleach.yaml

You might also be interested in looking to this project that is not for pool purpose but that use an ESP32 as well but for a Home Assitant Garden Automation System:

https://www.youtube.com/watch?v=Q9fjKeYOyqU
https://www.youtube.com/watch?v=XjcLWVci6_I
https://github.com/ledgardener/gardenAutomation