Hi!
thanks for your example, this works nice.
is there any way i can add the power that has been used till now? with bars.
i have no clue how to implement this from other examples unfortunatly 
Hi!
thanks for your example, this works nice.
is there any way i can add the power that has been used till now? with bars.
i have no clue how to implement this from other examples unfortunatly
Hey, I landed here while looking for a way to get the day-ahead prices into home-assistant.
Is there any chance we can get this into the official Tibber integration?
Do you want this for automation purposes or just a pretty graph?
Thank you very much for sharing your YAML-Code. Helped me out a lot.
While playing around with the API i found, that there is a “price_level” for the price with the following states:
NORMAL
The price is greater than 90 % and smaller than 115 % compared to average price.

CHEAP
The price is greater than 60 % and smaller or equal to 90 % compared to average price.

VERY_CHEAP
The price is smaller or equal to 60 % compared to average price.

EXPENSIVE
The price is greater or equal to 115 % and smaller than 140 % compared to average price.

VERY_EXPENSIVE
The price is greater or equal to 140 % compared to average price.
I reused your REST-sensor and modified it, so that i get the price level. YAML-code is like this:
# Tibber Preislevel
- platform: rest
  unique_id: tibber_price_level
  name: Tibber Price Level
  resource: https://api.tibber.com/v1-beta/gql
  method: POST
  payload: '{ "query": "{ viewer { homes { currentSubscription { status priceInfo { current { level } today { level } tomorrow { level } } } } } }" }'
  json_attributes_path: "$.data.viewer.homes[0].currentSubscription.priceInfo"
  json_attributes:
    - today
    - tomorrow
  value_template: "{{ value_json.data.viewer.homes[0].currentSubscription.priceInfo.current.level }}"
  scan_interval: 30
  headers:
    Authorization: !secret tibber_token
    Content-Type: application/json
    User-Agent: REST
The sensor gives the price_level as actual state and for today and tomorrow in the attributes.
At the moment i only use this for the following markdown-card:

type: markdown
content: |-
  {% if states("sensor.tibber_price_level") == "NORMAL" %}
    <ha-alert alert-type="info" title="Preislevel">  Das aktuelle Preislevel ist **normal**.</ha-alert>
  {% elif states("sensor.tibber_price_level") == "CHEAP" %}
    <ha-alert alert-type="success" title="Preislevel">  Das aktuelle Preislevel ist **günstig**.</ha-alert>
  {% elif states("sensor.tibber_price_level") == "VERY_CHEAP" %}
    <ha-alert alert-type="success" title="Preislevel">  Das aktuelle Preislevel ist **sehr günstig**.</ha-alert>
  {% elif states("sensor.tibber_price_level") == "EXPENSIVE" %}
    <ha-alert alert-type="warning" title="Preislevel">  Das aktuelle Preislevel ist **teuer**.</ha-alert>
  {% elif states("sensor.tibber_price_level") == "VERY_EXPENSIVE" %}
    <ha-alert alert-type="error" title="Preislevel">  Das aktuelle Preislevel ist **sehr teuer**.</ha-alert>
  {% endif %}
Has anyone here found a way to get the “minTotal” and “maxTotal”-values for “today” and “tomorrow” and mixed this with the “hourly”-list in the attributes of a home assistant entity?
I have no idea how to get “minTotal” and “maxTotal” into the JSON-String. I´m looking for a way to do it like this:
{
  viewer {
    homes {
      currentSubscription {
        priceInfo {
          today {
            total
            startsAt
            minTotal <- not included in "today"
            maxTotal <- not included in "today"
          }
          tomorrow {
            total
            startsAt
            minTotal <- not included in "tomorrow"
            maxTotal <- not included in "tomorrow"
          }
        }
      }
    }
  }
}
Hi there. Just wanted to say Thank you to you for this thread and your posts. It helped me out a lot to do a better start with tibber and home assistant.
I´ve created a custom-card to display my tibber prices, consumption and costs. It looks like this:
May you share your code? Looks very nice and would give me and maybe some other a good inspiration.
And it looks like you’re using an automation to charge your house battery from the grid. Maybe you can share this, too?
I just creates a dashboard where I have to setup charging the battery from the grid on each day (semi-manually).
Sure, no problem.
Card-Preview
The Card uses the following components:
YAML-Code for the Card and Sensors
For this you need:
Template-Sensors
You can setup the template sensors via UI as “helpers”. Here is the state-template for the sensors:
{{ ((state_attr("sensor.electricity_price_wester_esch_26b","max_price") | float(default=0) - state_attr("sensor.electricity_price_wester_esch_26b","min_price") | float(default=0)) * 100) | round(1) }}
{{ (((states("sensor.electricity_price_wester_esch_26b") | float(default=0) - state_attr("sensor.electricity_price_wester_esch_26b","min_price") | float(default=0)) / (state_attr("sensor.electricity_price_wester_esch_26b","max_price") | float(default=0) - state_attr("sensor.electricity_price_wester_esch_26b","min_price") | float(default=0))) * 100) | round(0) }}
daily, weekly, monthly and yearly costs per kwh (replace “daily” with “weekly”, “monthly” or “yearly”)
{{ (states("sensor.tibber_kosten_daily") | float(default=0) / states("sensor.tibber_verbrauch_daily") | float(default=0) * 100) | float(default=0) }}
Sensor that knows if it is before 13h (1pm)

Input-Boolean (Helper) that show if the home battery should be charged or not

The automation does the following things:
IF price-level changes to “cheap” or “very cheap”
AND IF home battery is below 95% charge AND the expected remaining solar energy today is lower then the capacity of the home battery
THEN start charging your home battery
ELSE IF price-level changes to “normal”, “expensive” or “very expensive”
OR home battery is above 95% charge
THEN stop charging your home battery
alias: Tibber - Speicher günstig laden
description: ""
trigger:
  - platform: state
    entity_id:
      - sensor.tibber_price_level
    to: VERY_CHEAP
    id: sehr günstig
  - platform: state
    entity_id:
      - sensor.tibber_price_level
    to: CHEAP
    id: günstig
  - platform: state
    entity_id:
      - sensor.tibber_price_level
    to: NORMAL
    id: normal
  - platform: state
    entity_id:
      - sensor.tibber_price_level
    to: EXPENSIVE
    id: teuer
  - platform: state
    entity_id:
      - sensor.tibber_price_level
    to: VERY_EXPENSIVE
    id: sehr teuer
  - platform: numeric_state
    entity_id:
      - sensor.senec_battery_charge_percent
    above: 95
    id: Speicher ist voll
condition: []
action:
  - choose:
      - conditions:
          - condition: trigger
            id:
              - Speicher ist voll
              - normal
              - teuer
              - sehr teuer
        sequence:
          - service: input_boolean.turn_off
            target:
              entity_id: input_boolean.tibber_speicher_laden
            data: {}
          - type: turn_off
            device_id: ba6662be81284ab19a7ff2a25d6c1c64
            entity_id: 4938b65e9c7938a7bfebb628361a12fb
            domain: switch
            enabled: true
      - conditions:
          - condition: trigger
            id:
              - sehr günstig
              - günstig
          - condition: numeric_state
            entity_id: sensor.senec_battery_charge_percent
            below: 95
          - condition: numeric_state
            entity_id: sensor.solar_restproduktion_heute
            below: 5
        sequence:
          - service: input_boolean.turn_on
            target:
              entity_id: input_boolean.tibber_speicher_laden
            data: {}
          - type: turn_on
            device_id: ba6662be81284ab19a7ff2a25d6c1c64
            entity_id: 4938b65e9c7938a7bfebb628361a12fb
            domain: switch
            enabled: true
mode: single
Love it. That’s not far what I’m planning to do.
Gives me a lot of ideas and inspiration. Thank you very much.
Lot’s of interesting approaches here.
I have a related Tibber use case: I use Home Assistant to activate my thermostat/heat pump when energy rates are lowest.
Since it doesn’t make sense to cycle a heat pump on-and off every hour I made my solution a bit smarter: I search for three continuous blocks of 4 hours in length where the average price is lowest (so 12 hours per day in total when heating is available).
To achieve this I created an external Python script that runs once per day to obtain pricing data from Tibber, I then use the Home Assistant API to plan calendar events for the time windows that I want my heating to be available. Finally the calendar triggers an automation that activates or deactivates a generic thermostat that controls my heating.
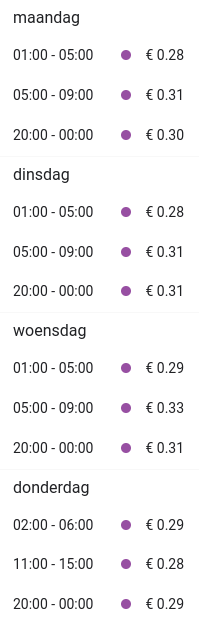
The title of each event contains the average price for the four-hour span (including tax, rounded to two decimal places):
Hourly prices are added to the description of each span:

Using a calendar to show hourly pricing would be easy: simply plan events for every hour with the pricing info in the title.
Hi Ingo
I tried to rebuild your tibber cards, but the first thing where I failed ist the
I put this code in the configuration.yaml and also my token to my secrets.yaml but I can´t find the tibber_prices under the entities.
Regards
Jörg
did you put your code unter the “sensor:”-part in your configuration.yaml like this? Did you take a look in your logs?
sensor:
  # Tibber Vorschaupreise
  - platform: rest
    unique_id: tibber_prices
    name: Tibber Prices
    resource: https://api.tibber.com/v1-beta/gql
    method: POST
    payload: '{ "query": "{ viewer { homes { currentSubscription { status priceInfo { current { total level } today { total level } tomorrow { total level } } } } } }" }'
    json_attributes_path: "$.data.viewer.homes[0].currentSubscription.priceInfo"
    json_attributes:
      - today
      - tomorrow
    value_template: "{{ value_json.data.viewer.homes[0].currentSubscription.priceInfo.current.total | float }}"
    scan_interval: 30
    headers:
      Authorization: !secret tibber_token
      Content-Type: application/json
      User-Agent: REST
    unit_of_measurement: EUR/kWh

  # Tibber Preislevel
  - platform: rest
    unique_id: tibber_price_level
    name: Tibber Price Level
    resource: https://api.tibber.com/v1-beta/gql
    method: POST
    payload: '{ "query": "{ viewer { homes { currentSubscription { status priceInfo { current { level } today { level } tomorrow { level } } } } } }" }'
    json_attributes_path: "$.data.viewer.homes[0].currentSubscription.priceInfo"
    json_attributes:
      - today
      - tomorrow
    value_template: "{{ value_json.data.viewer.homes[0].currentSubscription.priceInfo.current.level }}"
    scan_interval: 30
    headers:
      Authorization: !secret tibber_token
      Content-Type: application/json
      User-Agent: REST


  # Tibber Preislevel
  - platform: rest
    unique_id: tibber_price_level_german
    name: Tibber Price Level Deutsch
    resource: https://api.tibber.com/v1-beta/gql
    method: POST
    payload: '{ "query": "{ viewer { homes { currentSubscription { status priceInfo { current { level } today { level } tomorrow { level } } } } } }" }'
    json_attributes_path: "$.data.viewer.homes[0].currentSubscription.priceInfo"
    json_attributes:
      - today
      - tomorrow
    value_template: >
      {% if value_json.data.viewer.homes[0].currentSubscription.priceInfo.current.level == "NORMAL" %}
        normal
      {% elif value_json.data.viewer.homes[0].currentSubscription.priceInfo.current.level == "CHEAP" %}
        günstig
      {% elif value_json.data.viewer.homes[0].currentSubscription.priceInfo.current.level == "VERY_CHEAP" %}
        sehr günstig
      {% elif value_json.data.viewer.homes[0].currentSubscription.priceInfo.current.level == "EXPENSIVE" %}
        teuer
      {% elif value_json.data.viewer.homes[0].currentSubscription.priceInfo.current.level == "VERY_EXPENSIVE" %}
        sehr teuer
      {% endif %}
    scan_interval: 30
    headers:
      Authorization: !secret tibber_token
      Content-Type: application/json
      User-Agent: REST
  tibber sensors.txt
  "tibber sensors.txt" wird angezeigt.
That was the problem… I put it under tibber: in the configuration.yaml ![]()
Now I have another question:
Why differ the prices ?
Mh, good question. My price in HA Match the price in the App.
Is your Timezone setting in HA correct?
Yes, the timezone is correct. I ask tibber and see what they say
@ingo.niehues Thanks in advance for your help ![]()
Something is still wrong with the colors:
Do I still have to activate or define this var(–google-blue) somewhere?
Sorry. I use the Minimalist-Theme. Here is the Yaml-File for the Theme:
---
minimalist-desktop:
  # Journal
  state-icon-color: "rgb(var(--color-theme))"
  border-radius: "10px"
  ha-card-border-radius: "var(--border-radius)"
  error-color: "var(--google-red)"
  warning-color: "var(--google-yellow)"
  success-color: "var(--google-green)"
  info-color: "var(--google-blue)"
  divider-color: "rgba(var(--color-theme),.12)"
  accent-color: "var(--google-yellow)"
  ha-dialog-border-radius: "10px"
  # fix added border-lines in 2022.11
  ha-card-border-width: "0px"

  card-mod-theme: "minimalist-desktop"
  card-mod-view-yaml: |
    "*:first-child$": |
      #columns .column > * {
        padding-left: 5px;
        padding-right: 5px;
        padding-bottom: 5px;
      }
  modes:
    light:
      # text
      primary-text-color: "#212121"
      # main interface colors
      primary-color: "#434343"
      google-red: "#F54436"
      google-green: "#01C852"
      google-yellow: "#FF9101"
      google-blue: "#3D5AFE"
      google-violet: "#661FFF"
      google-grey: "#BBBBBB"
      color-red: "245, 68, 54"
      color-green: "1, 200, 82"
      color-yellow: "255, 145, 1"
      color-blue: "61, 90, 254"
      color-purple: "102, 31, 255"
      color-grey: "187, 187, 187"
      color-pink: "233, 30, 99"
      color-theme: "51,51,51"
      color-background-yellow: "250, 250, 250"
      color-background-blue: "250, 250, 250"
      color-background-green: "250, 250, 250"
      color-background-red: "250, 250, 250"
      color-background-pink: "250, 250, 250"
      color-background-purple: "250, 250, 250"
      color-yellow-text: "var(--primary-text-color)"
      color-blue-text: "var(--primary-text-color)"
      color-green-text: "var(--primary-text-color)"
      color-red-text: "var(--primary-text-color)"
      color-pink-text: "var(--primary-text-color)"
      color-purple-text: "var(--primary-text-color)"
      energy-gas-color: "rgb(156,39,176)"
      energy-water-color: "rgb(33,150,243)"
      opacity-bg: "1"
      # background and sidebar
      card-background-color: "#FAFAFA"
      primary-background-color: "#EFEFEF"
      secondary-background-color: "#EFEFEF"
      # header
      app-header-text-color: "var(--primary-text-color)"
      app-header-background-color: "var(--primary-background-color)"
      # paper-tabs-selection-bar-color: "var(--primary-text-color)"
      # slider
      slider-color: "rgb(var(--color-blue))"
      slider-bar-color: "rgba(var(--color-blue),0.38)"
      # cards
      box-shadow: "0px 2px 4px 0px rgba(0,0,0,0.16)"
      ha-card-box-shadow: "var(--box-shadow)"
      # sidebar
      sidebar-selected-text-color: "var(--google-red)"
      sidebar-selected-icon-color: "var(--google-red)"
      sidebar-text-color: "#80868b"
      # switch
      switch-checked-color: "var(--google-blue)"
      # media player
      mini-media-player-accent-color: "var(--google-blue)"
    dark:
      # text
      primary-text-color: "#DDDDDD"
      # main interface colors
      primary-color: "#89B3F8"
      google-red: "#F18B82"
      google-green: "#80C994"
      google-yellow: "#FCD663"
      google-blue: "#89B3F8"
      google-violet: "#BB86FC"
      google-grey: "#BBBBBB"
      color-red: "241, 139, 130"
      color-green: "128, 201, 148"
      color-yellow: "252, 214, 99"
      color-blue: "137, 179, 248"
      color-theme: "221,221,221"
      color-purple: "102, 31, 255"
      color-grey: "187, 187, 187"
      color-pink: "233, 30, 99"
      color-background-yellow: "var(--color-yellow)"
      color-background-blue: "var(--color-blue)"
      color-background-green: "var(--color-green)"
      color-background-red: "var(--color-red)"
      color-background-pink: "var(--color-pink)"
      color-background-purple: "var(--color-purple)"
      color-yellow-text: "var(--color-yellow)"
      color-blue-text: "var(--color-blue)"
      color-green-text: "var(--color-green)"
      color-red-text: "var(--color-red)"
      color-pink-text: "var(--color-pink)"
      color-purple-text: "var(--color-purple)"
      opacity-bg: "0.1"
      # floating button text color
      mdc-theme-on-secondary: "var(--card-background-color)"
      # background and sidebar
      card-background-color: "#1D1D1D"
      primary-background-color: "#121212"
      secondary-background-color: "#121212"
      # header
      app-header-text-color: "var(--primary-text-color)"
      app-header-background-color: "var(--primary-background-color)"
      paper-tabs-selection-bar-color: "var(--primary-text-color)"
      # Sidebar
      sidebar-selected-text-color: "rgb(var(--color-blue))"
      sidebar-selected-icon-color: "rgb(var(--color-blue))"
      # Slider
      slider-color: "rgb(var(--color-blue))"
      slider-bar-color: "rgba(var(--color-blue),0.38)"
      # card
      box-shadow: "none"
      # media player
      mini-media-player-accent-color: "var(--google-blue)"
      # Journal
      state-icon-color: "rgb(var(--color-theme))"
Hi @ingo.niehues ,
great example. Love it, but sensor.tibber_verbrauch_daily/weekly/monthly
and all with cost doesn’t work. I created the Helper and put the YAML Part behind Sensor. Any kind of other hint? KR Klaus
I tried it and addad this
Then I have changed the tibber token and restarted HA.
Afterwards I used the apex card which then complains that the sensor is missing

What is wrong ?
SOLVED:
thanks to Ingo’s reply the solution was easy.
I put the previously mentioned -platform: rest code
under “sensor:”
and now the sensor appears with all the data and the apex chart is happy too.