He is using an USB to Serial converter which has more connections than mine (for example, D+ and D- are not present in mine, and he is using those to connect U1RX and U1TX).
I successfully flashed TYWE3S chip and Shelly One with the Tasmotizer + USB to Serial converter combo in the past and I am applying the same principles with this TYWE1S chip but without success.
This is the GPIO layout of the TWYE1S chip:
And I am connecting it this way:
Tuya Chip —> USB to Serial converter
U1TX to RXD
U1RX to TXD
GND to GND
IO0 to GND
3V3 to VCC (the USB to Serial converter is set to 3v, not 5v)
By doing this way, Tasmotizer is failing to acquire a connection with the device and I am unable to erase the Tuya firmware on it and replace it with Tasmota.
To put the ESP8266 into Programming Mode:
Disconnect serial-to-USB adapter and power
Bridge GPIO0 and GND (by pressing the on-board button or connection with a wire)
Connect the serial-to-USB adapter to your computer
After a few seconds disconnect GPIO0 from GND.
Then go " Tasmotizer!" in link.
Once flashed. Go to
Initial Configuration
Using Web UI
Configure Wi-Fi
I just wanted to post an update on this: turns out I am an idiot.
I spent the last 4 days trying to figure out why I wasn’t able to flash this damn thing.
Yesterday, I grabbed a couple of old Shelly 1 and Sonoff S20 that I had laying around and tried to flash those. I wasn’t able. Baffling, since I flashed those exact items in the past with the same USB to Serial converter, same cables, same software running on the same PC.
I troubleshooted a bit with Tasmotizer and discovered I was failing because it couldn’t communicate on COM1 (I was getting an error message saying that I didn’t have permission on that ///COM1 port).
Turn out that my PC lacked the proper PCI Serial Port drivers (I updated it to Windows 10 20H2). I never needed to download anything in the past and I flashed everything correctly. I grabbed the correct PCI Serial port driver from the web, installed those and restarted Tasmotizer. Now I was able to flash the Zemismart Curtain USB dongle on COM3 port and I finally managed to configure the curtains following this helpful post here --> Curtain Automation
I am now able to control it in HA as if it was a dimmable light and it works just fine!
Hi, I tried to follow this guide but it didnt work for me, so I am writing this for anyone else that may buy a Zemismart smart wifi curtain after this post.
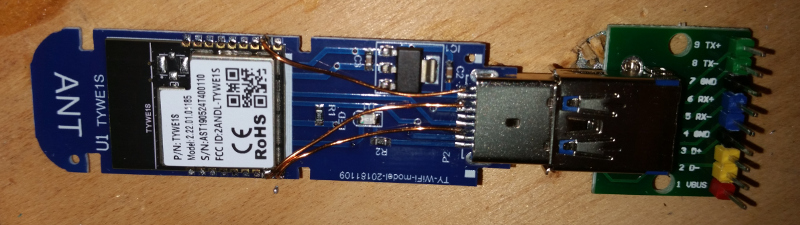
The chip in the motor is a TYWE1S but it also had headers on it. So I plugged it into a breadboard and powered it that way and also grounded it. That way I only had to stick TX and RX wires to the chip. Just to clarify, you can use those headers to power the board and by extension, it also powers the chip.
I then powered up the chip by connecting my serial programmer to my PC. I then used one of the ground cables to connect to IOO and then used the other ground gable to connect to reset. All you need to do is just touch the points and hold them. I then let go of reset and clicked tasmotize but kept the wire touching IOO. After I saw the transfer start, I took the cable away from IOO.
Here are some pictures to help. If you look at the headers on the right hand side of the board, they will have letters next to them. I put the power cable from the programmer in the header labelled V and the ground cable from the programmer in the header labelled
@hadeshorn i am interrested in your help freeing my heater.
I want to flash esphome on my tywes1.
i conected as you only rx and tx,
bridge temporarly io0 to gnd
switch on my heater and open web.esphome.io from my chromium browser
select my ttyUSB4 device
release the bridge
then flash
but it always tell me “Failed to initialize. Try resetting your device or holding the BOOT button while selecting your serial port until it starts preparing the installation.”
ok now i flashed esphome
access and flash it with homeassistant thrue wifi.
but the board does nothing.
i observe that only the first 5 pins vcc, u1tx, u1rx, 3v3 and gnd are connected to my heater board.
I just got this same Smart curtain with the TY-TYWE1S USB dongle. However, the USB dongle seems to be burned. The LED does not power on, and even in Windows or Linux, the USB is not recognized by either OS.


