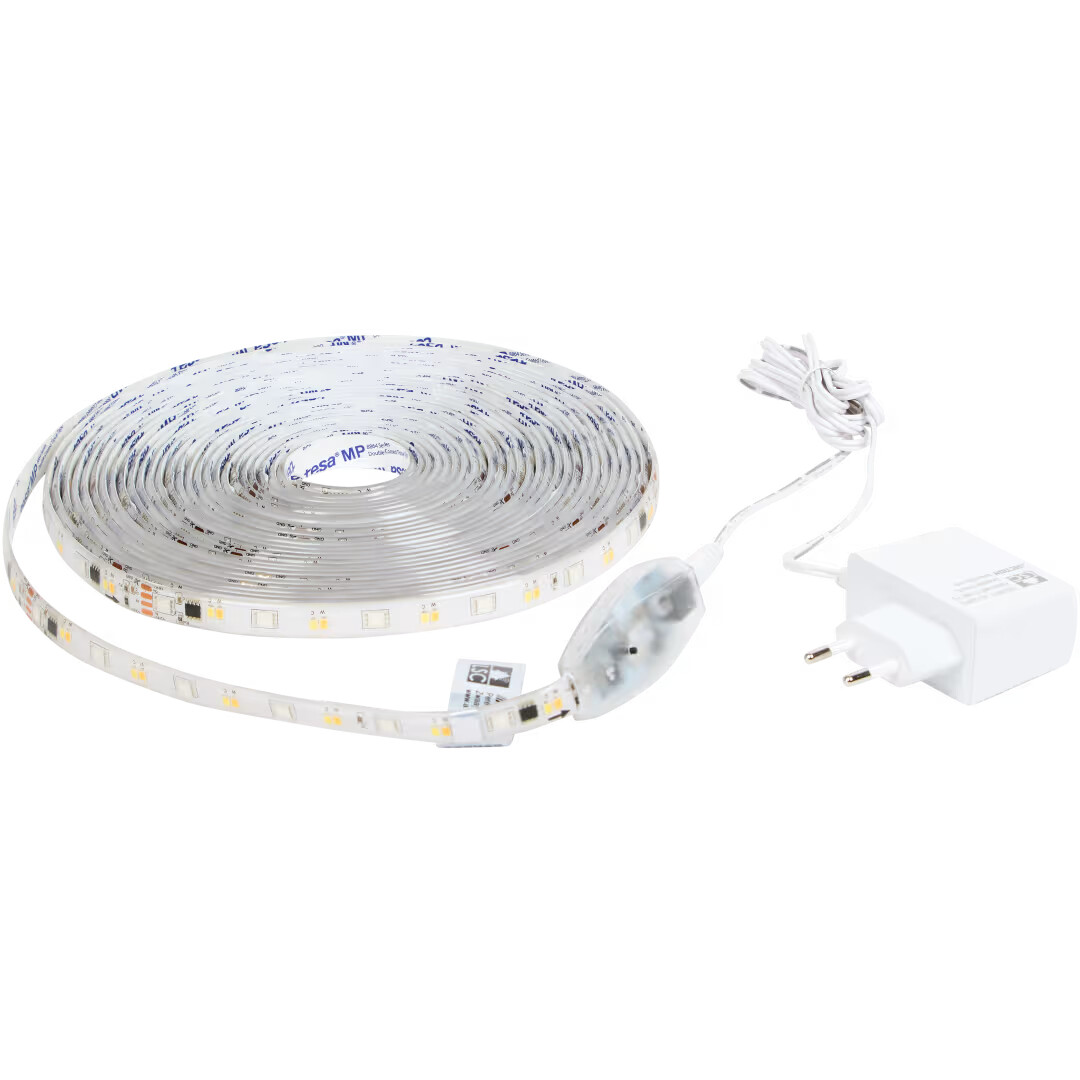
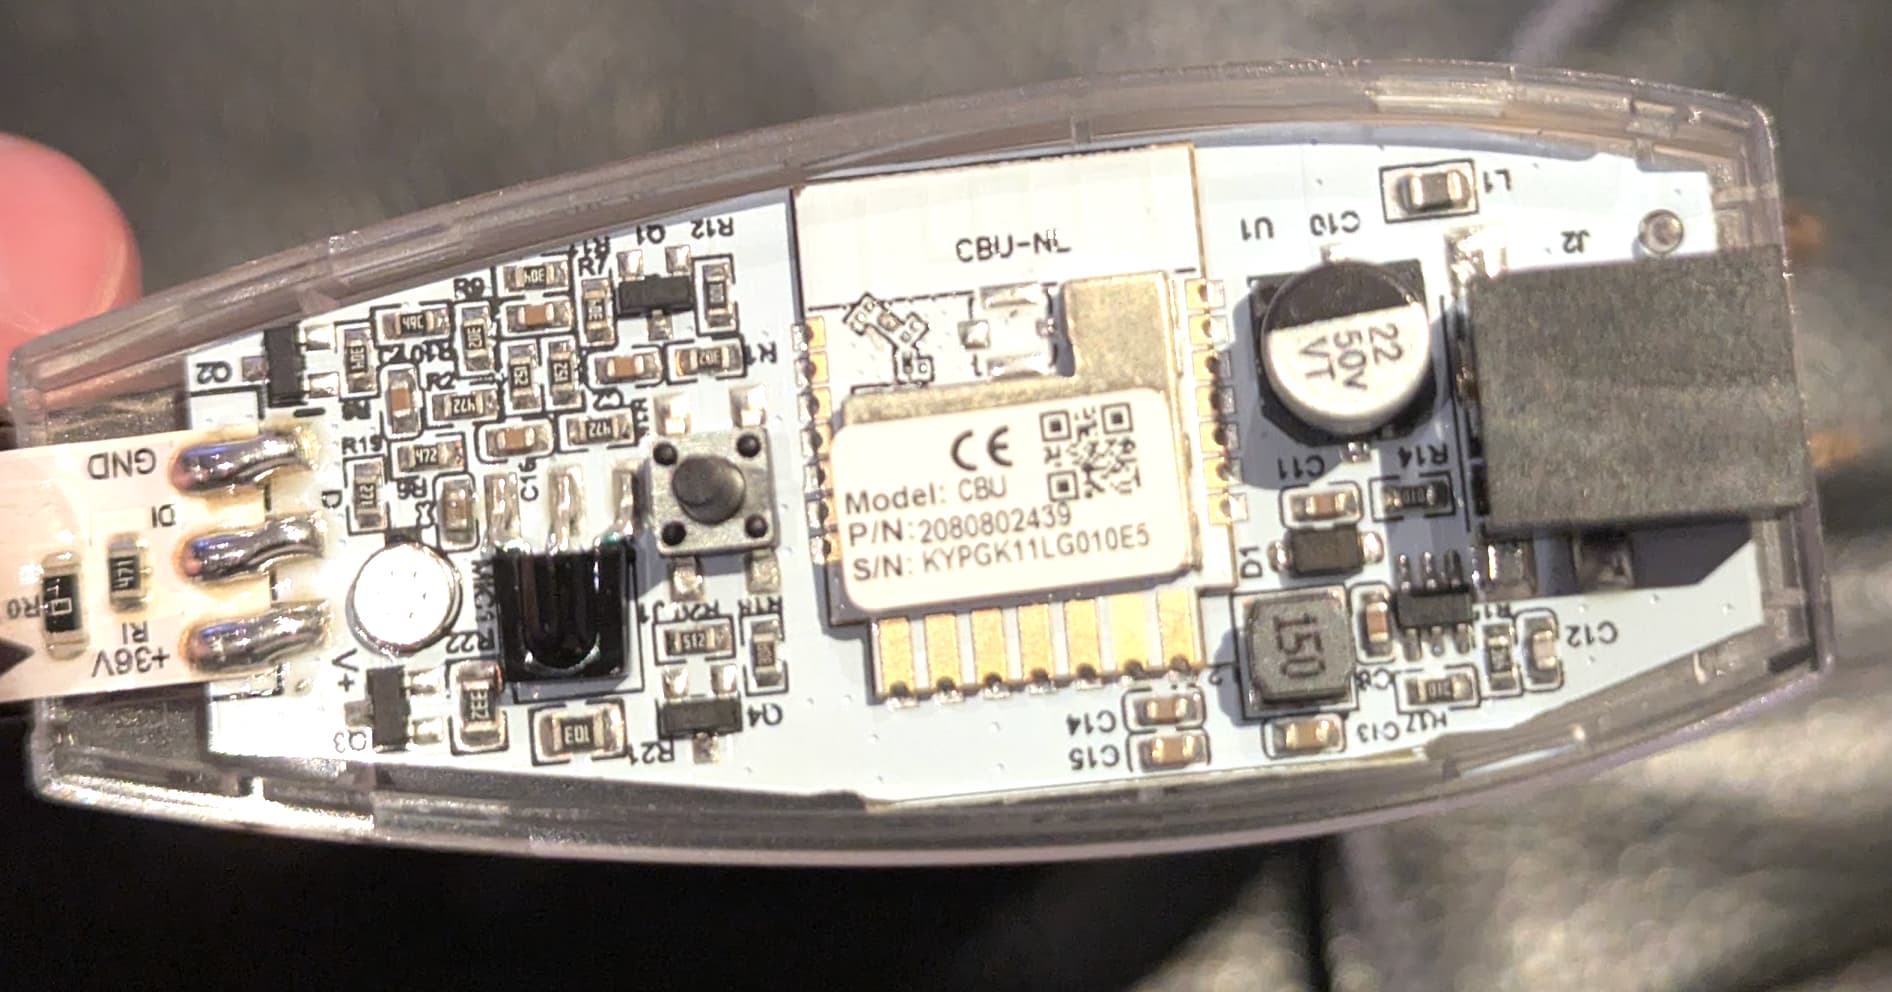
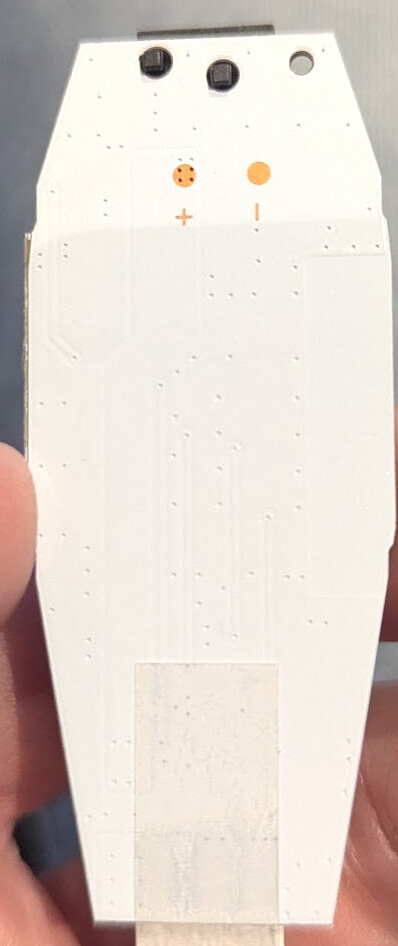
I just recently bought 2 strips, both mentioned 3202086.2 however one strip has a see through housing, 4 pin connection to the stip and no clear signs of a RX and TX connections (maybe I’m just blind) .
the other one is clearly the green PCB mentoined erlier whihc has 5 connections to the strip and clearly marked RX and TX markings.
this newer PCB has the RGB-white-RGB-White chip layout as mentioned earlier. The chip looks a lot like an ESP32, or clone. Was somebody already able to flash the ESP home to this chip? I whished a had a picture of this PCB, but due to circumstance I will not be home till friyday
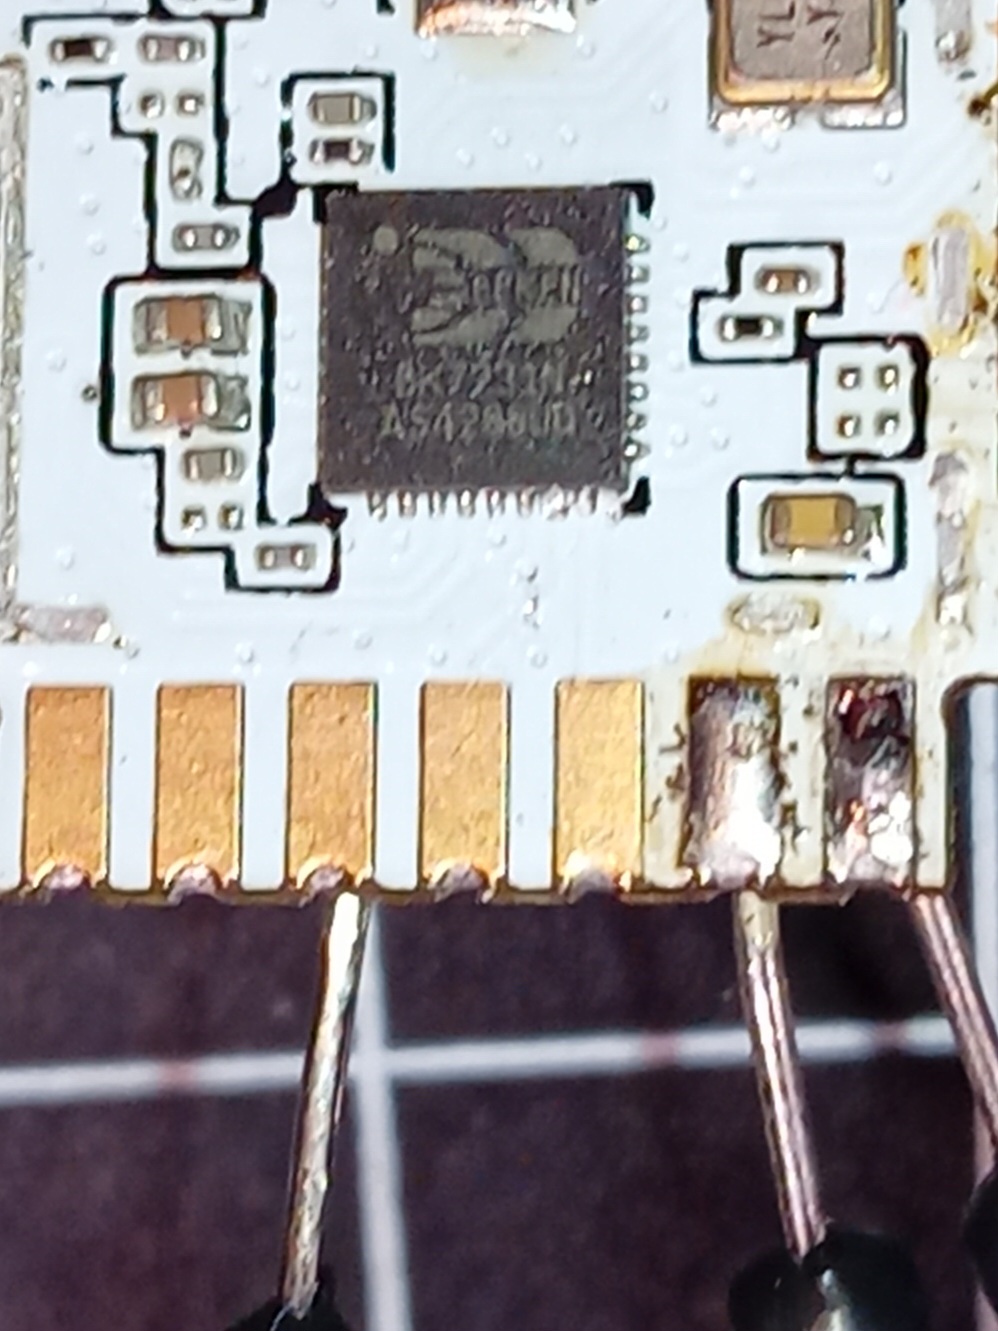
Oke, it seems to bet the CBU-NL chip
this is the mark 3 of the LED strip, currently working on getting an extract of the chip @gamekiller095 this will give an anser on your question as well
Happymadnes
December 14, 2025, 11:50am
43
I try to get an reas out but it is still not sucsesfull. Somehow I cannot connect to the chip
rick85
December 18, 2025, 7:51pm
44
Moin guys,
Many thanks in advance and have a wonderful pre-Christmas season!
Happymadnes
December 22, 2025, 10:02pm
45
Okey, it seems that my UART USB was not working correct. new connector and i was able to export, so i will keep you updated
maartenst
January 1, 2026, 8:47am
46
I tried to buy a similar led strip but ended up with a 3202086.4, any idea if this will work too? It also has the see-through casing with a white board like mentioned earlier
thijs74
January 14, 2026, 11:10pm
47
Thanks to the ‘Twoenter Blog’ as a starting point, and this thread, I was able to flash the 10m version of the LED Strip. 3202086.3.
Configuration:
CCT light controlable in Color (WW / CW) and brightness
RGB light controlable in brightness and various scenes
MIC is working, RGB scene available
MIC level is adjustable within HA
MIC noise floor level adjustable within HA
Strip length is adjustable within HA
Created the following code with the contribution of this thread;
esphome:
  name: testled
  friendly_name: TestLED

bk72xx:
  board: generic-bk7231n-qfn32-tuya

# Enable logging
logger:
  level: INFO

# Enable Home Assistant API
api:
  encryption:
    key: "---------------------------"

ota:
  - platform: -------
    password: "-----------------------------------------"

wifi:
  ssid: !secret wifi_ssid
  password: !secret wifi_password

  # Enable fallback hotspot (captive portal) in case wifi connection fails
  ap:
    ssid: "Thijsled Fallback Hotspot"
    password: "--------------------"

captive_portal:


web_server:
########################################

sensor:
  - platform: adc
    id: mic
    pin: ADC3
    internal: false #false=sensor visible in HA
    name: "Mic"
    update_interval: 50ms
    filters:
      - lambda: |-
          float gain = id(mic_sensitivity).state;  // waarde uit Home Assistant
          return x * gain;
      - lambda: |-
          float gain = id(mic_sensitivity).state;
          float noise = id(mic_noise_floor).state;
          float v = (x - noise);
          if (v < 0) v = 0;
          return v * gain;


number:
  - platform: template
    name: "MIC gevoeligheid" #sensitivity of the mic
    id: mic_sensitivity
    min_value: 0.1
    max_value: 5.0
    step: 0.1
    optimistic: true
    initial_value: 1

  - platform: template
    id: mic_noise_floor
    name: "MIC drempel waarde"  #noise floor level
    min_value: 0.0
    max_value: 0.2
    step: 0.01
    optimistic: true
    initial_value: 0

  - platform: template
    id: led_length     #LED strip length
    name: "LED lengte"
    min_value: 1
    max_value: 100     # sets the maximum
    step: 1
    optimistic: true
    initial_value: 50


# globale variables

globals:
  - id: cct_brightness   # Brightness CCT Lamp
    type: float
    initial_value: '1.0'
  - id: cct_temp         # Color temperature CCT Lamp, 0=cold 1=warm
    type: float
    initial_value: '1'

# output
output:
  - platform: gpio   # output is a power-relay, to switch the LED strip
    id: power
    pin: P22

# Template CCT
  - platform: template   # Virtual output sets CCT color temperature
    id: cct_temp_out
    type: float
    write_action:
      - lambda: |-
          // state ist 0..1 (0=cold, 1=warm) laut color_temperature-Output-API
          id(cct_temp) = state;
          float b = id(cct_brightness);
          float ratio = state;            // 0 -> cold, 1 -> warm
          float ww = ratio;
          float cw = 1.0f - ratio;

          auto call = id(cct_raw).make_call();
          call.set_state(true);
          call.set_brightness(b);         // brightness
          call.set_red_if_supported(cw);  // CW on red
          call.set_green_if_supported(ww); // WW on green
          call.set_blue_if_supported(0.0);
          call.perform();

  - platform: template   # Virtual output sets CCT brightness
    id: cct_bri_out
    type: float
    write_action:
      - lambda: |-
          id(cct_brightness) = state;
          float t = id(cct_temp);
          float ratio = t;
          float ww = ratio;
          float cw = 1.0f - (0.5 * ratio);

          auto call = id(cct_raw).make_call();
          call.set_state(true);
          call.set_brightness(state);
          call.set_red_if_supported(cw);
          call.set_green_if_supported(ww);
          call.set_blue_if_supported(0.0);
          call.perform();

# Lampen in Home Assistant
light:
  - platform: color_temperature   # CCT light in Home Assistant
    id: cct_light
    name: "CCT"
    color_temperature: cct_temp_out
    brightness: cct_bri_out
    warm_white_color_temperature: 2700 K
    cold_white_color_temperature: 6500 K
    on_turn_on:
      then:
        - if:
            condition:
              - light.is_on: rgb_light
            then:
              - light.turn_off: rgb_light
        - output.turn_on: power
    on_turn_off:
      then:
        - if:
            condition:
              - light.is_off: rgb_light
            then:
              - delay: 1s
              - output.turn_off: power

  - platform: beken_spi_led_strip   # Fysical LED strip
    id: RGBIC_CCTIC_ledstrip
    rgb_order: GRB
    pin: 16
    num_leds: 100
    chipset: SM16703
    name: None
    internal: true

  - platform: partition   # RGB light in HA
    id: rgb_light
    name: "RGB"
    internal: false # false =visible in HA
    on_turn_on:
      then:
        - if:
            condition:
              - light.is_on: cct_light
            then:
              - light.turn_off: cct_light
        - output.turn_on: power
    on_turn_off:
      then:
        - if:
            condition:
              - light.is_off: cct_light
            then:
              - delay: 1s
              - output.turn_off: power
    effects:
     - random:
     - pulse:
     - flicker:
     - addressable_rainbow:
     - addressable_color_wipe:
     - addressable_scan:
     - addressable_twinkle:
     - addressable_random_twinkle:
     - addressable_fireworks:
     - addressable_lambda:
         name: "Sound Rainbow Effect"
         update_interval: 50ms
         lambda: |-
           float mic_level = id(mic).state;
           float normalized = min(mic_level, 1.0);

           int length = id(led_length).state;
           int strip_size = it.size();

           // Veiligheid
           if (length > strip_size) length = strip_size;

           // Automatisch midden
           int center = length / 2;

           // Hoe ver het effect mag uitwaaieren
           int max_distance = floor(normalized * (length / 2));

           for (int i = 0; i < strip_size; i++) {
             if (i >= length) {
               it[i] = Color(0, 0, 0);  // LEDs buiten de ingestelde lengte uit
               continue;
             }

             int distance = abs(i - center);

             if (distance <= max_distance) {
               float hue = (float)i / length * 360.0;

               float h = hue;
               float s = 1.0;
               float v = 1.0;

               int sector = ((int)floor(h / 60.0)) % 6;
               float f = (h / 60.0) - floor(h / 60.0);
               float p = v * (1.0 - s);
               float q = v * (1.0 - f * s);
               float t = v * (1.0 - (1.0 - f) * s);

               float r, g, b;
               if (sector == 0) { r = v; g = t; b = p; }
               else if (sector == 1) { r = q; g = v; b = p; }
               else if (sector == 2) { r = p; g = v; b = t; }
               else if (sector == 3) { r = p; g = q; b = v; }
               else if (sector == 4) { r = t; g = p; b = v; }
               else { r = v; g = p; b = q; }

               it[i] = Color(r * 255, g * 255, b * 255);
             } else {
               it[i] = Color(0, 0, 0);
             }
           }


    # Hier worden de secties van de LED strip gemaak, de secties worden gekoppeld aan het ID RGB_LIGHT
    segments:
      # ALL RGB LEDS IN 1 LIGHT,RGB LEDS AT EVEN ADDRESSES
      - id: RGBIC_CCTIC_ledstrip
        from: 0
        to: 0
      - id: RGBIC_CCTIC_ledstrip
        from: 2
        to: 2
      - id: RGBIC_CCTIC_ledstrip
        from: 4
        to: 4
      - id: RGBIC_CCTIC_ledstrip
        from: 6
        to: 6
      - id: RGBIC_CCTIC_ledstrip
        from: 8
        to: 8
      - id: RGBIC_CCTIC_ledstrip
        from: 10
        to: 10
      - id: RGBIC_CCTIC_ledstrip
        from: 12
        to: 12
      - id: RGBIC_CCTIC_ledstrip
        from: 14
        to: 14
      - id: RGBIC_CCTIC_ledstrip
        from: 16
        to: 16
      - id: RGBIC_CCTIC_ledstrip
        from: 18
        to: 18
      - id: RGBIC_CCTIC_ledstrip
        from: 20
        to: 20
      - id: RGBIC_CCTIC_ledstrip
        from: 22
        to: 22
      - id: RGBIC_CCTIC_ledstrip
        from: 24
        to: 24
      - id: RGBIC_CCTIC_ledstrip
        from: 26
        to: 26
      - id: RGBIC_CCTIC_ledstrip
        from: 28
        to: 28
      - id: RGBIC_CCTIC_ledstrip
        from: 30
        to: 30
      - id: RGBIC_CCTIC_ledstrip
        from: 32
        to: 32
      - id: RGBIC_CCTIC_ledstrip
        from: 34
        to: 34
      - id: RGBIC_CCTIC_ledstrip
        from: 36
        to: 36
      - id: RGBIC_CCTIC_ledstrip
        from: 38
        to: 38
      - id: RGBIC_CCTIC_ledstrip
        from: 40
        to: 40
      - id: RGBIC_CCTIC_ledstrip
        from: 42
        to: 42
      - id: RGBIC_CCTIC_ledstrip
        from: 44
        to: 44
      - id: RGBIC_CCTIC_ledstrip
        from: 46
        to: 46
      - id: RGBIC_CCTIC_ledstrip
        from: 48
        to: 48
      - id: RGBIC_CCTIC_ledstrip
        from: 50
        to: 50
      - id: RGBIC_CCTIC_ledstrip
        from: 52
        to: 52
      - id: RGBIC_CCTIC_ledstrip
        from: 54
        to: 54
      - id: RGBIC_CCTIC_ledstrip
        from: 56
        to: 56
      - id: RGBIC_CCTIC_ledstrip
        from: 58
        to: 58
      - id: RGBIC_CCTIC_ledstrip
        from: 60
        to: 60
      - id: RGBIC_CCTIC_ledstrip
        from: 62
        to: 62
      - id: RGBIC_CCTIC_ledstrip
        from: 64
        to: 64
      - id: RGBIC_CCTIC_ledstrip
        from: 66
        to: 66
      - id: RGBIC_CCTIC_ledstrip
        from: 68
        to: 68
      - id: RGBIC_CCTIC_ledstrip
        from: 70
        to: 70
      - id: RGBIC_CCTIC_ledstrip
        from: 72
        to: 72
      - id: RGBIC_CCTIC_ledstrip
        from: 74
        to: 74
      - id: RGBIC_CCTIC_ledstrip
        from: 76
        to: 76
      - id: RGBIC_CCTIC_ledstrip
        from: 78
        to: 78
      - id: RGBIC_CCTIC_ledstrip
        from: 80
        to: 80
      - id: RGBIC_CCTIC_ledstrip
        from: 82
        to: 82
      - id: RGBIC_CCTIC_ledstrip
        from: 84
        to: 84
      - id: RGBIC_CCTIC_ledstrip
        from: 86
        to: 86
      - id: RGBIC_CCTIC_ledstrip
        from: 88
        to: 88
      - id: RGBIC_CCTIC_ledstrip
        from: 90
        to: 90
      - id: RGBIC_CCTIC_ledstrip
        from: 92
        to: 92
      - id: RGBIC_CCTIC_ledstrip
        from: 94
        to: 94
      - id: RGBIC_CCTIC_ledstrip
        from: 96
        to: 96
      - id: RGBIC_CCTIC_ledstrip
        from: 98
        to: 98


## ALL CCT LEDS IN 1 LIGHT
# Hier worden de secties van de LED strip gemaak, de secties worden gekoppeld aan het ID CCT_RAWRGB zit op de even adressen

  - platform: partition
    id: cct_raw
    internal: True  # deze virtuele lamp is niet zichtbaar in Home Assistant
    segments:
      # CCT LEDS AT ODD ADDRESSES
      - id: RGBIC_CCTIC_ledstrip
        from: 1
        to: 1
      - id: RGBIC_CCTIC_ledstrip
        from: 3
        to: 3
      - id: RGBIC_CCTIC_ledstrip
        from: 5
        to: 5
      - id: RGBIC_CCTIC_ledstrip
        from: 7
        to: 7
      - id: RGBIC_CCTIC_ledstrip
        from: 9
        to: 9
      - id: RGBIC_CCTIC_ledstrip
        from: 11
        to: 11
      - id: RGBIC_CCTIC_ledstrip
        from: 13
        to: 13
      - id: RGBIC_CCTIC_ledstrip
        from: 15
        to: 15
      - id: RGBIC_CCTIC_ledstrip
        from: 17
        to: 17
      - id: RGBIC_CCTIC_ledstrip
        from: 19
        to: 19
      - id: RGBIC_CCTIC_ledstrip
        from: 21
        to: 21
      - id: RGBIC_CCTIC_ledstrip
        from: 23
        to: 23
      - id: RGBIC_CCTIC_ledstrip
        from: 25
        to: 25
      - id: RGBIC_CCTIC_ledstrip
        from: 27
        to: 27
      - id: RGBIC_CCTIC_ledstrip
        from: 29
        to: 29
      - id: RGBIC_CCTIC_ledstrip
        from: 31
        to: 31
      - id: RGBIC_CCTIC_ledstrip
        from: 33
        to: 33
      - id: RGBIC_CCTIC_ledstrip
        from: 35
        to: 35
      - id: RGBIC_CCTIC_ledstrip
        from: 37
        to: 37
      - id: RGBIC_CCTIC_ledstrip
        from: 39
        to: 39
      - id: RGBIC_CCTIC_ledstrip
        from: 41
        to: 41
      - id: RGBIC_CCTIC_ledstrip
        from: 43
        to: 43
      - id: RGBIC_CCTIC_ledstrip
        from: 45
        to: 45
      - id: RGBIC_CCTIC_ledstrip
        from: 47
        to: 47
      - id: RGBIC_CCTIC_ledstrip
        from: 49
        to: 49
      - id: RGBIC_CCTIC_ledstrip
        from: 51
        to: 51
      - id: RGBIC_CCTIC_ledstrip
        from: 53
        to: 53
      - id: RGBIC_CCTIC_ledstrip
        from: 55
        to: 55
      - id: RGBIC_CCTIC_ledstrip
        from: 57
        to: 57
      - id: RGBIC_CCTIC_ledstrip
        from: 59
        to: 59
      - id: RGBIC_CCTIC_ledstrip
        from: 61
        to: 61
      - id: RGBIC_CCTIC_ledstrip
        from: 63
        to: 63
      - id: RGBIC_CCTIC_ledstrip
        from: 65
        to: 65
      - id: RGBIC_CCTIC_ledstrip
        from: 67
        to: 67
      - id: RGBIC_CCTIC_ledstrip
        from: 69
        to: 69
      - id: RGBIC_CCTIC_ledstrip
        from: 71
        to: 71
      - id: RGBIC_CCTIC_ledstrip
        from: 73
        to: 73
      - id: RGBIC_CCTIC_ledstrip
        from: 75
        to: 75
      - id: RGBIC_CCTIC_ledstrip
        from: 77
        to: 77
      - id: RGBIC_CCTIC_ledstrip
        from: 79
        to: 79
      - id: RGBIC_CCTIC_ledstrip
        from: 81
        to: 81
      - id: RGBIC_CCTIC_ledstrip
        from: 83
        to: 83
      - id: RGBIC_CCTIC_ledstrip
        from: 85
        to: 85
      - id: RGBIC_CCTIC_ledstrip
        from: 87
        to: 87
      - id: RGBIC_CCTIC_ledstrip
        from: 89
        to: 89
      - id: RGBIC_CCTIC_ledstrip
        from: 91
        to: 91
      - id: RGBIC_CCTIC_ledstrip
        from: 93
        to: 93
      - id: RGBIC_CCTIC_ledstrip
        from: 95
        to: 95
      - id: RGBIC_CCTIC_ledstrip
        from: 97
        to: 97
      - id: RGBIC_CCTIC_ledstrip
        from: 99
        to: 99


type or paste code here
1 Like
Hi Maarten,
Mr_Q
February 8, 2026, 7:46pm
49
I just opened one… CBU-NL inside.
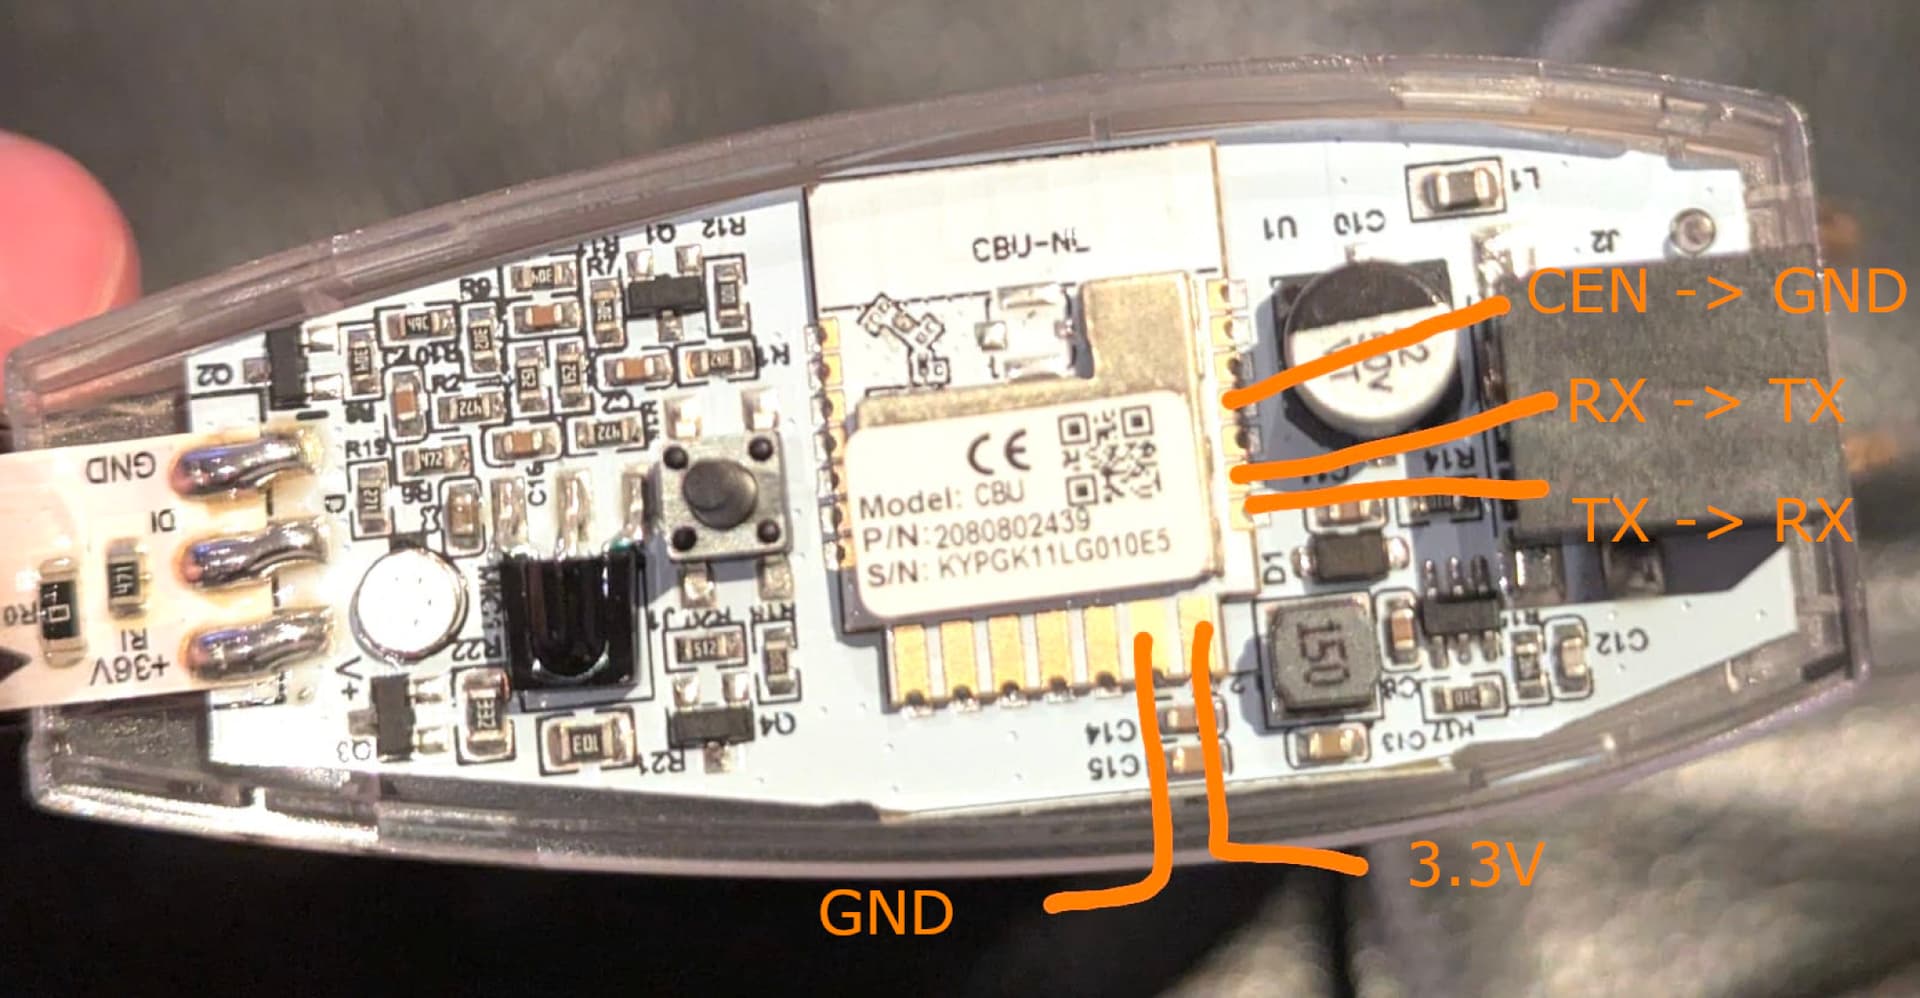
It seems I need to solder these pads like this for flashing, am I right? Based on Tuya CBU-NL documentation:
CEN to GND correct (short before backup & flash)?
Did you also have to solder the pads on the right? I have solder experience but not with the extremly tiny pads on the right-side. I see no solder pads on the bottom. Any tips (e.g. which materials to use) ?
Additional update/info: no solder pads on the bottom of the PCB except for + and -:
tureka
February 16, 2026, 7:04am
50
Hi!
HI this is indeed the same module as I had shown, but I had desolder the CBU-NL chip. this is just the beken chip
Hi all,GitHub - BasvanderHelm/LSC-in-ESP-Home
2 Likes
Mr_Q
February 22, 2026, 8:32pm
55
The pinout I gave earlier above, is indeed correct for the 3202086.4 LSC ledstrip (CBU-NL). I managed to backup the firmware. Then I was able to flash it with ESPHome firmware (first to OpenBeken then OTA the esphome firmware), solderless with my self-made 3d printed jig and some pogo pins…
I used the code from you git @Happymadnes . I used ‘203202086_3’ as a base. All worked, except that green and blue are swapped. So I changed ‘rgb_order: GRB’ to ‘rgb_order: BRG’ and now it’s good! Is that specific to the .4 or was that already wrong in your case too?
The microphone works (the Sound Rainbow effect) too. I was wondering, would it be possible to make the infrared work as well?
Will investigate myself too, but since you’ve been working on this already…
Thank you for sharing the code!
Mr_Q
February 22, 2026, 9:28pm
56
I actually also had to change the ‘cct_temp_out’ and ‘cct_bri_out’ to make the ‘w’-led work. The warm-white is actually ran by the ‘blue’ color not ‘green’ in my case. Since I had to swap the color for the RGB-leds too, this was sort of expected.
tureka
February 23, 2026, 10:15pm
60
Sorry for mess with deleted posts. My final code. Restored functions. I hope someone will make it perfect: GitHub - tureka/LSC-10m-Smart-LED-Strip-RGB-CCT: ESPHome code for LSC 10m Smart LED Strip RGB/CCT
RadoZA
March 18, 2026, 7:31am
61
Hi, nice work all of you. I have same LED strip, but I bought 20m version. How can I easily connect it to my HA ? Unfortunately I can’t see version number
Anyone can write step by step procedure to flash and connect it to HA ?
Thanks.
Update 2026-03-28 – Thanks for all the help. I successfully flashed it and integrated it into Home Assistant. It took me 6 hours, but it was worth it.
@radoZA Connect RX/TX of the CBU-NL chip to a USB TTL adapter and connect it to BK7231 GUI tool. See if it’s recognised and try to flash a basic ESPHome config. Afterwards you can try the configs from this thread to see if it works. Like the same I did: Flash LSC’s addressable LED strip with ESPHome and use it in Home Assistant - twoenter blog