The Settings - FAQ
First you must set up a “Humidity Derivative Sensor”. On how to do this Click Here
Humidity Derivative Sensor
This is the sensor that will be used as the trigger.
Fan Switch
This is the fan you would like to turn ON. You can also include an input boolean. Input booleans are used to link my toilet exhaust fan blueprint with this blueprint.
Input - Fan Speed - Low Speed Switch
If you have a fan with different speeds, you will have the option to stage your fan before turning it OFF. This is where you would enter your low-speed entity. It will be used in your selection for summer and winter modes
Input - Fan Speed - Switch Off
If you have a fan with different speeds, this allows you to enter your OFF entity. It will be used in your selection for summer and winter modes.
Input - Bathroom Humidity Sensor (Optional)
Select your bathroom humidity sensor. This sensor, located in your bathroom, will be used as the reference if you choose ‘The Maximum Humidity Option’ in your selection for summer and winter modes.
Rising Humidity & Falling Humidity Settings
Once you have your ‘Humidity Derivative Sensor’ set up in Home Assistant (HA), the best way to find your settings is to add your exhaust fan, humidity sensor, and humidity derivative sensor to a dashboard. To do this:
- Go to a dashboard.
- In the top right corner, click the three dots and select ‘Edit dashboard.’
- Click ‘+ ADD CARD.’
- Select ‘History Graph.’
- In the entity field, add your exhaust fan, humidity sensor, and humidity derivative sensor entities.
- Set the time range to show ‘2’ hours (you can change this any time).
- Click ‘Save’ and ‘DONE.’
You will now see something like this.
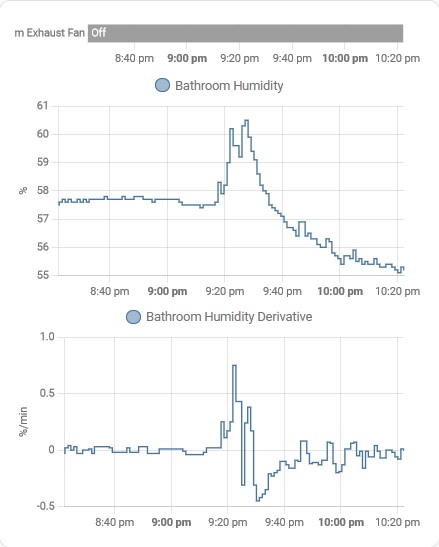
The above image shows humidity changes throughout the day in a 2-hour window. You can see the ‘Humidity Derivative Sensor’ values fluctuating around +0.75 and -0.48. Your values might be higher, as it all depends on your specific site and the location of your sensor.
The image below illustrates the effects of taking showers, with data from two separate instances. In the first shower, the humidity level increases to around +10.0 and then decreases to approximately -7.0 after finishing. Similarly, in the second shower, the humidity rises to about +14.0 and then drops to around -7.5 afterward. If you hover your mouse over your graph in Home Assistant (HA), a pop-up window will display more accurate figures.
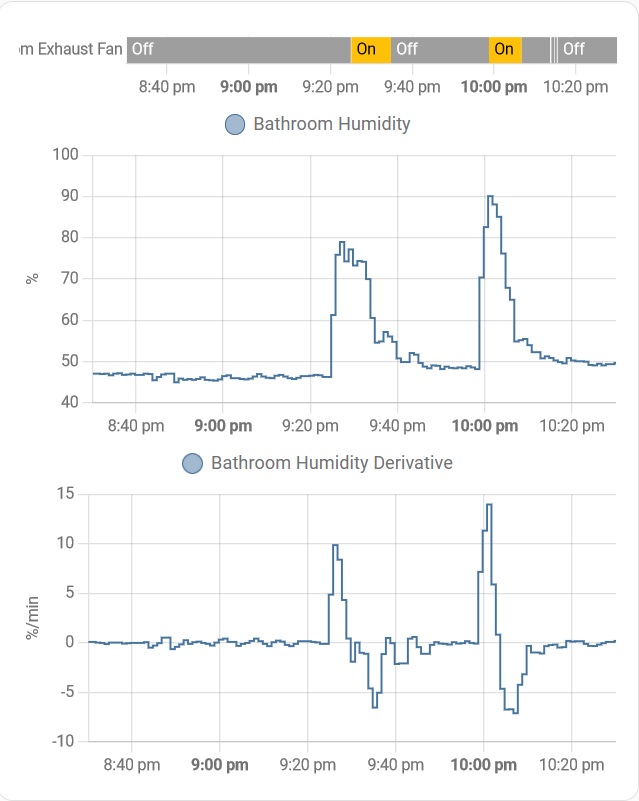
Now that we can observe what’s happening, we can adjust our settings accordingly. Looking at the Rising Humidity Derivative %:
- The first shower’s initial increase is just below +5.0, and the ending is just above -5.0.
- The second shower’s initial increase is around +7.0, and the ending is just above -5.0.
Note: These readings are with a working exhaust fan, so you may need to initially set it to +1.0 & -1.0 and then adjust and readjust your settings to achieve the desired results.
My sensor is positioned at the highest point right next to the fan inlet, resulting in high readings. Your readings might be lower, but the fundamental principle remains the same.
After monitoring my site for some time, I’ve observed that during summer mode, my readings never exceed +2.3 & -1.5, while in winter mode, they never exceed +1.0 & -0.8. With the sensor positioned high next to the fan, showering results in similar patterns to the graph above. It’s advisable to keep your settings as low as possible for faster reaction times, but we also want to avoid false triggers, especially at night.
In my setup, I’ve set the “Rising Humidity %” in summer (hot climate) to +3.2 and the “Falling Humidity %” to -3.1. In winter (cold climate), I’ve adjusted the “Rising Humidity %” to +1.8 and the “Falling Humidity %” to -1.2
Your settings will vary depending on factors such as your site, location, and climate. However, having the ability to monitor your settings will help you determine the optimal configuration for your specific situation.
If you experience false triggers turning ON the fan, consider adjusting your ‘Rising Humidity %’ or ‘Maximum Humidity’ settings if you’re using that option, as these are the triggers for activating the fan. You can analyze your trace lines to determine whether it was the ‘Rising Humidity %’ or the ‘Maximum Humidity’ that caused the activation, helping you pinpoint which setting to adjust.
Conversely, the ‘Falling Humidity %’ or the ‘Maximum Run Time Setting’ triggers the automation to initiate the ‘Time Delay.’ Monitor the system’s behavior and adjust the settings as necessary.
Time Delay
The ‘Time Delay’ setting is crucial, but its optimal duration can vary depending on factors such as the type of fan you have and the location of your humidity sensor. It’s essential to monitor this setting to ensure the fan adequately reduces humidity before turning off. As shown in the above image, the humidity tends to return to around the starting value after a shower, which can be particularly challenging during colder winter months. In such cases, additional measures like providing heat, opening a window, removing wet towels, or drying them may be necessary to reduce humidity levels effectively.
Start with a time delay of around 10 minutes and adjust as necessary based on your observations. For my setup, I have my ‘Time Delay’ set to 4.5 minutes in summer (hot climate) and 15 minutes in winter (cold climate).
Safe Guard - Maximum Run Time Setting
The Maximum Run Time Setting serves as a safeguard, ensuring the fan doesn’t run excessively, even during the longest showers. It shouldn’t be necessary if your settings are correct. I’ve set mine to 17 minutes for summer (hot climate) and 20 minutes for winter (cold climate).
Use The Maximum Humidity Option (Optional)
Sometimes, after a shower, the humidity can take longer to return to its normal level. This delay may result in a lower rising % when another shower is taken before the humidity has fully normalized, thus failing to trigger the automation. Enabling this option allows the fan to be activated when the humidity rises above the set value.
I’ve found this option particularly effective during busy periods with back-to-back showers. Remember, my sensor is directly on the fan inlet above the shower. For summer (hot climate), I’ve set mine to 85%, and for winter (cold climate), I’ve set mine to 87%.
NOTE: To enable this option, you must input your ‘Bathroom Humidity Sensor’ in ‘Input - Bathroom Humidity Sensor’. Your bathroom humidity sensor is the actual humidity sensor located in your bathroom.
Use The Winter Mode Option (Optional)
This option allows you to add another set of settings specifically for the winter months (colder months). The settings are the same as above, but you’ll need to select the months you want to apply the winter mode settings to. I’ve enabled this option for my setup.
Humidity Derivative Sensor By-pass
This will enable you to bypass the humidity derivative sensor and operate your fan as usual. Please note that the entity cannot be included in the ‘Fan Switch’, ‘Fan Speed - Low Speed Switch’, or ‘Fan Speed - Off Switch Option’ selections. Please see our FAQ on how to set this up without having a physical switch.
Use The Fan Speed Options
This applies if you have a fan with multiple speeds. You can choose the options you’d like to use.
Fan Speed - Low Speed Time Delay
This is an additional time delay to run the fan on low speed before turning it off. To use this feature, you must select the option to use the low-speed fan in ‘The Fan Speed Options,’ and you must enter your low fan speed in the 'Input - Fan Speed - Low Speed Switch.
Manual Fan Switch Option
This feature enables you to add a switch for manual control of the fan, allowing you to turn it on and off manually while still allowing the automation to take control when needed. This is particularly useful for removing any unwanted fumes from deodorant, hairspray, or the toilet. The auto-off time delay in option 2 ensures that you never forget to turn the fan off.
The switch can be:
- Switch
- Binary sensor
- Input boolean
![]() Please Note: The switch cannot be the actual fan switch and must be independent. Using the actual fan switch will prevent the automation from functioning properly.
Please Note: The switch cannot be the actual fan switch and must be independent. Using the actual fan switch will prevent the automation from functioning properly.
Lights Options
This feature is useful for controlling different lights when taking a shower, especially if you have LED lights installed in a shower niche.
The Automation Link
This feature enables you to link your other automations, automatically disabling them when this automation is activated. It’s particularly useful if you’re using another blueprint to control the lights, switches, or scenes in your bathroom and want to deactivate it when this automation is on. This ensures that the bathroom lights remain on when you’re in the shower and the motion sensor is unable to detect motion.
For more information on the Automation Link Option Click Here
Safe Guard - HA Restart
If Home Assistant restarts for any reason, the automation will evaluate the conditions and try to preform the correct action.
Enjoy
Blacky ![]()
Back to FAQ: Click Here