![]()
Step into the future of freshness - customize it your way and experience the convenience of automated humidity control! ![]()
![]()
Like this blueprint? Consider hitting the ![]() button below
button below ![]()
Version: 2.7 ![]()
![]() You must be on Home Assistant Version 2024.6 or later.
You must be on Home Assistant Version 2024.6 or later.
Need help? ![]() See our FAQ: Click Here
See our FAQ: Click Here
![]() The Automation Process:
The Automation Process:
-
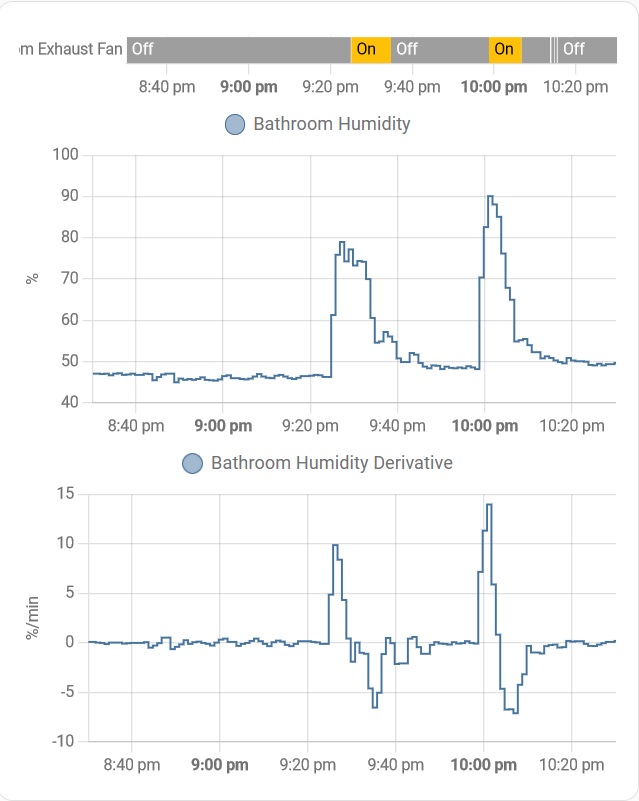
Trigger:
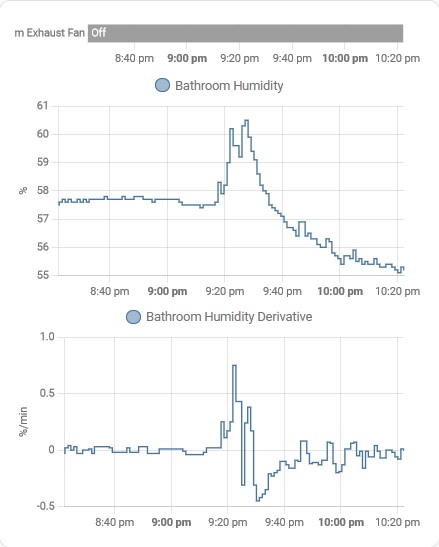
- When the derivative percentage rises above a set value, the fan turns ON
- When the derivative percentage falls below a set value, the automation waits for a time delay and then turns the fan OFF.
- Optional - Set a maximum humidity percentage to trigger the fan ON. This is useful when having back-to-back showers.
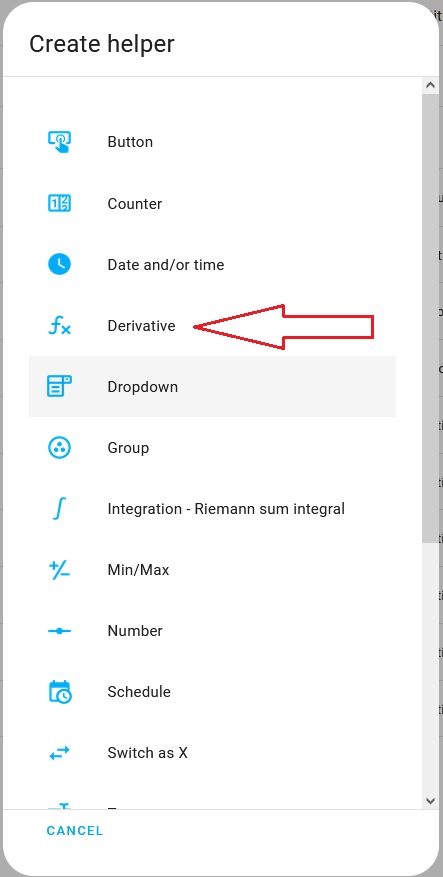
 Note: You must have a humidity sensor in the bathroom and set up a ‘Derivative Helper’ for this automation to work.
 -
Manual Trigger Option:
- This feature allows you to manually trigger the automation.
-
Multi-Speed Fan Control Option:
- You have the option to use fan speeds to control the staging of your fan.
- You can choose to stage your fan in your preferred configuration, such as High/Off, High/Low, High/Low/Off, High/Med/Low, etc.
-
Winter Mode Option:
- You have the option to use ‘Winter Mode.’ This mode allows for different settings to be applied, accommodating the typically higher humidity levels experienced in winter compared to summer.
-
Light Control Option:
- Use the “Light Control” option to turn ON lights, adjusting brightness levels, colour temperatures, and transition times.
- This feature is commonly utilized with LED lights in a shower niche.
- For expanded lighting options, consider integrating my
 Sensor Light blueprint, which utilizes the automation link feature.
-
Manual Control Option:
- Use a manual fan switch to toggle the fan ON/OFF.
- Opt to use the auto-OFF option for timer-like functionality.
- This is particularly useful for removing unwanted fumes from deodorant, hairspray, or the toilet.
-
Automation Link Option:
- This feature simplifies the process of automatically disabling your other automations by providing an automation linking mechanism.
-
Operating Hours Option:
- This allows you to restrict automatic operation of the automation to the selected times and days. The manual trigger, manual fan switch and bypass will still work outside the operating hours.
-
Bypass Functionality Option:
- This allows you to bypass the automation, offering manual control and additional customization capabilities.
-
Safety Measures:
- Set a maximum runtime safeguard for the fan to prevent continuous operation.
- Benefit from built-in safeguards to ensure smooth operation and reliability, even if Home Assistant restarts.
-
Blueprint Add-On Integration:
- Sensor Light: Control your lights in the bathroom. Click Here to learn more.
- Toilet Exhaust Fan: Integrate with a toilet in the bathroom. Click Here to learn more.
![]() CHANGELOG
CHANGELOG
- Version: 2.7 - 22 May-26 - Added operating hours
- Version: 2.6 - 26 Nov-24 - Update to Home Assistant YAML standards and coding practices, and fixed some bugs.
- Version: 2.5 - 25 June-24 - Added manual trigger, update deprecated code in light and fixed some bugs.
- Version: 2.4 - 12 June-24 - Added collapsible sections, Updated descriptions and some code clean up.
- Version: 2.3 - 28 Jan-24 - Some housekeeping, increased max humidity slider range and bug fix in option 2 by-pass auto OFF.
- Version: 2.2 - 6 October-23 - Added “input boolean” domain to “Input - Fan Speed - Switch Off (Optional)”
- Version: 2.1 - 5 October-23 - Added a manual fan switch option.
- Version: 2.0 - 2 October-23 - Added an automation link option. Major upgrade of HA restart. Fixed bugs in by-pass.
- Version: 1.9 - 18 Sep-23 - Multiple fan speeds control. Light separate time delay. Update deprecated code. Fixed two bugs.
- Version: 1.8 - 20 Aug-23 - Fixed a bug stopping the automation.
- Version: 1.7 - 18 Aug-23 - Fixed a bug in light transition.
Changelog of all releases click here
- Version: 1.6 - 15 July-23 - By-pass upgrade, By-pass auto OFF, works with blueprint link & updated HA restart.
- Version: 1.5 - 7 June-23 - Added a maximum humidity, winter mode settings & options for lights.
- Version: 1.4 - 8 March-23 - Added “fan” domain.
- Version: 1.3 - 6 Feb-23 - Added the ability to use scripts.
- Version: 1.2 - 26 Jan-23 - Added “Fan Speed - Off Switch Option” and ability to select lights.
- Version: 1.1 - 22 Jan-23 - Added safeguard if Home Assistant restarts
- Version: 1.0 - 30 Dec-22 - Initial release
![]() MY OTHER BLUEPRINTS
MY OTHER BLUEPRINTS
![]() Sensor Light - Motion Sensor - Door Sensor - Sun Elevation - LUX Value - Scenes - Time
Sensor Light - Motion Sensor - Door Sensor - Sun Elevation - LUX Value - Scenes - Time
![]() Smart Light - Entity - Sun Elevation - Ambient & Time Triggers
Smart Light - Entity - Sun Elevation - Ambient & Time Triggers
![]() Sensor Light Add On - Media & Movie Lights - House Alarm Lights - Smoke Alarm Lights & Exhaust Fans + More
Sensor Light Add On - Media & Movie Lights - House Alarm Lights - Smoke Alarm Lights & Exhaust Fans + More
![]() Holiday & Away Lighting
Holiday & Away Lighting
![]() Low Battery Notifications & Actions
Low Battery Notifications & Actions
![]() Appliance Notifications & Actions - Washing Machine - Clothes Dryer - Dish Washer - ETC
Appliance Notifications & Actions - Washing Machine - Clothes Dryer - Dish Washer - ETC
![]() Notifications & Announcements
Notifications & Announcements
![]() Calendar Notifications & Actions
Calendar Notifications & Actions
![]() State Notifications & Actions
State Notifications & Actions
![]() Battery Charger Notifications & Actions
Battery Charger Notifications & Actions
![]() ESPHome Device Update
ESPHome Device Update
![]() Blueprint Update Notifications
Blueprint Update Notifications
![]() Manual Control Status Tracker
Manual Control Status Tracker
![]() Zone Presence of People & Devices
Zone Presence of People & Devices
![]() Bee In The Hive Sensor
Bee In The Hive Sensor
![]() Android Notification Channel Manager
Android Notification Channel Manager
![]() Toilet Exhaust Fan with time delay
Toilet Exhaust Fan with time delay
![]() Entity - Run ON Timer
Entity - Run ON Timer
![]() Trigger - Run ON Timer
Trigger - Run ON Timer
![]() Manual light control with auto OFF
Manual light control with auto OFF
![]() Closet, Pantry, and Cupboard Lighting
Closet, Pantry, and Cupboard Lighting
![]() Timer
Timer
![]() Temperature Control Fan
Temperature Control Fan
![]() Temperature Control Exhaust Fan - Inverted
Temperature Control Exhaust Fan - Inverted
![]() Toggle Switch - Turn ON & OFF Entities
Toggle Switch - Turn ON & OFF Entities
![]() Press Button - Turn ON & OFF Entities
Press Button - Turn ON & OFF Entities
![]() Switch - Turn ON & OFF Entities
Switch - Turn ON & OFF Entities


 Previously, I had used the Generic Hygrostat integration and it was very unreliable.