đźšż Bathroom Humidity Exhaust Fan

Open your Home Assistant instance and show the blueprint import dialog with a specific blueprint pre-filled.

GitHub Link Click Here

Step into the future of freshness – customize it your way and let the automated fan system handle the humidity control for you! :herb::shower:

Like this blueprint? Consider hitting the :heart: button below :+1:

Version: 2.3 :fire:

Need help? :eyes: See our FAQ: Click Here

:newspaper: The Automation Process:

  • When the humidity rises above a set percentage value over a time window the fan will turn ON. You also have the option to set a maximum humidity % that will also turn the fan ON.
  • When the humidity falls below a set percentage value over a time window the automation will then wait for the time delay and then turn the fan OFF.
  • Works with multi speed fan by using the “Fan Speed Options”. You can select to stage your fan before turning OFF (High / Low / OFF), or you can just turn it OFF (ON / OFF).
  • You have the option to set a “Winter Mode”. This allows you to have different settings for the colder months of the year.
  • You have the option to turn ON lights and use the “Light Control” option. This allows you to set a brightness level, colour temperature in kelvin and a transition time for your lights.
  • You have the option to use a manual fan switch. This allows you to turn ON and OFF the fan manually and still allows the automation to be triggered. You also have an auto OFF option so it can work like a run on timer.
  • You have the option to use the “Automation Link Option”. This disables other automations via a By-pass control option when the automation is activated. It is designed to work with my other blueprints. Example, my sensor Light blueprint.
  • You have the option to use a By-pass. This allows you to add a switch to manually By-pass the “Humidity Derivative Sensor”.
  • Safe guard built in for HA restart.
  • Works with my Blueprint Add ON Click Here

:white_check_mark: Note: You must set up a “Derivative Sensor Helper” in HA for this automation to work. See our FAQ on how to set this up correctly. It is quick and easy :slightly_smiling_face:

:rocket: CHANGELOG

  • Version: 2.3 - 28 Jan-24 - Some housekeeping, increased max humidity slider range and bug fix in option 2 by-pass auto OFF.
  • Version: 2.2 - 6 October-23 - Added “input boolean” domain to “Input - Fan Speed - Switch Off (Optional)”
  • Version: 2.1 - 5 October-23 - Added a manual fan switch option.
  • Version: 2.0 - 2 October-23 - Added an automation link option. Major upgrade of HA restart. Fixed bugs in by-pass.
  • Version: 1.9 - 18 Sep-23 - Multiple fan speeds control. Light separate time delay. Update deprecated code. Fixed two bugs.
  • Version: 1.8 - 20 Aug-23 - Fixed a bug stopping the automation.
  • Version: 1.7 - 18 Aug-23 - Fixed a bug in light transition.
  • Version: 1.6 - 15 July-23 - By-pass upgrade, By-pass auto OFF, works with blueprint link & updated HA restart.
  • Version: 1.5 - 7 June-23 - Added a maximum humidity, winter mode settings & options for lights.
  • Version: 1.4 - 8 March-23 - Added “fan” domain.
  • Version: 1.3 - 6 Feb-23 - Added the ability to use scripts.
  • Version: 1.2 - 26 Jan-23 - Added “Fan Speed - Off Switch Option” and ability to select lights.
  • Version: 1.1 - 22 Jan-23 - Added safeguard if Home Assistant restarts
  • Version: 1.0 - 30 Dec-22 - Initial release

:shield: MY OTHER BLUEPRINTS

:bulb: Sensor Light - Motion Sensor - Door Sensor - Sun Elevation - LUX Value - Scenes - Time
:infinity: Sensor Light Add On - Media & Movie Lights - House Alarm Lights - Smoke Alarm Lights & Exhaust Fans + More
:low_battery: Low Battery Notifications & Actions
:vibration_mode: Appliance Notifications & Actions - Washing Machine - Clothes Dryer - Dish Washer - ETC
:calendar: Calendar Notifications & Actions
:round_pushpin: State Notifications & Actions
:toilet: Toilet Exhaust Fan with time delay
:hourglass_flowing_sand: Entity - Run ON Timer
:stopwatch: Trigger - Run ON Timer
:gear: Turn Light, Switch or Scene On & Off with Trigger Conditions
:magic_wand: Manual light control with auto OFF
:door: Closet, Pantry, and Cupboard Lighting
:timer_clock: Timer
:thermometer: Temperature Control Exhaust Fan
:snowflake: Temperature Control Exhaust Fan - Inverted
:eight_spoked_asterisk: Toggle Switch - Turn ON & OFF Entities
:nazar_amulet: Press Button - Turn ON & OFF Entities
:on: Switch - Turn ON & OFF Entities

Like this blueprint? Consider hitting the :heart: button below :+1:

71 Likes

FAQ

Q: How do you set up a Derivative Sensor Helper?

A: Please follow these steps Click Here

Q: I have set up a “Derivative Sensor Helper” but how do i set up the automation settings?

A: Please follow these steps Click Here

Q: How do you update the blueprint and not delete / recreate existing automations?

A: Please select below. It all depends on what version of HA you have and how you installed it.

  • For HA version 2023.12.0 + Please follow these steps Click Here
  • If you are on an older version of HA then please follow these steps Click Here

Q: Can you show us your full set up?

A: Sure… check this post out Click Here

Q: FAQ - How can I use a light domain for the “Fan Switch”

A: Please follow these steps Click Here

Q: How to use the “Humidity Derivative Sensor By-pass” without having a physical switch?

A: If you don’t have a physical switch you can create one in Home Assistant that will allow you to use the by-pass. If you would like to create a by-pass switch then follow the steps below.

How to create a By-pass switch

  • First go to Settings / Devices & Services / click on the “Helpers” tab / click “+ CREATE HELPER” and select “Toggle”.
  • In the name area, enter a name that best suits you. For this example we will put “Bathroom Humidity Sensor By-pass”. Then click save.
  • Go back into the automation and in the “Humidity Derivative Sensor By-pass” search for the name you created, in our case “Bathroom Humidity Sensor By-pass”. Then click save.

How to add by-pass switch to a dashboard

  • In a “Dashboard” click “Edit dashboard” then click “+ ADD CARD” click on “Button” or “Entities” and in the entity field again search for the name (entity) you created in our case “Bathroom Humidity Sensor By-pass”. Then click save.
  • Then click “DONE”.

You now have a “Humidity Derivative Sensor By-pass” switch to disable the trigger sensor of your Bathroom Humidity Exhaust Fan automation.

Q: How Do I Use The Automation Link?

A Please follow these steps Click Here

Q: Can we link the Bathroom Humidity Exhaust Fan blueprint with the Toilet Exhaust Fan blueprint as my bathroom has a toilet and a shower?

A Yes, please follow these steps Click Here.

Q: I have selected to only use scripts but the automation is not working correctly. What am I doing wrong?

A Please follow these steps Click Here

Q: I would like to set a different value but the slider is not letting me?

A Just simply type the number value you would like in the field and click save. A red line will appear under the number you have entered but once you click save, exit the automation and go back into it the red line will not be there.

Q: I can’t see the time window when creating a Humidity Derivative Sensor?

A Please reboot your HA, not a restart of HA but a reboot of HA. Sometimes you will need to reboot your system for the time window to reappear.

3 Likes

Derivative Sensor Helper - FAQ

In order for this automation to work you must set up a Derivative Sensor Helper in HA and you must have a humidity sensor located in the bathroom. In my bathroom I use a ENV III Temperature Humidity Air Pressure sensor (see below) located on the fan inlet. The update interval is set to 60s (report humidity data to HA every 60s regardless) and this is critical for this blueprint to work correctly. Don’t worry about building up data as HA automatically purge this data after a period of 10 days (default is 10 days). We need humidity data for the blueprint to react fast and we need humidity data for the time window in the Derivative Sensor Helper (see below). Whatever humidity sensor you decide to use I would recommend you locate your humidity sensor as high as possible in the room where the steam will be at all times (when showering) and or as close to the fan inlet possible. This will allow the automation to work more effectively.

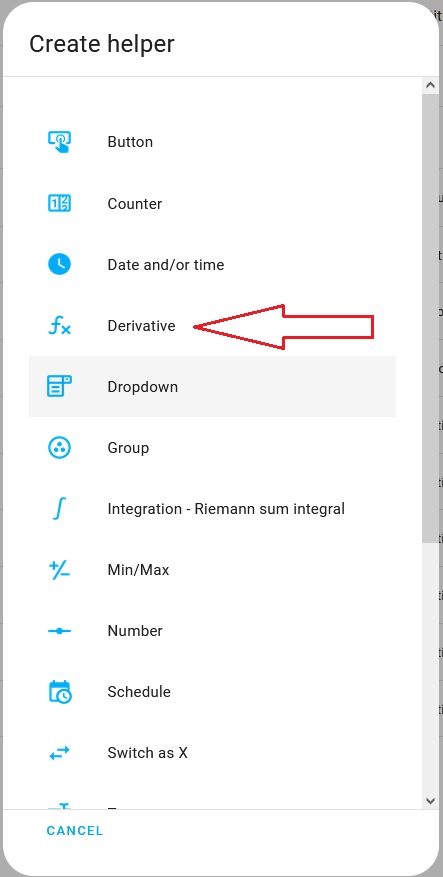
To add derivative sensor helper to HA, follow these steps.

Go to Settings / Devices & Services and click on the “Helpers” tab at the top. Click create helper and select “Derivative”

Fill out the name you would like your derivative sensor to be, select your humidity sensor in “input sensor” (this is my ENV III Temperature Humidity Air Pressure sensor) , precision = 2, time window can be 3 to start but you can change this later (see edit helper below) and in time unit, select “minutes”. Now click “SUBMIT”

NOTE: If you can’t see the time window please reboot your HA, not a restart of HA but a reboot of HA. Currently there is a bug in HA and with every update you will need to reboot your system for the time window to reappear.

Now go back into the blueprint and select / enter that derivative sensor in the “Humidity Derivative Sensor” Fill out the rest of the settings to your requirements. Click Here for help on setting up the automation correctly.

Your exhaust fan should automatically come ON now when you have a shower and turn OFF when your finished. :wink:

If you would like to know how to set up the automation settings so if functions correctly Click Here

EDIT HELPER
If you need to edit the Helper. Go back to Settings / Devices & Services / click on the “Helpers” tab / click the helper you would like to edit, in this case “Bathroom Humidity Derivative”. Click on the cogged wheel.

Then select “Derivative Options”

You will then see your settings. Edit as required.

Enjoy

Blacky :grinning:

Back to FAQ: Click Here

4 Likes

Thanks! I have been looking for something like this for some time. None of the methods I have tried have been reliable enough to trust. I’ll see how it works tomorrow morning :slight_smile:

One nice addition would be to add a time out, so that the fan will be turned off after a period of time even if the humidity hasn’t dropped enough.

Already there :blush:

1 Like

@sota no problem at all.

Hope it what your looking for, let us know how you go.

1 Like

The automation did not trigger this morning. The humidity derivative went to a max of +3.8% and -4.5%, but I had set the rising and falling limits to + & -5%. I reduced them to 3.5% and I’ll try again tomorrow.
Two possible suggestions:

  1. I currently trigger the fan when the bathroom light is turned on and turn it off 30 minutes after the light is turned off. It would be nice to have the option to include an entity that would turn on the fan immediately instead of waiting for the humidity to rise.
  2. When trying to get this to work, I had problems with false triggers - usually in the middle of the night. Not good for the WAF as the bathroom is off our bedroom! I don’t know if you have experienced this, but it might be nice to have a lockout time range where the automation cannot trigger.

Thanks.

I would suggests you start at +1 & -1. The best way to find your settings is to add your fan, humidity sensor and your derivative sensor into a dashboard. You will then be able to monitor your site. When you have a shower have a look at what happened and look at the first real increase to see what % that is. Below is a example and this is just normal humidity changes through the day in a 2 hour window.

below is a actual shower. The idea is to have the lowest % possible that will not give you a false trigger. Sensor position should also be considered (close to the steam).

I have a different blueprint for this called 'toilet exhaust fan with time delay"

Is this with this blueprint? as I haven’t had any false triggers to date. I have had false triggers when I tried different blueprints turning ON at night.

Thanks for the tips, I have done that now. I just started with your blueprint yesterday, so I am trying to avoid false triggers while getting it to work :wink: Previously, I had used the Generic Hygrostat integration and it was very unreliable.
Here is the graph from today showing the peaks for the shower around 9:00am, but there are also peaks of +1% and -1.5% so I think I will start at 2% and take it from there.

Screenshot 2023-01-01 171549

Yep that’s the way to do it :+1:

Success! The fan turned on just over a minute after the shower started, and it triggered the off delay about two minutes after it stopped.
Thanks!

1 Like

All good :smiley: :+1:

The Settings - FAQ

First you must set up a “Humidity Derivative Sensor”. On how to do this Click Here

Humidity Derivative Sensor

This is the sensor that will be used as the trigger.

Fan Switch

This is the fan you would like to turn ON. Lights can also be added. It is normal used when you have a niche in the shower that has a LED’s strip lighting and you would like to turn them ON when showering and OFF when finished automaticity.

Input - Fan Speed - Low Speed Switch

If you have a fan with different speeds you will have an option to stage your fan before turning it OFF. This is where you would enter in your low speed entity. This will be used in your selection for summer and winter modes.

Input - Fan Speed - Switch Off

If you have a fan with different speeds this allow you to enter in your OFF entity. This will be used in your selection for summer and winter modes.

Input - Bathroom Humidity Sensor (Optional)

Select your bathroom humidity sensor. Your bathroom humidity sensor is the actual humidity sensor located in your bathroom. This will be the reference sensor if you have chosen to use “The Maximum Humidity Option” below. It applies to default and winter mode settings.

Rising Humidity & Falling Humidity Settings

Once you have your “Humidity Derivative Sensor” set up in HA the best way to find your settings is to add your exhaust fan, humidity sensor and your humidity derivative sensor into a dashboard. To do this, go into a “Dashboard” then top right 3 dots click “Edit dashboard”, then click “+ ADD CARD”, click on “History Graph” in the entity field add your exhaust fan, humidity sensor and your humidity derivative sensor entities, then show “2” hours (you can change this any time), click save & “DONE”. You will now see something like this.

The above image shows humidity changes throughout the day in a 2 hour window. You can see the “Humidity Derivative Sensor” + & - values of around + 0.75 & - 0.48. Yours can be higher as it all depends on your site and the location of your sensor.

The below image is what happens when we have a shower. The image shows 2 showers data. You can see the first shower goes to + 10.0 then when finished around - 7.0. The next shower goes to + 14.0 then when finished around - 7.5. If you move your mouse over your graph in HA a pop up window will show more accurate figures.

Because we can see what is happening, we can now adjust our setting. Looking at the Rising Humidity Derivative %. The first shower jump is just below + 5.0 and the ending is just above -5.0. The second shower first jump is around + 7.0 and the ending is just above -5.0. Note: These reading are with a working exhaust fan so you may need to set + 1.0 & - 1.0 first then adjust and readjust your settings to get it right.

I have my sensor at the highest point right next to the fan inlet so my reading are high. Your reading could be lower but the working principle is the same.

I have monitored my site for some time now and I know my readings during the day never go above + 2.3 & - 1.5. Having the sensor up high next to the fan always has a similar results when showering as the above graph. It is good to keep your setting a low as possible as it will react faster but at the same time we don’t want to have false trigger turning ON the fan all the time, especially at night. I have set my “Rising Humidity %” in summer (hot climate) set to + 3.2 and my “Falling Humidity %” set to - 3.1. Then in winter (cold climate) I have set my “Rising Humidity %” set to + 3.1 and my “Falling Humidity %” set to - 2.1.

Your setting will depend on your site, where you live and your climate but being able to monitor your settings will help you work it out.

If you get false trigger turning ON the fan consider raising your “Rising Humidity %” or “Maximum Humidity” if using this option as this is what turns your fan ON. You can look at your traces line to see if it was the “Rising Humidity %” or the “Maximum Humidity” that triggered it ON, then you will know what setting to adjust. The “Falling Humidity %” or the “Maximum Run Time Setting” is what triggers the automation to start the “Time Delay”. Then just monitor what happens and adjust as necessary.

Time Delay

This is important. It really depends on the fan you have, location of your humidity sensor, etc. It is a good idea to monitor it so the fan brings down the humidity before turning it OFF. See the above image how the humidity returns to around the starting value after a shower. Then just monitor what happens and adjust as necessary. Try starting with 10 min and adjust as necessary. I have my “Time Delay” set to 3.5 min in summer (hot climate) and 8.0 min in winter (cold climate).

Safe Guard - Maximum Run Time Setting

Think of the longest shower anyone will have and add some time. It is really a safe guard and should never really be needed if your settings are correct. I have set mine to 17 min for summer (hot climate) and winter (cold climate).

Use The Maximum Humidity Option (Optional)

Sometimes after a shower the humidity can take longer to fall back to its normal level. This can cause a lower rising % when having another shower before the humidity has time to return to its normal level, thus not triggering the automation. Enabling this option will allow the fan to be turned ON when the humidity rises above the set value. I have enabled this option as when the bathroom is realy busy having back to back showers it work realy well. Remember my sensor is directly on the fan inlet above the shower. I have set mine to 96.5% for summer (hot climate) and winter (cold climate). I am yet to go through a summer with this setting as it is a new feature developed during winter so I may not use it in summer. I will update this later.

  • NOTE - You must input your “Bathroom Humidity Sensor” in “Input - Bathroom Humidity Sensor” for this option to work. Your bathroom humidity sensor is the actual humidity sensor located in your bathroom.

Maximum Humidity

This is where you set your maximum humidity %. When using this option, it is recommended to set this value as high as possible to stop false triggers. If you would like a lower % value and the slider will not allow it then just type the number value you would like in, and click save.

Use The Winter Mode Option (Optional)

This is where you can add another set of settings for the winter months (colder months). The settings are the same as above but you will need to select the months you would like to apply the winter mode settings to. I have enabled this option.

Humidity Derivative Sensor By-pass

This will allow you to By-pass the humidity derivative sensor and make your fan function as normal. The entity cannot be included in the “Fan Switch” and or “Fan Speed - Off Switch Option” selection. Please see our FAQ on how to set this up without having a physical switch.

Use The Fan Speed Options

This is if you have a fan with multiple speeds. You can choose the options you would like to use.

Fan Speed - Low Speed Time Delay

This is an additional time delay to run the fan on low speed before turning the fan OFF. You must select the option to use low speed fan in “The Fan Speed Options” and you must enter in your low fan speed in the “Input - Fan Speed - Low Speed Switch” for this to work.

Manual Fan Switch Option

This allows you to add a switch to turn the fan ON and OFF manually and still allows the automation to be triggered, taking control of your fan. This is useful in removing any unwanted fumes from deodorant, hairspray, toilet etc. The auto off time delay in option 2 makes sure you never forget to turn the fan OFF.

The switch can be:

  • Switch
  • Binary sensor
  • Input boolean

:warning: Please Note: The switch can not be the actual fan switch and must be independent. If you use the actual fan switch then the automation will not work.

The Automation Link

This allows you to link your other automations so they will be automatically disabled. This is useful if you are using one of my other blueprints to control the lights, switches and or scenes in your bathroom and you would like to disable it when this automation is ON. It allows you to keep the bathroom lights ON when you are in the shower and your motion sensor is unable to detect motion.

For more information on the Automation Link Option Click Here

Safe Guard - HA Restart

If Home Assistant restarts for any reason, the automation will evaluate the conditions and try to preform the correct action.

Enjoy

Blacky :smiley:

Back to FAQ: Click Here

1 Like

Hello I’m trying to use your blueprint, so far seems the most well thought that I have found for humidity control. I plan to use it in a technical room where I have some electronic equipment (router, switches, etc) but which is also prone to increased level of humidity. I have purchased an Aqara temperature humidity sensor and an Aqara smart plug, I also already have a dehumidifier. So basically what I am trying o do is whenever humidity is rising above a certain procent the dehumidifier to start automatically, it’s on auto and plugged into the Aqara plug. I have created the derivative humidity sensor with the helper and also make the Aqara plug look like a fan switch but in the blueprint settings it says at the fan section that no matching device is found, I have attached the part of the blueprint with the troubling settings.

@ionutm80 Firstly welcome to the community :smiley:

This issue is a bug in the latest release of HA. If you go back to your backup then it will be resolved until HA fixes it but you will loose what you have done from your update to now.

Another way if you are keen then you can try this.

Find out your “entity ID” you would like to use. Go to, Settings / Devices & Services, click on top tab “Entities”. Find it there.

Open the blueprint, click on 3 dots top right, and “edit in YAML”. You should see something like this.

alias: Bathroom Humidity Exhaust Fan
description: ""
use_blueprint:
  path: Blackshome/bathroom-humidity-exhaust-fan.yaml

For “Fan Switch *” enter “input” and change your entity_id to your sensor.

alias: Bathroom Humidity Exhaust Fan
description: ""
use_blueprint:
  path: Blackshome/bathroom-humidity-exhaust-fan.yaml
  input:
    fan_switch:
      entity_id:
        - switch.your_sensor_here

This is how my one looks like once everything is filled in.

alias: Bathroom Humidity Exhaust Fan
description: ""
use_blueprint:
  path: Blackshome/bathroom-humidity-exhaust-fan.yaml
  input:
    trigger: sensor.bathroom_humidity_derivative
    fan_switch:
      entity_id: switch.bathroom_exhaust_fan
    falling_humidity: -2
    rising_humidity: 2
    time_out: 25
    include_bypass: bypass_disabled
    time_delay: 3

Now click 3 dots top right and select “Edit in visual editor”

Hopefully you see your fan now :crossed_fingers:

Fill out the rest.

Not sure if it will work because I don’t know what HA did but be assured the blueprint works.

1 Like

Hi again, it worked, I could add my fan switch, now I have to fine tune the automation based on your guidance above. Thanks a lot for this blueprint and for the help provided!

Love it. If you have any other questions just ask. Your use case is interesting.

1 Like

Hi again,

I have set the derivative sensor with a time window of 3 minutes as per your FAQ above. Initially I have set the autommation based on your blueprint to -0.5 & 0.5 so it did not triggered when the first event that I was looking for happened: my wife put some clothes to dry in the technical room to take advantage of the heat inside at exactly 9.31 PM, I have attached 2 graphs with the evolution of the 2 sensors.


What would be the best settings for me to trigger specifically when these type of events occur? The derrivative jumps immediately at 9.31 PM but then drops also abruptly at 9.53 PM while the humidity remains high and above the 25% threshold that I would like to see constant within the technical room. Please help me, I’m a bit lost.
Thanks in advance and kind regards.

Hi, I have attached below the evolution up to this morning of the 2 senzors, derivative and actual humidity, as can be seen the derivative is decreasing very abruptly because it has a 3 minute moving average while the actual humidity is decreasing over a longer time period.The small period in which the dehumidifier worked is because I trigerred it manually to see whether the switch is working.

By the way the graphs are before updating this morning to 2023.1.2, after that the derivative senzors do not show anymore like line graphs but instead like history bar.

@ionutm80 I will PM you.