So I thought I might have been able to work out the way to set up a 2 gang 2 way Deta smart switch, but in checking all previous Deta devices on Esphome or Tasmota there doesn’t seem to be a consistent approach to the pinout. Does anyone have any advice on how to work out the pin assignment for when I flash Esphome via Cloudcutter to this device? The device model is 6952HA.
You can still use ltchiptool to get the device pinout
Is that after using cloudcutter and installing esphome kickstart?
Yes, unless the device use tuya mcu, then it’s a bit of trial and error finding the dpids
For anyone with a Deta 2 Gang 2 Way switch (6952HA) the following worked for me…
P6 - Relay 2
P14 - Relay 1
P8 - Power Sensor Switch 1
P9 - Power Sensor Switch 2
P23 - Switch 2
P24 - Status LED
P26 - Switch 1
The ltchiptool worked a treat, picking up everything bar the power sensors but they didn’t take long to work out given that earlier in the thread it was shared that the single gang version used P8.
1 Like
I have managed to use Cloudcutter and get LibreTiny working on an Aldi Casalife AL2017-TGTS CWWW down light. The device is in the Cloudcutter list so that bit was quite straight forward.

The code generated by ltchiptool is not correct as this light needs the color_temperature light platform not the cwww platform.
# Aldi Casa AL2017-TGTS CWWW Down Light
# Beken BK7231t with LibreTiny
# casa-dl-2.yaml

esphome:
  name: casa-dl-2
  friendly_name: casa-dl-2

  on_boot:
    priority: 600
    then:
      - light.turn_on:
          id: light_cwww
          brightness: 35%
          color_temperature: 3000K

bk72xx:
  board: generic-bk7231t-qfn32-tuya

logger:

web_server:

captive_portal:

mdns:

api:
  password: ""

ota:
  password: ""

wifi:
  ssid: !secret wifi_ssid
  password: !secret wifi_password
  ap:

text_sensor:
  - platform: libretiny
    version:
      name: LibreTiny Version

output:
  - platform: ledc
    id: colour_temp
    pin: P7
    inverted: True
  - platform: ledc
    id: bright
    pin: P8

light:
  - platform: color_temperature
    id: light_cwww
    name: Light
    color_temperature: colour_temp
    brightness: bright
    cold_white_color_temperature: 6500 K
    warm_white_color_temperature: 2700 K
# Ensure the light turns on by default if the physical switch is actuated.
    restore_mode: ALWAYS_ON

sensor:
  - platform: wifi_signal
    name: "Casa2 WiFi"
    update_interval: 60s
Update: The newer lights dated 05/2013 worked fine with the " aldi-lightway-smart-al2017-tgts-downlight.json" profile.
An older one dated 09/2021 had a different firmware version needed the " oem-bk7231s-light-ty-2.9.15-sdk-1.0.8-40.00.json" profile. The firmware version can be found in the Tuya Smart app.
1 Like
Just to add to the guide. I tried this on Virtual Box with a WiFi dongle. Worked on a 4 pack of Globe bulbs at 19.97 and 4 pack of Globe Plugs for 14.97 both discounted at Costco Canada. I have compiled a brief step by step. I followed a video by @digiblur
Open a system terminal
Run command: cd tuya-cloudcutter
Run command: sudo ./tuya-cloudcutter.sh
Select option 2

Then click enter and browse to your profile

Select your device
Select your firmware


Click yes

Select esphome

Follow the instructions
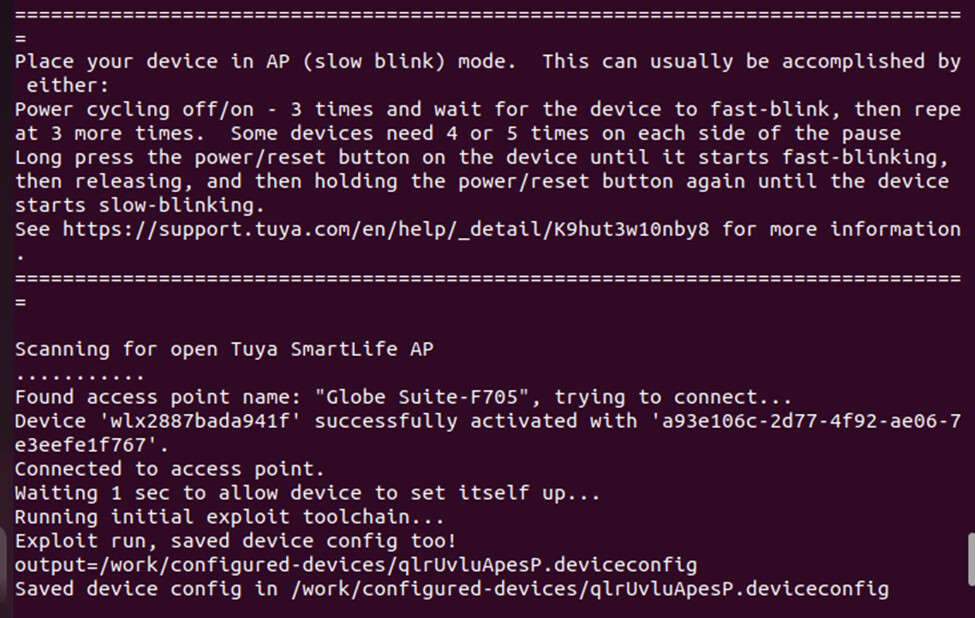
Power cycle your device and run in slow AP mode again

Join kickstart-bk7231t WiFi AP on your phone
Once you add the device to your network look for a device on your router
Put in your credentials to your WiFi
Run the Ichiptool
You may already see your device (192.168.88.60). Click on the first option
Open up Home Assistant and run LibreTiny ESPHome
Copy the YAMLand paste into the New Device profile. As suggested by Travis I only kept the first two lines of code
After ESP home has compiled the download, navigate to in your web browser to the IP Address and upload
In Home assistant you should get a new devices found
Follow the prompts and enjoy your freedom from being tethered to the cloud!
1 Like
And super excited to see this getting merged into Esphome for the next stable release.
Thanks @pencilhead, for documenting the approach you used for the DETA 6951HA.
It helped me a lot.
I’ve now used it for a DETA 6904HA 4 gang light switch with a slight modification successfully.
I selected :
- “1.1.5 - BK7231T / oem_bk7231s_rnd_zero_dctrl_switch”
- “Lonsonho”
- “X804A 4 Gang Smart Wifi Switch”
FYI for anyone else the GPIO Pins on the DETA 6904HA are
- touch buttons # P10, P6, P9, P14
- relays # P24, P7, P26, P8
- status LED P1
2 Likes
I have just found and old Tenda smart plug in the unused stuff box that has a Realtek RTL8710BX chip.
This device is not Tuya, it used it’s own app, so cloudcutter can’t be used.
So what is the process to flash this by serial ? What firmware do I put on it initially ??
It happened - it’s merged! ![]()
![]()
![]()
![]()
![]()
ESPHome 2023.9.0 is scheduled to be released next Wednesday with LibreTiny support ![]()
![]()
3 Likes
Yup! 10 char
This is pretty amazing. This really expands the number of devices that ESPhome works on. They might even need to change the name!
![]() I had this thought…
I had this thought…
serial method, connect tx2, rx2 pins and ground tx2 for a moment to start flashing
also try the 2mb 468k board if ota isn’t working for the RTL8710bx
rtl87xx:
  board: generic-rtl8710bn-2mb-468k
  framework:
    version: latest
Hi, I’ve just flashed an Avatto 1 Gang light switch using the GUIFlashTool and everything was clean, I’ve configured the device to be discovered by home assistant and it was recognized right. My question is, Is there any way you could configure an admin password for the config webpage like you do for tasmota? I just want to secure the devices so nobody in the LAN can get into those config pages and mess around with the configuration.
Which config webpage? This one ![]()
If yes just read the docs as it mentions how to add authentication via user/password ![]()
Ok, I have tried to load ESPHome onto the device but get this error:
E: ValueError: Failed to write to 0x800B000
I’m pretty sure I have the serial wired OK as I was able to read the original firmware from the flash, a look at the file shows this:
This flash type is not supported!
 CHIPID[%08x]
The flash chip is a H25S80BG which seems to be a 8Mbit.


Any ideas ??
Never got that error before.
Can you post that in the libretiny discord for discussion
I have created new uf2 files for the 3 possible options for that chip with Esphome 23.9.0b1a and get the same error with all of them. I’m pretty sure I have the serial stuff connected correctly and power is OK as I I can read from the device.
I can’t access my Discord account for some reason so I created an issue on the LibreTiny github and added the dump of the original firmware.