Detailed guide on how to flash the new Tuya Beken Chips with OpenBK7231T

I would NOT let it do any update. And while I’ve not been in the same scenario you are in now (not yet run across a wb2s chip with mcu attached), you might try a cloud cut and ‘guess’ at the firmware version. As long as you select the correct BK T or N chip, from my experience you stand a very small chance of ‘bricking’ the unit, it will just fail the ‘cut’ and reset it and the cloudcuttter machine and try another.

Do a filter/search for wb2s, which appears to be the chip in your device, however you should verify
https://openbekeniot.github.io/webapp/devicesList.html

This is a worse case path, however it does show with the above posts that you might need to do a physical firmware install with wires and a usb serial converter.

Good hunting!

Many thanks for the tips @dproffer - ill keep pursuing over the weekend and report back

I managed to flash this with ESP Home (LibreTiny version) but it is not for the faint of heart. Did it ‘with wires’ and usb serial. So a little soldering involved. Normally straight forward but due to power monitoring chip connected to TX pin had to make a trace cut before I could flash new firmware, then repair.
With a bit of practice on some old circuit boards and some care can be done.

Hi David,
Definitely do not update.
I had same problem too. If there is an update available, you can’t see what current version is.
If anyone knows how to get current version if update is available, that would be great to know.

I have successfully flashed Deta 6294HA Outdoor Powerpoint over wireless.

Sorry, I can’t find where I wrote down the version No, but it is one of these:
(pretty sure it’s deta-6920ha-double-touch-outlet-v1.1.4)

deta-6920ha-double-touch-outlet-v1.0.6
deta-6920ha-double-touch-outlet-v1.1.4
arlec-pc191ha-smart-plug-bk7231n-v1.1.8
arlec-pc191ha-smart-plug-bk7231t-v1.3.5

My esphome config is:

substitutions:
  device_name: detaexternalpowerpoint1
  friendly_name: "detaexternalpowerpoint1"
  device_ip: 192.168.1.136

esphome:
  name: ${device_name}
  friendly_name: ${friendly_name}

libretuya:
  board: wb2s
  framework:
    version: dev

# Enable logging
logger:
#  level: DEBUG
#  baud_rate: 0

# Enable Home Assistant API
api:
  encryption:
    key: "KEY"

ota:
  password: "otapassword"

wifi:
  ssid: !secret wifi_ssid
  password: !secret wifi_password
  #use_address: 192.168.1.21 
  manual_ip:
    static_ip: !secret ip_detaexternalpowerpoint1
    gateway: !secret ip_gateway
    subnet: !secret ip_subnet
    dns1: !secret ip_dns1

  # Enable fallback hotspot in case wifi connection fails
  ap:
    ssid: "Detapowerpoint1 Fallback Hotspot"
    password: "hotspot pass"


# Enable time component for use by daily power sensor
time:
  - platform: homeassistant
    id: homeassistant_time

uart:
  rx_pin: P10
  baud_rate: 4800

sensor:
  - platform: uptime
    name: ${friendly_name} Uptime
    filters:
      - lambda: return x / 60.0;
    unit_of_measurement: minutes

  - platform: wifi_signal
    name: ${friendly_name} Signal
    update_interval: 300s

  - platform: cse7766
    update_interval: 15s
    current:
      name: "${friendly_name} Current"
      icon: mdi:current-ac
      filters:
        - multiply: 4.869
        - sliding_window_moving_average:
            window_size: 10
            send_every: 10
            send_first_at: 1
    voltage:
      name: "${friendly_name} Voltage"
      icon: mdi:flash
      filters:
        - multiply: 1.925

    power:
      name: "${friendly_name} Power"
      icon: mdi:gauge
      id: ${friendly_name}_wattage
      filters:
        - sliding_window_moving_average:
            window_size: 10
            send_every: 10
            send_first_at: 1

    energy:
      name: "${friendly_name} energy"
      icon: mdi:gauge
      id: ${friendly_name}_energy
      filters:
        - sliding_window_moving_average:
            window_size: 10
            send_every: 10 
            send_first_at: 1

  - platform: total_daily_energy
    name: "${friendly_name} Daily Energy"
    power_id: ${friendly_name}_wattage
    filters:
      - multiply: 0.001
    unit_of_measurement: kWh
    icon: mdi:chart-bar

# Buttons
binary_sensor:
  # Left button
  - platform: gpio
    device_class: power
    pin:
      number: P7
      mode:
        input: true
        pullup: true
      inverted: true
    name: "${friendly_name} Left Button"
    filters:
      - delayed_on: 10ms
    on_press:
      - switch.toggle: relay_a
      - if:
          condition:
            and:
              - switch.is_off: relay_a
              - switch.is_off: relay_b
          then:
            - switch.turn_off: led_switch

  # Right button
  - platform: gpio
    device_class: power
    pin:
      number: P24 #D6
      mode:
        input: true
        pullup: true
      inverted: true
    name: "${friendly_name} Right Button"
    filters:
      - delayed_on: 10ms
    on_press:
      - switch.toggle: relay_b
      - if:
          condition:
            and:
              - switch.is_off: relay_a
              - switch.is_off: relay_b
          then:
            - switch.turn_off: led_switch

switch:
  - platform: gpio
    pin: P8
    name: "${friendly_name} - LED"
    restore_mode: always_off
    id: led_switch
    inverted: true
    icon: mdi:led-variant-on
    on_turn_on:
      - if:
          condition:
            and:
              - switch.is_off: relay_a
              - switch.is_off: relay_b
          then:
            - switch.turn_on: led_switch
    on_turn_off:
      - if:
          condition:
            and:
              - switch.is_off: relay_a
              - switch.is_off: relay_b
          then:
            - switch.turn_off: led_switch

  - platform: gpio
    pin: P6
    name: "${friendly_name} - A"
    restore_mode: restore_default_off
    id: relay_a
    inverted: false
    icon: mdi:power-socket-au
    on_turn_on:
      - if:
          condition:
            switch.is_off: led_switch
          then:
            - switch.turn_on: led_switch
    on_turn_off:
      - if:
          condition:
            and:
              - switch.is_off: relay_a
              - switch.is_off: relay_b
          then:
            - switch.turn_off: led_switch

  - platform: gpio
    pin: P26 #D7
    name: "${friendly_name} - B"
    restore_mode: restore_default_off
    id: relay_b
    inverted: false
    icon: mdi:power-socket-au
    on_turn_on:
      - if:
          condition:
            switch.is_off: led_switch
          then:
            - switch.turn_on: led_switch
    on_turn_off:
      - if:
          condition:
            and:
              - switch.is_off: relay_a
              - switch.is_off: relay_b
          then:
            - switch.turn_off: led_switch

  - platform: restart
    name: "${friendly_name} REBOOT"

This is brilliant, I’ll have to try this. By chance have you done the double two way switch as well? I have two of those as well as a single two way switch.

No, Sorry haven’t tried the 2 gang version. I need a 3 gang and 4 gang versions.
It is possible to have smart non-2way switches and have home assistant manage synchronisation of status between switches. My personal preference is that smart devices need to be able to still function without a central device controlling them

There’s a new esphome device group component that can be use to link the switches without ha.
Ideal to emulate 2 way or toggle esphome lights with decoupled relays

These steps worked for me but I needed to select the device as this one: 1.1.5 - BK7231T / oem_bk7231s_rnd_zero_dctrl_switch

It was the only one that would then get me to the next step where I could select Lonsonho.

Again - the steps and yaml were otherwise perfect, so thank you! Next up will be working out the two 2 gang 2 way switches I have :slight_smile:

Thanks for info. I have some 4 Gang switches that I have been holding off doing. I’ll give it a go.

Hi Matt,
Did you check out what version was already on the device through the phone app?
It would be interesting to know if other versions worked also.

Same as what you mentioned in your post - > For Deta 6951HA 2 way switch - MAIN is V1.1.5 / MCU is 1.1.5.

So I thought I might have been able to work out the way to set up a 2 gang 2 way Deta smart switch, but in checking all previous Deta devices on Esphome or Tasmota there doesn’t seem to be a consistent approach to the pinout. Does anyone have any advice on how to work out the pin assignment for when I flash Esphome via Cloudcutter to this device? The device model is 6952HA.

You can still use ltchiptool to get the device pinout

Is that after using cloudcutter and installing esphome kickstart?

Yes, unless the device use tuya mcu, then it’s a bit of trial and error finding the dpids

For anyone with a Deta 2 Gang 2 Way switch (6952HA) the following worked for me…

P6 - Relay 2
P14 - Relay 1
P8 - Power Sensor Switch 1
P9 - Power Sensor Switch 2
P23 - Switch 2
P24 - Status LED
P26 - Switch 1

The ltchiptool worked a treat, picking up everything bar the power sensors but they didn’t take long to work out given that earlier in the thread it was shared that the single gang version used P8.

1 Like

I have managed to use Cloudcutter and get LibreTiny working on an Aldi Casalife AL2017-TGTS CWWW down light. The device is in the Cloudcutter list so that bit was quite straight forward.

The code generated by ltchiptool is not correct as this light needs the color_temperature light platform not the cwww platform.

# Aldi Casa AL2017-TGTS CWWW Down Light
# Beken BK7231t with LibreTiny
# casa-dl-2.yaml

esphome:
  name: casa-dl-2
  friendly_name: casa-dl-2
  
  on_boot:
    priority: 600
    then:
      - light.turn_on: 
          id: light_cwww
          brightness: 35%
          color_temperature: 3000K

bk72xx:
  board: generic-bk7231t-qfn32-tuya

logger:

web_server:

captive_portal:

mdns:

api:
  password: ""

ota:
  password: ""

wifi:
  ssid: !secret wifi_ssid
  password: !secret wifi_password
  ap:

text_sensor:
  - platform: libretiny
    version:
      name: LibreTiny Version

output:
  - platform: ledc
    id: colour_temp
    pin: P7
    inverted: True
  - platform: ledc
    id: bright
    pin: P8

light:
  - platform: color_temperature
    id: light_cwww
    name: Light
    color_temperature: colour_temp
    brightness: bright    
    cold_white_color_temperature: 6500 K
    warm_white_color_temperature: 2700 K
# Ensure the light turns on by default if the physical switch is actuated.
    restore_mode: ALWAYS_ON
    
sensor:
  - platform: wifi_signal
    name: "Casa2 WiFi"
    update_interval: 60s

Update: The newer lights dated 05/2013 worked fine with the " aldi-lightway-smart-al2017-tgts-downlight.json" profile.
An older one dated 09/2021 had a different firmware version needed the " oem-bk7231s-light-ty-2.9.15-sdk-1.0.8-40.00.json" profile. The firmware version can be found in the Tuya Smart app.

1 Like

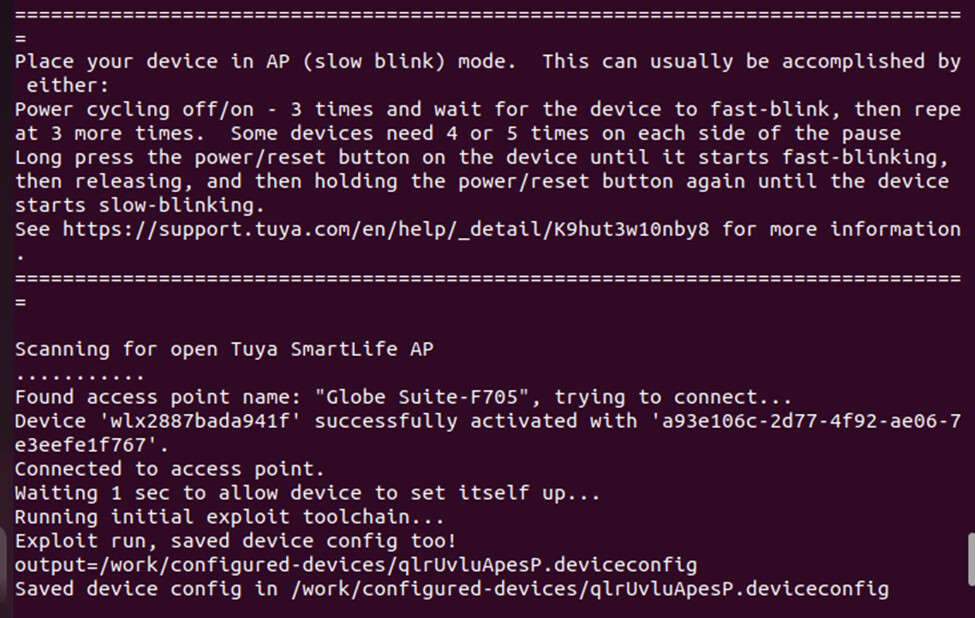
Just to add to the guide. I tried this on Virtual Box with a WiFi dongle. Worked on a 4 pack of Globe bulbs at 19.97 and 4 pack of Globe Plugs for 14.97 both discounted at Costco Canada. I have compiled a brief step by step. I followed a video by @digiblur

Open a system terminal
Run command: cd tuya-cloudcutter
Run command: sudo ./tuya-cloudcutter.sh
Select option 2

Then click enter and browse to your profile

Select your device

Select your firmware


Click yes

Select esphome

Follow the instructions

Power cycle your device and run in slow AP mode again

Join kickstart-bk7231t WiFi AP on your phone
Once you add the device to your network look for a device on your router
Put in your credentials to your WiFi
Run the Ichiptool

You may already see your device (192.168.88.60). Click on the first option
Open up Home Assistant and run LibreTiny ESPHome
Copy the YAMLand paste into the New Device profile. As suggested by Travis I only kept the first two lines of code

After ESP home has compiled the download, navigate to in your web browser to the IP Address and upload

In Home assistant you should get a new devices found

Follow the prompts and enjoy your freedom from being tethered to the cloud!

1 Like

And super excited to see this getting merged into Esphome for the next stable release.

Thanks @pencilhead, for documenting the approach you used for the DETA 6951HA.
It helped me a lot.

I’ve now used it for a DETA 6904HA 4 gang light switch with a slight modification successfully.

I selected :

  • “1.1.5 - BK7231T / oem_bk7231s_rnd_zero_dctrl_switch”
  • “Lonsonho”
  • “X804A 4 Gang Smart Wifi Switch”

FYI for anyone else the GPIO Pins on the DETA 6904HA are

  • touch buttons # P10, P6, P9, P14
  • relays # P24, P7, P26, P8
  • status LED P1
2 Likes