After 1.5 years of procrastination I finally have a working implementation of an electric grill/smoker powered by ESPHome!
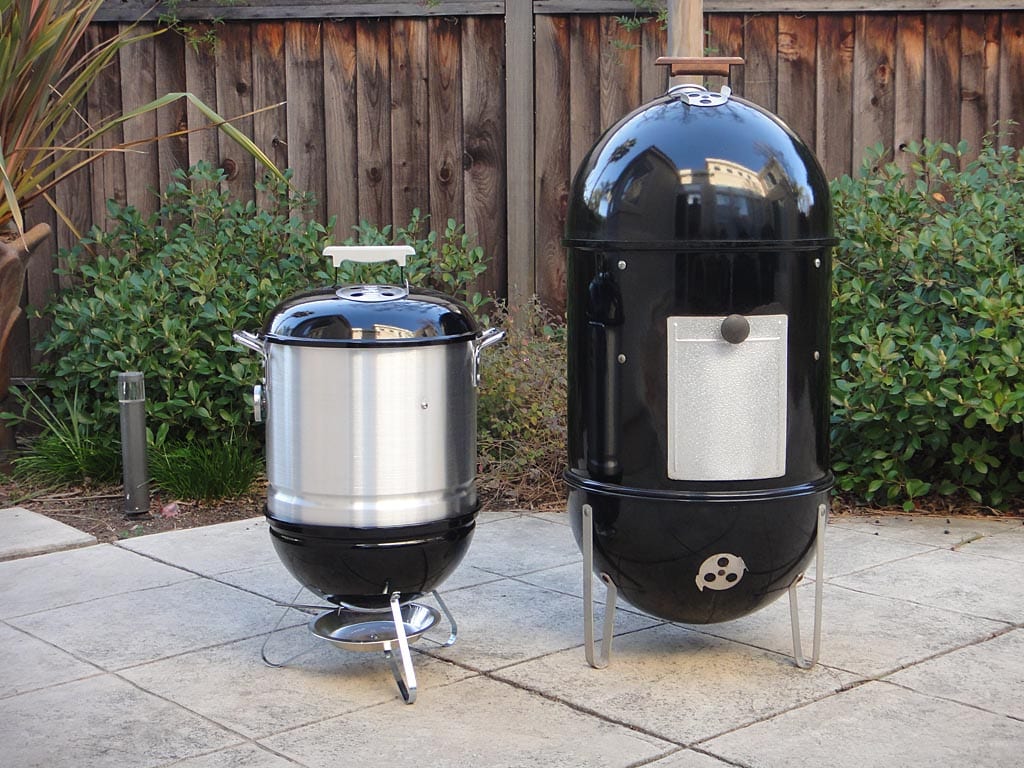
It all began when I saw the Alton Brown DIY flower pot smoker. Something like this:

I then saw the Weber Smokey Joe converted to a smoker with a tamale pot and I knew this is what I wanted.
But I haven’t seen anyone build this as an electric smoker so I decided that I would be the first.
I disassembled the counter-top burner and mounted the heating element to the charcoal grate, for the past year and a half I was using the smoker like this with the base of the electric burner outside of the grill. The temp control was terrible. The temp control seems to use a knob with a bi-metallic element that turns the grill on and off, and by removing the heating element the temp control got much worse.
I decided that it needed PID but I also wanted it integrated into Home Assistant. I went to the esphome webpage and found that there was no PID climate. I decided to start writing a custom climate implementation with PID but my c++ skills are not the best. This was during my last semester of my engineering degree so it got pushed to the back burner.
Every few months I would search to see if someone would beat me to making the PID climate and a few months ago it finally happened and made its way into the esphome beta build. My work got in the way of starting the implementation and soon enough, PID climate was pulled into the stable release. I was going to design a PCB but I got impatient so I used a ESP32 devkit C board and made this spaghetti monstrosity with all black wire that will soon be wrapped in electrical tape and hidden from the world.
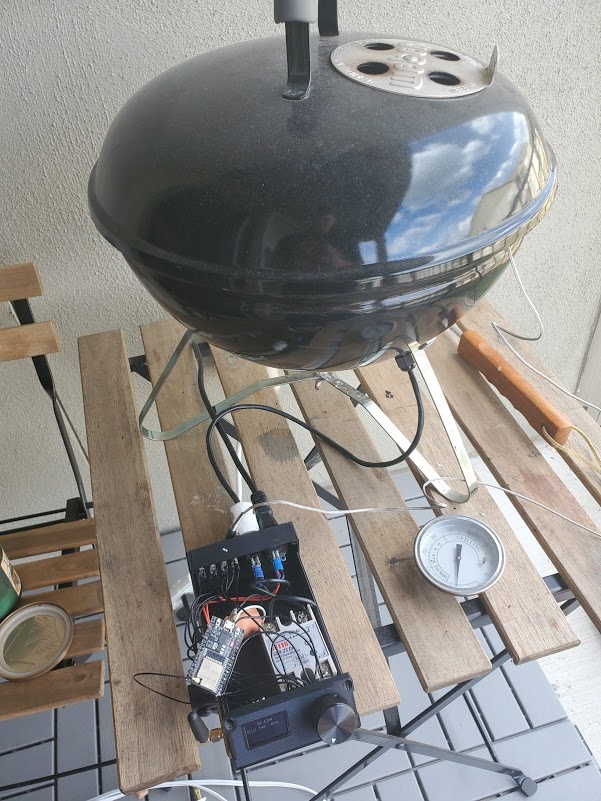
After about a day of tuning IT WORKS! The system response could be a little better but I’m pretty happy. It will most likely also need two tuning profiles for grill an smoker mode.


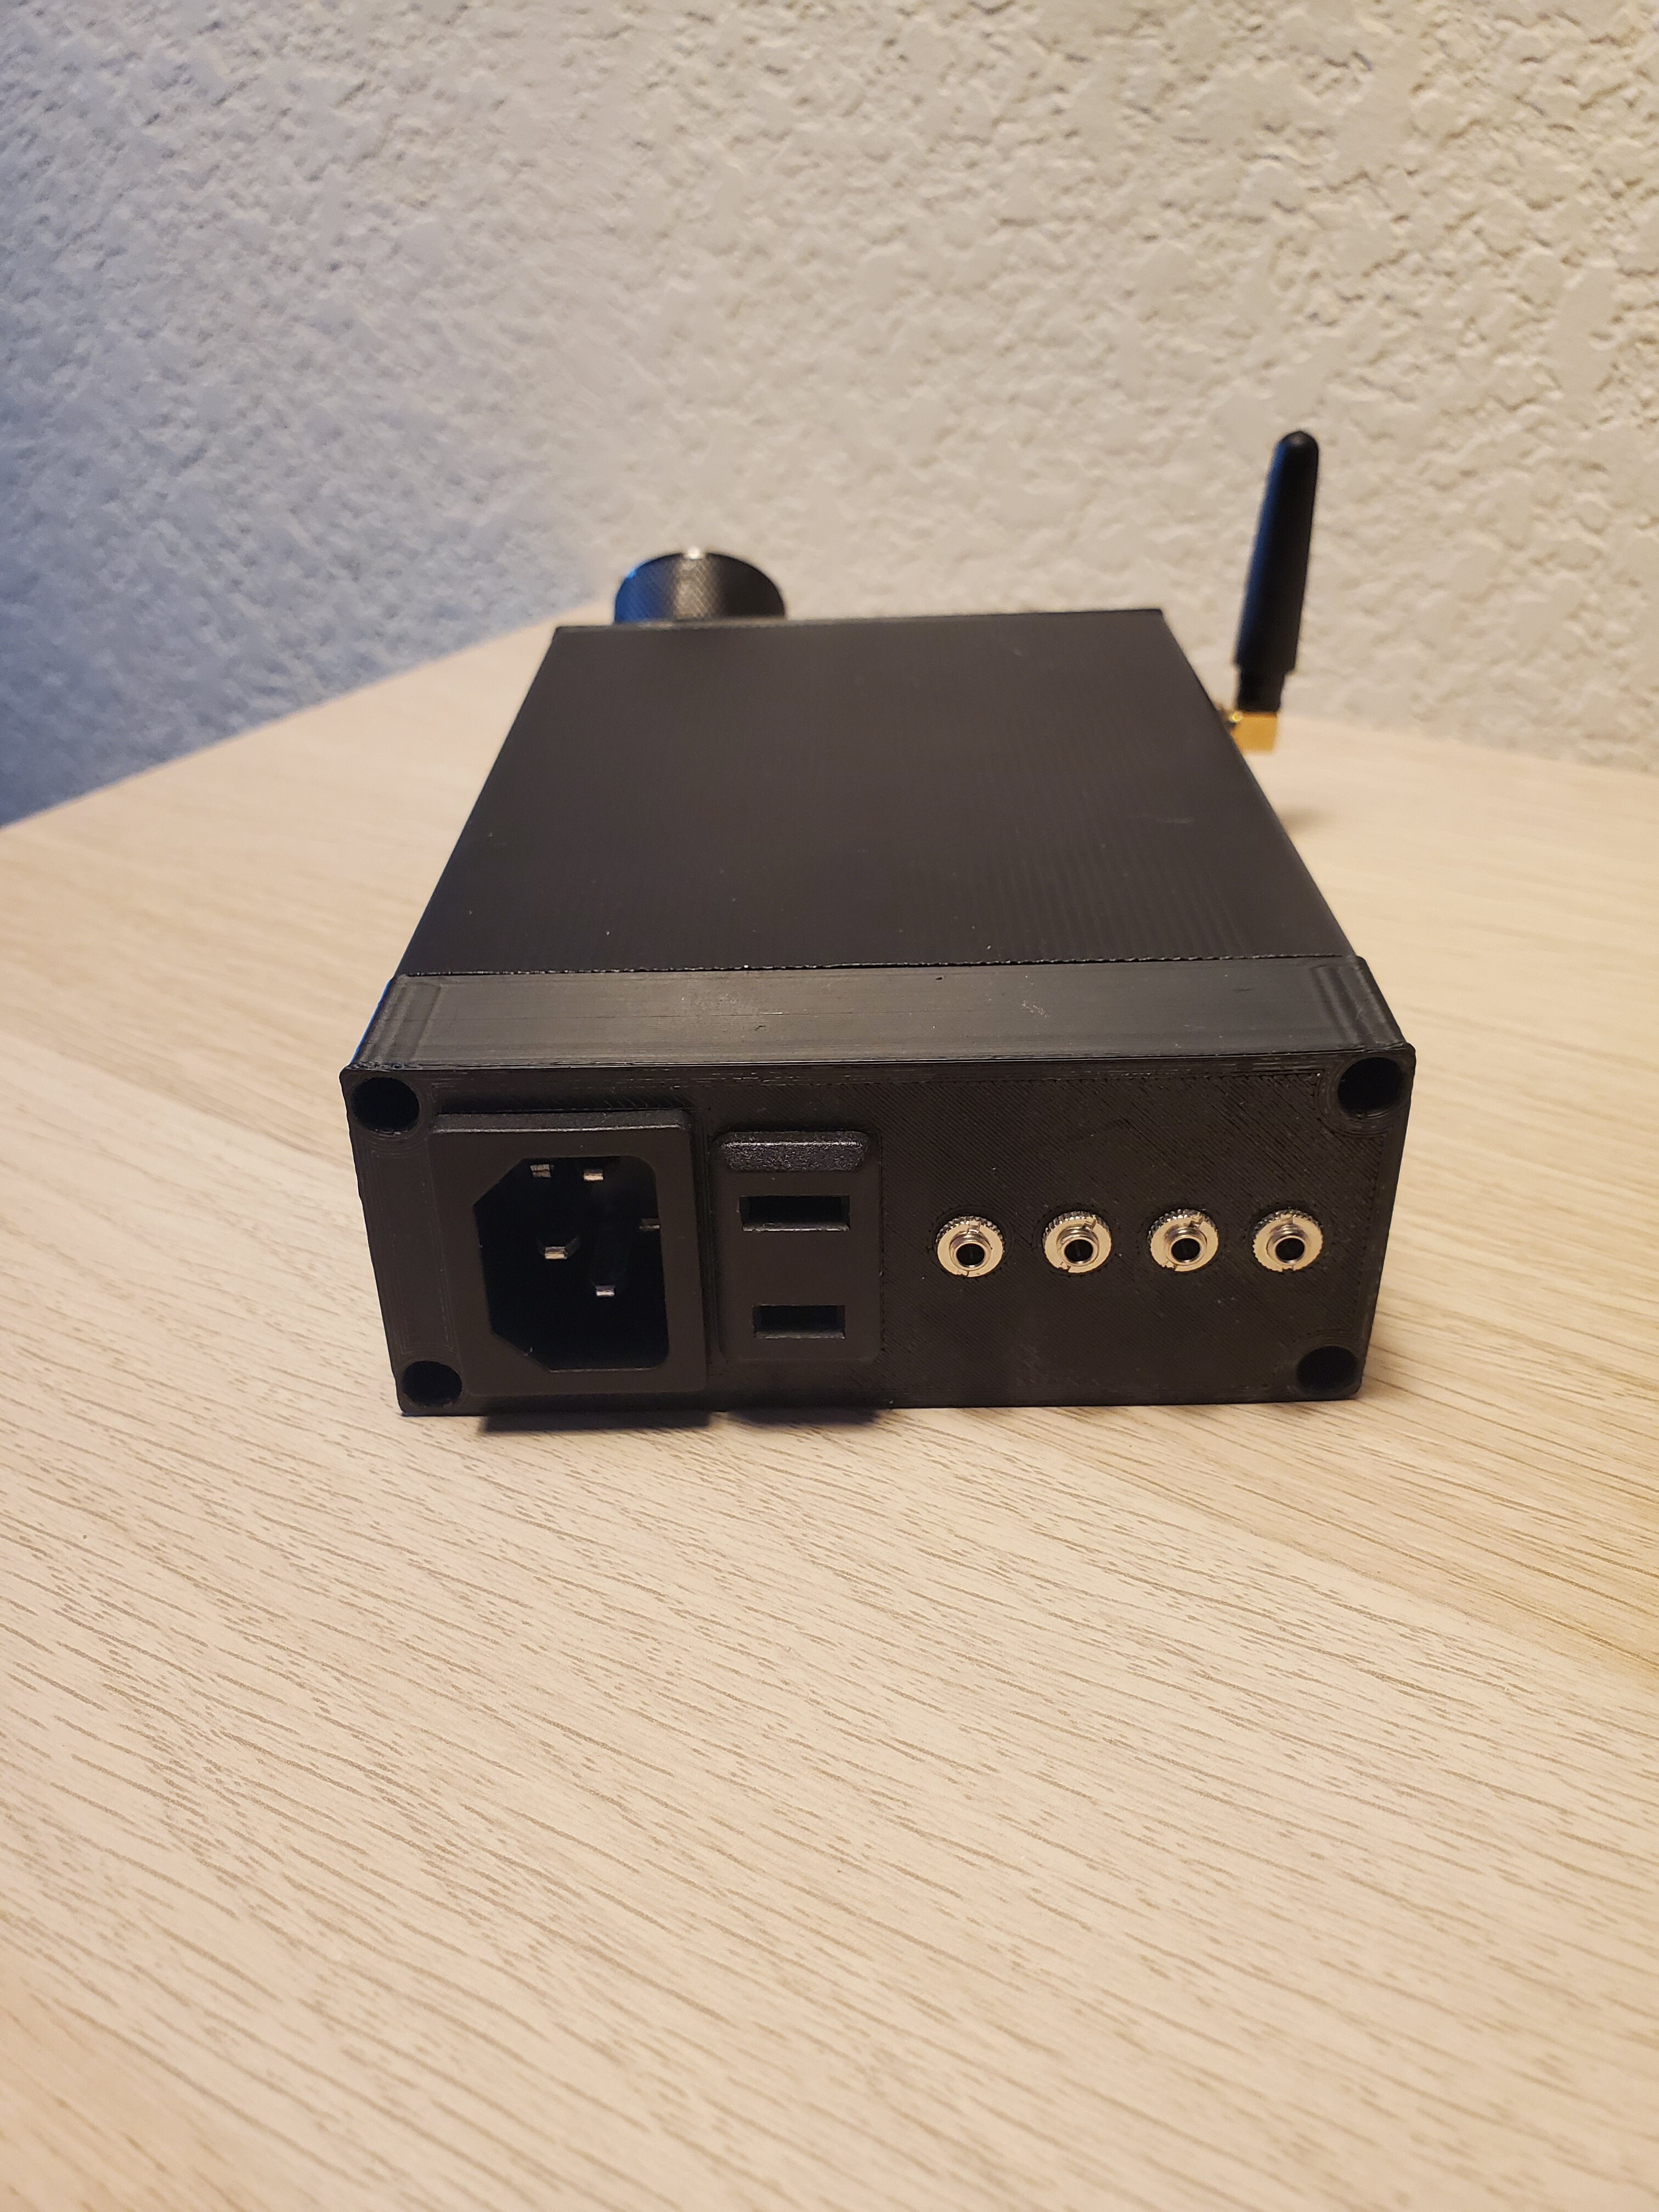
This is the controller all closed up.


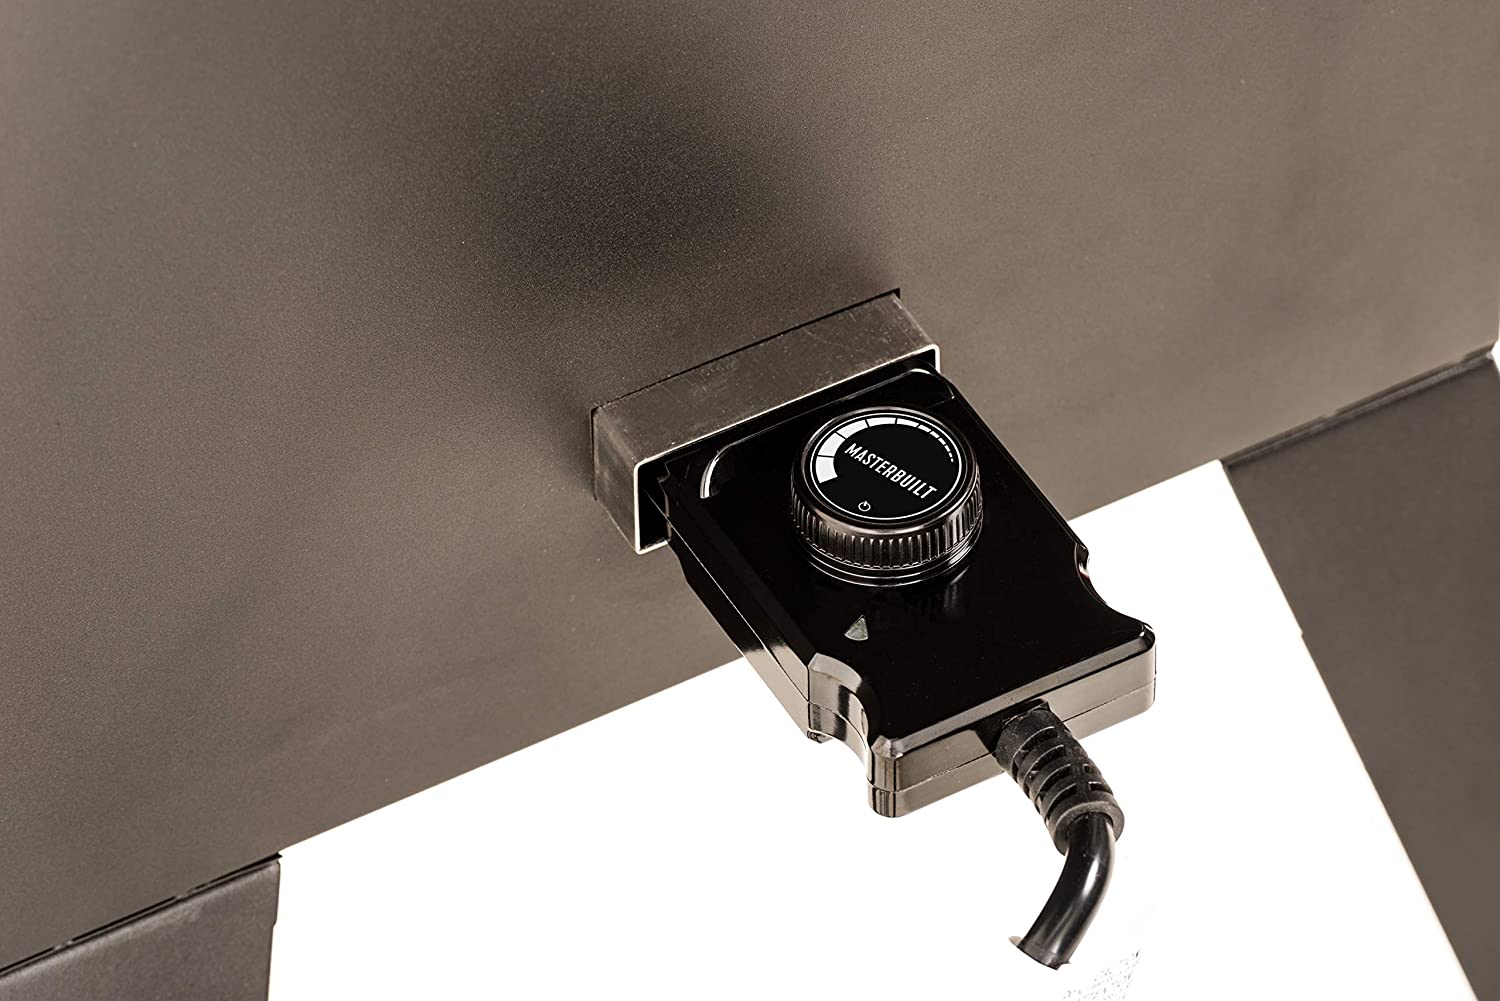
From left to right we have power in, power out, and the 4 temperature probes.
Where the burner coil is located.

For the grill temperature probe I use a Thermoworks High Temp Air Probe. Wood chips sit in a stainless pie pan on top of the burner coil.

Wiring and mounting of burner. Mounting uses no hardware. The metal bracket shown came as part of the coil, i ground it down so it would fit between the charcoal grate.

Smoker mode!

This schematic was originally going to turn in to a PCB with the ESP32 WROOM module soldered directly but I did not want to wait. All wiring is pretty much the same. The pins labeled Jack1-4 are for the switched 1/8 jacks to detect if a probe is connected. The same can be implemented in software since the voltage at the ADC will be 3.3V without a probe plugged in. I am also not using the exact SSR from the schematic, that was going to be PCB mounted but instead I used a common Fotek SSR.

esphome:
  name: lil_smokey
  platform: ESP32
  board: nodemcu-32s
  on_boot:
    then:
      - sensor.rotary_encoder.set_value:
          id: rotary
          value: 1
      - switch.turn_on: ntc_vcc


wifi:
  ssid: "nice try"
  password: "wouldnt you like to know"
    # Optional manual IP
  manual_ip:
    static_ip: nope
    gateway: no way
    subnet: kick rocks
  # Enable fallback hotspot (captive portal) in case wifi connection fails
  ap:
    ssid: "Lil Smokey Fallback Hotspot"
    password: "nuh uh"

captive_portal:

# Enable logging
logger:


# Enable Home Assistant API
api:

ota:

### Pull time from Home Assistant because everything needs a clock on it ###
time:
  - platform: homeassistant
    id: my_time

### Setup i2c for display and ADC ###
i2c:
  sda: GPIO15
  scl: GPIO4

switch:
### Power for Thermistors ###
  - platform: gpio
    pin: GPIO19
    id: ntc_vcc
### Switches for Setting and Getting PID Values in Home Assistant ###
  - platform: template
    name: "PID Set"
    turn_on_action:
      - climate.pid.set_control_parameters:
          id: pid_climate
          kp: !lambda
              return id(p_coefficient).state;
          ki: !lambda
              return id(i_coefficient).state;
          kd: !lambda
              return id(d_coefficient).state;
  - platform: template
    name: "Get PID Values"
    turn_on_action:
      - homeassistant.service:
          service: input_number.set_value
          data:
            entity_id: input_number.p_coefficient
            value: !lambda return id(kp).state;
      - homeassistant.service:
          service: input_number.set_value
          data:
            entity_id: input_number.i_coefficient
            value: !lambda return id(ki).state;
      - homeassistant.service:
          service: input_number.set_value
          data:
            entity_id: input_number.d_coefficient
            value: !lambda return id(kd).state;
### Switch to reset integral term for PID calculation ###
  - platform: template
    name: "Reset Integral"
    turn_on_action:
      - climate.pid.reset_integral_term: pid_climate

### Rotary Encoder Button - Some code to function as state machine - UNDER CONSTRUCTION ###
binary_sensor:
  - platform: gpio
    pin: GPIO21
    id: encoder_button
    filters:
      - invert:
    on_press:
      then:
        - if:
            condition:
               lambda: 'return id(edit);'
            then:
              - globals.set:
                  id: edit
                  value: "false"
              - sensor.rotary_encoder.set_value:
                  id: rotary
                  value: !lambda |-
                    return id(current_page);
            else:
              - globals.set:
                  id: edit
                  value: "true"
              - sensor.rotary_encoder.set_value:
                  id: rotary
                  value: 0
              - display.page.show: !lambda |-
                  if (id(current_page)==1) {
                    return id(page11);
                  } if (id(current_page)==2) {
                    return id(page12);
                  } if (id(current_page)==3) {
                    return id(page13);
                  } if (id(current_page)==4) {
                    return id(page14);
                  } if (id(current_page)==5) {
                    return id(page15);
                  }

### Global Vars for OLED Menu State Retention ###
globals:
  - id: edit
    type: bool
    initial_value: "false"
  - id: current_page
    type: int
    initial_value: "1"

### PID Loop ###
climate:
  - platform: pid
    visual:
      min_temperature: 150 °F
      max_temperature: 525 °F
      temperature_step: 1 °C
    id: pid_climate
    name: "Electric Grill"
    sensor: temp1
    default_target_temperature: 0°C
    heat_output: heater
    control_parameters:
      kp: 0.037
      ki: 0.0003
      kd: 3
      min_integral: 0
      max_integral: 0.9

### Slow PWM for PID Output ###
output:
  - platform: slow_pwm
    pin: GPIO12
    id: heater
    period: 3s

### External Analog to Digital Converter Setup ###
ads1115:
  - address: 0x48

sensor:
### Sensors to Read PID information into Home Assistant ###
  - platform: pid
    name: "PID Result"
    type: RESULT
  - platform: pid
    name: "PID Integral Term"
    type: INTEGRAL
  - platform: pid
    name: "PID Derivative Term"
    type: DERIVATIVE
  - platform: pid
    name: "PID Proportional"
    type: PROPORTIONAL
  - platform: pid
    name: "PID P Coefficient"
    id: kp
    type: KP
  - platform: pid
    name: "PID I Coefficient"
    id: ki
    type: KI
  - platform: pid
    name: "PID D Coefficient"
    id: kd
    type: KD
  - platform: pid
    name: "PID Output"
    type: HEAT
### Sensors to read input numbers for PID tuning in Home Assistant ###
  - platform: homeassistant
    name: "P Coefficient"
    entity_id: input_number.p_coefficient
    id: p_coefficient
  - platform: homeassistant
    name: "I Coefficient"
    entity_id: input_number.i_coefficient
    id: i_coefficient
  - platform: homeassistant
    name: "D Coefficient"
    entity_id: input_number.d_coefficient
    id: d_coefficient
###-----------------------------------------------------------------------------------------------------###
###                                     Temperature Sensing                                            ###
###-----------------------------------------------------------------------------------------------------###
  - platform: ntc
    sensor: resistance_sensor
    id: temp1
    name: "temp1"
    calibration:
      b_constant: 3950
      reference_temperature: 25°C
      reference_resistance: 100kOhm
### Exponential filter to smooth temp readings to mitigate derivative term instability ###
    filters:
      - exponential_moving_average:
          alpha: 0.09
          send_every: 1

### Does voltage divider calculations to determine resistance of thermistor ###
  - platform: resistance
    id: resistance_sensor
    sensor: adc1
    configuration: DOWNSTREAM
    resistor: 10000Ohm
    filters:
### Custom filter to filter out obviously erraneous values ###
      - lambda: |-
            if (400000 >= x && 200<=x) return x;
            else return {};
### Median filter to minimize influence of outlier values ###
      - median:
            window_size: 30
            send_every: 1

### Reads voltage from External Analog to Digital Converter ###
  - platform: ads1115
    multiplexer: 'A0_GND'
    gain: 4.096
    id: adc1
### Might be able to read faster than this. Have not tried yet ###
    update_interval: 0.75s
### Been working on temp control and signal filtetring. Will implement meat probes to display in home assistant and on display ###
  # - platform: ads1115
  #   multiplexer: 'A1_GND'
  #   gain: 4.096
  #   id: adc2
  # - platform: ads1115
  #   multiplexer: 'A2_GND'
  #   gain: 4.096
  #   id: adc3
  # - platform: ads1115
  #   multiplexer: 'A3_GND'
  #   gain: 4.096
  #   id: adc4

###------------------------------------------------------------------------------###
### Rotary Encoder - Some code to function as state machine - UNDER CONSTRUCTION ###
###------------------------------------------------------------------------------###
  - platform: rotary_encoder
    id: rotary
    pin_a: GPIO23
    pin_b: GPIO22
    on_value:
      then:
        - if:
            condition:
              lambda: 'return id(edit)==false;'
            then:
              - if:
                  condition:
                    lambda: 'return id(rotary).state > 5;'
                  then:
                    - sensor.rotary_encoder.set_value:
                        id: rotary
                        value: 1
              - if:
                  condition:
                    lambda: 'return id(rotary).state < 1;'
                  then:
                    - sensor.rotary_encoder.set_value:
                        id: rotary
                        value: 5
              - display.page.show: !lambda |-
                  if (id(rotary).state==1) {
                    return id(page1);
                  } if (id(rotary).state==2) {
                    return id(page2);
                  } if (id(rotary).state==3) {
                    return id(page3);
                  } if (id(rotary).state==4) {
                    return id(page4);
                  } if (id(rotary).state==5) {
                    return id(page5);
                  }
              - globals.set:
                  id:  current_page
                  value: !lambda |-
                    return id(rotary).state;
            else:
              - if:
                  condition:
                    lambda: 'return id(rotary).state == 1;'
                  then:


###-------------------------------------------------------------------###
###                           Display                                 ###
###-------------------------------------------------------------------###
font:
  - file: "chary.ttf"
    id: font_14
    size: 14
  - file: "chary.ttf"
    id: font_12
    size: 12
image:
  - file: "grill.png"
    id: grill
    resize: 24x24
  - file: "meat.png"
    id: meat


display:
  - platform: ssd1306_i2c
    model: "SSD1306 128x64"
    id: oled
    brightness: 1
### Originally set this entirely too fast. Got fast reponse from rotary encoder but caused frequent api disconnects and reconnects ###
    update_interval: 0.5s
    address: 0x3C
    pages:
      - id: page1
        lambda: |-
          if(true){
          it.strftime(40, 0, id(font_14), "%I:%M%p", id(my_time).now());
          }
          it.print(5, 16, id(font_12), "Grill Temp");
          it.printf(10, 34, id(font_14), "%.1f F", id(temp1).state* (9.0/5.0) + 32.0);
          it.print(82, 16, id(font_12), "Mode");
          it.line(5, 28, 64, 28);
          it.line(80, 28, 105, 28);
      - id: page2
        lambda: |-
          it.print(0, 10, id(font_14), "This is page 2!");
      - id: page3
        lambda: |-
          it.print(0, 10, id(font_14), "This is page 3!");
      - id: page4
        lambda: |-
          it.print(0, 10, id(font_14), "This is page 4!");
      - id: page5
        lambda: |-
          it.print(0, 10, id(font_14), "This is page 5!");
      - id: page11
        lambda: |-
          it.printf(0, 10, id(font_14), "This is %4.0f!", id(current_page)+id(rotary).state);
          it.line(100, 10, 128, 10);
      - id: page12
        lambda: |-
          it.print(0, 10, id(font_14), "This is page 2!");
      - id: page13
        lambda: |-
          it.print(0, 10, id(font_14), "This is page 3!");
      - id: page14
        lambda: |-
          it.print(0, 10, id(font_14), "This is page 4!");
      - id: page15
        lambda: |-
          it.print(0, 10, id(font_14), "This is page 5!");