How to access config.txt in Hassio?

Hello good people,
so I just bought a Pi4 with a RaspBee shield with the intention of replacing my IKEA gateway with it. Slapped the 32bit Hassio-image on the Pi, fired it up an soon had my Google home devices as well as Wemo and Tradfri lights working. Now i wanna move the lights from the Gateway to DeConz and stumbled onto the same problem: For the RaspBee to be recognized i need to edit the config.txt, however i only have a Mac at hand wich cant read the FS (and since that is my work computer i cannot install a VM). I am fairly comfortable messing around with computers and copy-pasting commands into terminal but i am completely new to Pi, Hassio and have no idea about SSH, SSH Keys or the like. Now i looked at Debugging Hass.io but the whole thing seems way out of my league with the whole SSH Key stuff and the like. Could anyone give me any advice on how to proceed?

I know i might be in over my head with Hassio requiring quite some knowledge of these things, but I was hoping to do some “learning by doing” withing the relatively safe “container” of Hassio, but this SSH 22222 thing is kinda outside the container…

so just install an app that can read/write linux filesystems?

Thank you for the quick reply!
I looked around for that too but didnt find anything - do you happen to have a link to such an app?

I’ve seen a few mentioned from time to time, but Paragon is one app I think

Thanks a lot, your answer brought me onto the right path:

While Paragon supports the mounting of extFS (Linux) and is perfect for e.g. installing custom components in Hassio the Boot-Partition of the Hassio-Image is in FAT32. Now while Paragon is no use for that there is indeed a work-around to force OSX into mounting a FAT32 Partition!

EDIT: After altering the config.txt and manually loading HACS into Hassio with the aforementioned method i could no longer login to my HA and after reversing the config alteration the system would not even boot anymore. I then flashed the Phoscon SD-Card image and started the Pi using VNC. I started the Phoscon app and let it run idle for about an hour because i read that this will update the Raspbee-Firmware. Then reflashed the SD with Hassio, did the config.txt alterationons (without trying to install HACS) BEFORE firing it up for the first time and now it finally works! Dont forget to manually specify the serial-port on wich the Raspbee sits while installing the integration!

2 Likes

Access config.txt on the HassOS FAT boot partition (Pi3b or Pi3B+)

HassOS uses a completely different partition layout and format than the normal Raspberry Pi (Raspbian / Pi-OS) schema, with eight partitions rather than two.

The first of these partitions (sd[x]1) is the equivalent of the Raspbian/Pi-OS boot partition, normally readable on Windows, Mac & Linux machines. But, when a HassOS format SD card/USB adaptor is inserted, partition one does not auto mount and it is therefore not easy to find and/or edit the config.txt file.

It is possible to manually mount the HassOS boot partition on a linux machine (e.g. another Raspberry Pi and/or the same Raspberry Pi running standard Raspbian/Pi-OS from a separate SD card). The HassOS SD card can then be placed in a USB SD Card Adaptor, the adaptor inserted into the Raspberry Pi and the HassOS boot partition (and more importantly the config.txt file) accessed using the following commands.

df -h
lsblk

sudo mkdir /mnt/boot
sudo mount -t vfat /dev/sda1 /mnt/boot

ls -l /mint/boot
sudo nano /mint/boot/config.txt

sudo umount /dev/sda1
sudo rmdir /mnt/boot

NOTE: where /dev/sda1 is the HassOS device partition 

The HassOS boot partition has many fewer files on it than a Raspian/Pi-OS boot partition, as it loads a different operating system (a minimalist linux appliance OS based on buildroot https://github.com/buildroot/buildroot/tree/master/board/raspberrypi with HassIO running in Docker on top). You will however find the familiar bootcode.bin,cmdline.txt, config.txt, fix up.dat and start.elf together with the usual overlays folder and a subset of the system files (bcm2710-rpi-3-b.dtb, bcm2710-rpi-3-b-plus.dtb, bcm2710-rpi-cm3.dtb)

There are also some ‘new’ files (boot.scr & u-boot.bin), relating to the different operating system (HassOS) to be loaded and run.

This approach allowed me to add the following lines to the config.txt file on my old Raspberry Pi3b . . .

[all]
boot_delay=1
arm_freq=1400
core_freq=500
over_voltage=4
sdram_freq=500

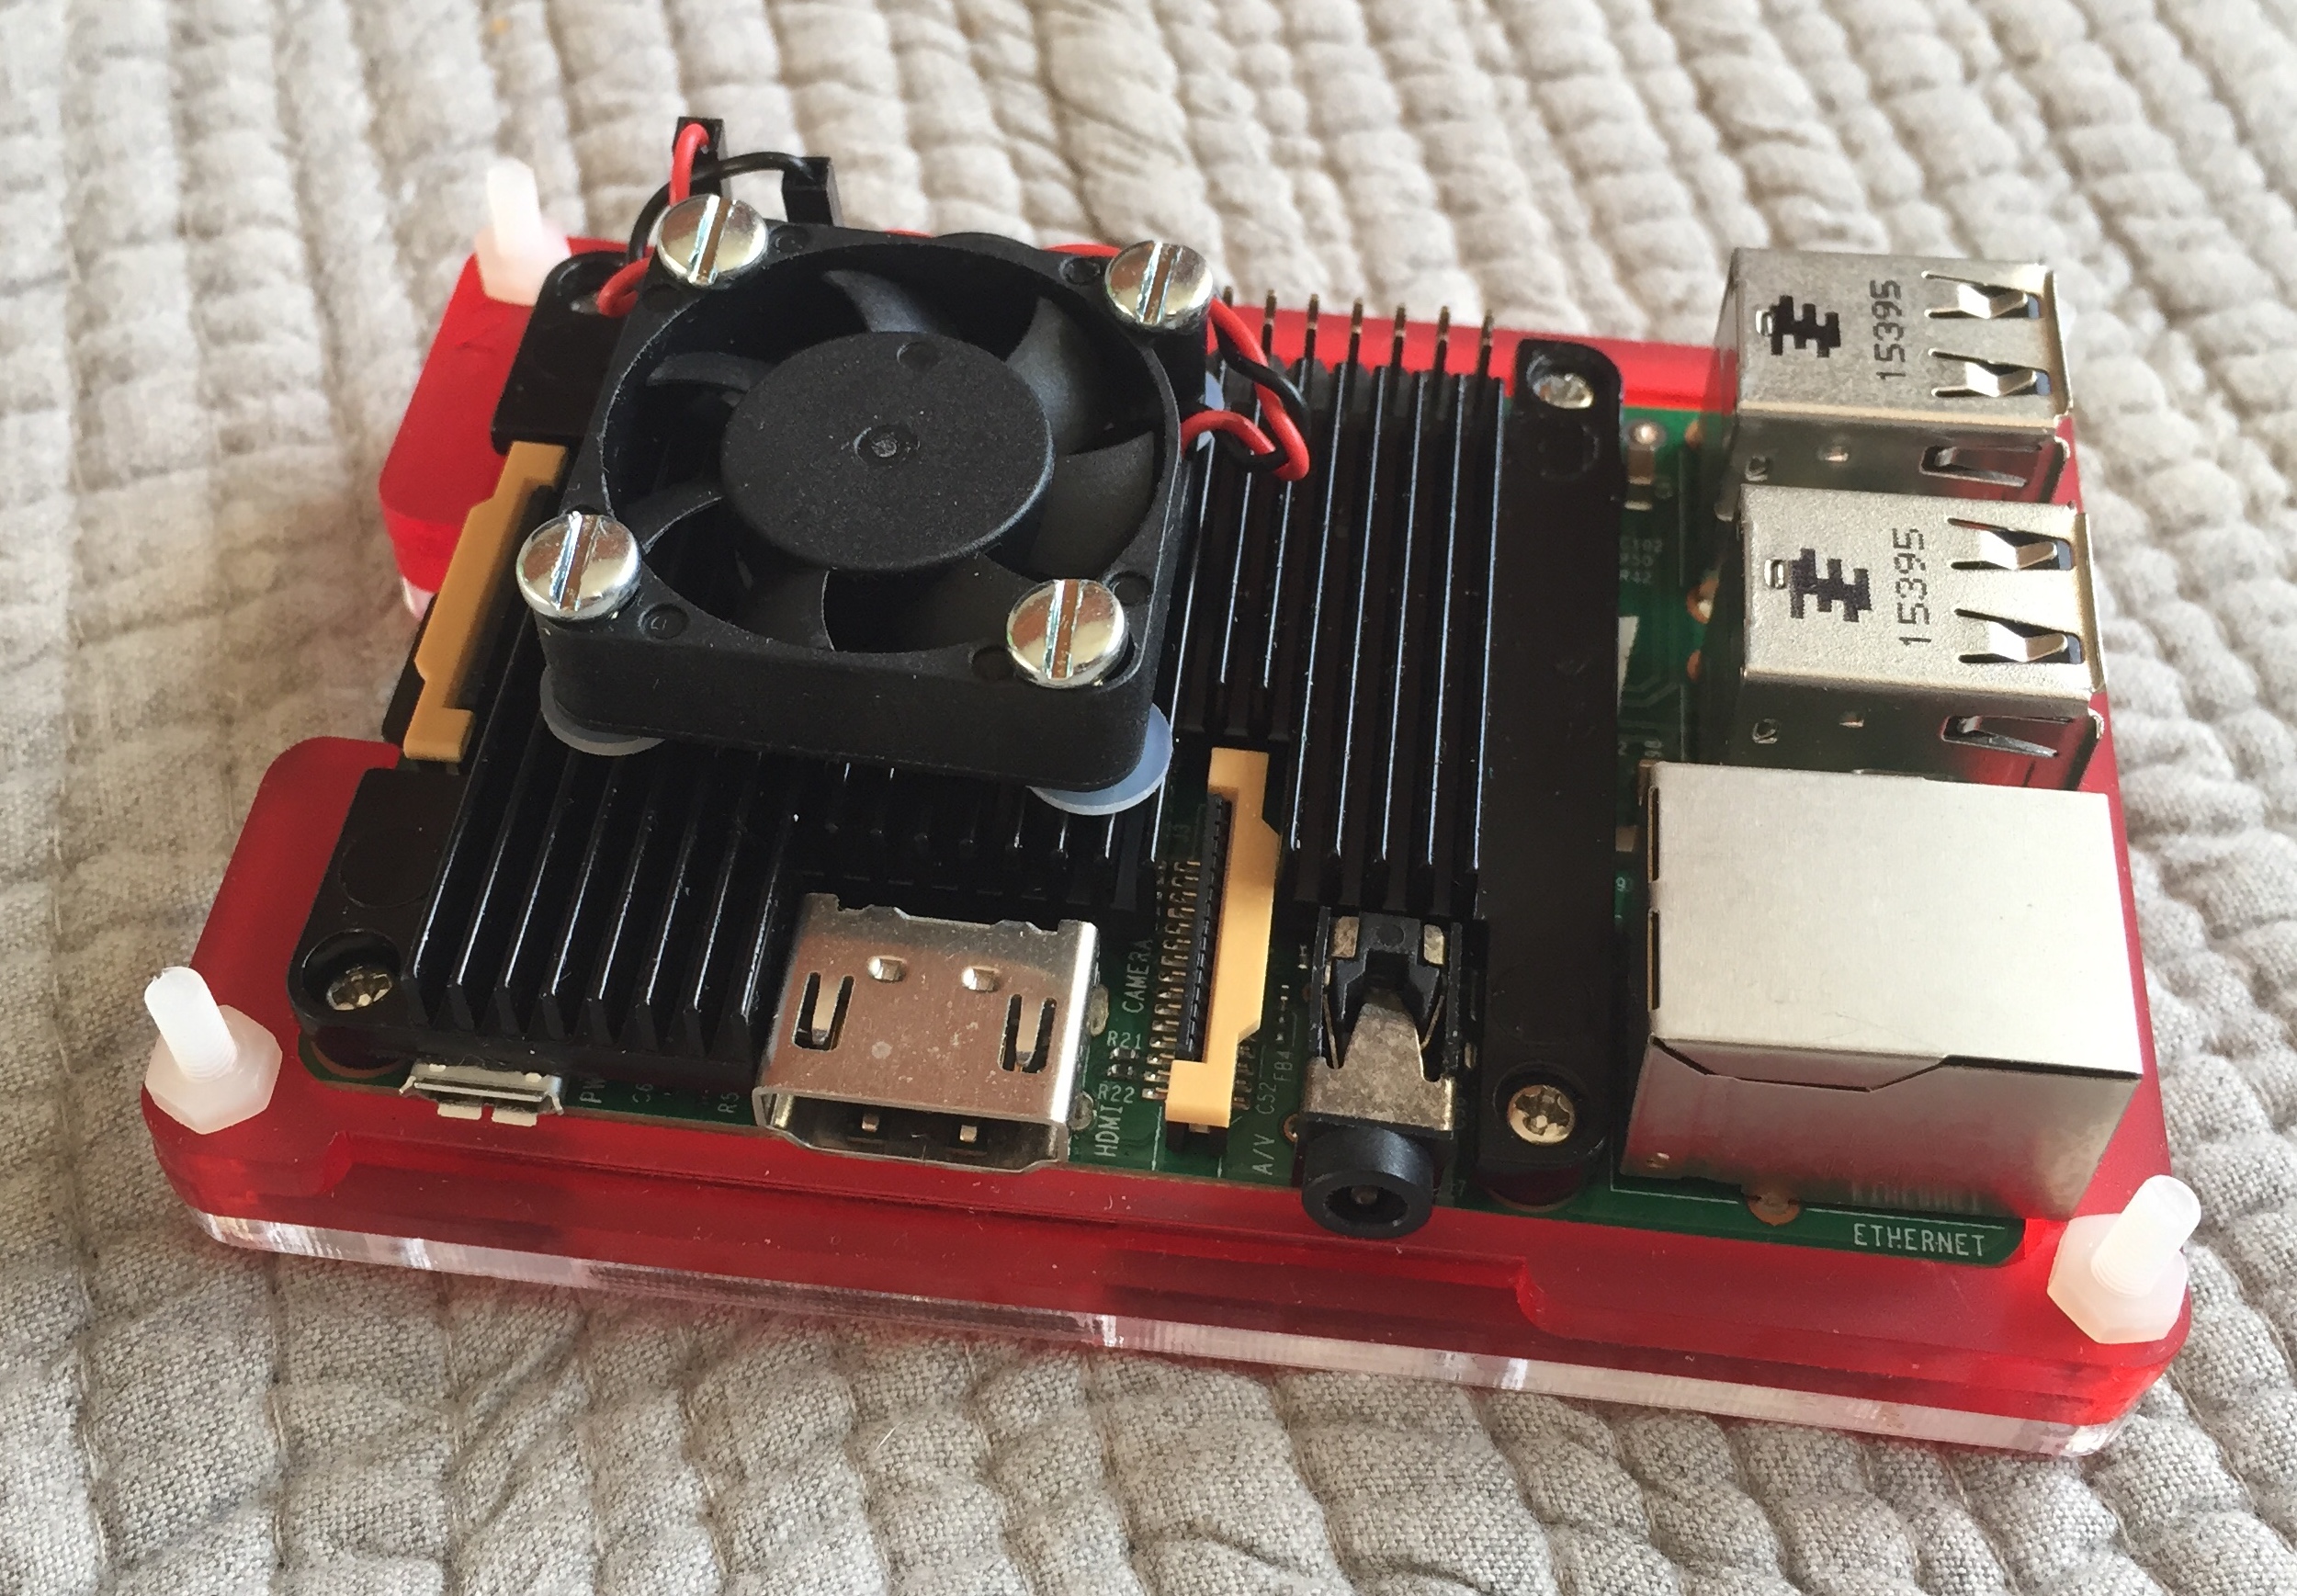
. . . to Over Clock it, and get a significant improvement in horse power & responsiveness [of course, I had also added a substantial heat sink and active cooling with a 5v fan which keeps its CPU temperature down at around 40ºC].

4 Likes

Hi, when I ssh to my Pi on my Mac using:

ssh [email protected] -p 22222

I cannot log into a normal terminal. it has the

ha > 

symbol on. Does anyone know how to access it so I can do

sudo nano /boot/config.txt

?

Many Thanks,
Alex

You could just read and then follow the instructions in the post immediately sbove yours !

hey DWuskow,
Thanks for your reply but I do not think you understand my question. my problem was getting from a terminal starting with ha > to a normal terminal. where I type commands like the one above my first post.

It is obvious that when you log in into home assistant via ssh you get a line that says:

If you need access to host system use 'login'.

so I did type login and now the command prompt changed from ha > to #. But I thought that it was not a proper terminal since when I tried to type basic commands like ls it doesn’t seem to list the files, and there is no indication of the folder I am in. Furthermore, the sudo command seems missing.

Does anyone know what I am missing? Thanks in advance

Here is a piece of code:

ssh [email protected] -p 22222
 _    _                                         _     _              _   
| |  | |                          /\           (_)   | |            | |  
| |__| | ___  _ __ ___   ___     /  \   ___ ___ _ ___| |_ __ _ _ __ | |_ 
|  __  |/ _ \| '_ ` _ \ / _ \   / /\ \ / __/ __| / __| __/ _` | '_ \| __|
| |  | | (_) | | | | | |  __/  / ____ \\__ \__ \ \__ \ || (_| | | | | |_ 
|_|  |_|\___/|_| |_| |_|\___| /_/    \_\___/___/_|___/\__\__,_|_| |_|\__|
                                                                         
Welcome on Home Assistant command line.

For more details use 'help' and 'exit' to close.
If you need access to host system use 'login'.

ha > login
# ls
# df -h
Filesystem                Size      Used Available Use% Mounted on
/dev/root                99.3M     99.3M         0 100% /
devtmpfs                  1.9G         0      1.9G   0% /dev
tmpfs                     1.9G         0      1.9G   0% /dev/shm
tmpfs                     1.9G    972.0K      1.9G   0% /run
tmpfs                     1.9G         0      1.9G   0% /sys/fs/cgroup
tmpfs                     1.9G    972.0K      1.9G   0% /etc/machine-id
/dev/mmcblk0p7           89.0M      1.7M     80.5M   2% /mnt/overlay
/dev/mmcblk0p7           89.0M      1.7M     80.5M   2% /etc/docker
/dev/mmcblk0p7           89.0M      1.7M     80.5M   2% /etc/dropbear
/dev/mmcblk0p1           31.9M      3.1M     28.8M  10% /mnt/boot
/dev/mmcblk0p7           89.0M      1.7M     80.5M   2% /etc/modprobe.d
/dev/mmcblk0p7           89.0M      1.7M     80.5M   2% /etc/modules-load.d
/dev/mmcblk0p7           89.0M      1.7M     80.5M   2% /etc/udev/rules.d
/dev/mmcblk0p7           89.0M      1.7M     80.5M   2% /root/.docker
/dev/mmcblk0p7           89.0M      1.7M     80.5M   2% /root/.ssh
/dev/mmcblk0p7           89.0M      1.7M     80.5M   2% /etc/NetworkManager/system-connections
/dev/mmcblk0p7           89.0M      1.7M     80.5M   2% /etc/hostname
/dev/mmcblk0p7           89.0M      1.7M     80.5M   2% /etc/hosts
/dev/mmcblk0p7           89.0M      1.7M     80.5M   2% /etc/systemd/timesyncd.conf
/dev/mmcblk0p8           57.8G      4.3G     50.5G   8% /mnt/data
/dev/zram1               31.0M    128.0K     28.6M   0% /var
/dev/zram2               15.5M     40.0K     14.3M   0% /tmp
/dev/mmcblk0p7           89.0M      1.7M     80.5M   2% /var/lib/NetworkManager
/dev/mmcblk0p7           89.0M      1.7M     80.5M   2% /var/lib/bluetooth
/dev/mmcblk0p8           57.8G      4.3G     50.5G   8% /var/lib/docker
/dev/mmcblk0p7           89.0M      1.7M     80.5M   2% /var/lib/systemd
/dev/mmcblk0p8           57.8G      4.3G     50.5G   8% /var/log/journal
overlay                  57.8G      4.3G     50.5G   8% /mnt/data/docker/overlay2/d49074cf7ba8794a3fd10aec42ada14998d6d4ba83a49e6a9ca0bdfb65f42c1f/merged
overlay                  57.8G      4.3G     50.5G   8% /var/lib/docker/overlay2/d49074cf7ba8794a3fd10aec42ada14998d6d4ba83a49e6a9ca0bdfb65f42c1f/merged
overlay                  57.8G      4.3G     50.5G   8% /mnt/data/docker/overlay2/8cdba1c8db46d51dee975159a9b7fa7cb3d18223eb3012713f27fa6123498a96/merged
overlay                  57.8G      4.3G     50.5G   8% /var/lib/docker/overlay2/8cdba1c8db46d51dee975159a9b7fa7cb3d18223eb3012713f27fa6123498a96/merged
overlay                  57.8G      4.3G     50.5G   8% /mnt/data/docker/overlay2/3fd7c3ead12c70f4036782ea5940b835a16a96d3cc070f83f2acfd1bf53a5ac5/merged
overlay                  57.8G      4.3G     50.5G   8% /var/lib/docker/overlay2/3fd7c3ead12c70f4036782ea5940b835a16a96d3cc070f83f2acfd1bf53a5ac5/merged
overlay                  57.8G      4.3G     50.5G   8% /mnt/data/docker/overlay2/27e363795211c6936b65ca595c0106a28f5d7e7580e90fa05a7c1c6dc9e8d236/merged
overlay                  57.8G      4.3G     50.5G   8% /var/lib/docker/overlay2/27e363795211c6936b65ca595c0106a28f5d7e7580e90fa05a7c1c6dc9e8d236/merged
overlay                  57.8G      4.3G     50.5G   8% /mnt/data/docker/overlay2/14cccae6732e2faebc6709ccd3f38845abd8103ca637021323718ca7632dce72/merged
overlay                  57.8G      4.3G     50.5G   8% /var/lib/docker/overlay2/14cccae6732e2faebc6709ccd3f38845abd8103ca637021323718ca7632dce72/merged
overlay                  57.8G      4.3G     50.5G   8% /mnt/data/docker/overlay2/ca7334f1298eb070c4ba533a2a0652e0267ca2c372264d157a09a3071f25245c/merged
overlay                  57.8G      4.3G     50.5G   8% /var/lib/docker/overlay2/ca7334f1298eb070c4ba533a2a0652e0267ca2c372264d157a09a3071f25245c/merged
overlay                  57.8G      4.3G     50.5G   8% /mnt/data/docker/overlay2/95c1c475e39ef24228b0697f77a0d6160b20f27920080ecb2d8309f9f1461f23/merged
overlay                  57.8G      4.3G     50.5G   8% /var/lib/docker/overlay2/95c1c475e39ef24228b0697f77a0d6160b20f27920080ecb2d8309f9f1461f23/merged
overlay                  57.8G      4.3G     50.5G   8% /mnt/data/docker/overlay2/63638208b59aa8ce0f04f63fd5a05e64ea95f7647e523b5dd857e6cf96b11675/merged
overlay                  57.8G      4.3G     50.5G   8% /var/lib/docker/overlay2/63638208b59aa8ce0f04f63fd5a05e64ea95f7647e523b5dd857e6cf96b11675/merged
overlay                  57.8G      4.3G     50.5G   8% /mnt/data/docker/overlay2/55beefe16792b04f567b39b66cb1e91f0085d7eef2ac6bf73694240201008e9c/merged
overlay                  57.8G      4.3G     50.5G   8% /var/lib/docker/overlay2/55beefe16792b04f567b39b66cb1e91f0085d7eef2ac6bf73694240201008e9c/merged
overlay                  57.8G      4.3G     50.5G   8% /mnt/data/docker/overlay2/12b171482f63343fedfa77b2895f7c976d1cf37af8f7eec18e4c45ec4ae160d8/merged
overlay                  57.8G      4.3G     50.5G   8% /var/lib/docker/overlay2/12b171482f63343fedfa77b2895f7c976d1cf37af8f7eec18e4c45ec4ae160d8/merged
# lsblk
NAME        MAJ:MIN RM   SIZE RO TYPE MOUNTPOINT
sda           8:0    1  57.8G  0 disk 
`-sda1        8:1    1  57.8G  0 part 
mmcblk0     179:0    0  59.5G  0 disk 
|-mmcblk0p1 179:1    0    32M  0 part /mnt/boot
|-mmcblk0p2 179:2    0    24M  0 part 
|-mmcblk0p3 179:3    0   256M  0 part 
|-mmcblk0p4 179:4    0    24M  0 part 
|-mmcblk0p5 179:5    0   256M  0 part /
|-mmcblk0p6 179:6    0     8M  0 part 
|-mmcblk0p7 179:7    0    96M  0 part /mnt/overlay
`-mmcblk0p8 179:8    0  58.8G  0 part /mnt/data
zram0       254:0    0 976.1M  0 disk [SWAP]
zram1       254:1    0    32M  0 disk /var
zram2       254:2    0    16M  0 disk /tmp
# sudo mkdir /mnt/boot
/bin/ash: sudo: not found
# ls
# 
1 Like

SHH into the host

1 Like

Thanks, but this only tells me how to ssh and set up my rsa key which I have done. Unless I am missing something else

You still need to ssh in and change config.txt

Here you login to the HA container, not to the host !

Okay, reviving an old thread. I am not big on SSH keys or jumping over the tallest part of the fence. I have a monitor and a keyboard, let’s go!

When you boot the Raspberry, you get the prompt with a terminal saying “home assistant login:”
Here you just type “root” and press enter. You are now at the “ha” shell where you can update the OS, update the backend and maybe a couple of other (very) limited things.
Ignore this and just type “login”.
Now you are at the base os’ shell terminal and can modify config.txt with the following command (and yes, there is only the vi editor - sigh!):

vi /mnt/boot/config.txt

Press the “Insert” button on your keyboard to regain a minimum of sanity and go to the end of the file.

Insert the RaspBee config text of your choice (I tried both to see what worked).

add an extra line at the end and press the esc key. This will enable commands in vi.
Type “:x” and press enter. This saves the file and exits. No warnings, no “are you sure”, just 70’s style confidence you know what you are doing. And with this guide, you do, and you are done :slight_smile:

6 Likes

This is a good guide for accessing the config.txt when the SD card/SSD/whatever HASS OS is running on is put in another machine.

I´m wondering if and how it´s possible to access config.txt from a running HASS OS. That would speed up things a lot, even of course for changes done in config.txt taking effect a host reboot is required.

When trying to mount (from host SSH, not addon SSH) it just gives

mounting /dev/mmcblk0p8 on /mnt/boot failed: Resource busy

(/dev/mmcblk0p8 is the HASS OS device partition)

Not possible at all?

Update: Answered it by myself.

  1. Using blkid gives available partitions, blkid | grep hassos-boot shows the partition number we´re looking for
  2. So in my case mount -t vfat /dev/mmcblk0p1 /mnt/boot mounts the boot partition and…
  3. ls -lha /mnt/boot shows content, vi /mnt/boot/config.txt finally gives access to config.txt. Unfortunately there´s no nano and I hate that damn old vi but hey, that´s another story… :wink:
2 Likes

Thank you DWiskow for your tutorial, this helped me a lot. I only needed to alter the config.txt file to turn off the red power LED …

[pi4]
dtparam=pwr_led_trigger=none
dtparam=pwr_led_activelow=off

…on my Pi4B so that I didn’t have a constant red glow in the corner of my room :+1:

2 Likes

Eeeehh… i just put the (ssd in my case) sd card to my windows computer, boot partition is available since its fat. Edit the config.txt with text editor. Same on Linux. Should even be possible with android phones. I know, its not from hassOS, but a quicky also.

Yeah… that´s what everyone can do. All the other ways are just… more sexy, less downtime, can be performed remotely without physical access, … :wink:

1 Like

You might want to modify “mint” to be “mnt” on these two lines to avoid confusion. Thanks for all the info!!

1 Like

When I type “login” I get another prompt

[core-ssh ~]$ login
core-ssh login: 

What do I enter here?

There seriously needs to be some improvement of accessing config.txt from boot partition. In windows 10 it doesn’t load because you cannot mount the paritition. I’ve tried various things for hours to access it and still didn’t succeed.
I can read it, and third party windows partitition managers can read the partitiion - yet none of them can mount it. If you go into windows partition manager - it will first thing format the full disk into an empty GPT drive.

I want to run home assistant from USB 3.0 nvme drive and need to add quirks (RTL 9210b chip). Usability sucks so bad I just want to throw that raspi in the next rubbish bin - yet the fault is all on home assistant.

documentation everywhere seems just outdated. SSH addon doesn’t allow to edit config.txt either.

So right now is the only way to edit it to install Raspberry Pi standard OS into another drive - then from there mount the nvme drive and try to change it? It’s simply ridiculous.