Update
Spotify nolonger works with mopidy so I’m now using LMS. Set up instruction for LMS are available here.
Background
This is a complete instructions for building a whole house audio system. There are other threads on this subject, such as this one. My issue is nothing I found on the internet provided complete instructions that resulted in the end product I desired.
My main requirement for the whole house audio system
- Has to be accessible from my cell phone and my computer
- It has to play multiple music streams at the same time.
- I want no limit on the number of speakers that can be connected
- Any speaker has to be easily connected to any music stream
- The system must allow playing locally stored music. I have a lot of music CDs that I’ve ripped.
- Needs to allow playing of music from Spotify
- Play back of pod cast and other sources would be nice, but not required
- Anyone living in the house has to be able to start a stream on any speaker (NO IT SKILLS required)
- The implementation has to be build on all open source software
With all the discussion on the internet my requirements didn’t seem like too much to ask. On the internet (this forum include) I found partial instructions for pulling the system together. Since I have to replicate this for multiple family members I figured I go ahead and capture the instructions here. The end product is based on mopidy, mpd, Iris, spotify-library, snapcast and HA. If you have an alternative setup I’d love to hear what products you’re using. With my install the bulk of the implementation was done outside of HA. I did not use the HA Mopidy add on, as it didn’t seem like a good use of HA resource and I don’t believe you can run multiple copies to provide multiple music streams. HA is used to simply provides a means to access the Mopidy Iris interface and to provide control for connecting the speakers to individual streams.
This is a simple picture of what these instruction build. Most of the speakers connect into the system via wifi, while my HA, music server and one speaker are hardwired.

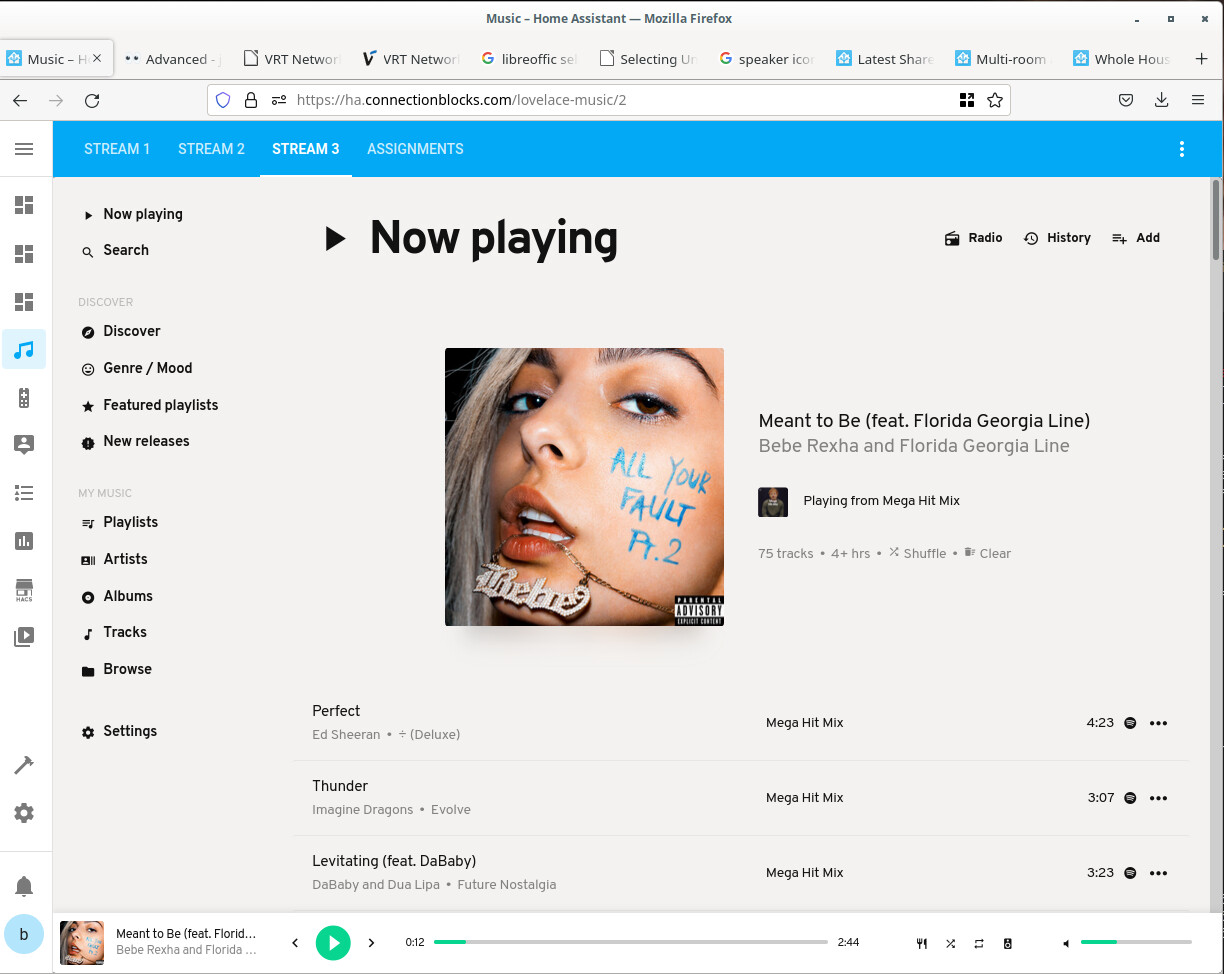
Here are two pictures of what it looks like in HA. The first shows that I have a dashboard with three tabs (views) for controlling the different music streams. Each tab is just a web card for accessing a mopidy iris web page.
There is a forth tab on this dashboard that enables connecting speakers to streams

Using the forth tab you select the stream number you want associated with a speaker and then click the button to make it happen. If anyone has a better way to implement this tab/view please let me know. I tried multiple things I found on HACS but ended us just using an HA vertical stack card with a horizontal stack cards for each speaker.
Hardware
- Raspberry PI 3 for the mopidy music server.
Note I intended to use a PI 4, however the required Spotify library hasn’t been updated in a while, and may never be. As such you can’t find a version complied for the PI 4. They do have a version for the PI 3, that’s why I’m using it for my music server. I’ve had no performance issues using the PI3. I do have some concern that the spotify stuff will stop working in the future, but for now it’s good.I was informed by Nick on the mopidy team that You can use a PI4 but you must install the 32 bit version of the raspberry operating system. - A Raspberry PI 3 for each speaker
- A very old stereo system (optional) in living room
- A AV amplifier (optional) in basement
- USB Wifi, while the PI 3 has built in WiFi it not very good and it results in the music stream dropping out. I used two of these.
- Ground loop noise isolator. If you power the speaker off the PI USB port you’ll need these. Alternatively you can use a separate power source for the speaker and the PI.
- You should also use a good power supply as to not over tax your PIs
Prepare items at the OS level in preparation for the mopidy server install
Mopidy is really a framework that allows you to use other components to build an excellent music server. The one limitation with mopidy is that it only allows the playing of one music stream at a time. This can address by running multiple copies of the mopidy servers. All of the instruction I found that supported multiple music streams had the multiple mopidy servers running on different hardware. The instruction provide here run multiple copies of mopidy on one platform. Along with the multiple copies of mopidy you also need multiple copies of snapcast server to stream your music over your home network.
As previously mention I installed mopidy on a PI3, because the spotify library isn’t available for the PI4.If you use a PI4 make sure you use the 32 bit version of the raspberry OS. You need to do a normal install of the respberry pi OS. I use the desktop version as it makes initial set up of things like ssh, wifi, locale, keyboard and SPI easy. After everything is working I use the raspberry configuration tool to turn off the gui. I think its wise from a security perspective to add a different user account and then remove the pi user account. I’ll leave it to you if you want to use a user other than pi on your machines. If you add an alternative user account you should put this user in the exact same groups that the pi user is already in. The pi user is in a lot of group in /etc/group. To add a user:
sudo adduser YOURUSER
Make sure the user is in all the same groups that the pi user was in:
sudo nano /etc/group
If you don’t want to have to provide a password with sudo for your new user
cd /etc/sudoers.d/
sudo cp 010_pi-nopasswd 010_YOURUSER-nopasswd
Edit the file and change “pi” at the start of the line to YOURUSER name
sudo nano 010_YOURUSER-nopasswd
You don’t need printer access and discovery services running so remove them
sudo apt --purge remove avahi-daemon
sudo apt --purge remove cups-daemon
Remove any supporting packages related to things you just removed
sudo apt auto-remove
You need a static IP address for your mopidy server and all of your snapclients. This is simple to do on raspberry os with an easy modification to the /etc/dhcpcd.conf file. Any line that start with # is a comment. There is commented out section that gives an example for “interface eth0”. You need update at least four of these line. Once update the required 4 lines should look something like this:
interface eth0
static ip_address=192.168.1.25/24
static routers=192.168.1.1
static domain_name_servers=192.168.1.1
If you’re connecting via wifi then eth0 should be replaced by wlan0. The ip_address line assigns an IP to your box using CIDR notation. The route and domain_name_server are normally the address of the route at your house. Don’t use my IP addesses as shown above as they will not work on your network. After making the update restart the pi to verify it’s now assign your chosen IP address.
Initial single playback stream Mopidy Server Build out
Add mopity and mpd
sudo apt install mopidy mopidy-mpd mopidy-local
Add mopidy iris web interface to your install
sudo python3 -m pip install Mopidy-Iris
Install the spotify library. According to the mopidy team you can use the alternative method mentioned here to install spotify.
You need the correct library file based on your board type. The instructions below pull the library that is appropriate for the Raspberry Pi3 arm processor. If you check libspotify archive | libspotify-archive you will see that there is no package available for the arm processor in the PI 4 . There are however packages available for other processor, include x86. Pull the library from the internet and install it:
cd
wget https://mopidy.github.io/libspotify-archive/libspotify-12.1.51-Linux-armv7-release.tar.gz
tar -xvf libspotify-12.1.51-Linux-armv7-release.tar.gz
cd libspotify-12.1.51-Linux-armv7-release/
sudo make install prefix=/usr/local
pkg-config --variable pc_path pkg-config
install the mopidy to spotify connection package, which uses the library you just installed.
sudo python3 -m pip install Mopidy-Spotify
Set up a configuration file for an initial test copy of mopidy. Make the file /etc/mopidy/mopidy.conf look like this:
[http]
enabled = true
hostname = 0.0.0.0

[mpd]
enabled = true
#password =

[spotify]
client_id = YOUR_CLIENT_ID
client_secret = YOUR_SECRET
username = YOUR_USERNAME
password = YOUR_PASSWORD

[audio]
output = audioresample ! audioconvert ! audio/x-raw,rate=48000,channels=2,format=S16LE ! tcpclientsink host=127.0.0.1 port=3333
You need to update the spotify section with your spotify information. The username and password are your username and password for spotify. To run an application that access spotify you have to go to this web site login and create an app.
The audio section above configures the audio output from mopidy to be feed to the snapserver input.
The full configuration for mopidy is a combination of the configuration above and default parameters provided by the installed package. To see all configured parmeters use the following command.
sudo mopidyctl config
It’s good to run the previous command because it can also point out some error if they exist in your install.
Enable mopidy to run on boot and go ahead and start it.
sudo systemctl enable mopidy
sudo systemctl start mopidy
Install the snapcast software components. There are separate package for the server and the client. On this machine you need at least the server. I also installed the client because I used the music server as the interface for one of my speakers. It’s also good to install both at lease initially to verify the system can play music out a speaker.
sudo apt install snapserver
sudo apt install snapclient
You need to edit the /etc/snapserver.conf file and make sure you have the following lines enabled in the file. There are other lines already enabled in the file. You’re just making sure the web interface is enabled and setting the port, and changing the steam to work with mopidy
[http]
enabled = true
port = 1780

[stream]
stream = tcp://127.0.0.1:3333?name=mopidy_tcp
The last thing to get a working system is to change the /etc/default/snapclient file to look like the following so the local snapclient connects to the local snapserver.
SNAPCLIENT_OPTS="--host 127.0.0.1"
Configure the snapclient to start on boot as a service and kick it off now.
sudo systemctl restart snapserver
sudo systemctl restart snapclient
At this point you should have a working mopidy server with the iris interface accessible via a web brower at:
http://IP_OF_YOUR_MOPIDY_BOX:6680/
Accessing your version of this link should a page like this

Click on Iris link then Playlist from the left hand side . If everything is working right you should be able to click on Playlist and see your spotify play list. It should look something like this.

If that works, select something and select the Play button. Hopefully you’ll get music out of your speaker. I didn’t have to do anything special when using the raspberry pi os to make the audio output work. Hopefully yours also works.
Update your system to provide multiple music streams
To provide multiple music streams you need to update the configuration files so you can run multiple copies of mopidy and snapserver without them stepping on each other. In these instruction I show you how to set up 3 streams. If you want a 4th or a 5th stream you just follow on with the same pattern.
We start by making a service file that can be used to start multiple copies of mopidy. So we’ll copy the original mopidy.sevice file:
sudo cp /usr/lib/systemd/system/mopidy.service /usr/lib/systemd/system/[email protected]
Next you need to edit /usr/lib/systemd/system/[email protected] and make it look like this:
[Unit]
Description=Mopidy music server #%i
After=avahi-daemon.service
After=dbus.service
After=network-online.target
Wants=network-online.target
After=nss-lookup.target
After=pulseaudio.service
After=remote-fs.target
After=sound.target

[Service]
User=mopidy
PermissionsStartOnly=true
ExecStartPre=/bin/mkdir -p /var/cache/mopidy%i
ExecStartPre=/bin/chown mopidy:audio /var/cache/mopidy%i
ExecStart=/usr/bin/mopidy --config /usr/share/mopidy/conf.d:/etc/mopidy/mopidy%i.conf

[Install]
WantedBy=multi-user.target
The changes are simple modifications to 4 lines adding the %i to the end, or near the end of the lines. You need to let systemctl know you’ve modified this file via:
sudo systemctl daemon-reload
Now you need to create a configuration file for each copy of mopidy you’ll be running
sudo cp /etc/mopidy/mopidy.conf  /etc/mopidy/mopidy1.conf
sudo cp /etc/mopidy/mopidy.conf  /etc/mopidy/mopidy2.conf
sudo cp /etc/mopidy/mopidy.conf  /etc/mopidy/mopidy3.conf
You need to edit each of the mopidyX.conf files. This is what the mopidy1.conf file should look like:
# For information about configuration values that can be set in this file see:
#
#   https://docs.mopidy.com/en/latest/config/
#
# Run `sudo mopidyctl config` to see the current effective config, based on
# both defaults and this configuration file.
[core]
cache_dir = /var/cache/mopidy1

[http]
enabled = true
hostname = 0.0.0.0
port = 6681

[mpd]
enabled = true
hostname = 127.0.0.1
port = 6601
#password =

[spotify]
client_id = YOUR_CLIENT_ID
client_secret = YOUR_CLIENT_SECRET
username = YOUR_USERNAME
password = YOUR_PASSWORD

[audio]
output = audioresample ! audioconvert ! audio/x-raw,rate=48000,channels=2,format=S16LE ! tcpclientsink host=127.0.0.1 port=3331
In the above we change 3 port records and add the [core] section. You’re changing things so that each copy of mopidy will utilize a unique set of ports for it services. The changes to the three configuration files results in copies of mopidy web mopidy web server listing on ports 6681, 6682 and 6683. So for configuration file #2 your’re looking at mopidy using ports 6682 (http), 6602 (mpd) and 3332 (audio). You increment each of the port numbers again for the third copy of the configuration file. When we add the core section the number at the end of cashe_dir also has to be updated based on which stream this configuration file is for. The configuration files need to be owned by the mopidy user. Fix this with the following command:
sudo chown mopidy: /etc/mopidy/mopidy*.conf
We want to stop and disable the current copy of mopidy that we have running
sudo systemctl disable mopidy.service
sudo systemctl stop mopidy.service
Next enable the three copies of mopidy to run on boot and go ahead and start them:
sudo systemctl enable [email protected]
sudo systemctl enable [email protected]
sudo systemctl enable [email protected]
sudo systemctl start [email protected]
sudo systemctl start [email protected]
sudo systemctl start [email protected]
After a couple minutes all three copies of mopidy should be up and running. You can verify this by looking at your listening ports and verifying you have two ports up for each instance of mopidy, which shows as a python process:
netstat -lntp
Now we need to do basically the same thing for the snapserver. Start by coping the service control file:
sudo cp /usr/lib/systemd/system/snapserver.service /usr/lib/systemd/system/[email protected]
Edit /usr/lib/systemd/system/[email protected] to add a “%i” on two of the lines, the 1st line under [Unit] and the first line under [Service] When done the file should look like this:
[Unit]
Description=Snapcast server #%i
Documentation=man:snapserver(1)
Wants=avahi-daemon.service
After=network.target time-sync.target avahi-daemon.service

[Service]
EnvironmentFile=-/etc/default/snapserver%i
ExecStart=/usr/bin/snapserver --logging.sink=system --server.datadir="${HOME}" $SNAPSERVER_OPTS
User=_snapserver
Group=_snapserver
Restart=on-failure

[Install]
WantedBy=multi-user.target
We need to create a systemctrl configuration files in /etc/default for each steam. For 3 music streams I needed 3 three files:
sudo cp /etc/default/snapserver /etc/default/snapserver1
sudo cp /etc/default/snapserver /etc/default/snapserver2
sudo cp /etc/default/snapserver /etc/default/snapserver3
Edit each of these files to look like the following, with the X is replaced by the steam number (1, 2 or 3):
SNAPSERVER_OPTS="-c /etc/snapserverX.conf"
Create a copy of the snapsever configuration file for each stream:
sudo cp /etc/snapserver.conf /etc/snapserver1.conf
sudo cp /etc/snapserver.conf /etc/snapserver2.conf
sudo cp /etc/snapserver.conf /etc/snapserver3.conf
Edit each file and update the port number used by the snapserver. You have two lines under the [stream] section that need to be update and one line under the [http] section. You also want to disable [tcp]. You replace the X with the stream number. It is the same number appended to the filename. You’re not changing any other lines in the file.:
[http]
port = 178x

[tcp]
enabled = false

[stream]
port = 170X
stream = tcp://127.0.0.1:333X?name=mopidy_tcp
So copy one of the file uses ports 1701 and 3331.
You also need to stop and disable the original copy of snapserver we had running:
sudo systemctl disable snapserver
sudo systemctl stop snapserver
Reload the systemctl information. Then enable on boot and star on boot of three copies of snap server:
sudo systemctl daemon-reload
sudo systemctl enable [email protected]
sudo systemctl enable [email protected]
sudo systemctl enable [email protected]
sudo systemctl start [email protected]
sudo systemctl start [email protected]
sudo systemctl start [email protected]
You can check that the three copies of snapserver are up and listening to the correct ports via:
sudo netstat -lntp
As later we’ll be starting all instances of our snapclient from home assistant go ahead and Stop and disable the local copy of snapclient:
sudo systemctl disable snapclient
sudo systemctl stop snapclient
If you want to test the three servers work, you can manually kick off the snapclient and direct it to the appropriate snapserver port for the stream you want to test:
snapclient -h 127.0.0.1 -p 170X
In the above command X is replaced with 1, 2 or 3 depending on which stream you’re connecting to.
You access the IRIS web interface via:
http://IP_OF_MOPID_BOX:668X/iris
In the above command X is replaced with 1, 2 or 3 depending on which stream you want to hear play out the speaker. With the snapclient running you can use the IRIS interface to have mopid and snapcast play something. If all goes well you should hear music out of the speaker.
Build out your snapclients
The above instructions place the snapclient software on the music server. I believe your music server should be hardwired into your network and not on wifi. That’s just an opinion. My network is hardwired to my AV server so I placed my music server in the same location to get a hard wired network connection. Since I wanted to have a snapclient feeding my AV hardware I just used the snapclient on the music server. Your layout will determine if you should run a snapclient on your music server.
For each location you want music you will require something to run the snapclient. I’m running the snapclient on a couple of orange PIs running armbian, a raspberry PI 3 running raspberry OS and a desktop running fedora. Fedora was the hardest to get working. Raspberry OS was the easiest. As such these instructions are for raspberry OS. I’m pretty sure you can use any raspberry pi platform you desire for the snapclient. A lot of people use a raspberry PI zeros. If you do you’ll need an additional daughter board to get audio out. At this point I’m using the audio out straight from my arm boards. I’ll probably change this at some point but it’s good enough for an initial setup. If you attempt to power the speaker from one of the arm board’s USB ports you’ll need something like what I mention in the hardware to deal with the ground loop issue (static on the line). I don’t think the hardware I bough for this is the best solution as I think it filters some of the base from the signal, but it works.
You need to get your raspberry PIs up and running. You’ll need to configure them with a static IP address so HA script can find them. The instruction I provide above for setting a static IP address on the music server will work for the snapclient boxes. Start by loading the snapclient software:
sudo apt install snapclient
Make sure it isn’t configure to start on boot:
sudo systemctl stop snapclient
sudo systemctl disable snapclient
For security reasons you should create a new user account to run the snapcliet. This account will be used to remotely run commands from HA via ssh with a shared key:
sudo adduser snap_control
User snap_control needs to be in the audio group:
sudo usermod -a -G audio snap_control
Become the user snap_control:
sudo su - snap_control
Create the file start_snapclient with the following contents
#!/bin/bash
killall snapclient
nohup snapclient -h $1 -p $2 </dev/null &>/dev/null &
Create the file stop_snapclient with the following contents
#!/bin/bash
killall snapclient
Make both files executable
chmod 755 *snapclient
Create a directory to place an HA public ssh key:
mkdir .ssh
chmod 700 .ssh
At this point you need to hop onto your HA web interface
You need an ssh key pair you’ll use to kick off commands on your snapclient boxes from the HA server. If you don’t already have the HA “Terminal & SSH” add-on installed on your HA box install it from the Add-on Store in the HA GUI.
Open the web Terminal do the following to create a key pair and place it in the right place
cd /root/config
mkdir .ssh
cd .ssh
ssh-keygen -t rsa
It will ask you where to save the key, enter
/root/config/.ssh/id_rsa
It’ll ask you for a passphrase, just hit the enter/return key
It’ll ask you for the passphare again, just hit the enter/return key
See that they key pair has been generated:
ls -l
Push the id_rsa.pub key to each of your snapclients
scp id_rsa.pub snap_control@IP_OF_SNAPCLIENT:
You do the above for each snapclient pi you have in your system.
Keep this web terminal up as you’ll need it again in a couple of steps
now you need to be back at the command line on the snapclient machine as user snap_control
Make the .pub file an ssh authorized_keys file:
mv *.pub .ssh/authorized_keys
chmod 600 .ssh/authoized_keys
Jump back to the HA web terminal and make sure the key pair is working
ssh -i ./id_rsa -o StricthostKeyChecking=no snap_control@IP_OF_SNAPCLIENT
You do the above for each snapclient pi you have in your system.
Back to the snapclient box
Verify user_snapcontrol can start the snapclient:
./start_snapclient  IP_OF_MOPIDY_BOX  170X
ps -efw |grep snapclient | grep -v grep
X is replaced with the stream number (1,2 or 3) you’re connecting to on the music server. If the ps command produces a snapclient output line you know at least that the software is connecting. If you have a speaker connected then you should get output if the mopidy server is playing anything on this stream. If the client is running go ahead and stop it:
./stop_snapclient
Rinse and repeat for the number of speakers/snapclients you’re going to have in your system.
Configuration to enable HA control
You now need to make changes to a few of the yaml files on your HA box. You can do this via the HA Web Terminal, just like we did above to generate the ssh key pair. You start by editing the /root/config/configuration.yaml file and adding the following updates under the identified tags. If your file doesn’t have the tag you’ll also need to add the tag
Under the input_boolean: tag you need an entry for each speaker. Here are two of the tneries from my yaml file:
  update_living_room_zone:
    initial: off
  update_basement_zone:
    initial: off
You need an entry for each snapclient/speaker. This provides the on/off button for the speaker.
Under the input_select: section you need an entry for each speaker. Here are two from my yaml file:
  living_room_speaker:
    name: Living Room Speaker
    options:
      - "0"
      - "1"
      - "2"
      - "3"
  basement_speaker:
    name: Basement Speaker
    options:
      - "0"
      - "1"
      - "2"
      - "3"
The above are used to select the music stream the snapclient/speaker gets connected to. “0” is used to disconnect from all streams.
Under the shell_command: section you’ll need this entry:
update_zone: '/config/shell_cmds/update_music_zone {{ device }} {{ zone }}'
Under your homeassistant: allowlist_external_dirs: tag pair you’ll need to add an entry for a directory that will hold a shell script you create below. The section in the configure file will look something like this:
homeassistant:
  allowlist_external_dirs:
    - '/config/shell_cmds/'
You may have other items under the homeassistant section. Don’t remove them just add the lines for allowlist_external_dirs.
Exit the editor and save your changes.
In your automations.yaml file you’ll need this automation:
- id: '1647311120863'
  alias: set speaker zone
  description: ''
  trigger:
  - platform: state
    entity_id: input_boolean.update_back_bed_zone
    to: 'on'
  - platform: state
    entity_id: input_boolean.comp_room_zone
    to: 'on'
  - platform: state
    entity_id: input_boolean.update_basement_zone
    to: 'on'
  - platform: state
    entity_id: input_boolean.update_living_room_zone
    to: 'on'
  - platform: state
    entity_id: input_boolean.update_kitchen_zone
    to: 'on'
  condition: []
  action:
  - service: shell_command.update_zone
    data_template:
      device: '{{ trigger.to_state.entity_id }}'
      zone: "{% if trigger.to_state.entity_id == \"input_boolean.update_back_bed_zone\" %}
                {{ states('input_select.back_bed_speaker') }}
             {% elif trigger.to_state.entity_id == \"input_boolean.comp_room_zone\" %}
               {{ states('input_select.comp_room_speaker') }}
             {% elif trigger.to_state.entity_id == \"input_boolean.update_living_room_zone\" %}
               {{ states('input_select.living_room_speaker') }}
             {% elif trigger.to_state.entity_id == \"input_boolean.update_basement_zone\" %}
               {{ states('input_select.basement_speaker') }}
             {% elif trigger.to_state.entity_id == \"input_boolean.update_kitchen_zone\" %}
               {{ states('input_select.kitchen_speaker') }}
             {% endif %}"

  - delay: 0:0:2
  - service: input_boolean.turn_off
    target:
      entity_id: '{{trigger.entity_id}}'
  mode: single
Your automation will be different based on the number of speakers you’re including and the names you used for both the input_booleans and input_select entities.
You need to create the command line script on your HA file system. Start by creating the directory shell_cmds in the HA web terminal
mkdir /root/config/shell_cmds
You need to create the file “/root/config/shell_cmds/update_music_zone” with the following contents:
#!/bin/bash
if [ $1 == "input_boolean.update_living_room_zone" ]; then
	ip="192.168.1.30"
elif [ $1 == "input_boolean.update_back_bed_zone" ]; then
	ip="192.168.1.31"
elif [ $1 == "input_boolean.comp_room_zone" ]; then
	ip="192.168.1.32"
elif [ $1 == "input_boolean.update_basement_zone" ]; then
	ip="192.168.1.33"
elif [ $1 == "input_boolean.update_kitchen_zone" ]; then
	ip="192.168.1.34"
fi
if [ $2 == "0" ]; then
    ssh -i /config/.ssh/id_rsa -o StrictHostKeyChecking=no snap_control@$ip ./stop_snapclient
else
    ssh -i /config/.ssh/id_rsa -o StrictHostKeyChecking=no snap_control@$ip ./start_snapclient 192.168.1.25 "170$2"
fi
This script is has details appropriate for my network and configuration. You need to update the script with the input_boolean names you created in your configuration.yaml file and the associated IP address of your snapclient boxes. Then at the bottom of the script the last ssh command needs to have the IP 192.168.1.25 updated with the IP address of your music server.
The finally HA step is to create the Music dashboard. Basically you create a new dashboard and enable “Show in sidebar”. On the dashboard you add a tab (view) for each copy of mopidy you have running and one extra. Each tab is set as a panel card. In the tabs for your music server you add a web page card and put the URL with port number/iris for the appropriate music stream you’re accessing. So something like:
http://192.168.1.25:6681/iris
The final tap has a vertical stack card, with a horizon stack card for each speaker. The the horizon stack card has an entities card with one of the input_select entities, and a button card with one of the input_boolean entities. So in the Show Code Editor view it looks like this:
type: vertical-stack
cards:
  - type: horizontal-stack
    cards:
      - type: entities
        entities:
          - entity: input_select.kitchen_speaker
      - show_name: true
        show_icon: true
        type: button
        tap_action:
          action: toggle
        entity: input_boolean.update_kitchen_zone
        icon: mdi:gesture-tap-button
        name: Update Kitchen
  - type: horizontal-stack
    cards:
      - type: entities
        entities:
          - entity: input_select.living_room_speaker
        show_header_toggle: true
      - show_name: true
        show_icon: true
        type: button
        tap_action:
          action: toggle
        entity: input_boolean.update_living_room_zone
        icon: mdi:gesture-tap-button
        show_state: false
        name: Update Living Room
I build a second setup for a family member off the instructions and it’s up and running so I believe the instructions are complete.
