UPDATE: Marcel has added a nice setup instruction on his site here: initial setup slimmelezer Please try that first before going off on a wild tangent like I did. In case it still helps someone else stuck with another topic, I’ve left my initial dive into updating the .yaml below.
I was pretty excited when the new energy management features of Home Assistant were added in 2021.7, and immediately ordered the afformentioned “SlimmeLezer” ESPHome device to get up and running. However, the device arrived without any sort of documentation, I didn’t know what ESPHome was, and I struggled to get everything hooked up properly over the course of a few days. In case it helps somebody else in a similar boat, here’s what I did to get the SlimmeLezer talking to Home Assistant. As of this writing, I’m running Home Assistant OS on a RPi 4 with core version 2021.8.7.
First of all, Marcel Zuidwijk’s SlimmeLezer is an ESPHome device, so you need to install the ESPHome addon via Supervisor in Home Assistant. Next, SlimmeLezer provides a default “slimmelezer.yaml” configuration for uploading to the device via ESPHome. This can be found here on github: https://github.com/zuidwijk/dsmr/blob/2a60634ab628626951736d404878e1361c23868b/slimmelezer.yaml
When I tried to load the yaml file onto the SlimmeLezer using the documentation provided on ESPHome for Home Assistant, the device did not show up via USB, and I couldn’t figure out how to get the HTTPS thing working. So instead, I followed the instructions here, and headed over to https://github.com/esphome/esphome-flasher/releases to download the precompiled binary (I’m using a MacBook so that’s the one I chose).
When trying to launch ESPHome-flasher, I still had this issue: https://github.com/esphome/esphome-flasher/issues/26 In order to solve it, something needs to happen in Terminal. So I launched the Terminal app on my MacBook, and entered in the below line of code. I’m not sure if it was necessary, but I copied the application from the downloaded and extracted .zip file into my applications folder on the MacBook up front.
chmod +x /Applications/ESPHome-Flasher.app/Contents/MacOS/ESPHome-Flasher
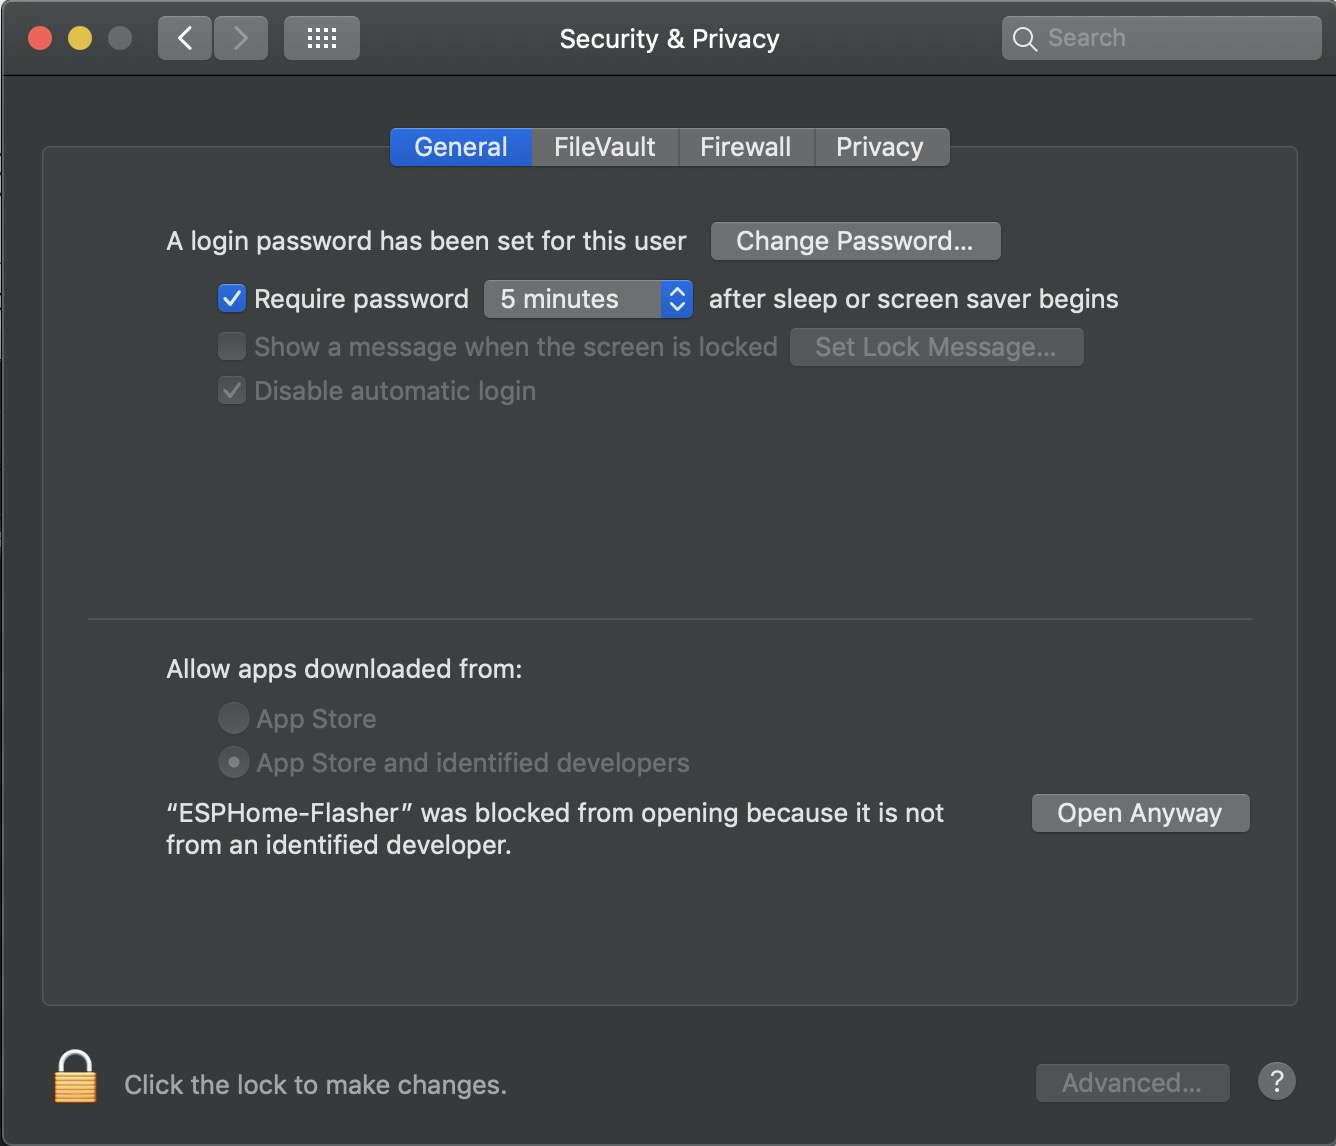
Next hurdle was to remove the block put on by my MacBook because the app was from an unidentified developer. After the error pops up once, head over to System Preferences security settings and allow it to open anyway.
Now, ESPHome-flasher is used to upload a .bin firmware file to an ESPHome device, so I needed that first. I used the .yaml mentioned here (replacing $$$wifissid$$$ and $$$password$$$ with the real ones for my home wifi network, and a different passford for ota) as a first test to get the device connected to Home Assistant before setting it up with the full sample .yaml config file from github. Note that it is not possible to change the ota password “over the air”, so that password must stay constant for future updates unless connecting the ESPHome device again directly via USB.
substitutions:
  device_name: slimmelezer
  device_description: "DIY P1 module to read your smart meter"

esphome:
  name: ${device_name}
  comment: "${device_description}"
  platform: ESP8266
  esp8266_restore_from_flash: true
  board: d1_mini
ota:
  password: "$$$password$$$"

logger:

wifi:
  ssid: "$$$wifissid$$$"
  password: "$$$password$$$"
  fast_connect: true
Via the ESPHome addon for Home Assistant, I created a new node for SlimmeLezer, pasted the .yaml code above into the “edit” function, and clicked on intall → “manual download” to generate a .bin file which was automatically downloaded to my MacBook (see here). ESPHome-flasher wasn’t recognizing and serial ports with the first USB cable I tried (perhaps that’s why I needed to use ESPHome-flasher in the first place), so I tried a different one and that worked.
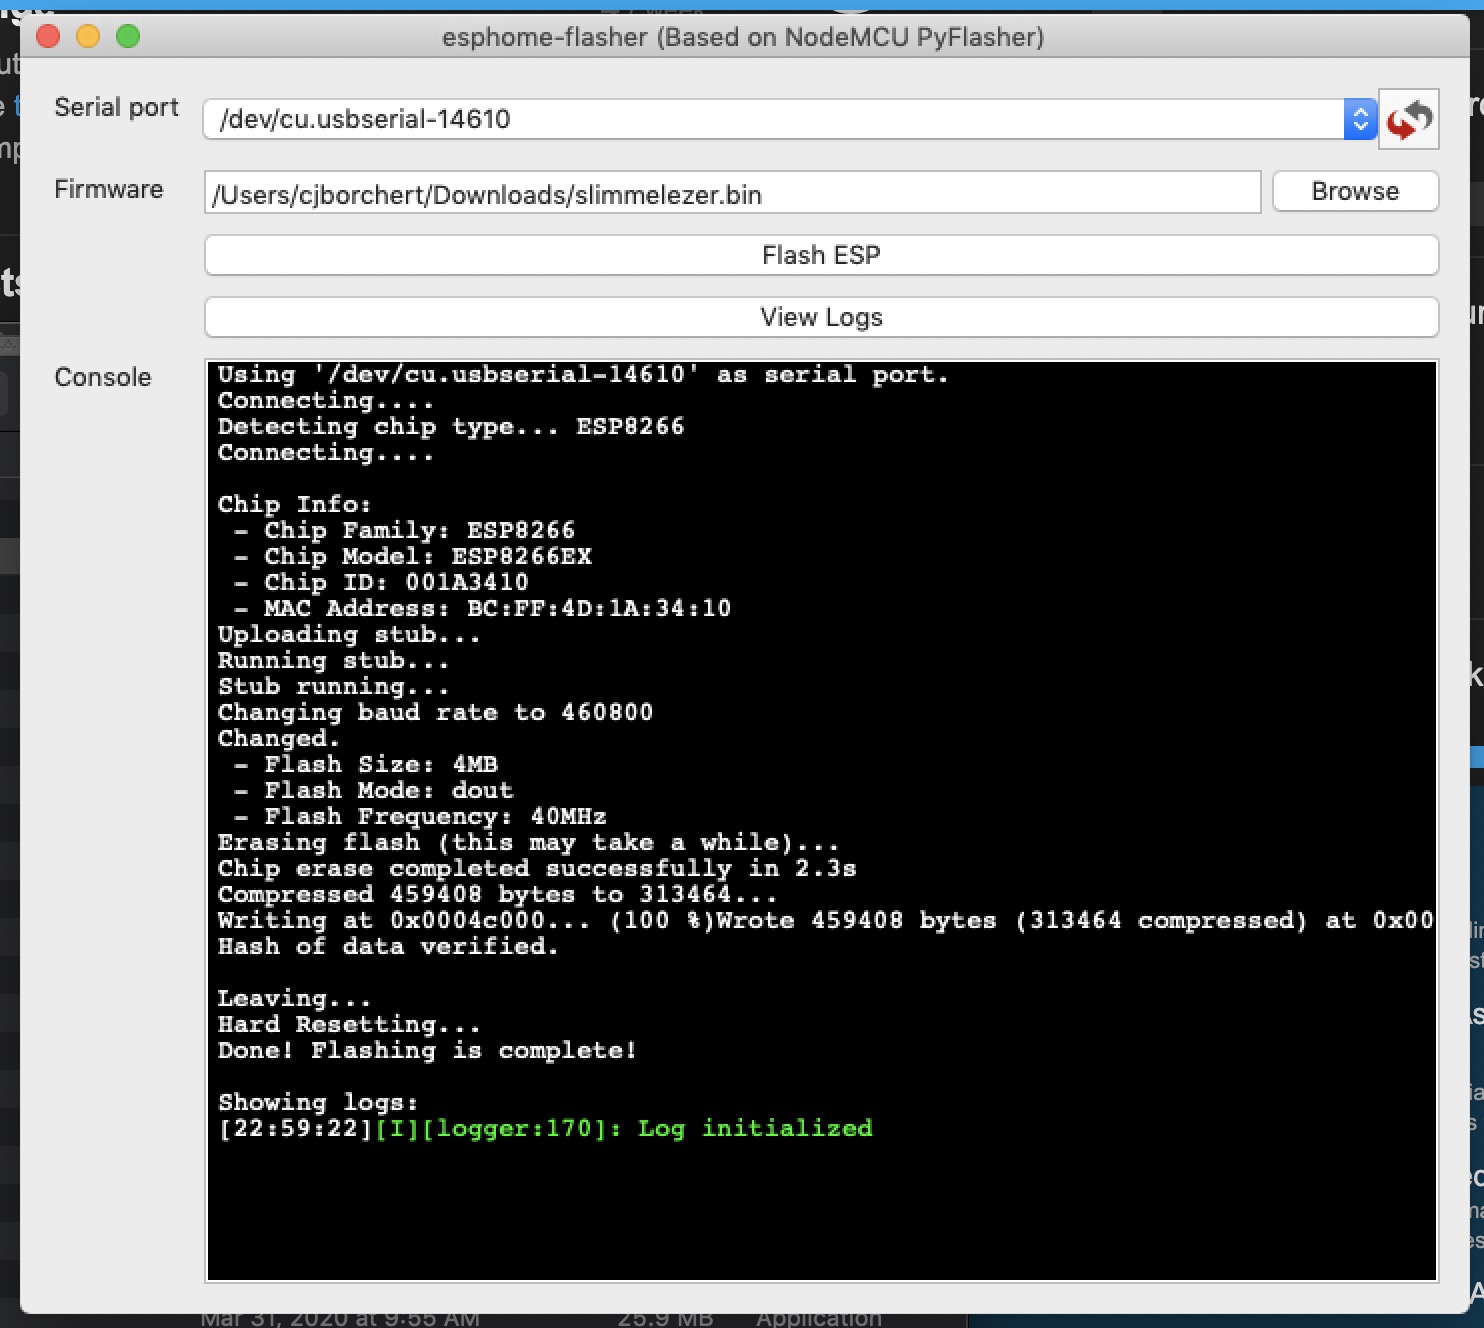
Next I went back over to the ESPHome addon in the Home Assistant Supervisor tab and launched the web UI. The SlimmeLezer node I had created still reported as “offline” so I power cycled the SlimmeLezer device. Unfortunately still no luck, turns out I had entered the wifi password incorrectly in my slimmelezer.yaml file. After correcting that, recreating the .bin file and flashing it to the SlimmeLezer with ESPHome-flasher, I checked my wifi router config and was able to locate the mac address of the SlimmeLezer (you can find this in the ESPHome log while it’s flashing your .bin file), so it was at least connecting to the network.
Back over in the Home Assistant Supervisor ESPHome addon, the node was now reporting online!

Now I’ve installed the SlimmeLezer at my smart meter with the P1 cable (and power over USB since my meter is DSMR version 4). I can then use the over the air (OTA) update function of ESPHome to add in the full template .yaml file from github. That was also a bit confusing, so here below is what I actually used (this time I used ESPHome’s secrets.yaml function to specify secure passwords & wifi SSID). Some things are commented out which I don’t need or seemed to help to get the SlimmeLezer recognized as “online” in Home assistant.
substitutions:
  device_name: slimmelezer
  device_description: "DIY P1 module to read your smart meter"

esphome:
  name: ${device_name}
  comment: "${device_description}"
  platform: ESP8266
  board: d1_mini
  #esp8266_restore_from_flash: true
  #name_add_mac_suffix: true
  #project:
  #  name: zuidwijk.slimmelezer
  #  version: "1.0"
  #on_boot:
  #  then:
  #    - if:
  #        condition:
  #          lambda: return id(has_key);
  #        then:
  #          - lambda: |-
  #              std::string key(id(stored_decryption_key), 32);
  #              id(dsmr_instance).set_decryption_key(key);
  #        else:
  #          - logger.log:
  #              level: info
  #              format: "Not using decryption key. If you need to set a key use Home Assistant service 'ESPHome:  ${device_name}_set_dsmr_key'"

wifi:
  ssid: !secret wifi_ssid
  password: !secret wifi_password
  fast_connect: true

  # Enable fallback hotspot (captive portal) in case wifi connection fails
  ap:
    ssid: ${device_name}

captive_portal:

# Enable logging
logger:

# Enable Home Assistant API
api:
  #services:
  #  service: set_dsmr_key
  #  variables:
  #    private_key: string
  #  then:
  #    - logger.log:
  #        format: Setting private key %s. Set to empty string to disable
  #        args: [private_key.c_str()]
  #    - globals.set:
  #        id: has_key
  #        value: !lambda "return private_key.length() == 32;"
  #    - lambda: |-
  #        if (private_key.length() == 32)
  #          private_key.copy(id(stored_decryption_key), 32);
  #        id(dsmr_instance).set_decryption_key(private_key);

ota:
  password: !secret ota_password

web_server:
  port: 80

uart:
  baud_rate: 115200
  rx_pin: D7

#globals:
#  - id: has_key
#    type: bool
#    restore_value: yes
#    initial_value: "false"
#  - id: stored_decryption_key
#    type: char[32]
#    restore_value: yes

dsmr:
  id: dsmr_instance
  # For Luxembourg users set here your decryption key
  #decryption_key: !secret decryption_key // enable this when using decryption for Luxembourg; key like '00112233445566778899AABBCCDDEEFF'

# selection of sensors from
# https://github.com/zuidwijk/dsmr/blob/2a60634ab628626951736d404878e1361c23868b/slimmelezer.yaml
sensor:
  - platform: dsmr
    #energy_delivered_lux:
    #  name: "Energy Consumed Luxembourg"
    energy_delivered_tariff1:
      name: "Energy Consumed Tariff 1"
    energy_delivered_tariff2:
      name: "Energy Consumed Tariff 2"
    #energy_returned_lux:
    #  name: "Energy Produced Luxembourg"
    energy_returned_tariff1:
      name: "Energy Produced Tariff 1"
    energy_returned_tariff2:
      name: "Energy Produced Tariff 2"
    power_delivered:
      name: "Power Consumed"
      accuracy_decimals: 0
      filters:
        - multiply: 1000
    power_returned:
      name: "Power Produced"
      accuracy_decimals: 0
      filters:
        - multiply: 1000
    electricity_failures:
      name: "Electricity Failures"
      icon: mdi:alert
    electricity_long_failures:
      name: "Long Electricity Failures"
      icon: mdi:alert
    voltage_l1:
      name: "Voltage Phase 1"
    voltage_l2:
      name: "Voltage Phase 2"
    voltage_l3:
      name: "Voltage Phase 3"
    current_l1:
      name: "Current Phase 1"
    current_l2:
      name: "Current Phase 2"
    current_l3:
      name: "Current Phase 3"
    power_delivered_l1:
      name: "Power Consumed Phase 1"
      accuracy_decimals: 0
      filters:
        - multiply: 1000
    power_delivered_l2:
      name: "Power Consumed Phase 2"
      accuracy_decimals: 0
      filters:
        - multiply: 1000
    power_delivered_l3:
      name: "Power Consumed Phase 3"
      accuracy_decimals: 0
      filters:
        - multiply: 1000
    power_returned_l1:
      name: "Power Produced Phase 1"
      accuracy_decimals: 0
      filters:
        - multiply: 1000
    power_returned_l2:
      name: "Power Produced Phase 2"
      accuracy_decimals: 0
      filters:
        - multiply: 1000
    power_returned_l3:
      name: "Power Produced Phase 3"
      accuracy_decimals: 0
      filters:
        - multiply: 1000
    gas_delivered:
      name: "Gas Consumed"
    #gas_delivered_be:
    #  name: "Gas Consumed Belgium"
  - platform: uptime
    name: "Uptime"
  - platform: wifi_signal
    name: "Wi-Fi Signal"
    update_interval: 60s

text_sensor:
  - platform: dsmr
    identification:
      name: "DSMR Identification"
    p1_version:
      name: "DSMR Version"
    #p1_version_be:
    #  name: "DSMR Version Belgium"
  - platform: wifi_info
    ip_address:
      name: "IP Address"
    ssid:
      name: "Wi-Fi SSID"
    bssid:
      name: "Wi-Fi BSSID"
