Its time for me to share after all the help I got here and hope it will be useful to someone.
I got inspired by the Sprinkler Controller, available in ESPHome (for me the argument, convincing my wife, building it myself ![]() ).
).
The project is described from beginning to end including the 3d Prints (.stl files) I used for mounting the enclosure and electronics.
I learned a lot along the way and (special thanks to @rcblackwell, who inspired me for the ESPCode using substitutions and changelog). I used his code as a start and changed to my wishes.
####### Update V09, April 2024
Due to a compilation error since esphome v2024.3.1, it’s needed to short the ESPHOME_PROJECT_VERSION to max 30 chars.
####### Update V2, May 2023 ############
Edited 23 May: updated to v2 adding NTC to watch internal enclosure temperature and updated schematics, since it contained an error in wiring the power.
Edited 24th May: updated schematics to V2, added 3K3 resistor, so GPIO15 can be used as Output
######################################
Project Introduction
Home Assistant sprinkler / irrigation system controller is able to control four electromagnetic valves. The controller enclosure will be installed indoor (utility room) where as the valves are positioned in the garden. The goal was to have full control with Home Assistant. The system should be able to work fully automatic and have a manual override. The system should be extended in the future with one or more soil moisture sensors as an indicator / starter for an automated run. Without the soil moisture sensors it needs to be started manual. One of the beauties of Home Assistant is that it allows ESPHome devices to connect directly to Home Assistant with the native ESPHome API.
Although the following project is designed for Home Assistant, it should not be hard to run or integrate it at another way.
Approach and requirements
The project should be build with additional following requirements:
- Reusing components I already had
- additional components should be easy to purchase and installation (as less as possible single electronics)
- For human physical indication:
- if system is powered (green led)
- system status (red led). More information can be found here.
- Blink slowly (about every second) when a warning is active
- Blink quickly (multiple times per second) when an error is active
- Easy to use for my family members
- Have the board type available in the frontend (since I use multiple devices)
End result


Components
(for reference)
At Amazon.nl (April 10th 2023): total: € 78,78.
- 4 Channel relay board € 6,99
- NodeMCU (ESP8266 or ESP-32S) € 11,99
- Transformer (230VAC to 2x 12VAC) € 16,37
- DC Buck converter (12-24VAC to 5VDC) € 9,15
- 5 pin connector € 7,29
- Enclosure with transparent lid (180 x 130 x 90 mm) € 26,99
- NTC
- Control Cable (5x0,5mm) (to the valves in the garden)
- 24VAC electromagnetic valves
Enclosure
Dimensions / measures
Based on this enclose, measures are taken

Electronics
Schematic

Home assistant
Integration is done with ESPHome and makes use of the
Documentation: https://esphome.io/components/sprinkler.html
ESPHome YAML configuration
YAML configuration for the nodeMCU or ESP32
# Processing irrigation (board: nodemcuv2; framework: arduino; platform: platformio/[email protected])
# --------------------------------------------------------------------------------
# HARDWARE: ESP8266 80MHz, 80KB RAM, 4MB Flash

# Based on ESPHome Sprinkler Controller - https://esphome.io/components/sprinkler.html
# Change Log
# 2023 01 XX
  # Initial version

# 2023 04 09 V03
  # fix run duration to seconds
# 2023 04 22 V04
  # fix GPIO order to match relay 1- 4
  # added % at the lambda return for progress sensor return value
# 2023 04 25 V05
  # added nodemcu as sensor to display in HA ui
  # added includes for api key en ota password
# 2023 05 07 V06
  # added a NTC temp sensor to  watch the enclosure temperature
# 2023 05 10 V07
  # addjusted settings reference voltage to adjust to actual temp (default 3.3)
# 2023 06 06 V08
  # adjusted settings for valves corresponding to switches
  # added repeat function
# 2024 04 04 V09
  # Corrected the value of KEY ESPHOME_PROJECT_VERSION due to compiling error esphome v2024.3.1
  # initializer-string for 'char [30]' is too long
  # changed 2023 06 06 V08 to 20240404_V09
  # removed the text "Irrigation Controller.,"
# 2025 03 12 V10
  # breaking change, configure platform explicitly

# Establish Substitutions
substitutions:
### Modify only the following 6 lines.
  zone_1_name: Drip Line A
  zone_2_name: Drip Lane B
  zone_3_name: Sprinkler A
  zone_4_name: Sprinkler B
  software_version: 20240404_V09
  sensor_update_frequency: 1s
  log_level: debug # Enable levels logging https://esphome.io/components/logger.html
  # none, error, warn, info, debug (default), verbose, very_verbose
##############################################
#  DO NOT CHANGE ANYTHING BELOW THIS LINE  ###
##############################################
  zone_1_valve_id: valve_0
  zone_2_valve_id: valve_1
  zone_3_valve_id: valve_2
  zone_4_valve_id: valve_3
  esphome_name: irrigation
  esphome_board: nodemcuv2
  esphome_comment: Four Valve Irrigation Controller
  esphome_project_name: jaya.Irrigation Controller
  esphome_project_version: $software_version
  devicename: irrigation_controller
  upper_devicename: "Irrigation Controller"
  uom: Min # this overrides the uom in sprinkler -> run_duration


#Define Project Deatils and ESP Board Type
esphome:
  name: $esphome_name
  comment: $esphome_comment
  project:
    name: $esphome_project_name
    version: $esphome_project_version
  on_boot:
    priority: -100
    then:
      # Set default state for Valve Status
      - text_sensor.template.publish:
          id: valve_status
          state: "Idle"
      # Set multiplier to 60, convert seconds to minutes
      - sprinkler.set_multiplier:
          id: $devicename
          multiplier: 60

esp8266:
  board: $esphome_board

wifi:
  ssid: !secret wifi_ssid
  password: !secret wifi_password
# Enable fallback hotspot (captive portal) in case wifi connection fails
  ap:
    ssid: "$esphome_name Fallback Hotspot"
    password: !secret esphome_ap_password

logger:
  level: ${log_level}
  logs:
    text_sensor: WARN

ota:
  password: !secret esphome_ota_password

# Enable Web server.
web_server:
  port: 80

# Sync time with Home Assistant.
time:
  - platform: homeassistant
    id: homeassistant_time

###############################################
# Enable Home Assistant API
###############################################
api:
  encryption:
    key: !secret esphome_api_encrypt_key
  reboot_timeout: 0s

###############################################
# Binary Sensor.
###############################################
binary_sensor:
  - platform: homeassistant
    # prevent deep sleep - Needs further investigation on usefullness
    id: prevent_deep_sleep
    name: "$upper_devicename Prevent Deep Sleep"
    entity_id: input_boolean.prevent_deep_sleep

###############################################
# Text sensors with general information.
###############################################
text_sensor:
  - platform: version # Expose ESPHome version as sensor.
    name: $esphome_name ESPHome Version
    hide_timestamp: false
  - platform: wifi_info
    ip_address:
      name: "$esphome_name IP"
    ssid:
      name: "$esphome_name SSID"
    bssid:
      name: "$esphome_name BSSID"

# Expose Time Remaining as a sensor.
  - platform: template
    id: time_remaining
    name: $upper_devicename Time Remaining
    update_interval: $sensor_update_frequency
    icon: "mdi:timer-sand"
    lambda: |-
      int seconds = round(id($devicename).time_remaining_active_valve().value_or(0));
      int days = seconds / (24 * 3600);
      seconds = seconds % (24 * 3600);
      int hours = seconds / 3600;
      seconds = seconds % 3600;
      int minutes = seconds /  60;
      seconds = seconds % 60;
        return {
          ((days ? String(days) + "d " : "") +
          (hours ? String(hours) + "h " : "") +
          (minutes ? String(minutes) + "m " : "") +
          (String(seconds) + "s")).c_str()};


  # Expose Progress Percent as a sensor.
  - platform: template
    id: progress_percent
    name: $upper_devicename Progress %
    update_interval: $sensor_update_frequency
    icon: "mdi:progress-clock"
    lambda: |-
      int progress_percent = round(((id($devicename).valve_run_duration_adjusted(id($devicename).active_valve().value_or(0)) - id($devicename).time_remaining_active_valve().value_or(0)) * 100 / id($devicename).valve_run_duration_adjusted(id($devicename).active_valve().value_or(0))));
      std::string progress_percent_as_string = std::to_string(progress_percent);
      return progress_percent_as_string +"%";

  # Expose Valve Status as a sensor.
  - platform: template
    id: valve_status
    name: $upper_devicename Status
    update_interval: never
    icon: "mdi:information-variant"

  - platform: template # Expose the board type as a sensor
    id: espboard_type
    icon: "mdi:developer-board"
    name: $esphome_name ESPBoard
    lambda: |-
      return to_string("${esphome_board}");

# https://esphome.io/devices/nodemcu_esp8266.html
# Enable On-Board Status LED.
status_led:
  pin:
    # Pin D2 / GPIO4
    number: GPIO04
    inverted: false

sensor:
  # Uptime sensor.
  - platform: uptime
    name: $upper_devicename Uptime

  # WiFi Signal sensor.
  - platform: wifi_signal
    name: $upper_devicename WiFi Signal
    update_interval: 60s

  # temperature sensor https://esphome.io/components/sensor/ntc.html using  a switch every 1 minute. Pull Upp GPIO16 (3.3V). prevents self-heating NTC
  - platform: ntc
    sensor: resistance_sensor
    name: $upper_devicename Temperature
    calibration:
      b_constant: 3950
      reference_temperature: 25°C
      reference_resistance: 10kOhm
  - platform: resistance
    id: resistance_sensor
    sensor: source_sensor
    configuration: DOWNSTREAM
    resistor: 10kOhm
    name: Resistance Sensor
    reference_voltage: 3.1V
  - platform: adc
    pin: A0
    id: source_sensor
    # Added:
    update_interval: never
    filters:
      - multiply: 3.3

interval:
  - interval: 60s
    then:
      - switch.turn_on: ntc_vcc
      - component.update: source_sensor
      - switch.turn_off: ntc_vcc
      - logger.log: "Measure Temp"

###############################################
# Configuration to set multiplier via number
###############################################
number:
  - platform: template
    id: $zone_1_valve_id
    name: $zone_1_name
    min_value: 1
    max_value: 60
    step: 1
    unit_of_measurement: $uom
    icon: "mdi:timer-outline"
    mode: box # Defines how the number should be displayed in the UI
    lambda: "return id($devicename).valve_run_duration(0);"
    set_action:
      - sprinkler.set_valve_run_duration:
          id: $devicename
          valve_number: 0
          run_duration: !lambda 'return x;'
  - platform: template
    id: $zone_2_valve_id
    name: $zone_2_name
    min_value: 1
    max_value: 60
    step: 1
    unit_of_measurement: $uom
    icon: "mdi:timer-outline"
    mode: box # Defines how the number should be displayed in the UI
    lambda: "return id($devicename).valve_run_duration(1);"
    set_action:
      - sprinkler.set_valve_run_duration:
          id: $devicename
          valve_number: 1
          run_duration: !lambda 'return x;'
  - platform: template
    id: $zone_3_valve_id
    name: $zone_3_name
    min_value: 1
    max_value: 60
    step: 1
    unit_of_measurement: $uom
    icon: "mdi:timer-outline"
    mode: box # Defines how the number should be displayed in the UI
    lambda: "return id($devicename).valve_run_duration(2);"
    set_action:
      - sprinkler.set_valve_run_duration:
          id: $devicename
          valve_number: 2
          run_duration: !lambda 'return x;'
  - platform: template
    id: $zone_4_valve_id
    name: $zone_4_name
    min_value: 1
    max_value: 60
    step: 1
    unit_of_measurement: $uom
    icon: "mdi:timer-outline"
    mode: box # Defines how the number should be displayed in the UI
    lambda: "return id($devicename).valve_run_duration(3);"
    set_action:
      - sprinkler.set_valve_run_duration:
          id: $devicename
          valve_number: 3
          run_duration: !lambda 'return x;'
  - platform: template
    id: sprinkler_ctrlr_repeat_cycles
    name: "Sprinkler Repeat Cycles"
    min_value: 0
    max_value: 4
    step: 1
    mode: box
    icon: "mdi:water-sync"
    lambda: "return id($devicename).repeat();"
    set_action:
      - sprinkler.set_repeat:
          id: $devicename
          repeat: !lambda 'return x;'

###############################################
# Main Sprinkler Controller
###############################################
sprinkler:
  - id: $devicename
    main_switch:
      name: "Start/Stop/Resume"
      id: main_switch
    auto_advance_switch: "Auto Advance"
    valve_open_delay: 2s
    repeat_number: "Repeat"
    valves:
      - valve_switch: $zone_1_name
        enable_switch: Enable $zone_1_name
        run_duration: 15s
        valve_switch_id: ${devicename}_1
      - valve_switch: $zone_2_name
        enable_switch: Enable $zone_2_name
        run_duration: 15s
        valve_switch_id: ${devicename}_2
      - valve_switch: $zone_3_name
        enable_switch: Enable $zone_3_name
        run_duration: 10s
        valve_switch_id: ${devicename}_3
      - valve_switch: $zone_4_name
        enable_switch: Enable $zone_4_name
        run_duration: 10s
        valve_switch_id: ${devicename}_4

button:
  - platform: template
    id: sprinkler_pause
    name: "Pause"
    icon: "mdi:pause"
    on_press:
      then:
        - text_sensor.template.publish:
            id: valve_status
            state: "Paused"
        - sprinkler.pause: $devicename

####################################################
# Switch Control to restart the irrigation system.
####################################################
switch:
  - platform: restart
    name: "Restart $devicename"

# Switch for the NTC https://esphome.io/components/sensor/ntc.html, Prevent self heating by switching the voltage on a GPIO
  - platform: gpio
    pin:
      number: GPIO5 # Pin D1
      inverted: false
    id: ntc_vcc

####################################################
# Hidden I/O  Switches to control irrigation valve relays
####################################################
  - platform: gpio
    name: Relay Board Pin IN1
    restore_mode: RESTORE_DEFAULT_OFF # Prevents GPIO pin from going high during boot
    internal: true # Prevents GPIO switch NAME from showing up in Home Assistant
    id: ${devicename}_1
    on_turn_on:
      - text_sensor.template.publish:
          id: valve_status
          state: "$zone_1_name Active"
    on_turn_off:
      - text_sensor.template.publish:
          id: valve_status
          state: "Idle"
    pin: GPIO14 # D5
    inverted: true
  - platform: gpio
    name: Relay Board Pin IN2
    restore_mode: RESTORE_DEFAULT_OFF # Prevents GPIO pin from going high during boot
    internal: true # Prevents GPIO switch NAME from showing up in Home Assistant
    id: ${devicename}_2
    on_turn_on:
      - text_sensor.template.publish:
          id: valve_status
          state: "$zone_2_name Active"
    on_turn_off:
      - text_sensor.template.publish:
          id: valve_status
          state: "Idle"
    pin: GPIO12 # D6
    inverted: true
  - platform: gpio
    name: Relay Board Pin IN3
    restore_mode: RESTORE_DEFAULT_OFF # Prevents GPIO pin from going high during boot
    internal: true # Prevents GPIO switch NAME from showing up in Home Assistant
    id: ${devicename}_3
    on_turn_on:
      - text_sensor.template.publish:
          id: valve_status
          state: "$zone_3_name Active"
    on_turn_off:
      - text_sensor.template.publish:
          id: valve_status
          state: "Idle"
    pin: GPIO13 # D7
    inverted: true
  - platform: gpio
    name: Relay Board Pin IN4
    restore_mode: RESTORE_DEFAULT_OFF # Prevents GPIO pin from going high during boot
    internal: true # Prevents GPIO switch NAME from showing up in Home Assistant
    id: ${devicename}_4
    on_turn_on:
      - text_sensor.template.publish:
          id: valve_status
          state: "$zone_4_name Active"
    on_turn_off:
      - text_sensor.template.publish:
          id: valve_status
          state: "Idle"
    pin: GPIO15 # D8
    inverted: true
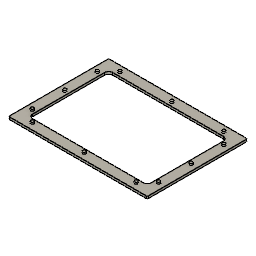
Print parts
Base plate and Wall mount
For easy mount and dismount the enclosure, a baseplate, two frame pieces and bracket can be used. (this saves the trouble of unscrewing the entire box).


- If you want the .stl files, please sent me a pm. (It’s not possible to attach here)
Future additional Features
Next step is to build a soil moisture based on an ESP device that can live on battery and placed in the garden. Things like deep sleep…
 Also you addition is welcome. It’s on my todo list, building an outdoor soil moisture sensor and use it as a binary to start the sprinkler sequence.
