Morning all,
This might help someone.
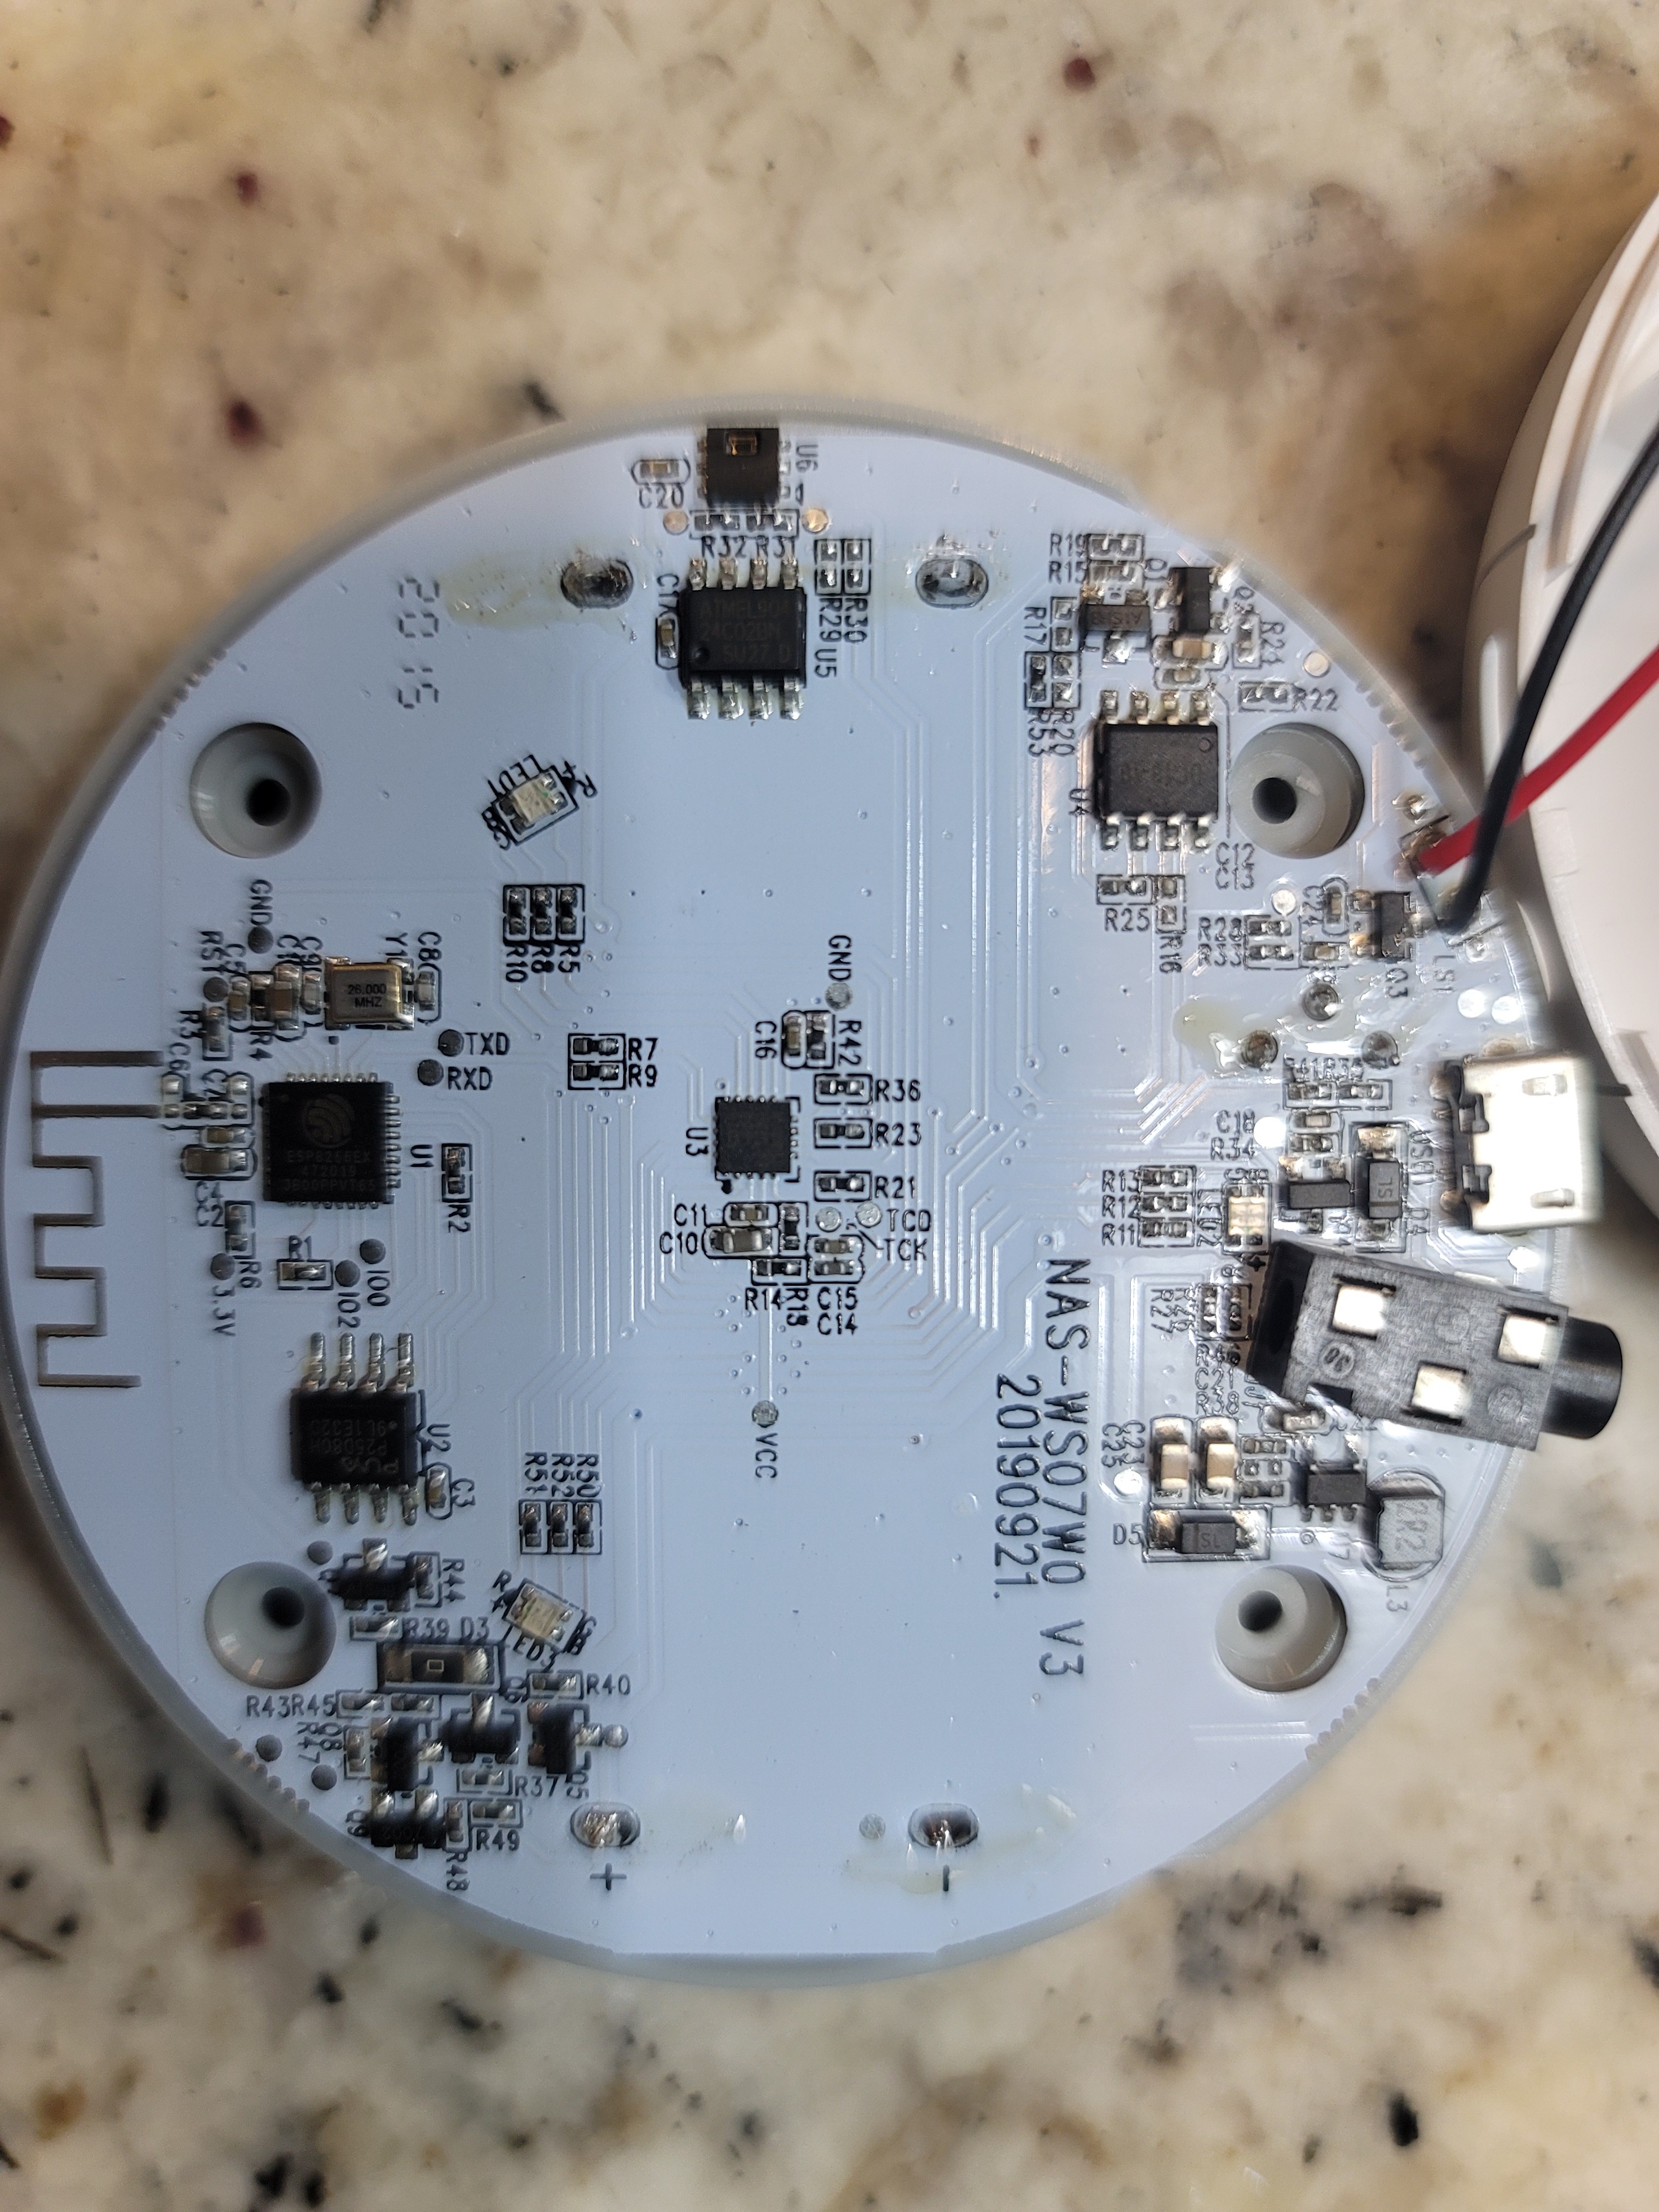
I recently bought a smartlife thermometer and humidity (and siren) 3 in 1 sensor. My initial plan was to utilitise smartlifes scenes to trigger things, but out of interest I tried flashing the device with tasmota.
It worked.
But unfortunately for me, there are no templates available for the unit.
However, using the tasmota interface, I set up a generic unit, enabled tuyaMCU, setup weblog 4 and found two Ids being transmitted - 105 and 106.
105, I believe after some testing is the temperature reading.
106, the humidity.
Not being completely savvy with tasmota (I asked for assistance on the tasmota forum just to have my question deleted…) I ended up mapping these values to tasmota 31 and 32 - which are watts and amps I believe. Temperature on 31, Humidity on 32.
A little bit of conversion in HA allows me to read these figures from the sensor.
Alas, the siren part of the setup is beyond my capabilities (and to be honest, I didnt need that functionality), but for those of you looking to find wifi, affordable, ways to monitor these values, this might be what you are looking for.
These devices range from about £16 from China, are all generic units with different branding. Just a caution, some are only advertised as sirens. Look for the 3 in 1.
Hope this helps someone.
Rob
and if anyone has any ideas on how to make tasmota indicate the values as temperature and humidity, please let me know!
i managed to flash the sirene und to connect to home assistant. The connecntion through Mqtt is working.
What did you do to read the temperature und humudity values? What kind of conversion in HA?
First make sure you have the 3 in 1 version that has Temperature and Humidity sensors (I received the version without ).
With the proper hardware version enabling temperature reporting is likely TuyaSend4 105,1 and TuyaSend4 106,1 respectively for humidity (with 112 changing between C and F).
Then, in HA need to set up template sensors on the topic used by Tasmota (can use mosquitto_sub -d -t "#" to look at all the messages received by MQTT). Unless you changed the reporting period to anything else than 300 you will not receive any payload from the siren for at least 5 minutes (minimal value is 10 (seconds)).
I bought 3 of these sensors thinking I could get them working in home assistant. https://www.amazon.com/gp/product/B088K9YPLW/ref=ppx_yo_dt_b_asin_title_o00_s00?ie=UTF8&psc=1
They look like the same thing with the added 2.5mm jack for a binary sensor “leak detector” Also looking at the inside it looks like it has a neo type chip running 3 RGB leds. It would be awesome to have control over Humidity, Temp, Leak, Siren, and RGB leds for mqtt automations. I could really use this.
I flashed with tasmota before reading this and I didn’t disconnect any trace/resistor. I got tasmota on the device but, I have no clue how to configure it.
If someone is fairy certain they can get these implemented I’d be glad to donate one. With the added plug for an extra sensor and RGB leds I think this could be a very nice feature for Homeassistant.
Also the siren looks more like a speaker possible to get playback? I post a few pictures of the internals tomorrow when I have some time
You’ve probably completed the most difficult part by flashing Tasmota and now just need to find a proper template to match the actual wiring of the device by identifying the traces of the PCB to the NodeMCU pins with a multimeter (looking at the pins pictures helps but there might be traces that are not visible at a glance).
If your device isn’t already mapped, then worst case scenario is to look at similar sensors templates and find the right setup by trial and error. As you said, it looks like a 3-in-1 with hum&temp&siren (similar to the one referenced above and you can start from that) + binary for leakage + RGB.
I think that the leakage sensor template (https://templates.blakadder.com/W06.html) is different from yours as that is a battery only device (has a separate MCU that monitors the contacts of the probe and only wakes up the ESP chip to make the wifi connection).
The one I flashed with tasmota, I lost connection to when I changed to Tuya module. I then sent new generic config over serial and followed the setoption instructions for setting up tuya here. I lost connection again. After several attemps I got the generic config to flash again over serial and logged into the webui. Setup as Tuya and once again I loose connection. I’m not sure how I will ever figure this out.
Side note: It uses two AA batteries for a battery backup. It’s a very well built design. If I can get it working I’m definitely getting more
Hey Petrica,
thanks for all. It´s working quite well and i getting the MQTT Message:
10:54:31 MQT: sirene/tele/RESULT = {"TuyaReceived":{"Data":"55AA03070008690200040000001494","Cmnd":7,"CmndData":"6902000400000014","DpType2Id105":20,"105":{"DpId":105,"DpIdType":2,"DpIdData":"00000014"}}}
10:54:31 TYA: fnId=0 is set for dpId=105
@Petrica’s config didn’t quite work as-is for me (it resulted in an “unknown” in the HA UI), but I did modify below and it seems to be working I think:
I added the “int(base=16)/10” since I believe the MQTT output from the sensor in in hex and needs to be converted to binary. Without it, the sensor’s output in HA just read as “zero”.
For my use case, I want to convert from C to F. The TuyaSend4 106,1 command in the console didn’t seem to work for me to convert the output of the sensor to F, so I added the “*1.8+32” manual conversion in the template.
The only problem so far: “the round(1)” portion doesn’t seem to be working to round the result to a single decimal point. Without rounding, there seems to be a bit of noise in the HA history graph.
Does anyone have any ideas regarding the rounding function, and how to apply it in the above temperature config template? My JSON skills are nonexistent.
Edit: I’ve updated the temperature template to include the correctly formatted rounding filter (thanks @francisp)
I just want to thank everyone for their input on this topic. I’m very new to HA and I found this post invaluable. I had a lot of trouble flashing Tasmota onto my Neo 3 in 1 but eventually succeeded thanks to this post and others. However my mqtt message format was different, here is an example:
Original message:
unfortunately the code above only returned a value just after the mqtt message comes through, at all other times it showed zero so I changed the template (in full) to this:
cool that you found a workaround for the different json format.
I remember that I also had this issue but in the end I found out that it was caused by the Tasmota version that tuya-convert provided by default. After I’ve updated to latest Tasmota, the json had the same structure as the one described to this post.
One final piece of the puzzle. I wanted to change the siren chime for various purposes (like using it as a doorbell). It took me ages to puzzle out the correct mqtt syntax to send the dpld commands but here is a working example. This snippet is from an automation that detects the pressing of my ring doorbell, sets the Neo to Lone Ranger and the volume to loud. The topic for this Neo is tasmota_THSDn and the HA entity is switch.tasmota
Hello,
I hope that it is ok that I am attached to the post, as I have not found anything comparable on the topic.And sorry, my english is not so good.
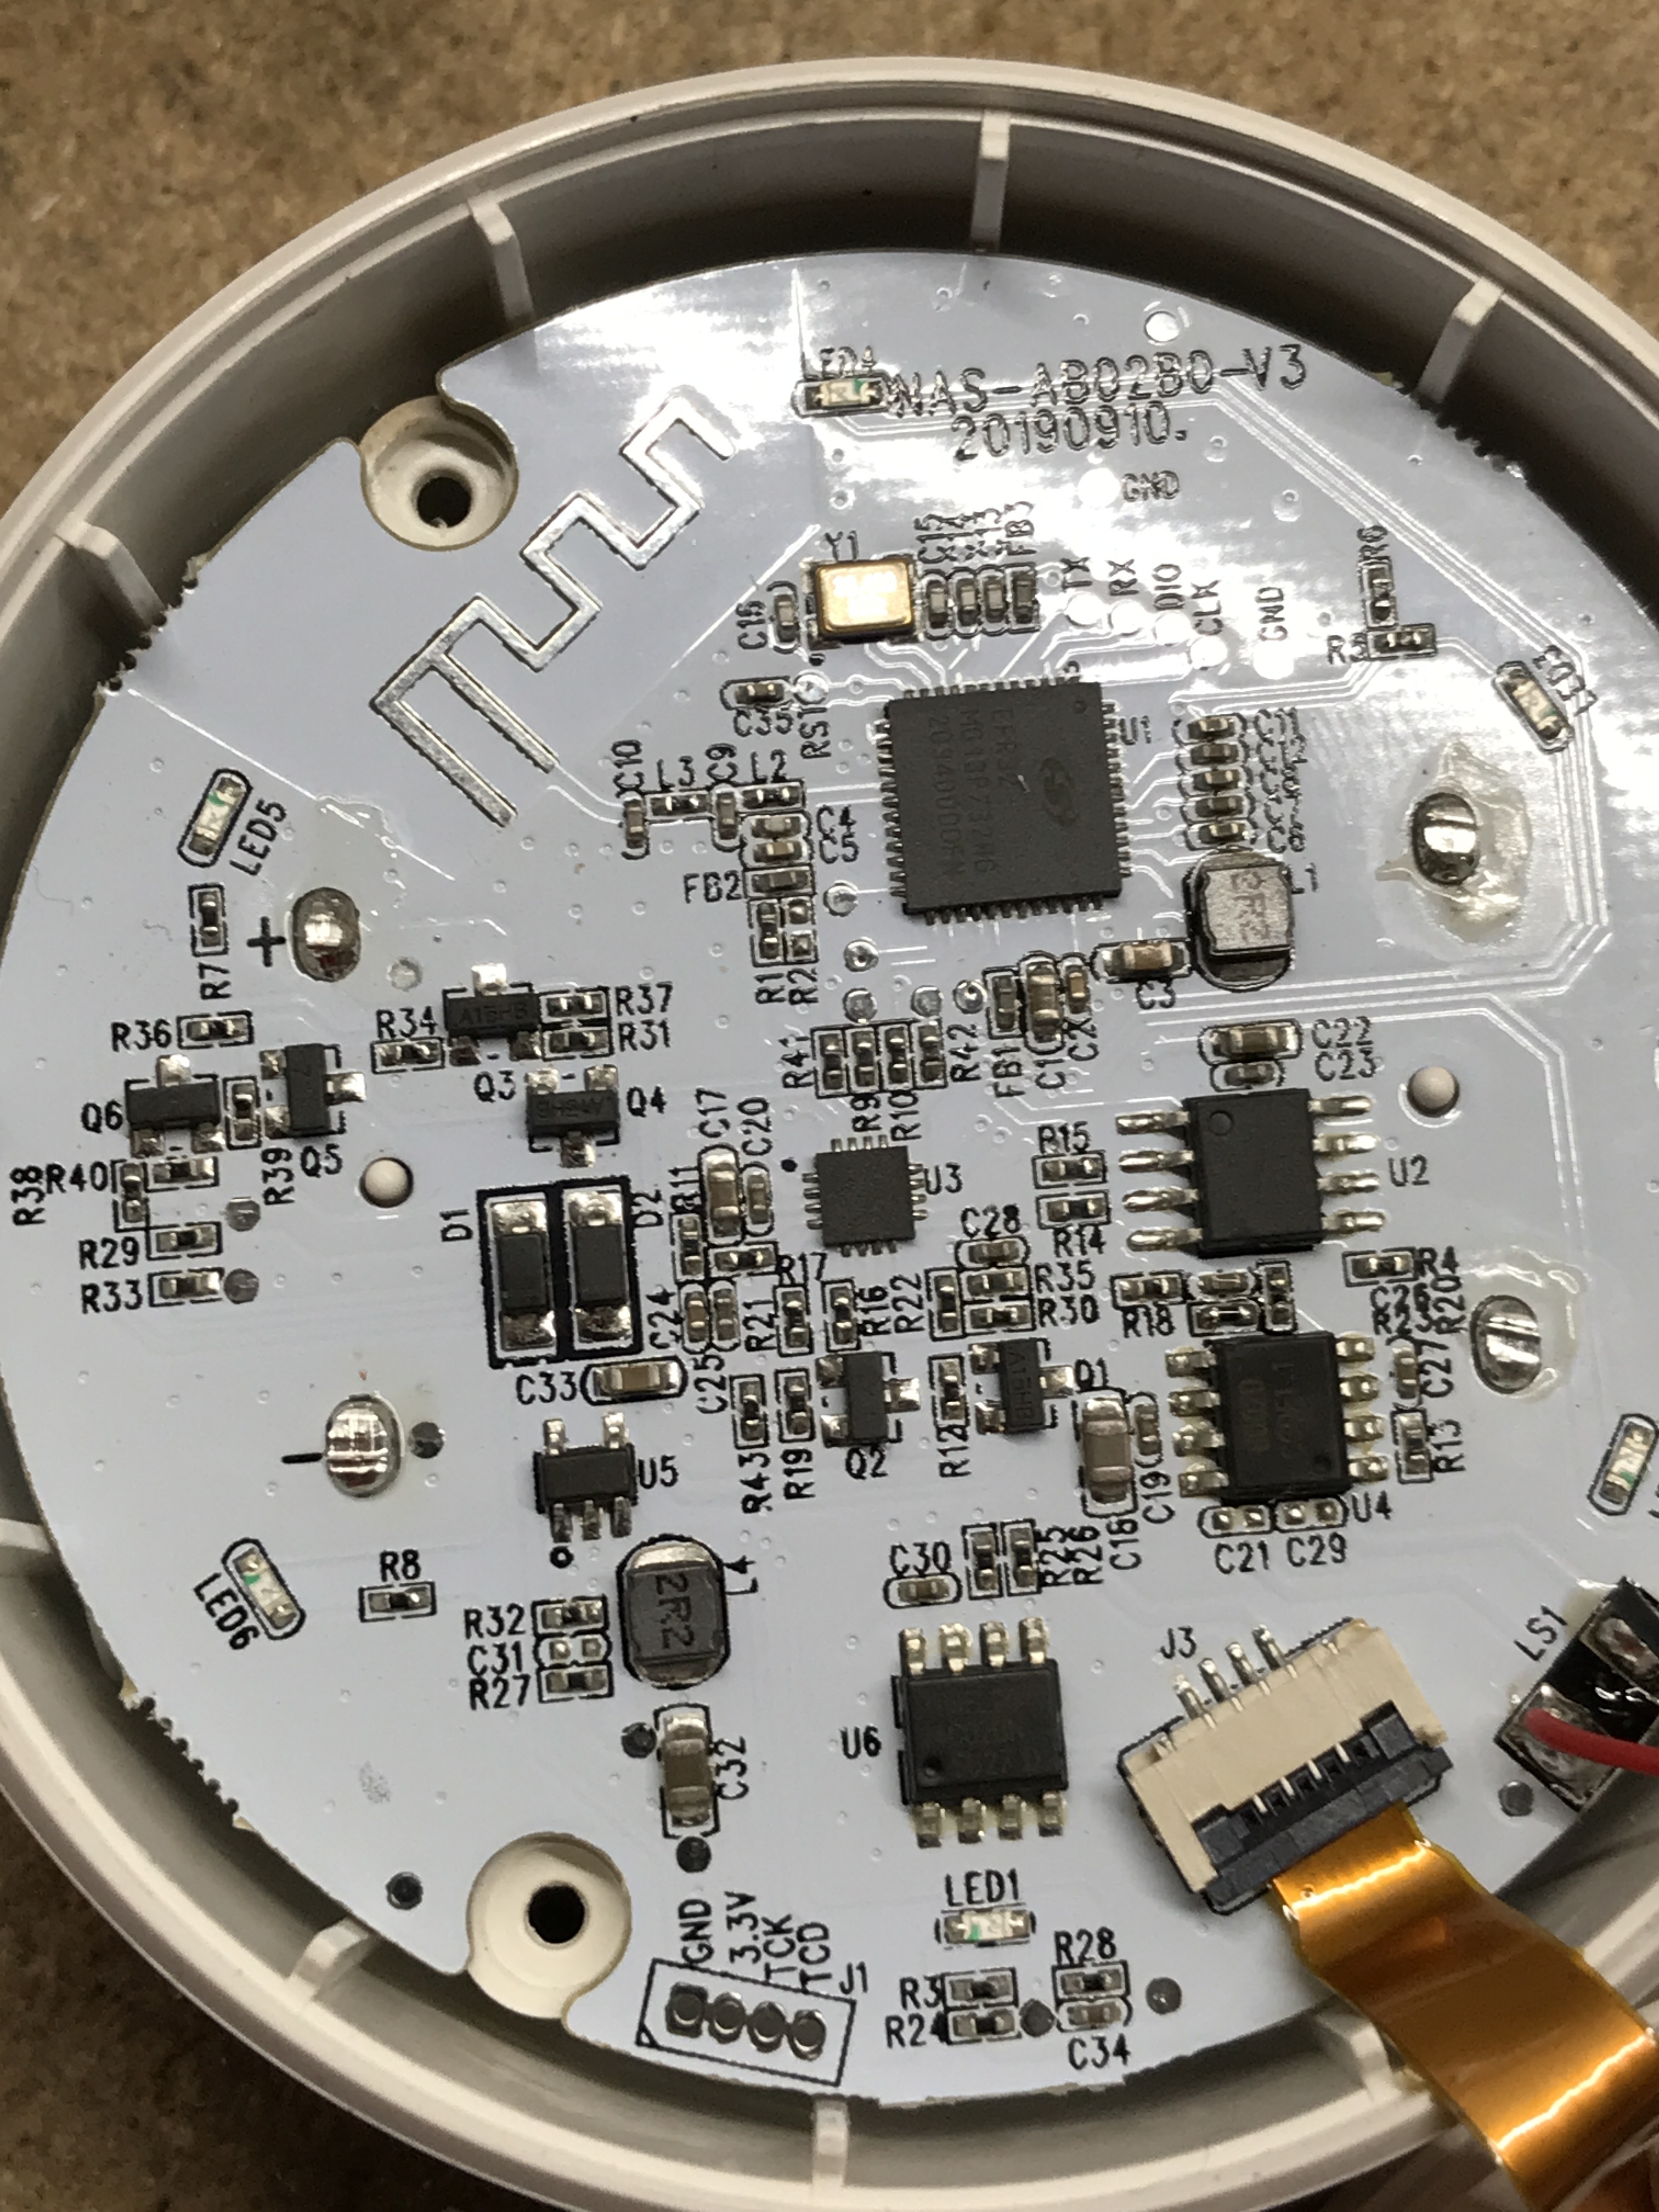
After many other devices, I’m now trying to flash a Neo Coolcam NAS-AB02W (see picture) with a Tasmota firmware via Serial interface. Flashing via tuya flash is not possible because the version is too new.
I connected the 4 lines (VCC, GND, Tx, Rx).
Follow the blakadder template, a resistor has to be removed. I did not find this one.
If I now apply voltage (Interface FTDI232), the blue LEDs flash permanently and also Rx, Tx on the interface.
Do I still have to ground GPIO0?
Can anyone help me further?
Best regards
Herbert
Hi, I need also some guidance to flash my NEO Siren ALARM.
I bought this siren to work along with sonoff sensors to obtain a residencial alarm solution without any monthly fee.
I just saw blakadder post but it seems that my siren perhaps it’s different.
Where can I have to put the wires?
Should I put it in the rectangular box named J1 that has GND, 3,3V, TCK and TCD?

 ).
).