Today I wanted to share how I made a fingerprint sensor to control my garage.
It’s what got me in Home Assistant for the first time. I wanted to be able to control my garage from my phone. That’s some time ago, but now I can also control it with a fingerprint sensor 
I won’t cover how I control the garage itself in this topic, but mainly how to control the fingerprint sensor and how to build it into a wooden object.
What you need:
- GROW R503 fingerprint sensor (Aliexpress)
- ESP8266 or ESP32 running ESPHome
- UTP cable
- Drill
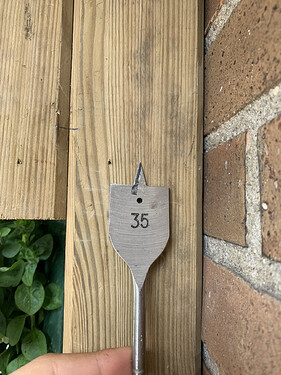
- ± 35mm drill bit
- ± 8mm drill bit
- Soldering Iron with solder
- (Optional) 3D printer to print the cover
- (Optional) Premade cover for the sensor (Aliexpress)
The first step is to strip the UTP cable so you have all coloured wires visible and they can be soldered. The grow sensor has six wires. I soldered the white and red wire together because they both need 3.3v. The other wires I soldered to similar colours on the UTP cable.
After soldering, cover the solder with some electrical tape to isolate them from eachother.
For the other end of the cable, you have to solder them to the ESP8266 or ESP32 board. This are the colours and pins I used.
For ESP8266:
- Red and white: 3V
- Black: G
- Yellow: D1
- Green: D0
- Blue: D2
For ESP32:
- Red and white: 3V
- Black: GND
- Yellow: GPIO16
- Green: GPIO17
- Blue: GPIO05
Once that’s done, load the ESPHome config on the ESP. This is my config.
uart:
  tx_pin: D0 # Or GPIO17 for ESP32
  rx_pin: D1 # Or GPIO16 for ESP32
  baud_rate: 57600

fingerprint_grow:
  sensing_pin: D2 # Or GPIO05 for ESP32
  on_finger_scan_matched:
    - switch.turn_on: trigger_relay
    - fingerprint_grow.aura_led_control:
        state: BREATHING
        speed: 200
        color: BLUE
        count: 1
    - text_sensor.template.publish:
        id: fingerprint_state
        state: "Authorized finger"
  on_finger_scan_unmatched:
    - fingerprint_grow.aura_led_control:
        state: FLASHING
        speed: 25
        color: RED
        count: 2
    - text_sensor.template.publish:
        id: fingerprint_state
        state: "Unauthorized finger"
  on_enrollment_scan:
    - fingerprint_grow.aura_led_control:
        state: FLASHING
        speed: 25
        color: BLUE
        count: 2
    - fingerprint_grow.aura_led_control:
        state: ALWAYS_ON
        speed: 0
        color: PURPLE
        count: 0
    - text_sensor.template.publish:
        id: fingerprint_state
        state: "Finger scanned"
  on_enrollment_done:
    - fingerprint_grow.aura_led_control:
        state: BREATHING
        speed: 100
        color: BLUE
        count: 2
    - text_sensor.template.publish:
        id: fingerprint_state
        state: "Enrolled fingerprint"
  on_enrollment_failed:
    - fingerprint_grow.aura_led_control:
        state: FLASHING
        speed: 25
        color: RED
        count: 4
    - text_sensor.template.publish:
        id: fingerprint_state
        state: "Failed to enroll fingerprint"

text_sensor:
  - platform: template
    id: fingerprint_state
    name: "Garage Fingerprint State"

sensor:
  - platform: fingerprint_grow
    fingerprint_count:
      name: "Garage Fingerprint Count"
      id: fingerprint_count
    last_finger_id:
      name: "Garage Fingerprint Last Finger ID"
    last_confidence:
      name: "Garage Fingerprint Last Confidence"
    status:
      name: "Garage Fingerprint Status"
    capacity:
      name: "Garage Fingerprint Capacity"
    security_level:
      name: "Garage Fingerprint Security Level"

api:
  password: !secret api_password

  services:
  - service: enroll
    variables:
      finger_id: int
      num_scans: int
    then:
      - fingerprint_grow.enroll:
          finger_id: !lambda 'return finger_id;'
          num_scans: !lambda 'return num_scans;'
  - service: enroll_next # Idea by Ralf Klüber (thanks!)
    variables:
      num_scans: int
    then:
      - fingerprint_grow.enroll:
          finger_id: !lambda 'return id(fingerprint_count).state;'
          num_scans: !lambda 'return num_scans;'
  - service: cancel_enroll
    then:
      - fingerprint_grow.cancel_enroll:
  - service: delete
    variables:
      finger_id: int
    then:
      - fingerprint_grow.delete:
          finger_id: !lambda 'return finger_id;'
  - service: delete_all
    then:
      - fingerprint_grow.delete_all:
Like @mkloeckner mentioned, it’s important to also set a password for the fingerprint sensor to prevent physical attacks, like soldering another fingerprint sensor to the UTP cable. Please refer to the ESPHome documentation for more information.
Make sure you add the device in Home Assistant as an integration if you haven’t already.
When that’s done, you can enroll your fingerprint in the sensor by calling the service esphome.X_enroll where X is the device name, with the parameters finger_id and num_scans. For the first finger fill in id 0, the second finger id 1 and so on. The num scans is the amount of scans it takes to register the finger. I use 2 for that.
Everything worked? Good! Let's build it into a surface.
To get it in the wood I had to desolder the fingerprint sensor from the UTP cable. Grab the drill and a big drill bit, something like this.
Then drill a hole in the wood, deep enough so the fingerprint sensor and some wires can go in there. Then grab a smaller drill bit with the diameter of the UTP cable and drill a hole all the way through the wood so the cable can go trough there. This is how it looks under my cover.
Next step is to attach the cover to the fingerprint sensor. Do you have A 3D printer? Here is an STL file I made for this cover. Don’t have a 3D printer? I linked a fitting cover in the What you need section.
Then solder the fingerprint sensor to the UTP cable again and screw the cover to the wood and you’re all done!


I hope this gave you guys some inspiration for your own projects 
If you’ve got any questions, just ask!


