Installing Home Assistant on VMWare Player / Workstation 16 (or 17)

Full guide here: https://smarthomepursuits.com/how-to-migrate-home-assistant-from-raspberry-pi-to-vmware-workstation/

I don’t often see HA users using VMware, but it has been nothing short of fantastic for me, so I thought I’d share my step-by-step guide of migrating from a raspberry pi to a VMware Player VM.

By the end of this guide, you’ll have created a VMWare VM, restored from snapshot, and then I have two additional guides at the end that will 1. automatically connect the USB dongle of your choice to the VM so it gets detected when the VM starts, and 2. automatically start the VM when your PC starts. This guide is for Windows 10 users, on Windows version 20H1 and above.

Step 1: Download VM Workstation Player

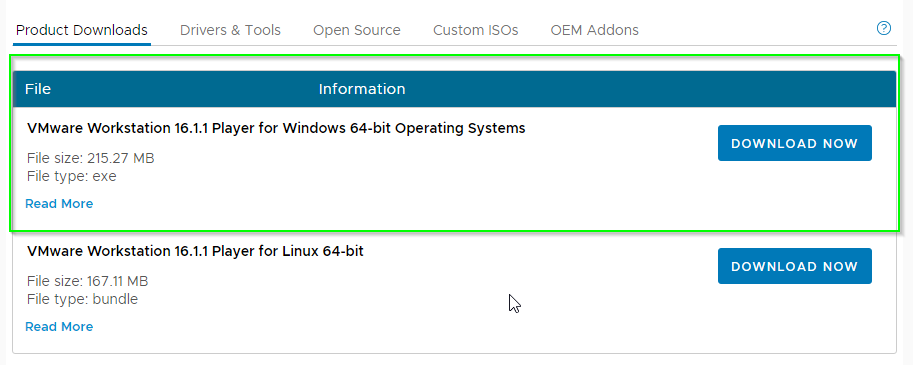
Download VMplayer from here: https://my.vmware.com/en/web/vmware/downloads/details?downloadGroup=WKST-PLAYER-1611&productId=1039&rPId=63655

If using Windows 10 PC as a host, select the 64-bit Windows Operating System.

Then, install VMware Workstation 16 Player with all defaults. On the custom setup screen, check the box for Enhanced Keyboard Driver.

On the User Experience screen, you can uncheck both options:

Continue with the install until complete. Then, it’ll prompt you to reboot your PC.

Step 2: Download Home Assistant .VMDK image

Download the Vmware Workstation (.vmdk) image from here: Windows - Home Assistant

The file will be download as a file with a .xz extension which needs to be extracted. To extract it:

  1. Download 7zip.
  2. Right-click the hass_ova-5.12.vmdk.xz file you just downloaded > 7zip > Open Archive.
  3. Then, click Extract. It should extract to a .vmdk file.
  4. Rename the file to something like homeassistant.vmdk, and place it into a directory where your VM will live (C:\HomeAssistant)

Step 3: Launch VMware Workstation 16 Player

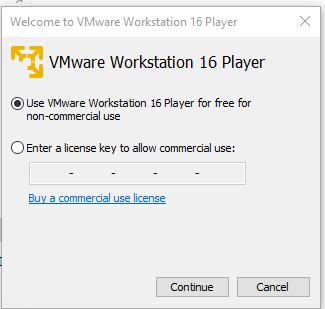
Search your computer for VMware Workstation 16 Player and open. Select the free for non-commercial use option.

Click Create a New Virtual Machine

Click I will install the operating system later.

Select Linux. For the version, you would use Other Linux 5.x and later kernel 64-bit.

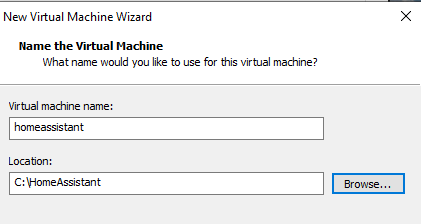
Give your VM a name (like homeassistant) and select the folder you created in Step 2.

A message will pop up like below. Select Continue.

Store it as a single file, and set your storage size. I chose 20gb.

On the next screen, click Customize Hardware. Memory and CPU can be specified to whatever you want (1gb of RAM and 1CPU is recommended), but the network adapter needs to be set to “bridged” mode.

  • Memory: 2048
  • CPU: 2
  • Network Adapter: Choose “Bridged”

Your VM should now be created.

Step 4: Edit VM Settings

Navigate back to the C:\HomeAssistant folder. You will now see two .vmdk files:

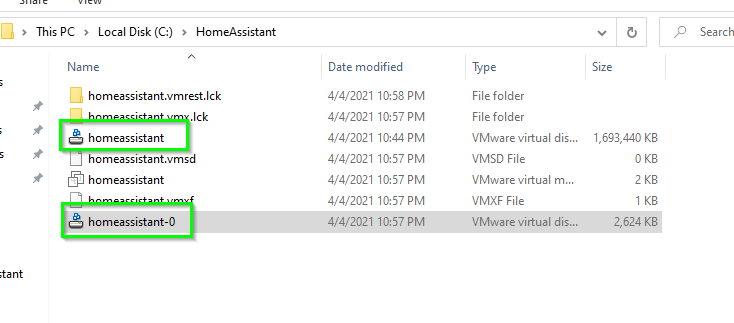
Delete the homeassistant-0 one (the newly created .VMDK), and rename the homeassistant one to homeassistant-0 (this is the extracted image you downloaded).

Then, locate the homeassistant VMware virtual machine configuration file (.vmx). Right-click > Open With > notepad.

Under the .encoding line, add the following code and save the file.

firmware=“efi”

Step 5: Start the Virtual Machine

Then, click Play Virtual machine or click the green triangle at the top of the window.

If you see this message, click Yes.

Download and install VMTools. I’m not entirely sure if this was necessary, but I did it anyway:

If everything is successful up until this point, you should see the Home Assistant login screen in a command window like below.

The default username is root. Logging in will show you your IP address of your new HA virtual machine. In my case, it is 192.168.68.128. It’s not necessary to login if you can get your IP from your router.

At this step, you should be able to navigate to http://192.168.68.128:8123 in a web browser. The HA gui will state that it may take up to 20 minutes to complete, but in my experience it took less than 5.

While you are waiting, remove your USB dongle from your raspberry pi and plug it into your Windows 10 PC that has VM Workstation Player installed. Windows should detect it automatically and install all necessary drivers.

The VMware VM should automatically detect it as well:

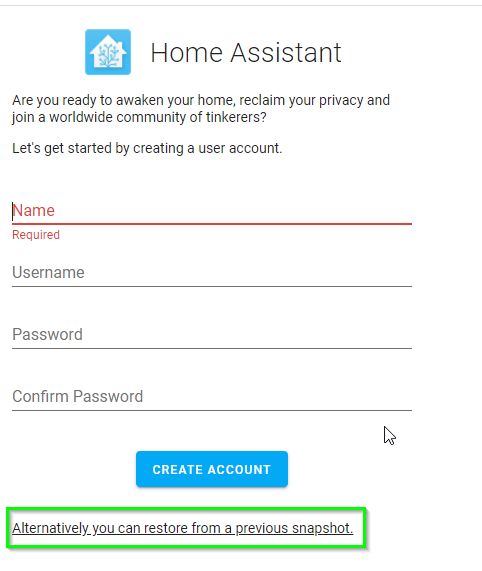
Once the “it may take 20 minutes to complete” screen goes away, you will see the New User Account screen like the screenshot below. I am restoring from a previous snapshot, so I’m going to choose Alternatively, you can restore from a previous snapshot.

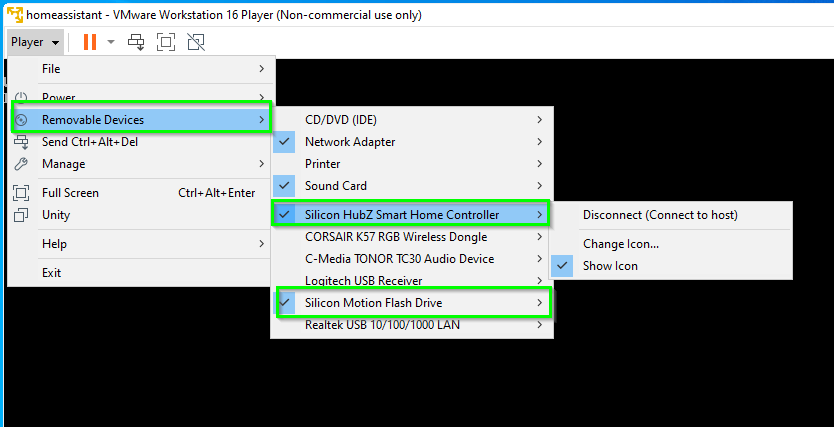
After restoring from snapshot, you may notice all of your wifi devices work – but zwave and zigbee devices don’t. This is because we need to “attach” the Nortek USB dongle to the vm (referred to as USB passthrough).

To do this, on the VMware Player window, select Player > Removeable Devices. There should be two Silicon devices.

Click each of them > Connect.

Testing It Out

If all has gone well so far, you can now test things out. Toggle a few lights, switches, and motion sensors. If you have any secure nodes, like a smart lock, you should test those as well.

The last thing you’ll need to do is either the change the internal IP address in your Home Assistant Mobile app (under App Configuration in the sidebar) or change the IP address of your VM to the old IP address.

Additional (but recommended) steps:

  1. Run VMWare Workstation in the background / Auto launch VMWare VM after reboot
  2. Automatically connect USB dongle to VMWare VM
14 Likes

Thank you so much for taking the time to document and share this. I got part way through the instructions provided in the official documentation and realized I was just heading down yet another rabbit hole. I was very relieved to find your post and even more so when it actually worked.

2 Likes

Thanks for the description. It worked for me until the point, where I restored a HA snapshot from my raspberry inside the VM. Of course the raspberry has a different IP address, etc.

I thought I could still access the VM from a browser or am I wrong? My goal is to test upgrades inside the VM before I do it with the raspberry.

Signed up just to say this should be in the official install docs. Thank you!

3 Likes

You are very welcome! I’m glad it helped you set it up.

Like many others at this time, I’m scrambling to regain control on my Insteon Hub.

The details in this post are great - far more useful and accurate than those listed on the Windows install.

Question - when my VM came up, the Network Manager and Kernel Time Sync processes failed.
I’m presuming the first issue leads to the second one.
Although I’ve worked with Unix & Linux for years, some stuff still stonewalls me … thoughts / ideas?

Found the problem solution in the Forums.
Needed to disable all but what is being used:
x

UEfi can also be set in UI (virtual machine settings / options / advanced):


Or in case of a VMWare Player, just edit your vmx file manually, and add:

firmware = "efi"

I have the VMWare up and running with the banner showing. The only difference I see is that there are no lines for the login. The ha prompt is showing and I can execute the ha commands. The problem is that when I bring up a browser on port 8123 I get a timeout. Any suggestions on troubleshooting this?

I have tried following this but I cant enable efi. My vmx configuration file is completely different so not sure what to add. And i cant do it via ui as i dont have the advanced options.

Any ideas?

Are you sure that you open .vmx file and not .vmxf?

Thanks for the suggestion, but I gave up and have installed x86 method on a laptop so finally up and running

I have same problem with the first page showing the logo just times out and tries to retry every 60 seconds. Did you ever find the fix for this problem?
Thanks.

Same problem here, I checked only one Network adapter and Network manager problem seems gone, but Kernet Time Sync still fails.
Also IPv4 addresses for enp2s1 is empty. And I can not access HAOS by any address (localhost, laptop IP)
OS version: 8.2

Fixed:
After checking up only one Network Adapter I should remove old HAOS-0.vmdk and replace it with fresh downloaded vmdk.
But still have a problem with Kernel Sync Time. It slows booting for 1.5 mins.

Network adapter bridged with your the interface connected to the internet ?
image

You can also specify which network card to use(in case you have multiple) in the virtual network configurator:
image
Unfortunately, this option is only available in the VMWare16 workstation, not in the Player

I can’t check now, but I’m pretty sure there is a way to select one or more cards in Player.

@djbrooks022 Thanks very much.
Nice one! Clear and easy guide.

It even worked on my ancient i7.
I ignored the warning at VM install

I had a VMX-Unrestricted-Guest warning similar to below on VM start

This host does not support
virtualizing real mode. The Intel
"VMX Unrestricted Guest" feature is
necessery to run this virtual machine
on an Intel Processor.

fixed with addition to VM workstation config.ini

go to this path :

C:\ProgramData\VMware\VMware Workstation

and so change this file : config.ini
set this parameter on file config.ini

authd.client.port = "902"
authd.proxy.nfc = "vmware-hostd:ha-nfc"
installerDefaults.autoSoftwareUpdateEnabled = "no"
installerDefaults.autoSoftwareUpdateEnabled.epoch = "25844"
installerDefaults.componentDownloadEnabled = "yes"
installerDefaults.dataCollectionEnabled = "no"
installerDefaults.dataCollectionEnabled.epoch = "25844"

monitor.allowLegacyCPU = "true"    <---- this needs to be added

I had to sort the bridge adapter bit also… I only have my NIC card ticked in configure option
Capture

one buggy bit was typing on the account creation page. I could only type a letter at a time and box would lose focus, until I mouse clicked on it again, Reloading the page fixed that.

Worked with an Addon using bluetooth too!

Quick question. I am using your method of bringing up HA under VMWare Player automatically by the Windows Task Scheduler. Whether or not I specify “nogui”, there is no GUI and the VM comes up automatically in the background. Where can I find the log that is normally seen in the black screen of the VMWare Player as HA is coming up? I’ve had some issues during HA startup and would like to see the log. However, now that it’s coming up in the background, I don’t see anything.

Thanks, David

oh nice… had the exact same problem, no network available because of that. will have 2nd attempt to get it runnng now (didnt bother enough to go googling as i run production on virtual box)

I’m running VMware Workstation Player 17, and I don’t have that Advanced option available to me. I couldn’t get Workstation Player to boot properly until this post listed adding the entry in the config file. I even tried downloading a trial version of Pro, but I couldn’t get the Zooz Stick to connect. When I saw this I gave Player another try. It’s been stable all evening. I guess I’ll find out in the morning if the improvement will last.