Moes Smart Knob Lights Control

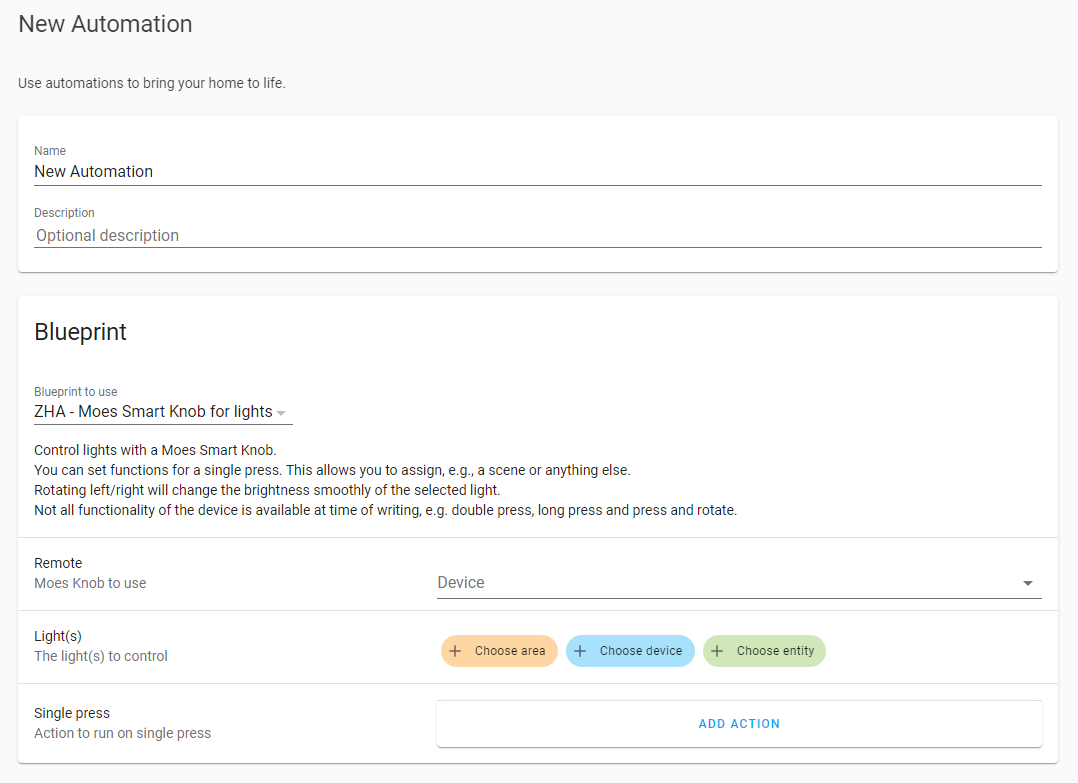
Blueprint to control lights using a Moes Smart Knob and ZHA.

You can set functions for a single press. This allows you to assign, e.g., a scene or anything else.

Rotating left/right will change the brightness smoothly of the selected light by 5% each step.

Pressing and Rotating left/right will change the brightness smoothly of the selected light by 20% each step.

Not all functionality of the device is available at time of writing, e.g. double press and long press.

Screen

Blueprint

Click the badge to import this Blueprint: (needs Home Assistant Core 2021.3 or higher)

Open your Home Assistant instance and show the blueprint import dialog with a specific blueprint pre-filled.

Or import this Blueprint by using the forum topic URL:

blueprint:
  name: ZHA - Moes Smart Knob for lights
  description: 'Control lights with a Moes Smart Knob.
    You can set functions for a single press. This allows you to assign, 
    e.g., a scene or anything else.
    Rotating left/right will change the brightness smoothly of the selected light.
    
    Not all functionality of the device is available at time of writing, e.g. double press, long press and press and rotate.'

  domain: automation
  input:
    remote:
      name: Remote
      description: Moes Knob to use
      selector:
        device:
          integration: zha
          manufacturer: _TZ3000_4fjiwweb
          model: TS004F
    light:
      name: Light(s)
      description: The light(s) to control
      selector:
        target:
          entity:
            domain: light
    single_press:
      name: Single press
      description: Action to run on single press
      default: []
      selector:
        action: {}
  source_url: https://gist.github.com/seamus65/939a147634942dd885c8704334627f93
mode: restart
max_exceeded: silent
trigger:
- platform: event
  event_type: zha_event
  event_data:
    device_id: !input 'remote'
action:
- variables:
    command: '{{ trigger.event.data.command }}'
    cluster_id: '{{ trigger.event.data.cluster_id }}'
    args: '{% if trigger.event.data.args[0] == 0 %} 0 {% elif trigger.event.data.args[0] == 1 %} 1 {% elif trigger.event.data.args[0] == 3 %} 3 {% endif %}'
- choose:
  - conditions:
    - '{{ command == ''toggle'' }}'
    - '{{ cluster_id == 6 }}'
    sequence: !input 'single_press'
  - conditions:
    - '{{ command == ''step'' }}'
    - '{{ cluster_id == 8 }}'
    - '{{ args == 0 }}'
    sequence:
    - repeat:
        while:
        - condition: template
          value_template: "{{ repeat.index < 2 }}"
        sequence:
        - service_template: light.turn_on
          target: !input 'light'
          data_template:
            brightness_step_pct: 5
            transition: 0.5
  - conditions:
    - '{{ command == ''step'' }}'
    - '{{ cluster_id == 8 }}'
    - '{{ args == 1 }}'
    sequence:
    - repeat:
        while:
        - condition: template
          value_template: "{{ repeat.index < 2 }}"
        sequence:
        - service_template: light.turn_on
          target: !input 'light'
          data_template:
            brightness_step_pct: -5
            transition: 0.5
  - conditions:
    - '{{ command == ''step_color_temp'' }}'
    - '{{ cluster_id == 768 }}'
    - '{{ args == 1 }}'
    sequence:
    - repeat:
        while:
        - condition: template
          value_template: "{{ repeat.index < 2 }}"
        sequence:
        - service_template: light.turn_on
          target: !input 'light'
          data_template:
            brightness_step_pct: 20
            transition: 0.5
  - conditions:
    - '{{ command == ''step_color_temp'' }}'
    - '{{ cluster_id == 768 }}'
    - '{{ args == 3 }}'
    sequence:
    - repeat:
        while:
        - condition: template
          value_template: "{{ repeat.index < 2 }}"
        sequence:
        - service_template: light.turn_on
          target: !input 'light'
          data_template:
            brightness_step_pct: -20
            transition: 0.5
6 Likes

This is brilliant! Thanks!

Just wondering if you intend on implementing the other functions of the button as well at some point in the future?

Thank You.

I think the handler needs created/updated to make the other functions available.

Hopefully that will happen, but I don’t have the knowledge on how to do that unfortunately.

Any chance of zigbee2mqtt version. Would be greatly appriciated.

1 Like

Hello there!

can you help me? i’ve added the TS004F 4 button device with my ZHA.
The only thing i get is the battery status. At the automatisations page i cant choose “one click or two clicks etc.” i’ve deleted the TS004F multiple times. but cant get it to work.

my other aqara devices are working perfectly with multiple taps.

Try this: Z2M - TS004F Tuya 4-Gang Switch blueprint - #27 by khvej8

Please use that thread for any follow-up questions since this is not the same device.

Thanks for the inspiration :-). I’m wondering if the automation could be made shorter by evaluating the second element of args. I’m using z2m but the basics should be the same: the button reports how much it was “turned”, so if I got it right you are choosing the number of reps/step_pct based on this arg (13, 25, 37 and so on). Maybe something like reps = “round(arg[1]/13)”, should do the trick?

That sounds interesting.

This was a quick and dirty blueprint to make it work.

Nice work, has shown me that i have a lot to get my head around.
My end goal is to get it running as a volume control. Looking over you code as an example i am a step closer.

Thanks for sharing

Hi,

Here’s my take of a automation using this button, but with z2m. The “repeat” part could be used to replace the “while” loop:

- id: botao_rotatorio_1
  mode: queued
  max_exceeded: silent
  trigger:
    platform: state
    entity_id: sensor.botao_rotatorio_1_action
    attribute: action
    from: ''
  action:
  - variables:
       action: '{{ trigger.to_state.attributes.action }}'
    - choose:
      - conditions:
        - '{{ action == ''brightness_step_down'' }}'
        sequence:
          repeat:
            count: '{{ (trigger.to_state.attributes.action_step_size / 13) | round }}'
            sequence:
              - service: <whataver>
    - conditions:
      - '{{ action == ''brightness_step_up'' }}'
      sequence:
        repeat:
          count: '{{ (trigger.to_state.attributes.action_step_size / 13) | round }}'
          sequence:
            - service: <whatever>
    - conditions:
      - '{{ action == ''toggle'' }}'            
      sequence:
         - service: homeassistant.toggle
           entity_id: <whatever>

A little bit of explanation: z2m reports the action up/dow + attributes, and immediately after report the actions as “” without all the attributes, like this:

z2mqtt/botao_rotatorio_1 {"action":"brightness_step_down","action_step_size":13,"action_transition_time":0.01,"linkquality":174}
z2mqtt/botao_rotatorio_1 {"action":"","linkquality":174}
z2mqtt/botao_rotatorio_1 {"action":"brightness_step_down","action_step_size":49,"action_transition_time":0.02,"linkquality":174}
z2mqtt/botao_rotatorio_1 {"action":"","linkquality":174}

I am using this product at the moment via z2m and have one in living room that is just a on off button with brightness on rotation and then push and rotate for temprature of lights. In my kids room the other one is on and off button, but with the push and rotate being for cycle through themes, I would be happy to share both automations if you wish so you can try to adapt to this (they both use a couple of scripts to change the temp up and temp down and scene up and scene down). if this helps you make something better. my skill set has not quite got to the all in one automation yet.

I would like to see how you got it working with z2m

This is what I have come up with so far, seems to work but looks like if I assign the single press to toggle a light it will toggle off, pause then back on.

blueprint:
  name: Zigbee2MQTT - Tuya Smart Knob TS004F
  description: Automate your Tuya Smart Knob (_TZ3000_4fjiwweb) via Zigbee2MQTT.
  domain: automation
  input:
    switch:
      name: TS004F Tuya Smart Knob
      description: Tuya Smart Knob to use
      selector:
        entity:
          domain: sensor
          integration: mqtt
    short_press:
      name: Single Press
      description: Action to run on single press
      default: []
      selector:
        action: {}
    double_press:
      name: Double Press
      description: Action to run on double press
      default: []
      selector:
        action: {}
    toggle:
      name: Toggle
      description: Action to run on Toggle
      default: []
      selector:
        action: {}
    hold:
      name: Hold
      description: Action to run on hold
      default: []
      selector:
        action: {}
    rotate_left:
      name: Rotate - Left
      description: Action to run on left rotation
      default: []
      selector:
        action: {}
    rotate_right:
      name: Rotate - Right
      description: Action to run on right rotation
      default: []
      selector:
        action: {}
    brightness_step_up:
      name: Brightness Step Up
      description: Action to run on right rotation
      default: []
      selector:
        action: {}
    brightness_step_down:
      name: Brightness Step Down
      description: Action to run on left rotation
      default: []
      selector:
        action: {}
    color_temperature_step_up:
      name: Color Temperature Step Up
      description: Action to run on hold & right rotation
      default: []
      selector:
        action: {}
    color_temperature_step_down:
      name: Color Temperature Step Down
      description: Action to run on hold & left rotation
      default: []
      selector:
        action: {}
mode: single
max_exceeded: silent
trigger:
  - platform: state
    entity_id: !input "switch"
    attribute: action
action:
  - variables:
      command: "{{ trigger.to_state.attributes.action }}"
  - choose:
      - conditions:
        - '{{ command == ''single'' }}'
        sequence: !input 'short_press'
      - conditions:
        - '{{ command == ''double'' }}'
        sequence: !input 'double_press'
      - conditions:
        - '{{ command == ''toggle'' }}'
        sequence: !input 'toggle'
      - conditions:
        - '{{ command == ''rotate_right'' }}'
        sequence: !input 'rotate_right'
      - conditions:
        - '{{ command == ''rotate_left'' }}'
        sequence: !input 'rotate_left'
      - conditions:
        - '{{ command == ''brightness_step_up'' }}'
        sequence:
          repeat:
            count: '{{ (trigger.to_state.attributes.action_step_size / 13) | round }}'
            sequence: !input 'brightness_step_up'
      - conditions:
        - '{{ command == ''brightness_step_down'' }}'
        sequence:
          repeat:
            count: '{{ (trigger.to_state.attributes.action_step_size / 13) | round }}'
            sequence: !input 'brightness_step_down'
      - conditions:
        - '{{ command == ''color_temperature_step_up'' }}'
        sequence: !input 'color_temperature_step_up'
      - conditions:
        - '{{ command == ''color_temperature_step_down'' }}'
        sequence: !input 'color_temperature_step_down'
      - conditions:
        - '{{ command == ''hold'' }}'
        sequence: !input 'hold'


1 Like

for the single press to work, I just set two automations as it worked better, example button press, condition light off, action turn on light, then seperate automation button press, light off, condition light on.

It also allowed me to do it via the call service so I can have all the lights come on and off with a 5 second transition.

using with hue scenes on press and rotate to cycle scenes (you can use with non hue other scenes too)

add a helper, (drop down) give it a name and note the name (mine is input_select.aj_room_scene)

these are all the scenes for that room, when creating this copy over your entities from scenes, just leaving out the scenes. section at the start all my scenes would have scene. from the start of these

the so push in and rotate and clockwise would be used like this (smart dial aj room is my moes rotary)

counter clockwise is this

The important part is the helper and then the actions (color temp step up is the push and rotate action)
the code for the final part of action is

service: scene.turn_on
target:
  entity_id: scene.{{ states.input_select.aj_room_scene.state }}

you copy this code and add it and the end edit service as yaml (but obviously replace the input_select.aj_room_scene) with the one you created from your drop down helper

I have to thank @petro here for helping me see my error of leaving scene. at begining of my dropdow helper entries, which was causing the turn on script target scene.scene. lol, hence why you have to make your dropdown helper without scene. at start of each one you add to it.

1 Like

Does anyone have a blueprint which includes the rotary input? Would be nice to use it for dimming the light.

just set the acton for the “brightness_step_up” trigger of device to do action - device (light name) (increase brightness)?

@Richi_Bowzer, thanks for your reply, i don’t have this as a trigger:
image

i see the problem, here if you look previously I did mention I use zigbee2mqtt with mine :frowning: but it might be dim down buttom pressed for rotate counter clockwise and dim up for clockwise?

This blueprint, the one you are commenting in, does dim-up and dim-down of the light you choose through the rotary input.

@seamus65, hi, but the blue print only has a trigger for single press: