Switching from OpenZwave (Beta) to Zwave JS

This guide is for switching from OpenZwave (Beta) to Zwave JS.

Preparation

In home assistant.

  1. Browse to Developer Tools.

    image

  2. Click on the template tab

    image

  3. Paste the following code into the template section.

    {%- for node, zstates in states | selectattr('attributes.node_id', 'in', range(1000)) | groupby('attributes.node_id') %}
    {{ node }}:
      {%- for s in zstates %}
      - {{ s.name }}
        {{ s.entity_id }}
      {% endfor %}
    {%- endfor %}
    

  4. Copy the results and paste them to a text file for safe keeping. You’ll reference this at a later time.

    image

Migration

  1. Install Zwave JS addon.

  2. Copy device and network_key from OpenZwave configuration.

    device - This is the path for the USB Stick
    network_key - This is the key used when adding a secure node.

    image

    image

    image

  3. Stop OpenZwave (beta) addon, turn off Start on Boot and Watchdog.

  4. Delete OpenZwave Integration.

  5. Add the copied device and network_key from OpenZwave configuration into the Zwave JS configuration.

    image

    image

    image

  6. Start Zwave JS addon.

  7. Watch the logs and wait for it to fully start up.

  8. Fix all ‘unknown’ devices by waking them up. No need for a refresh node, just wake them up.

  9. Install Zwave JS integration and see what you have.

    (optional but this is what I did)

    7.1. Delete Zwave JS integration (I did this because names were unknown in HA still)
    7.2. Restarted Zwave JS after waking all devices.
    7.3. Install Zwave Js Integration and see what you have.
    7.4. Go to Step 7.1 if things aren’t where you want them.

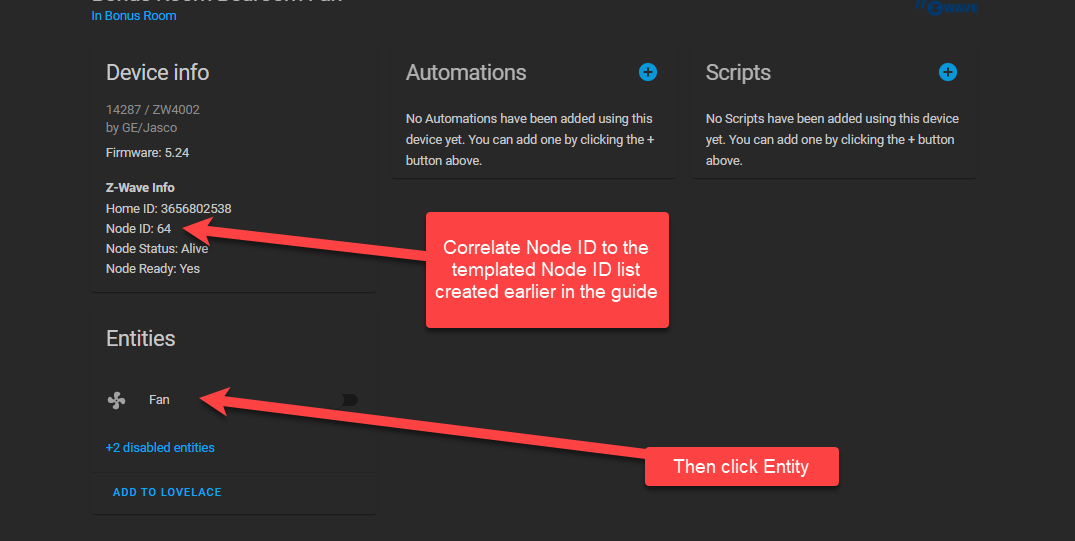
  10. Rename Devices using the text file as a reference from the Preparation #4 step. This is the most time consuming step

    image

    image

    image

15 Likes

Might want to add a note there just for the absent minded of us like myself that would forget to also turn off the “Start On Boot” and “Watchdog” options at the same time.

Do you not need to change the format of the network_key for Zwave JS (by removing all the 0x’s)?

1 Like

It’s not needed. We’ve put a small conversion in place on the Z-Wave server so it accepts your OZW key and converts it on the fly.

3 Likes

OK, thanks!

If I’m running Home Assistant in docker without a supervisor, what do I need to do? I notice the integration wants to point to a websocket on 3000. Should I assume that means the best way to integrate this is not MQTT but some other API?

This is a good point. I’ve already switched but did exactly this. I remembered to turn off “Watchdog” but forgot to turn off “Start On Boot” and had to figure out why it wasn’t working after a reboot.

I already added it to the guide, everyone is welcome to make edits where they see fit. This is a community guide, any community guide can be edited. It’s like a wiki page.

you are using the wrong procedure if you aren’t running a supervisor. there is no add-on without the supervisor.

use this instead:

FYI I just made the swap from Zwave JS to ZwaveJS2MQTT, took all of 5 minutes. I moved the 3 cache files with both addon’s off. Then started ZwaveJS2MQTT and it immediately ran with the files and was good to go. There’s no reason this won’t work going the other way. I didn’t have to rename a thing. All the unique_ids were constant, thus the custom names set by the user transfered.

1 Like

Thanks for the guide! Worked flawlessly and I got cut over without issue. So nice to have a modern Z-Wave configuration UI.

So I’ve migrated my network from OpenZwave (Beta) to Zwave JS, set up the new monikers for the devices, and edited my automations to use the new names and entities.

Just one thing, though - my list of Devices is still showing all the old OZW device names. I can disable them, and hide them from the lists of devices and entities, but is there some way to delete them altogether? Thanks.

Remove the OZW integration and restart HA. They will all be deleted then.

Those are from mqtt, remove them from the broker.

Edit Nevermind, I thought that was the other interface.

Ah, thanks - I’d already removed the OZW integration, and since I’m not using the MQTT broker for anything else, I’ll remove that as well.

If you deleted the integration, restart

Um, I’ve restarted the Core, restarted the Supervisor, and rebooted the Host, in that order - and those entries are still present?

Then you should just be able to delete them manually

If you click on the device then in the next page that opens does the device itself have a “delete” button at the bottom?

I’m afraid not - no delete button in sight…