Analogue style rotary dimmer switch - Sonoff + ESPEasy + MQTT

I’ve been working slowly on a project over the past few weeks to create a smart dimmer switch that mimics a standard UK style analogue dimmer switch.
I have many analogue dimmers around my house but of course these wont dim a smart bulb such as Hue.
There are loads of advantages of smart bulbs that I want to take advantage of, but also want to keep the same experience as with traditional lighting controls - e.g. for children, guests etc.

I select a Sonoff basic as the basis for the project as they:

  • are cheap
  • are easy to obtain
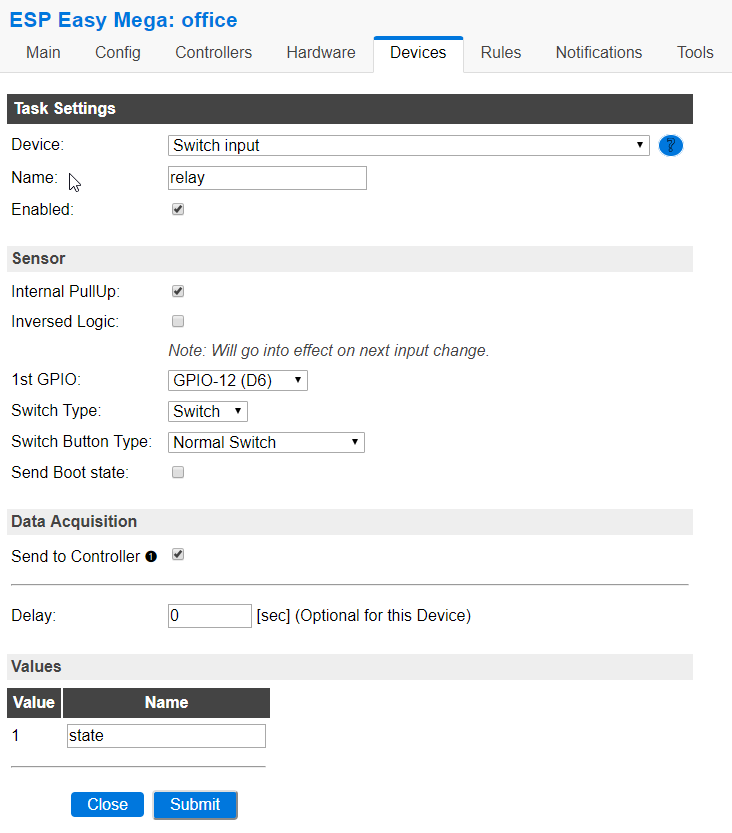
  • expose enough GPIOs for a KY-040 rotary encoder (needs 3) without messing around (I reused the UART TX/RX GPIOs on the header)
  • built in power supply (as opposed to nodemcu etc)
  • widely used, with generally good experiences
  • easy to flash - just solder on that header…

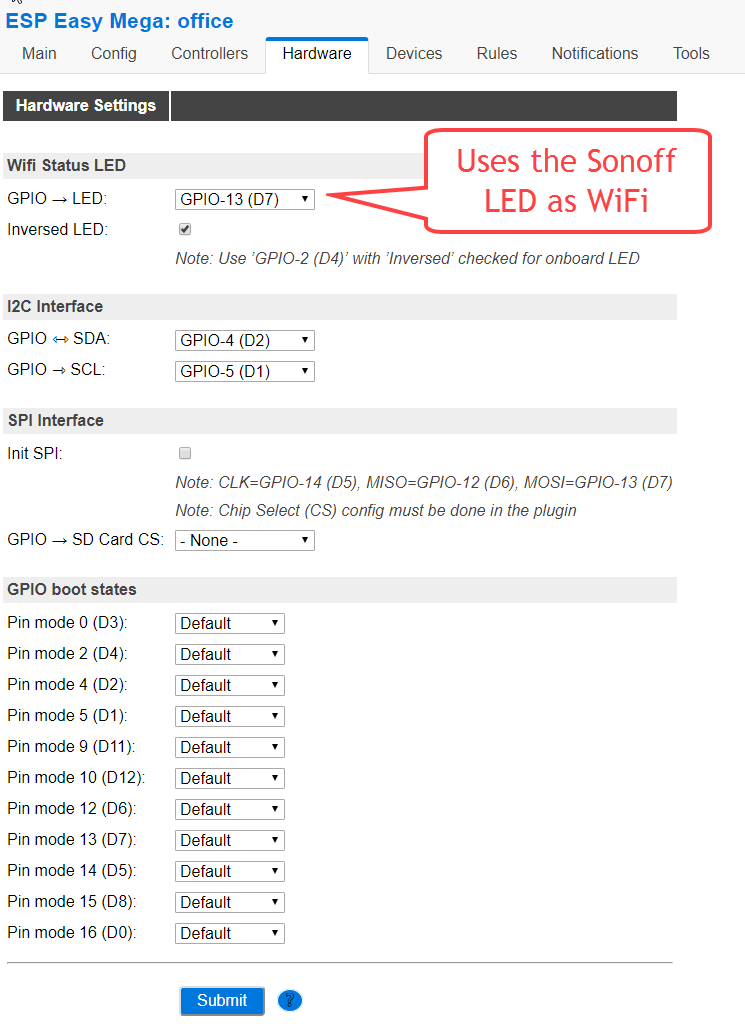
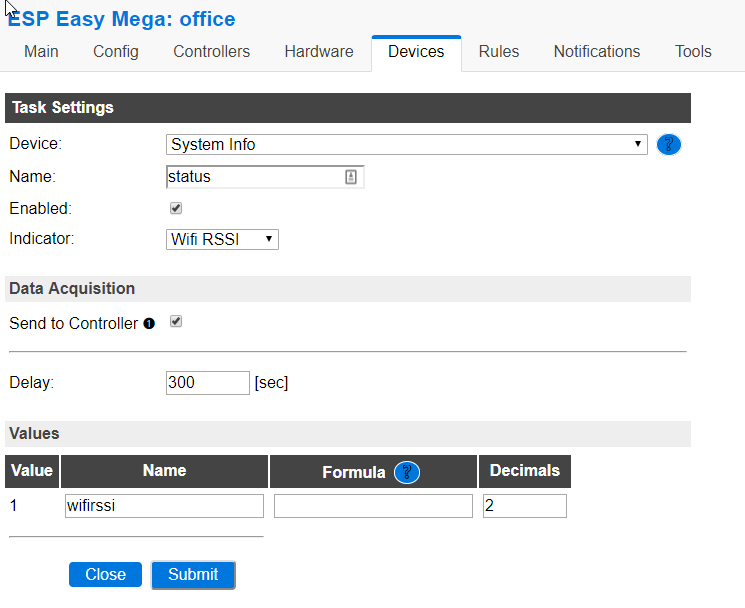
Originally I was planning to hack up other peoples project as a code base, but I discovered that ESPEasy supports MQTT and rotary encoders. This made the project a matter of configuration in a webpage rather than C coding (not my forte). ESPEasy is great!

The parts:

Total price
£5 for the Sonoff
£1 for the KY-040 encoder
£0.69 for the blank plate
The dupont cables and 5 pin header I had already in bits boxes
The knob was salvaged from a broken dimmer I already had (and fits the encoder perfectly!)

This is cheaper than most analogue dimmers :smiley:

The prototype:

Testing prior installation - Demo Video

I needed to trim ends off the Sonoff as the next challenge is that I need to get it in here:


As you can see the sonoff is a tight fit even without the casing and connected wiring :sweat:

I also need to work out how to implement a long press in ESPEasy so that I can toggle the relay - eg bulb change or if HA is down… any advice on this is welcome!

I’ll post a follow up with the ESPEasy and HA configs sometime soon…

20 Likes

I’m very interested in a specific point: how do you provide power to the Sonoff? Do you have neutral + line + load in your wall switch encasing? I live in France, and we only have line + feedback to load in those encasings, so I can’t see a proper way to power up something like a Sonoff.

I have Live + Neutral at the switch.
I understand that the guidelines in UK changed, and the rewire I had done approx 10 years back means I have L+N (by luck not by planning).

For those that don’t have Live and Neutral at the switch, there is a nice project by @Dullage here to position a Sonoff next to the light fitting, but use the old wall switch as a control:

1 Like

Great project @hijinx! I may have to replicate this :smiley:.

AMAZING project dude. I have all these parts, looking forward to seeing the config so I can start playing! Great work.

At the moment I use Xiaomi Buttons to achieve this. They have a double click feature that I use regularly for turning all ALL lights in a zone (downstairs for example) that’s the only thing I can think to add to this other than trigger the sonoff relay as you mentioned. Great work! Love it

Thanks @Dullage and @badgerhome

Very interesting, I like to use ESPEasy a lot, but I don’t understand how you can make a normal sonoff with relais into a dimmer, where are the triacs, null detection.
Please how did you do this? Which Sonoff or other ESP device do you use?

Its not a real dimmer! :slight_smile:
Its a rotary mqtt controller.

As you quite correctly say a real dimmer needs zero crossing detection, FET/triac etc.

This is a smart bulb controller that looks and acts like a dimmer, but really is sending mqtt commands to HA, which in turn controls a smart bulb like Hue. In the video the bulb is a hue bulb and its 100% NOT being conventionally dimmed by the sonoff - it being dimmed by HA controlling the Hue bridge based on MQTT commands from the Sonoff.

If you know of similar that can also dim a 240v incandescent or LED load I want to know as I have some rooms with expensive 240v LED downlighters that I don’t want to replace!

O I thought so, but thanks for the clearification. I use ESPEasy in all my Sonoffs and esp8266, I love it really easy and yes I had the rotary tried before but I love to make a real light dimmer out of it but never managed that.
In my setup I used a Wemos mini. and yes I can dim my rgb leds with it same as you did with the Hue.

1 Like

@jayjay - have you seen these:

Definitely a possibility for ESP8266 controlled dimmer…

I did this: NodeMCU Dimmer

to achieve more or less the same thing. However my dimmer is not in the wall but in a nightstand so I did not use a sonoff.

I would be interested in you HASS configuration with respect to the dimmer. I find mine quite laggy…

my dimmer transmits its value to a sensor and then I have an automation reacting to the sensor. This is not the most elegant way I suppose

Going to post it later tonight. Stay tuned.
V nice project BTW… wish I saw it before :slight_smile:
I might borrow your code sometime :slight_smile:

1 Like

Here is the config for ESPEasy.
I am using ESPEasy v2.0.0-dev12, which is current the latest. I am using the TEST version of the firmware as it is needed for rotary encoder support - ESPEasy_v2.0.0-dev12_test_1024.bin

Unfortunately ESPEasy does not have a way to export config in ASCII - it only has a binary export format - so I will post a bunch of pictures of all the settings.

If you already have ESPEasy up and running, you can use config.dat and rules1.txt to enter these settings automatically. I cannot post them here (file type constraints) but PM me if you want them…

Note that I discovered that some recent Sonoff devices need to be flashed using DOUT mode due to a change in flash chip - this is a nice guide to use Espressif own tool to achieve this:
https://www.letscontrolit.com/forum/viewtopic.php?f=5&t=3386&p=18240#p18240

ESPEasy Config

#1 Config tab

Set the name of the device. This will be used as the 1st token in the MQTT topics:

#2 Controllers Tab

Here you want to add a OpenHab MQTT controller:

Configure the controller with your MQTT server details:

The %% placeholders are:

%sysname% - the name configured in the config tab
%taskname% - the name of the device that generated the mqtt message (see device tab)
%valname% - the name of the value that the device generates

#3 Controllers tab:
Here you can set two things:

  1. To use the sonoff LED (GPIO 13) as the WiFi activity LED - useful
  2. The default state of the relay (GPIO12) on boot - I left as-is and it defaults to ON - i.e. any load will be ON after ESPEasy fully boots.

#4 Devices tab
This is where all the buttons, rotary encoder etc are configured.
I also configured devices to periodically send system parameters e.g. WiFi signal strength


This device is for the Sonoff PCB mounted switch:

This is for the relay:

This is for the rotary encoder:
NB GPIO1 & 3 are the UART tx/rx so the 5 pin header of the Sonoff can be used.
I use 4 pulses per cycle - which counts from 0 to 64 in increments of 4 = 16 steps.
In HA I multiply this to scale to 0 to 255, which is the input range of light brightness.

This is for the rotary encoder push button:
The momentary switch is on GPIO14 - the “spare” GPIO on the sonoff header.

The next four are sending the following system stats every 300 seconds (5 mins):

  • Free RAM (bytes)
  • WiFi RSSI (dBM)
  • System load
  • Uptime (minutes)


#5 Rules Tab
I have a single rule currently defined, which switches the relay based on the pcb switch being pushed - i.e. to mimic Sonoff OOB behaviour:

I need to define other rules:

  • Send IP address on start up (supported by my HA config)
  • Detect a long press of the rotary encoder switch to toggle the relay

#6 Tools tab --> Advanced Settings
Set MQTT retain for retention of last value
Also set the delay to 0ms for as low latency as possible on the dimmer events
I set ntp, but this is optional
Also I disabled the serial port because I am reusing GPIO 1 and 3, but it does not seem to matter if you do this. I recommend to do it as best practice.

1 Like

Here is the config for Home Assistant
(apologies in advance if any if the indentation is out… this was pulled together from config, groups, automation etc yamls)

# Sonoff dimmer config:

sensor:
  - platform: mqtt
    state_topic: "office/dimmer/state"
    name: "Office Dimmer Brightness"
    retain: true

  - platform: mqtt
    state_topic: "office/status/ipaddress"
    name: "Office Dimmer IP Address"

  - platform: mqtt
    state_topic: "office/status/uptime"
    name: "Office Dimmer uptime"
    unit_of_measurement: "Minutes"

  - platform: mqtt
    state_topic: "office/status/wifirssi"
    name: "Office Dimmer Wifi RSSI"
    unit_of_measurement: "dB"

  - platform: mqtt
    state_topic: "office/status/freemem"
    name: "Office Dimmer Free Memory"
    unit_of_measurement: "bytes"

  - platform: template
    sensors:
      normalised_office_dimmer_brightness_256:
        value_template: '{{ states.sensor.office_dimmer_brightness.state | multiply (4) | round (0) }}'
        friendly_name: 'Normalised Office Dimmer Brightness'

binary_sensor:
  - platform: mqtt
    state_topic: "office/switch/state"
    name: Office Dimmer Switch
    payload_on: "1"
    payload_off: "0"
    retain: true

switch:
  - platform: mqtt
    name: "Office Dimmer"
    command_topic: "office/gpio/12"
    state_topic: "office/relay/state"
    payload_on: "1"
    payload_off: "0"
    retain: true

automation:
  - alias: Switch office light
    trigger:
      platform: state
      entity_id: binary_sensor.office_dimmer_switch
      to: 'on'
    action:
      service: light.toggle
      entity_id: light.hue_color_lamp

  - alias: Switch office light
    trigger:
      platform: state
      entity_id: binary_sensor.office_dimmer_switch
      to: 'off'
    action:
      service: light.toggle
      entity_id: light.hue_color_lamp

  # On message for dimmer topic update brightness
  - alias: Switch office light
    trigger:
      platform: mqtt
      topic: office/dimmer/state
    action:
      service: light.turn_on
      entity_id: light.hue_color_lamp
      data_template:
        brightness: '{{states.sensor.normalised_office_dimmer_brightness_256.state}}'

group:
 - office_dimmer_switch:
    name: Office Dimmer Switch
    icon: mdi:nest-protect
    entities:
      - binary_sensor.office_dimmer_switch
      - sensor.normalised_office_dimmer_brightness_256
      - switch.office_dimmer
      - sensor.office_dimmer_wifi_rssi
      - sensor.office_dimmer_uptime
      - sensor.office_dimmer_ip_address
      - sensor.office_dimmer_free_memory
      - light.hue_color_lamp

HA config now posted above.
I do the same as you - have sensor for the push switch and the rotary count which then drives automation to toggle the light or set brightness. AFAIK there is not any other way to map a sensor value to a light brightness.
I don’t find it laggy with 16 brightness levels. I am used to a light lag anyway as my analogue dimmers are “soft on” electronic dimmers for good LED support.
BTW I am running HA on an x86 server (hass.io on ubuntu VM on a low end Xeon server running VMWare ESXi) so I guess that the performance of HA is greater than it would be on RPi 3.

@hijinx Thanks. I suppose the lag comes mainly from the fact that I dim 3 HUE lights at once. so it has to send three commands each time. I also did not multiply by four. so I have more dimming levels. But yeah maybe that is a good idea - i might twerk mine.

Looking at your sketch I think you might improve the latency by increasing the step size from 5 to 16 (= 16 steps between 0 and 255)

A Hi!

I’m brand new to this system And have just got it running on my NUC. On the homepage I notice It’s picked up my chromecast audio.

Do you think that the hardware in this thread could be used to be a volume controller for the CCA?

Would be cool to control the speakers with the rotary and maybe play/pause with a press of the dimmer and next track with a double press?

Hi @Jammyb
Absolutely you could use the same approach to control audio volume or any other parameter driven change.
The things you’d need to change are:

  • the automation- to control a media player entity volume instead of a lights brightness
  • the value template for the brightness mqtt value as I would think that volume is in % rather than 8 bit decimal number (but check this)
  • the espeasy config that sends the brightness - this is 0-64 value that gets scaled by x4 - you could send 0-100 direct from the sonoff if that works for you

Also I saw another project posted a few days ago to control volume with a rotary encoder… have s search as that should give you inputs for automation. That project used a pi zero rather than esp8266

Nice project, be great to see it on Hackster :slight_smile:

1 Like