Installing HAOS in a VM on TrueNAS

Install Home Assistant OS

Begin in the TrueNAS UI by selecting Datasets from the left-hand menu. Next, choose a location within your datasets where you want to place your VM (Virtual Machine). Click Add Zvol to create a new Zvol at least 32 GiB in size.

Show Create Zvol

create_zvol

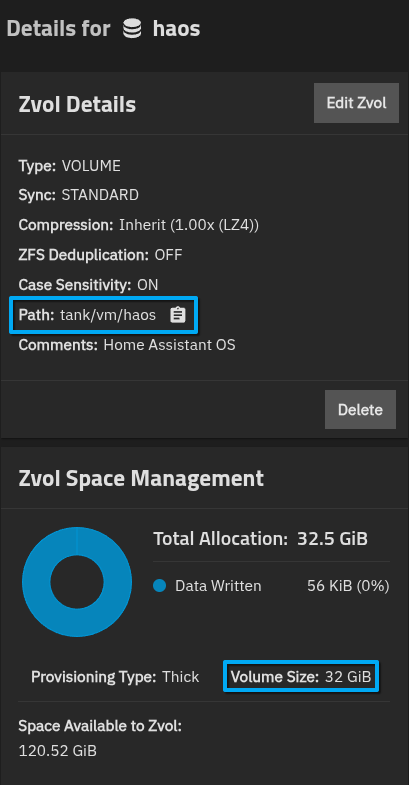
Next. check the Zvol Details to take note of the Path. Please also confirm that the Volume Size was set correctly, and is at least 32 GiB in size.

Show Zvol Details

Then, using the TrueNAS shell, run these commands to (1) download, (2) extract, and (3) write the HAOS image for KVM to the Zvol you created. In the 3rd command, replace tank/vm/haos with the path to your Zvol. Notice the full path should begin with /dev/zvol/ - If you are using the shell as the root user, you should omit sudo from the command.

wget https://github.com/home-assistant/operating-system/releases/download/16.2/haos_ova-16.2.qcow2.xz
unxz -v haos_ova-16.2.qcow2.xz
sudo qemu-img convert -p -O raw haos_ova-16.2.qcow2 /dev/zvol/tank/vm/haos

Create the Virtual Machine

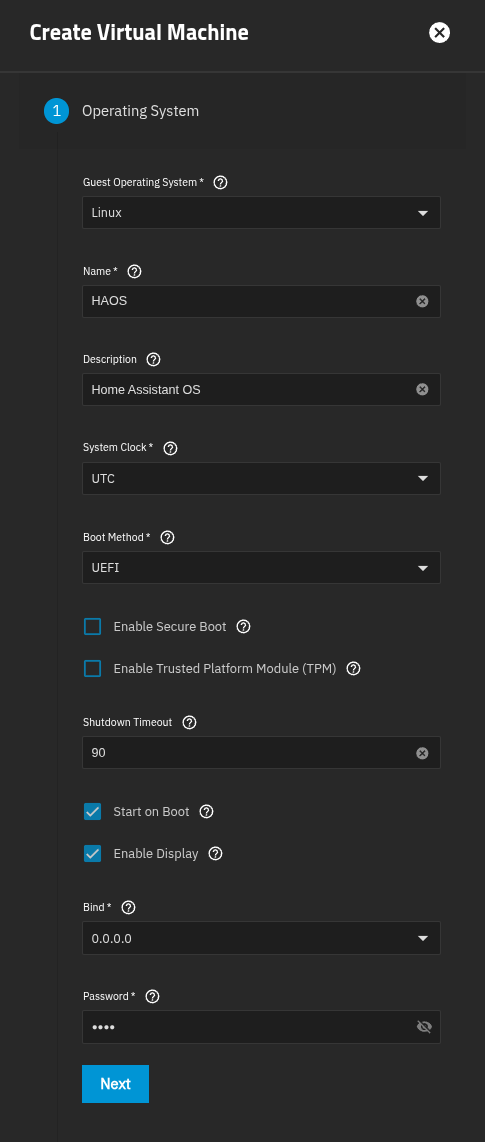
In the TrueNAS UI, select Virtual Machines from the left-hand menu, then click the Add button to begin the Virtual Machine Creation Wizard.

Show Create Virtual Machine

create_vm_with_bridge

1 - Operating System - Set the guest operating system to Linux and give your VM a name. Ensure UEFI is the selected boot method. You should also set a password for the Spice display. Optionally, add a description and change the system clock to UTC.

Show Operating System

2 - CPU and Memory - Assign one virtual CPU with at least two cores. Change the CPU mode to host passthrough, and set the memory size to a minimum of 2 GiB.

Show CPU and Memory

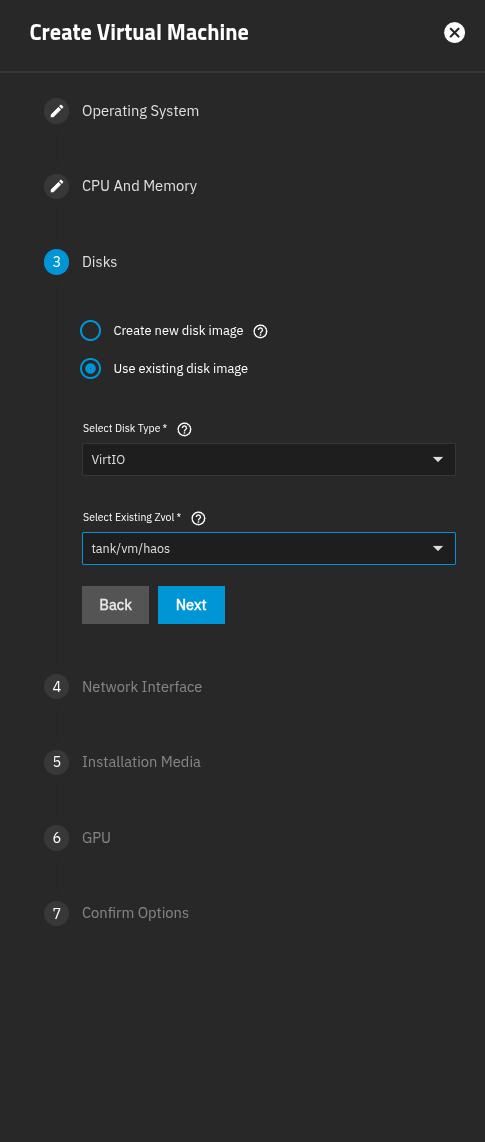
3 - Disks - Click use existing disk image and set the disk type to VirtIO. Select the Zvol on which you installed HAOS.

Show Disks

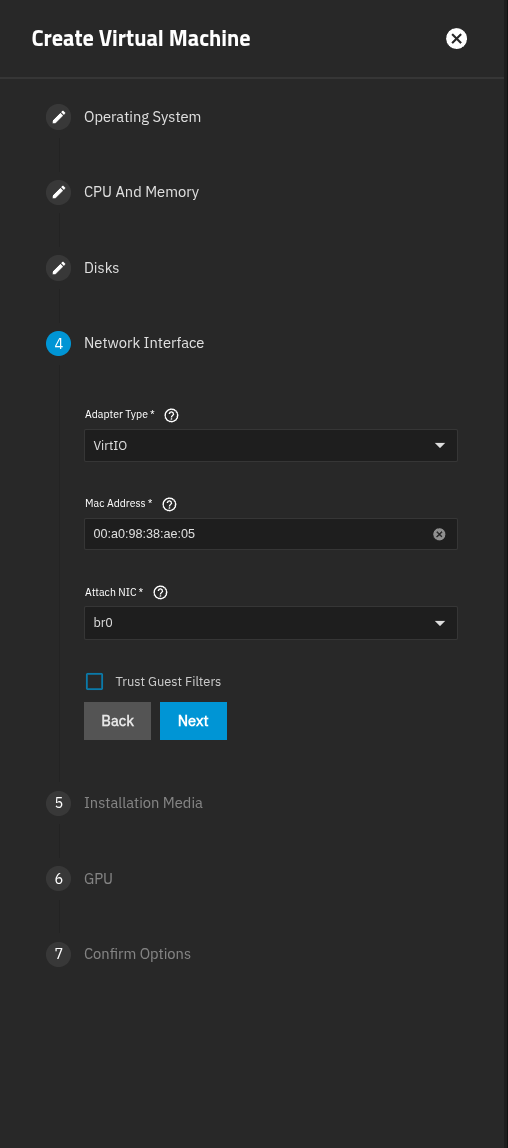
4 - Network Interface - Set the adapter type to VirtIO. Select a network device to associate with the VM. You should choose a bridge if you want the VM to communicate with TrueNAS. If you are not using a bridge, enable Trust Guest Filters to allow Home Assistant’s discovery to work.

Show Network Interface

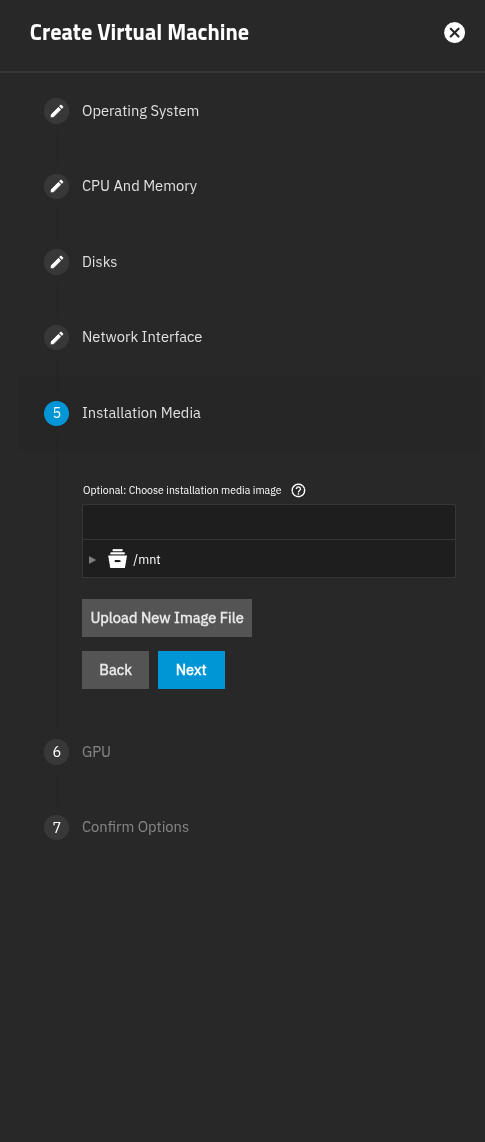
5 - Installation Media - Nothing is needed here.

Show Installation Media

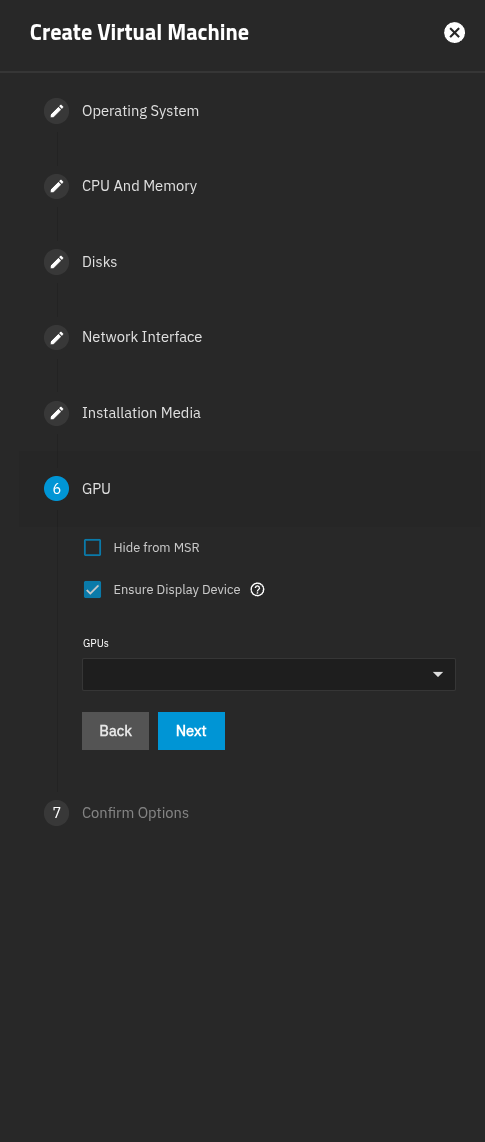
6 - GPU - Defaults should be fine.

Show GPU

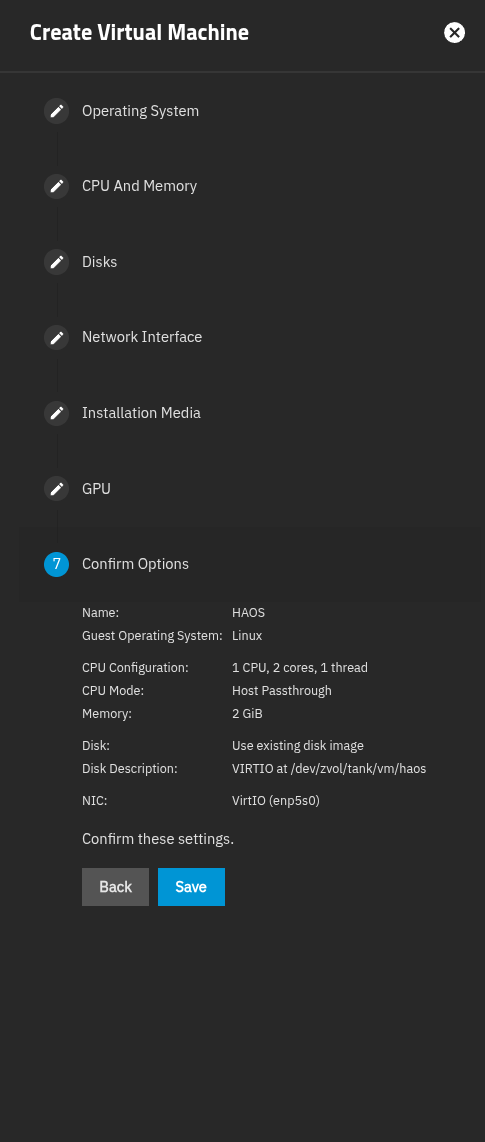
7 - Confirm Options - Click Save.

Show Confirm Options


Please see the 2nd post for troubleshooting common issues

  • This guide is also posted in the TrueNAS forum and can be found here
  • More information about creating a VM in TrueNAS can be found here
  • More information about installing HAOS in a VM can be found here
52 Likes

Troubleshooting and Additional Information


:warning: Permission denied

The following errors (or similar) when trying to download, extract, or install HAOS using the TrueNAS shell are typically caused by insufficient user permissions.

haos_ova-9.5.qcow2.xz: Permission denied
Cannot write to ‘haos_ova-9.5.qcow2.xz’ (Permission denied).
unxz: haos_ova-9.5.qcow2: Permission denied
qemu-img: /dev/zvol/tank/vm/haos: error while converting raw: Protocol driver 'host_device' does not support image creation, and opening the image failed: Could not open '/dev/zvol/tank/vm/haos': Permission denied

You may need to run the commands as root or use sudo

sudo wget https://github.com/home-assistant/operating-system/releases/download/9.5/haos_ova-9.5.qcow2.xz
sudo unxz haos_ova-9.5.qcow2.xz
sudo qemu-img convert -O raw haos_ova-9.5.qcow2 /dev/zvol/tank/vm/haos

:warning: Cannot grow device files

This can happen when the Zvol does not get sized correctly.

qemu-img: /dev/zvol/tank/vm/haos: error while converting raw: Cannot grow device files

Confirm the size of your Zvol is at least 32 GiB


:warning: VM is booting to the UEFI Interactive shell

This happens if we use the incorrect path when writing the HAOS image to our Zvol. Notice in the following command that the path starts with /dev/zvol

qemu-img convert -O raw haos_ova-11.5.qcow2 /dev/zvol/tank/vm/haos

If you’re still having trouble, please reply with the exact command you used for this step.


:information_source: Using the ConBee II Zigbee Gateway

The ConBee II needs to be attached to the VM in a specific way. Currently, TrueNAS lacks a method to handle such a device using USB passthrough. If you are using the ConBee II, it is recommended to use PCI passthrough for the USB controller to which the ConBee is connected.

Alternatively, you can use a script to start your VM. The script will correctly attach the ConBee II to your VM before Home Assistant or any add-ons have a chance to start. It is annoying, but if you don’t restart your VM very often, this may be a suitable workaround.

Click to Show Script

start_haos.sh

  1. Save this script to your TrueNAS and make it executable.
  2. Edit line 4 and set the name of your VM.
  3. Using the TrueNAS shell, run the script to start your VM.
#!/usr/bin/env bash

## Set the name of your VM
VM='HAOS'


if [ ${EUID} -ne 0 ]; then
  echo "Please run this script as root or using sudo" ; exit
elif [ -z "${CONBEE:="$(ls /dev/serial/by-id/*ConBee_II*)"}" ]; then
  echo "ConBee II not found" ; exit
fi

## HEREDOC: ConBee_II.xml
read -r -d '' XML << END_XML
<serial type="dev">
  <source path="${CONBEE}"/>
  <target type="usb-serial" port="1">
    <model name="usb-serial"/>
  </target>
  <address type="usb" bus="0" port="4"/>
</serial>
END_XML

# create a temporary file containing the ConBee II HEREDOC
conbee_xml=$(mktemp -t conbee.xml.XXXXX)
echo "${XML}" > "${conbee_xml}"

# get id and use it to start the VM
id=$(/usr/bin/midclt call vm.query | /usr/bin/jq -r '.[] | select(.name == "'"${VM}"'") | .id')
/usr/bin/midclt call vm.start "${id}" &> /dev/null
sleep 1

# get VM name and use it to attach the ConBee II
name=$(/usr/bin/virsh -c "qemu+unix:///system?socket=/run/truenas_libvirt/libvirt-sock" list --name | /usr/bin/grep "${VM}")
/usr/bin/virsh -c "qemu+unix:///system?socket=/run/truenas_libvirt/libvirt-sock" attach-device "${name}" "${conbee_xml}"

# remove the temporary file
rm "${conbee_xml}"

The ConBee II will then be visible inside the VM as follows:

/dev/serial/by-id/usb-QEMU_QEMU_USB_SERIAL_1-0000:00:03.7-4-if00-port0
7 Likes

Happy new year to you.
Will this method use an IP address from the LAN DHCP server, that is, if the IP range is 192.168.0.0/24, will it use an address in it?

Is there USB pass through?

1 Like

Yea, unless you configure something differently the VM will have its own IP in the same network range as your TrueNAS. In Home Assistant, you can configure if it’s a static IP or uses DHCP (default)

Yep - I’m using it with a Gen 5 Z-Stick with the Z-Wave JS UI addon

Here’s how I added it to my VM

And in the addon, I used the /dev/serial/by-id/usb... path that’s typically recommended.

image

2 Likes

Just wanted to chime in that I migrated my HAOS install from ESXi to TrueNAS SCALE successfully by following this guide, including USB passthrough of a Z-Wave/Zigbee coordinator.

Thanks.

I opted for patching the middleware to handle the QEMU Guest Agent, which seems to have worked well as the machine does respond to the shutdown command.

2 Likes

Any particular reason for adding the QEMU Guest Agent?

I’m currently experimenting as I’d like to switch to TrueNAS from RPi4 in a few weeks and not sure why the QEMU Guest Agent is required.

I was able to boot up HA. Do we need it for shutdown, or why?

Edit: I issued Stop and it managed to shutdown.

It’s what the official Home Assistant documentation tells you to do. I’ve tried asking a few times on Discord but never got a reply to precisely what the guest agent does for HAOS.

That was my assumption. If your VM runs and shuts down to your satisfaction, you may skip adding the guest agent. Some other users have not been so lucky.

My VM also shuts down without the guest agent, but I added it anyways because I want everything to work as best as possible.

1 Like

Hello and thank you for the tutorial. I confirm that I also did not need to add the QEMU Guest Agent, the machine starts well when starting truenas scale, and responds to the commands to start and stop the vm.

To understand I directly asked the question to GPT chat “why the QEMU guest agent is necessary for home assistant os?”

And here is his answer: The QEMU guest agent is needed for Home Assistant OS because it allows using virtual devices in a guest OS (like Home Assistant) that does not support them natively. QEMU acts as an emulator that translates virtual device instructions to make them compatible with the guest operating system, so attached devices can be used as if they were connected directly to the host.

Il est possible que vous n’ayez pas besoin de l’agent invité QEMU si vous n’utilisez pas de périphériques qui nécessitent une émulation, ou si vous utilisez un système d’exploitation qui prend en charge ces périphériques nativement. Cependant, pour certaines personnes, l’utilisation de QEMU peut être nécessaire pour connecter des périphériques spécifiques à leur système Home Assistant, comme des cartes réseau, des périphériques USB, des disques durs virtuels, etc. Il est donc nécessaire pour certains utilisateurs pour utiliser certains périphériques qui nécessite une émulation pour fonctionner avec Home Assistant OS.

So that was what I originally understood. Normally we do not need Qemu in this specific case of construction

1 Like

I’m having trouble getting USB passthrough working with ConBee II.

I came across this message: VM for Home Assistant OS needs multicast | TrueNAS Community

But it doesn’t seem to work for me. I can confirm that it looks like Scale is grabbing it, because /dev/ttyACM0 exists there

I’m also having issues with the ConBee II USB.

Also, the linked message has a typo. The correct command is:

system advanced update kernel_extra_options="module_blacklist=cp210x"
1 Like

Yeah, I noticed their follow up and fixed the typo. I have an AMD Ryzen if that’s meaningful

up and running had to use sudo with the commands above not sure why but it worked
one problem
my addons are not running
node red
and a few others any advice

Hi, i’m very new to all of this, so excuse my rookie question.
I’m stuck on the first step to dl HAOS… I’m getting this error when I use the code in the shell:

haos_ova-9.5.qcow2.xz: Permission denied

Cannot write to ‘haos_ova-9.5.qcow2.xz’ (Permission denied).
unxz: haos_ova-9.5.qcow2.xz: No such file or directory
qemu-img: Could not open ‘haos_ova-9.5.qcow2’: Could not open ‘haos_ova-9.5.qcow2’: No such file or directory

Any idea of what I’m doing wrong?

Hi @metatroneoz

Are you logged into the shell as root or another user?

If the first command to dl does not work, none of the remaining commands will work either

Seems like a permissions issue. Try adding sudo to the beginning of each command like this

sudo wget https://github.com/home-assistant/operating-system/releases/download/9.5/haos_ova-9.5.qcow2.xz
sudo unxz haos_ova-9.5.qcow2.xz
sudo qemu-img convert -O raw haos_ova-9.5.qcow2 /dev/zvol/tank/vm/haos

Hi @kzelnick

Sorry I missed your post.

My fault, I need to update the guide to mention that commands may need to be run as root or use sudo. Not every case is the same. It depends on your setup and how you’re accessing the TrueNAS shell.

Were you able to get your add-ons working?

If your still having issues, mind listing all the trouble add-ons. I don’t know how much I can help but I can at least install them to see if I can reproduce the issue.

I did not sure why but a second reboot and they all came up
Works great thanks

Did not do the qemu agent script looked above my paygrade and working without it

Thanks again

Ken

1 Like

I got my SkyConnect and that works for me

1 Like

Hi @troy

Perfect it worked with Sudo. Got HA to run.
I’m having another issue which I can’t seem to figure out. After a few minutes Home assistant loses connection and crashes. I can’t restart it and I have to restart the VM to run it again. There’s no error message that I can see. Would you have any idea why this is happening? (I didn’t set up the qemu agent).

Thank you for your help.

:thinking: I’m not sure @metatroneoz. But I dought this is related to not having the qemu guest agent.

When you’re in TrueNAS, does the DISPLAY button work? Maybe you can find some clues there. For example, is Home Assistant crashing but the supervisor still running, or is it the entire VM that crashes?

From this same page, have you tried downloading the logs?

I’m just making some guesses here. When you log into your TrueNAS UI, are you logging in as root or another user? If it’s another user, try adding them to the root group. I don’t know if it will help, but I’ve seen there is a known issue that has some effect on Apps and VMs when you’re not logged in as root.


I’m sorry I can’t be more helpful - Maybe someone else can jump in with tips for better troubleshooting.

Hi @troy thank you for your help, you are being very kind to try figure out my issues.
So here’s the interesting finding: HA works on the app on my phone (local) all the time, no crashing.
I can’t get to the HA ui in my browser. So there’s nothing wrong from the VM side of things and HA is running stable and fine by the look of it while I’m using the app. I’ve also tested on my laptop and it appears to be working fine there too.
I wonder if it’s an issue with my computer being connected by wifi and some strange local access issue. I don’t know why I can’t access from my iMac. I’ll try some stuff with the cache and other things, hopefully i could fix it.