Need Daikin Wifi? Use the Open-Source Faikin ESP32 Hardware instead of the official wifi Modules

Disclaimer - I have nothing to do with the Faikin project, but I do have five Daikin mini-splits, which were becoming a pain with Home Assistant.

I am starting a new thread here, because visibility in the forum regarding the “Faikin” Wifi module for Daikin Mini-Split units does not seem to be well known. I did a search for “Faikin” and only a few posts showed up. I only stumbled across the Faikin after extensive googling looking for a way to make my Mini Splits work with Home Assistant again after the “updates” to the firmware.

What is the Faikin? Its a Git Repo:

Its also an ESP32 and a bit of extra hardware that runs MQTT and fully integrates with Home Assistant.

You can build your own, or order one from Amazon UK - you need to use a re-shipper for most non-EU countries. I had to in the US.

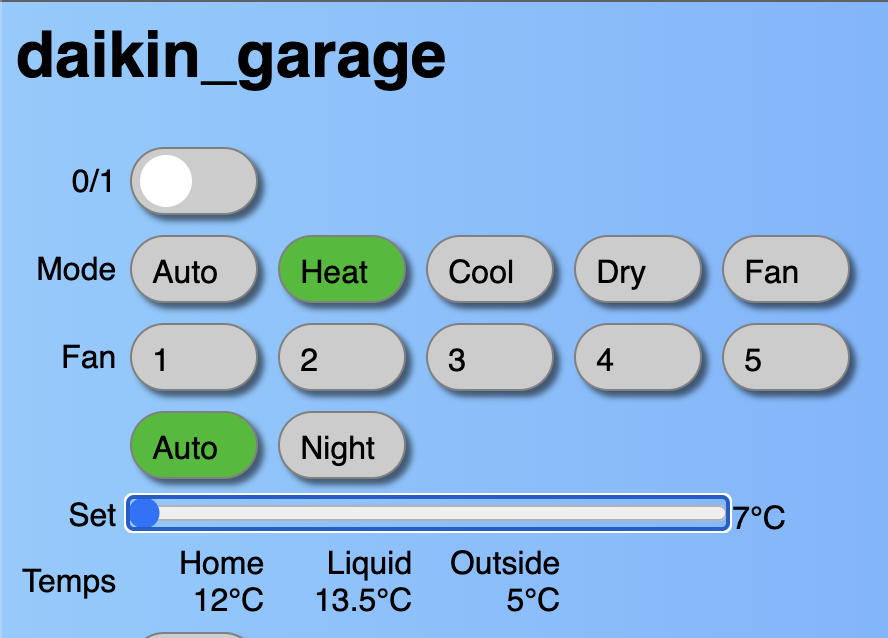
My first test (yes its a mess, its in testing)

So, why should you care?

The official Daikin Wifi modules used to offer a local API - then they kept pushing updates that broke older features. Finally, they came out with new Wifi adapters that are cloud only, and don’t work with Home Assistant.

So, if you have Daikin Mini Splits, or are interested in getting them, consider building (or buying) the Faikin ESP32 devices.

Advantages of the Faikin:

Open Source
Even with re-shipping to the US from the UK it was cheaper than the OEM units
(My original OEM units now go for $400 because they are discontinued)
MQTT control
You can build your own from an ESP32 if you like
Automatic MQTT integration with Home Assistant

Supports Remote Bluetooth Thermometers - Daikin uses wired ones.
Being an ESP32, its really small, much smaller than the offical ones
Here is an official photo of it in a 3D printed case. I will upload better screenshots when my cases arrive

Direct Plug in to the S21 port on your Daikin - Just like OEM
Fully local control over HTTP - no need for an “app”
Actually blinks different colors depending on the mode

  • Blue; AC
  • Red; Heat
  • Light Blue: Dehumidify
  • Lights can be disabled
    Fully Local. No data being sent to the cloud.

Negatives:
Its not “official” Daikin
If you need a case, you have to get one 3D printed
You might need to buy extra cables - (Or make your own, its really easy)
You might need a VPN to see them on Amazon UK (Otherwise they show out of stock, for example, I live in the US - so on VPN to London they showed in stock)
You might need a re-shipper depending where you live to get them from the UK. (Still cheaper than OEM)

I’ll update this thread with more details, I am awaiting my 3D printed cases to arrive. Once I have those I can show what they look like “fully” installed. They don’t “require” the 3D Printer cases, but I want to ensure these last a long time, and a case is the right way to handle it.

There is another thread here around Daikin’s API breaking:

6 Likes

I just discovered one other “negative” with the Faikin units. They only heat or cool from 16 C to 32 C, whereas the official Daikin remotes for the US market heat or cool from 7 C to 35 C. I think the communication protocols for UK models are the same, but the physical mini splits have different maximum ranges. It seems that in Europe, Daikins only operate between 16 C and 32 C for some (probably legal?) reasons.

I have already opened a discussion on Github, as the creator of the Faikin units is very active.

And revk has already responded on Github, so he clearly cares about his code base. Makes me even happier for buying the ESP32 units from him.

And he replied on Github, seems that he already coded in tmin and tmax that you can set with MQTT:

OK sending setting/nameoffaikin/tmin with a payload of the min (Celsius) value, integer, will set the min. Same with tmax for maximum. That should do what you need.

I just need to figure out how to properly set this in MQTT and test it, will post the results here.

So, knowing that you need to adjust the tmin and tmax settings is well and good, but how do you do it? Well, I will give a screenshot below. But before I do, something to be cautious about - I am setting the Min and Max on my Daikin’s to the same as the OEM range. I don’t know if going outside your range will damage the units, and given the costs, I am not willing to try.

In my case, the OEM setting is 45 F as a low, and 95 F as a high for the US. Thats about 7 C and 35 C. (As a Canadian living in the US I prefer C, but the WAF demands F… :wink: )

In order to set this, you need to publish it to MQTT:

Go to Settings → Devices and Services → (Your MQTT HERE) → Configure

you need to fill out two bits:

Publish a Packet:
setting/NAME_OF_DEVICE_HERE/tmin

Payload:
Value in Celcius

So, as you can see, I set the min temp tmin to 7 C, and then did the same for tmax by setting it to 35.

Now, when going to the local web page, the device has updated itself with the min and max values:


And the same goes for Home Assistant!


I can’t recommend these enough for your Daikin Mini-Splits.

As I get all the bits together, I will turn this post into a detailed write up for how to get them (you can also build them yourself) and how to get them physically installed and working with Home Assistant.

So my Bluetooth Low Energy Thermometers arrived, they are Telink BLE sensors (see here):

They are smaller than I expected - barely bigger than the CR 2032 batteries that power them!

I flashed them according to the directions above - it requires a web-based flash. After that, I unpaired from the device, and brought it into the garage. In the web page for the Faikin itself, I went into the settings, and turned on the BLE setting.

Then in the main page, I selected unter the External Temperature Reference for Faikin-auto mode BLE: I selected the new Thermometer (which I placed near to the Faikin to ensure connectivity).

I then moved the BLE Thermometer across the garage, away from the Daikin which is high on the wall. I checked the device itself in Home Assistant, and the new sensor showed up under the device - easy as that!

I added it here to a dashboard readout so you can see it and the humidity readout:

This means that I can build a Home Assistant Thermostat that uses the temp/humidity from the Bluetooth sensor, and not the Daikin itself. Meaning, its giving you the real temp of the room and not what the wall unit thinks it is.

So, for the first time I broke one of the boards along the scored lines:

I must say, this was a bit stressful, it felt like I was going to destroy the ESP32. If you do this, I recommend that you use two sets of pliers to get a good grip along the scored lines.

From Ebay, I had ordered:
JST EH 2.5mm Pitch 5-Pin Male Female Connector socket lead wire 300mm x 10 Sets

The 10 pack has a set of pre-connected female JST EH 2.5mm leads, and extra male leads that I did not use. I soldered two of the female leads together to build a Daikin cable. I then connected it to the ESP32 (If you look closely, you can see the heat-shrink tubes covering the middle where they are joined)

I took the two clear pieces of the 3d printed case, and after turning off and tearing the head unit apart, I attached the cable for a test (Don’t open those things while the breaker is on, touching live wires is not fun)

5C1BC536-6E48-4890-8989-67264549EDD5_4_5005_c

I restored power to the Daikin and the Faikin booted up and started working right away! I connected to the local FAIKIN-XXXXXXX Wifi network, set up the name, Wifi Settings, MQTT Server and hit save. It restarted and started appearing in Home Assistant immediately.

The tempurature ranges were goofy though, something was amiss. So in the settings I clicked the Upgrade Firmware link:

After upgrading, and restarting, it now registered a low of 16 C and a high of 32 C, like the above, I went into the settings and published an update with MQTT, and that fixed it.

Before fully reassembling the Daikin, I fixed up the wiring a little with automotive wiring tape, and glued the case pieces together, as they seemed to separate a little to easially:

96780ED4-2F0B-4558-84DD-D19A3C1B6050_4_5005_c

After routing the wires though a safe pathway, I drilled a small hole in the Daikin case, as this head unit did not have the breakouts in an easy location (this is just the nature of the install) and buttoned everything up. The final step was a bit of double sided tape to make sure that the Faikin stayed in place:

63EC012D-C090-4DC5-B862-F607C1E0BFC9_4_5005_c

And this one is done!

Over time, I will get around to replacing the other Daikin controllers as these Faikin ESP32’s are much better than the OEM ones, and then sell off my OEM bits on Ebay as I won’t need them anymore.

2 Likes

As a final bit of setup, I got the second Bluetooth Temp/Humidity Sensor set up, and stuck it to the bottom of the holder for the IR remote, so it gets the values from the other side of the room:

2B980F62-2993-41FA-B800-AF0E803361FD_4_5005_c

1 Like

A great write up, thank you.
I got my Faikin yesterday. Not only does it work well with MQTT, it can also be added in via the official Daikin integration for Home Assistant. Meaning if you wanted you could use it without MQTT. It has a HTTP API as well as MQTT. I’d say MQTT is faster though.

The developer is indeed very active and he just today added in names for the fan speed controls. Before it was 1, 2, 3, 4 & 5. Now it’s Low, lowMedium, Medium etc. My unit is fairly old and doesn’t support horizontal swing mode and he also just added the ability to remove horizontal mode.

So it’s all nicely set up and working great. It also doesn’t make a beep noise when changing settings, unlike with a remote or IR blaster.

1 Like

I just got mine setup today on an AC I had installed a few days ago. So far, so good. I’m in the US and purchased from Amazon UK. No forwarder needed.
A few things I am wondering:

  • Is there a way to change the UI display from celsius to fahrenheit
  • how does one set the timezone? The linked list doesn’t look anything like the default values
  • I don’t understand a few of the UI icons: Green Dot/Blob, emoji with hands above head, left/right arrow, teddy bear
  • what are the temps listed? They are labeled ‘Home’ & ‘Outside.’ Does the unit have an outdoor thermostat as well as one in the head unit?

I think Home is the head unit, liquid is the coolant in the line, and outside is the condenser. Mine looks slightly different from yours because it’s probably got a different feature set.

I don’t know if you can change the Celcius in the web GUI to F - but you can change it within Home Assistant. All the thermostats for our mini splits are in F, whereas the web unit is in C.

I tried to figure out how to set the timezone and ntp, and could not really figure it out - but I am mangaging all of it with HA anyways. But you are supposed to go into settings, then select the timezone from a list:

I would bet you can set those values through some MQTT commands like I did with extending the temp range, but I don’t know what those values would be.

I’ve posted to the faikin GitHub with the same questions I’ve posted here. Rev suggested making a change that would show the F alongside the C. I’ll reply back on this thread if/when he answers the other questions.

I do plan on managing the faikin and AC through home assistant so, the other questions may be moot points.

Thank you for taking the time to respond. Much appreciated…

1 Like

Just received the faikin module and jst-eh 5pin connector. Unfortunately it doesn’t seem to fit to the s21 connector on the AC board. Which connector should I use for the ac end (i.e. the s21)

I don’t know for your particular unit, but I do know that there are a lot of discussions on Github regarding the S21 port (and one other port that apparently works) and attaching a cable.

This link might help, as it specifically covers the cables for Daikin’s, and different models may need different cables:

There is also good detail under the issues on that topic:

1 Like

Thanks, yes I stumbled upon this article and it seems that the connector is a jst-pa. I just wanted to check if anyone here had already tested it.
In the GitHub issue they are also working on the cn_wired which is (can be) differently shaped

1 Like

If you do it, please post your results here!

Will do ! I just ordered some pa terminals. Will let the forum know and if everything works well I will propose a PR to faikin’s documentation

1 Like

hello working also on the integration with the Faikin wifi
have ony an issu I got the wifi page by setup made connection with my home network
but cant fint the unit anymore in the lanscan and also not on the local host name?
how can i go back to the factory setup?
the led is flashing red now so that say it sould work?
thx jd

hello Question what do i need to do to see the unit in HA I found the module finaly via the ip address not on the host name ?
wat are the steps in the HA?
thanks

Looks like there are a TON of neat updates to the Faikin since I last logged in. Either way:

You need to have MQTT installed and working.

Then configure your MQTT Settings in the Faikin:

Then in the settings you can enable HA:

There is a way to do it with the official integration as someone mentioned above, but I have not tried that because the MQTT stuff just worked.

1 Like

Not a good fit… I’m starting to loose hope