(Hundreds of possible actions!!) Works with MQTT Directly bypassing both Legacy and non-Legacy trigger issues. This Blueprint uses a Zigbee2MQTT built sensor to sort out the 58+ unique commands (118+ total) available from the Xiaomi Magic Cube Remote. (Some unique commands listed as + are not counted & available thru templating only. See the related document.)
 Changelog
- 2024-06-04: Blueprint Input Sections for enhanced Descriptions.
- (Documentation change 2-7-2024 to add License notice. Changes only to Descriptions.)
- 2023-12-09: Stop log spamming leak. #32
- 2023-10-20: Enhancement Add flip to side from any
- 2023-10-11: Bug fix Descriptions wrong
- 2023-08-07: Updates for Home Assistant 2023.8
- LOOK THIS LINK FOR IMPORTANT UPDATE INSTRUCTIONS
- Selector syntax change
- Condition Selector addition (where applicable)
- MQTT Discovery name changes (where applicable)
- Clean-up code formatting
- 2022-03-01-A: Beef-up the note not to use spaces and non alpha in MQTT topics.
- 2023-03-01: Add Author Tag. Bump HA required Version to 2023-3-0
- 2023-01-26-1: Add in the forgotten Scene Mode Hold function
- 2023-01-26:
 First Release. Based on Zigbee2MQTT-Xiaomi_Cube_Controller_MQTT_Triggered Blueprint
 * Hardware Versions
NOTE: This blueprint is for the PRO cube version ONLY and is not fully compatible
with the original version of the cube.
Links for those are in my GIT repository.
This cube has an ‘‘Action’’ mode (Shown below with this graphic: ![]() ACTION MODE ONLY
ACTION MODE ONLY ![]() )
)
and a ‘‘Scene’’ mode (Shown below with this graphic: ![]() SCENE MODE ONLY
SCENE MODE ONLY ![]() ).
).
Make sure the cube is in the mode you think it is in when triggering it.
The functions are separate. IE Action - slide will do something different from Scene - slide.
 About this blueprint
Type of blueprint: AUTOMATION
What if I am having problems getting it going?
You can contact me for help, see the links below.
Why do I need this?
The Cube remote/switch device has a lot of ways to trigger it. This Blueprint makes it a bit easier to figure out what you are doing and remembering that in the future. It also makes sure the trigger is as clean and repeatable as possible, screening out false triggers and making the log clean and the experience good overall.
 License Notice:
-
Copies of the original Blueprint that were converted via the ‘Take Control’ feature or other means are officially not supported by me.
-
I may or may not be able to support you when you have a problem after you make changes to my code, as some of the code is no longer mine.
-
I & my license also require attribution as a link back to the original should you use this code in your own creation.
-
Here is a link to my license & the original github post expected to be followed & referenced as attribution should you use this code elsewhere.
Configuration
Requirements
- To make the Blueprint work you will need a functional Magic Cube T1-PRO integrated to Home Assistant thru Zigbee2MQTT.
- My ‘suggestion’ is that you do separate scripts for most, if not all of the actions you generate here. If you are using the UI editor for the simple things you are fine, but for more complicated things scripts may work better for you. This is my opinion and how I am using it, to each their own. See my example dimmer script below…
- IF YOU SEE → TemplateError: Must provide a device or entity ID …
- If you get an error like that, The friendly_name in Z2M likely does not match the friendly_name on HA. To fix go into the Z2M
Open web UIand set the friendly_name there. Setting this in just HA or in Z2M without ticking the update HA box will cause this.
- If you get an error like that, The friendly_name in Z2M likely does not match the friendly_name on HA. To fix go into the Z2M
- This version of the Blueprint uses MQTT to deal with cube interface duties. This means that if you have Legacy triggers enabled on your setup or not, it will still work. It also created it’s own number helper to track a variable needed to do all the tricks. You as the user will not have to deal with that.
You will also need the correct MQTT topic to talk to your device.
This blueprint has been known to freak out when there are spaces or odd characters in the MQTT Topic. Make sure there are no spaces, ONLY a single word, and ONLY A thru Z, a thru z, and 0 thru 9 in the topic. ( / is ok between device and topic) If there are, you will need to change the name of the cube to remove those characters.
Wise advice from: HiveMQ:
Never use spaces in a topic
A space is the natural enemy of every programmer. When things are not going the way they should, spaces make it much harder to read and debug topics. Just because something is allowed, doesn’t mean it should be used. UTF-8 has many different white space types, such uncommon characters should be avoided.
Use only ASCII characters, avoid punctuation and non printable characters
Because non-ASCII UTF-8 characters often display incorrectly, it is very difficult to find typos or issues related to the character set. Unless it is absolutely necessary, we recommend avoiding the use of non-ASCII characters in a topic.
The topic can be found by going into devices and finding your cube device. 

Then clicking on MQTT INFO:

Then looking for the subscribed topic that looks like this… zigbee2nqtt/[your device name here]:

That is what belongs in the the topic question you get when setting up a new automation with this blueprint.
 Template error
If you see an error similar to: Error while executing automation automation.magic_cube_automations: TemplateError: Must provide a device or entity ID there is a way to fix it. It happens (usually) because the friendly_name that is in HA does not match the friendly_name that is in Z2M.
In order to fix I suggest you go into the Z2M web UI and change the friendly name. Below is how to do this if you are using the Z2M Addon.
- Open the Z2M Web UI:

2: Select the change name icon in the row of the cube device:
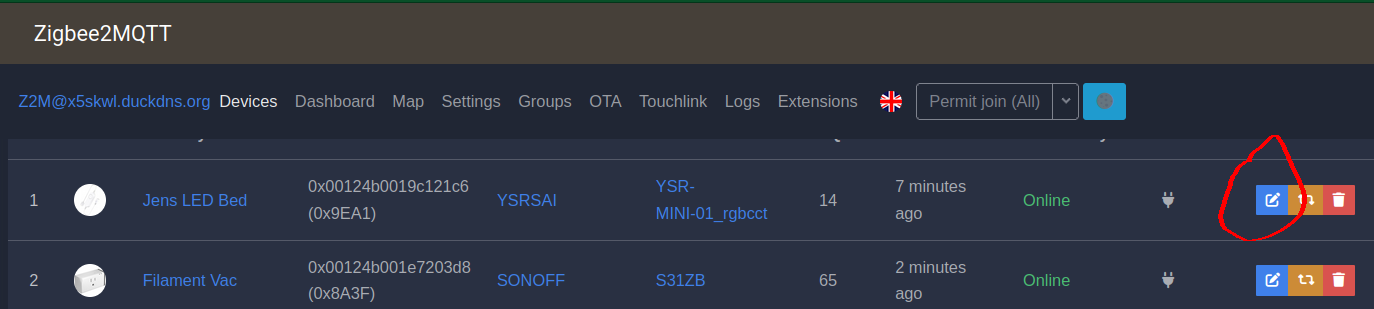
3: Change the name and be certain to tick the box to update HA at the same time:

After this find the topic again the same way as above and it should work.
 Input fields
topic/name: Topic
    The main MQTT Topic for your cube.

additional_conditions:
    Extra conditions you may want to add to this automation
    (Example: Home occupied, TV on, etc)
action_shake:
  name: 🫳 ACTION MODE ONLY 🫳 Shake the cube 🍕
    This trigger only occurs once in the set-up.

action_throw:
  name: 🫳 ACTION MODE ONLY 🫳 Throw the cube 🍕
    You don't actually ''Throw'' the cube. The action is as follows:
      > Pick up the cube firmly.
      > Make a throwing motion with it but do not motion back towards yourself.
      > Hold it there for a second.
      > The throw trigger should be sent to Z2M.
    This trigger only occurs once in the set-up.
action_slide_any:
  name: 🫳 ACTION MODE ONLY 🫳 Group 2 🍒 Slide on any side

action_doubletap_any:
  name: 🫳 ACTION MODE ONLY 🫳 Group 2 🍒 Double tap on any side

action_flipped90_any:
  name: 🫳 ACTION MODE ONLY 🫳 Group 2 🍒 Flip 90 degrees to any side

action_flipped180_any:
  name: 🫳 ACTION MODE ONLY 🫳 Group 2 🍒 Flip 180 degrees to any side

action_rotate_cw_any:
  name: 🫳 ACTION MODE ONLY 🫳 Group 2 🍒 Rotate CW on any side

action_rotate_ccw_any:
  name: 🫳 ACTION MODE ONLY 🫳 Group 2 🍒 Rotate CCW on any side
**There is a set of these 🍎 for all 6 sides. 36 inputs total..**

action_slide_face_1:
  name: 🫳 ACTION MODE ONLY 🫳 Group 1 🍎 Slide with face 1 up

action_doubletap_face_1:
  name: 🫳 ACTION MODE ONLY 🫳 Group 1 🍎 Double tap with face 1 up

action_flipped90_face_1:
  name: 🫳 ACTION MODE ONLY 🫳 Group 1 🍎 Flip 90 degrees to face 1

action_flipped180_face_1:
  name: 🫳 ACTION MODE ONLY 🫳 Group 1 🍎 Flip 180 degrees to face 1

action_flip_from_any_to_face_1:
  name: 🫳 ACTION MODE ONLY 🫳 Group 1 🍎 Flip From any face to face 1

action_rotate_cw_face_1:
  name: 🫳 ACTION MODE ONLY 🫳 Group 1 🍎 Rotate CW with face 1 up

action_rotate_ccw_face_1:
  name: 🫳 ACTION MODE ONLY 🫳 Group 1 🍎 Rotate CCW with face 1 up
**There is a set of these 🍐 for all 6 sides. 30 inputs total..**
The one action that flips 180 changes in every set.

action_1_from_6:
  name: 🫳 ACTION MODE ONLY 🫳 Group 3 🍐 Flip to side 1 from side 6

action_1_from_2:
  name: 🫳 ACTION MODE ONLY 🫳 Group 3 🍐 Flip to side 1 from side 2

action_1_from_3:
  name: 🫳 ACTION MODE ONLY 🫳 Group 3 🍐 Flip to side 1 from side 3

action_1_from_4:
  name: 🫳 ACTION MODE ONLY 🫳 Group 3 🍐 Flip to side 1 from side 4

action_1_from_5:
  name: 🫳 ACTION MODE ONLY 🫳 Group 3 🍐 Flip to side 1 from side 5
scene_hold:
  name: 👀 SCENE MODE ONLY 👀 Lift up the cube and hold it 🍕 Group 4
    This trigger only occurs once in the set-up.

scene_shake:
  name: 👀 SCENE MODE ONLY 👀 Shake the cube 🍕 Group 4
    This trigger only occurs once in the set-up.

scene_throw:
  name: 👀 SCENE MODE ONLY 👀 Throw the cube 🍕 Group 4
    You don''t actually ''Throw'' the cube. The action is as follows:
      > Pick up the cube firmly.
      > Make a throwing motion with it but do not motion back towards yourself.
      > Hold it there for a second.
      > The throw trigger should be sent to Z2M.
    This trigger only occurs once in the set-up.
    It can be combined in any group.'
scene_flip_to_side_any:
  name: 👀 SCENE MODE ONLY 👀 Group 2 🍒 Flip 180 degrees any side

scene_rotate_cw_any:
  name: 👀 SCENE MODE ONLY 👀 Group 2 🍒 Rotate cube CW with any side

scene_rotate_ccw_any:
  name: 👀 SCENE MODE ONLY 👀 Group 2 🍒 Rotate cube CCW with any side
**There is a set of these 🍎 for all 6 sides. 18 inputs total..**

scene_flip_to_face_1:
  name: 👀 SCENE MODE ONLY 👀 Group 1 🍎 Flip to face 1 from any other face

scene_rotate_cw_face_1:
  name: 👀 SCENE MODE ONLY 👀 Group 1 🍎 Rotate cube CW with face 1 up

scene_rotate_ccw_face_1:
  name: 👀 SCENE MODE ONLY 👀 Group 1 🍎 Rotate cube CCW with face 1 up
**There is a set of these 🍐 for all 6 sides. 30 inputs total..**
The one action that flips 180 changes in every set.

scene_1_from_6:
  name: 👀 SCENE MODE ONLY 👀 Group 3 🍐 Flip to side 1 from side 6

scene_1_from_2:
  name: 👀 SCENE MODE ONLY 👀 Group 3 🍐 Flip to side 1 from side 2

scene_1_from_3:
  name: 👀 SCENE MODE ONLY 👀 Group 3 🍐 Flip to side 1 from side 3

scene_1_from_4:
  name: 👀 SCENE MODE ONLY 👀 Group 3 🍐 Flip to side 1 from side 4

scene_1_from_5:
  name: 👀 SCENE MODE ONLY 👀 Group 3 🍐 Flip to side 1 from side 5

 Extended Information
This Blueprint uses a Zigbee2MQTT built sensor to sort out the commands available from the Xiaomi Magic Cube Remote.
The split out of functions gives you the ability to assign local scripts or functions
to do the things you want the remote to do.
Functions that are left empty will simply do nothing.
 There is a set of 36 event functions that will trigger on specific actions
on specific sides that are listed as Group 1 actions ![]() .
.
 There is a set of 6 event functions that will trigger on specific actions
on ANY side that are listed as Group 2 sctions ![]() .
.
 There is a set of 30 event functions that will trigger on cube flips to
& froma specific sides that are listed as Group 3 sctions ![]() .
.
 There are 2 actions (shake and drop) that only occur once and are OK to
be combined with any other group. Listed as Group 4 sections ![]() .
.
Please be aware that ALL actions except the 2 listed above,
![]() will trigger an action in ALL 3 groups at the same time every time. Therefore
will trigger an action in ALL 3 groups at the same time every time. Therefore
I suggest if you just have a couple of things you want this remote to do that
you choose the ANY / Group 2 / ![]() events.
events.
If you want more than a few events, you should select actions in Group 1 / ![]()
OR Group 3 / ![]() .
.
With careful selection you can use mixed groups, but you run the risk of a single
cube action triggering more than 1 Home Assistant action and making a mess of
things ![]() .
.
 Setting Action Mode or Scene Mode on Cube
To change the mode of the cube, there is a switch in the configuration section of the Device panel. This can be pulled into the Dashboard wherever you like as well. There is a configuration window, opens once an hour on itself, only during which the cube will respond to mode switch. Mode switch will be scheduled to take effect when the window becomes available. You can also give it a throw action to force a respond! Otherwise, you may open lid and click LINK once to make the cube respond immediately. [Hard Switch]: Open lid and click LINK button 5 times.

 My Cube triggers on the Desk with a slight Bump. How do I fix that?
I have 3 of these cubes. If you aren’t careful they trigger and do all kinds of things just sitting on the desk. Awesome when you want it to do this, but a HUGE PITA if you don’t.
A friend of mine came up with this and it works awesome. He didn’t want people hassling him about remixes and such, so he let me put it on the Thingiverse. I printed one for each of my cubes and because it’s now parked at a diagonal it will not trigger, unless you knock it on the floor or something. I highly suggest you print yourself one of these or find someone to print one for you… It will make cube life much simpler…
NOTICE: This cube can be triggered over a hundred ways, but only 38 of them are unique
How does this darn cube work?
There is sample code to make the template sensor in the help file on GitHib named the same as this one and in the community page related to this.
Seeing the cube commands for training the operator
Within this blueprint there is an event handler that will latch the last command that the blueprint finds and sends that to the event buss. From there a simple Template sensor can grab it and show you the last action sent. This will help when setting up new functions and to troubleshoot strange behaviors. Add an entity card in your dashboard for sensor.cube_last_action to see what actions occur as you move the cube.
Yaml file that contains the sample code here
Event Sensor in Action

If you wish to ‘store’ these events you can add this sensor to recorder and it will save them for you.
 Getting Tap and Flip actions to work
I have had reports of the ‘tap’ action working. It was due to the lack of instructions provided by the manufacturer of the cube. Tap actions on the cube are initiated by sharply tapping the cube 2x on a hard surface like this:

In a similar manner, flips need to tap the surface at the end of the 90 or 180 flip. Setting up the template sensor above will help train you in the force needed for all the actions.
 Acknowledgments
This was ‘forked’ from
Aqara Cube ZHA - Simplified face-based device control
Project authored by EdwardTFN (Edward Firmo) and he based on on several other giants that came up with most of the base code.ZHA - Aqara Magic Cube (57 actions)
I sincerely thank Them for their work.
I wanted to support a version that was virtually the same as my Z2M version,
and leverage all the documentation and code samples there but still port it
to ZHA. I also had a better idea for troubleshooting info.
 Dimmer Control
If you are looking for a dimmer control to change brightness based on rotation, here’s something I cobbled together from other community posts here and there. ( Credit Profile - yourigh - Home Assistant Community and others )
I did this with all the complicated stuff in a script that is called with data from the blueprint automation. Then the complicated part is all in 1 place and there is only 1 copy of it. The same script works for both increase and decrease of brightness because the angle in the cube goes positive when turning clockwise and negative when going counter clockwise.
Code Examples are found in the Yaml file here
If you want to create the script file using a script BluePrint, I have that for you right here: Dimmer Control BluePrint
![]()
- The script reduces the angle number to 40% of the rotation angle (you can change this, but 40% works well for my needs).
- It then grabs the current brightness from the light entity (as a % of the full scale 255 number).
- The new_brightness target is then calculated.
- It then checks if the light is already off, and if so, leaves it off.
- It makes sure the new_brightness is above, in my case, 10% so all the lights come on.
- It then makes sure that if new_brightness >90%, it is set to 100% and not over that.
- Finally it provides the calculated brightness %.
NOTICE when building action scripts…
It has been found that some set-ups use trigger.payload_json.action_angle here and others only accept trigger.payload_json.angle here. I have not been able to determine which attributes are available in which version of firmware and/or configurations, so it is up to you to determine the one you need here. Look in the Device listing for this cube and determine which version of angle is one of the listed sensors. That would be the one to use here.
 Color Control
I also extended this to controlling the color one octet (color) at a time. Each color will use both rotations on one side of the cube. Colors are changed one at a time (Red or Green or Blue) and change the amount (positive ot negative) based on how far you rotate the cube.
Code Examples are found in the Yaml file here
If you want to create the color change script file using a script BluePrint, I have that for you right here: Color Change BluePrint
![]()
- The script reduces the angle number to 60% of the rotation angle (you can change this, but 60% works well for my needs).
- It then grabs the current colors from the light entity and puts them into a list.
- The new color target is then calculated.
- It makes sure the new color is not negative.
- It then makes sure that the new color is not over 255.
- Finally it provides the calculated color if not in the limits.
This can be used over and over for as many lights as you want to control. But you will need to repeat this and modify it for red and blue color octets.
NOTICE when building action scripts…
It has been found that some set-ups use trigger.payload_json.action_angle here and others only accept trigger.payload_json.angle here. I have not been able to determine which attributes are available in which version of firmware and/or configurations, so it is up to you to determine the one you need here. Look in the Device listing for this cube and determine which version of angle is one of the listed sensors. That would be the one to use here.

 Using Rotate CW and CCW as a Short-Press / Long-Press Toggle
Not enough switch positions for you? How about a possible 24 more? I came up with some scripts you can add to Home Assistant and call for more actions. One is for CW rotation < 100 degrees, another for > 100 degrees. Also the same for CCW. These are can be called from the Group 1 ![]() rotate actions and the Group 2
rotate actions and the Group 2 ![]() rotate actions. Match the CW call/recieve or the CCW call/receive pairs together or you are going to be sad.
rotate actions. Match the CW call/recieve or the CCW call/receive pairs together or you are going to be sad. ![]()
Here is a sample of what you put into the script Blueprint UI. It will need to be a manual YAML edit and contain your specific variables. What you see here is one from my config.
Code Examples are found in the Yaml file here
If you want to create the long / short rotation switch script file using a script BluePrint, I have that for you right here: Long Short Rotation Switch BluePrint
![]()
You can also do this buy going full gui and picking the matching template out of the below section and filling it in similar to this:

These are the standalone scripts that are ‘called’ from the Script calling yaml shown above. If you don’t need all of these only install the ones you will use.
This is a homeassistant.toggle action, so it can toggle anything that that service can handle. Changing it to homeassistant.turn_on or homeassistant.turn_off would change the behavior slightly if this fits your needs better. Using this integration, you can control lights, switches, locks, and lots of different things.
NOTICE when building action scripts…
It has been found that some set-ups use trigger.payload_json.action_angle here and others only accept trigger.payload_json.angle here. I have not been able to determine which attributes are available in which version of firmware and/or configurations, so it is up to you to determine the one you need here. Look in the Device listing for this cube and determine which version of angle is one of the listed sensors. That would be the one to use here.
 Volume Control
This script was invented to be used with my Magic Cube Blueprints. I released it as a standalone Script Blueprint because because of requests to extend the function of my BP’s with how to convert cube rotation to volume in other places. Research found me this Post from Petro which had a very elegant solution to the problem, It was very easy decision to adopt it here.
Code Examples are found in the Yaml file here
If you want to create the script file using a script BluePrint, I have that for you right here: Volume Control BluePrint
![]()
- The script scales the angle number of the rotation angle (you can change this, but 30 works well for my needs).
- You send the script the media_player that you want to adjust.
- You use a template (examples in the script BP description) to send the angle to the script.
- Some math happens and it uses the amount you turn the cube to adjust the volume.
NOTICE when building action scripts…
It has been found that some set-ups use trigger.payload_json.action_angle here and others only accept trigger.payload_json.angle here. I have not been able to determine which attributes are available in which version of firmware and/or configurations, so it is up to you to determine the one you need here. Look in the Device listing for this cube and determine which version of angle is one of the listed sensors. That would be the one to use here.
Method to use Group 3 actions and not interfere with Group 1
Not enough switch positions for you still? How about another posible 30 more?
This is another ‘action’ that I stumbled upon. I noticed if you turn the cube from side to side very gently, it will internally register as being on a new side, but the flip action doesn’t register. Then if you slide the cube, it will send out an action of slide on side 5 from side 2, or whatever side combo’s you choose. I used 5 from 2 in the example, but you can use any of them.

I’ll be honest, this is the trickiest thing to do yet and I’m not sure it is worth the trouble, but if you want an action in your pocket as a secret action that only you know, this is the trick. Using a soft surface like a towel helps to keep the flip from registering when you set it down.
NOTE: In this example the slide side 5 will also trigger. You may need to add a condition to prevent that from triggering. An example for this 5 from 2 example is to put this condition on the slide side 5 action
{{ not last_side == 2 }}before the thing you want to do. Or you can just not have a slide 5 action.
It is as simple as adding a condition of let’s say ‘slide’ in one of the Group 3 ![]() slots.
slots.
Here is the GUI editor showing this.

Code Examples are found in the Yaml file here
 Troubleshooting tip
If you are troubleshooting and you want to see more traces back when doing so, here is a TIP I’ve found.
Manually edit the automation created with the ui editor (or manually with a text editor) and add the following to have this automation contain 10 traces instead of the normal 5.
HA Docs on this here.
trace:
  stored_traces: 10
 Version Updates
Updates will be published on my GIT repository with the rest of my Home Assistant Blueprint collection.
Please Click the  at the end of this top Post if you find this Useful
 Software to Download
HA link to download blueprint: ![]()
Direct link to download Blueprint: https://github.com/SirGoodenough/HA_Blueprints/blob/master/Automations/Zigbee2MQTT-Aqara-Magic-Cube-T1-Pro-CTP-R01-Xiaomi-Lumi.yaml
 All My Blueprints
https://github.com/SirGoodenough/HA_Blueprints/blob/master/README.md
 Contact Links or see my other work
What are we Fixing Today Homepage / Website: https://www.WhatAreWeFixing.Today/
Channel Link URL: (WhatAreWeFixingToday) https://bit.ly/WhatAreWeFixingTodaysYT
Discord Guild: (Sir_Goodenough#9683) WhatAreWeFixingToday?
 If you want to support me
Buy me Coffee: https://www.buymeacoffee.com/SirGoodenough
PayPal one-off donation link: PayPal.Me
#WhatAreWeFixingToday
#SirGoodEnough


 Changelog
