I did a Hyper-V version of this a while ago; and now I’ve finally got around to doing the same for ESX. There may be other guides, I haven’t looked. I like really simple step-by steps myself.
Download the Hass.io VMDK file. It’s a pre-built appliance - no skill needed! I love it.
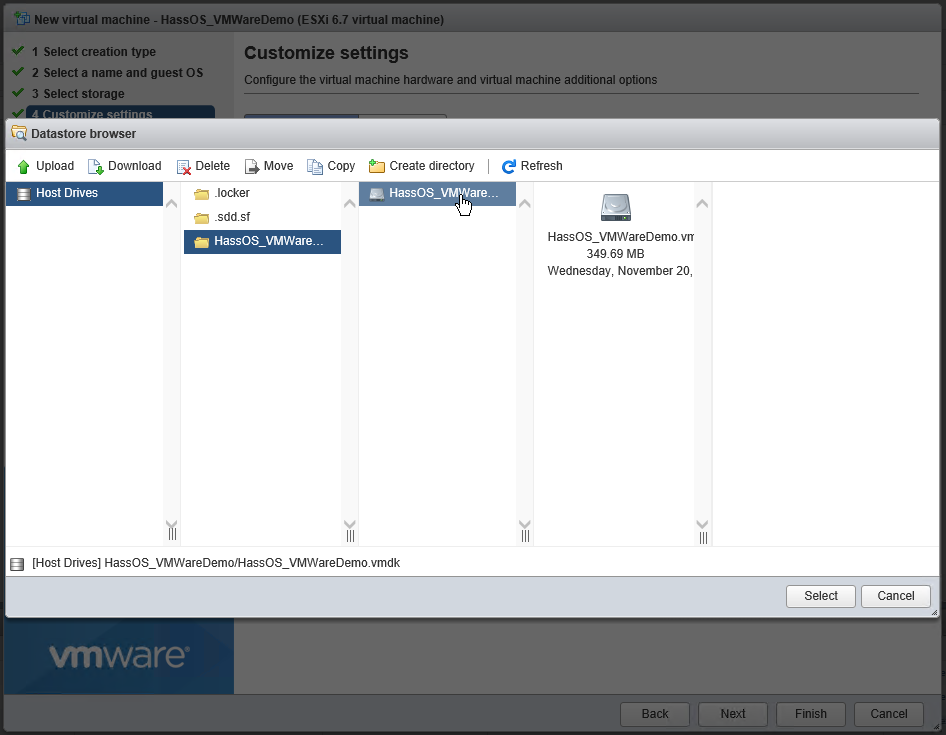
Your setup may differ - but I downloaded the file and re-named it to reflect the desired name of my VM.
I rename it here, because once it’s uploaded to the ESX Datastore it doesn’t appear that you can change its name in the web interface and I always like my disk names to clearly reflect their appropriate VM.
Log into your ESXi 6.7 web management interface. Select the “Storage” node on the left, and open the Datastore Browser.
These are the basic settings I used. Name your VM, tell ESX that it’ll be Linux, and choose Debian 9. I imagine the only relevant bit under the hood here is perhaps processor architecture.
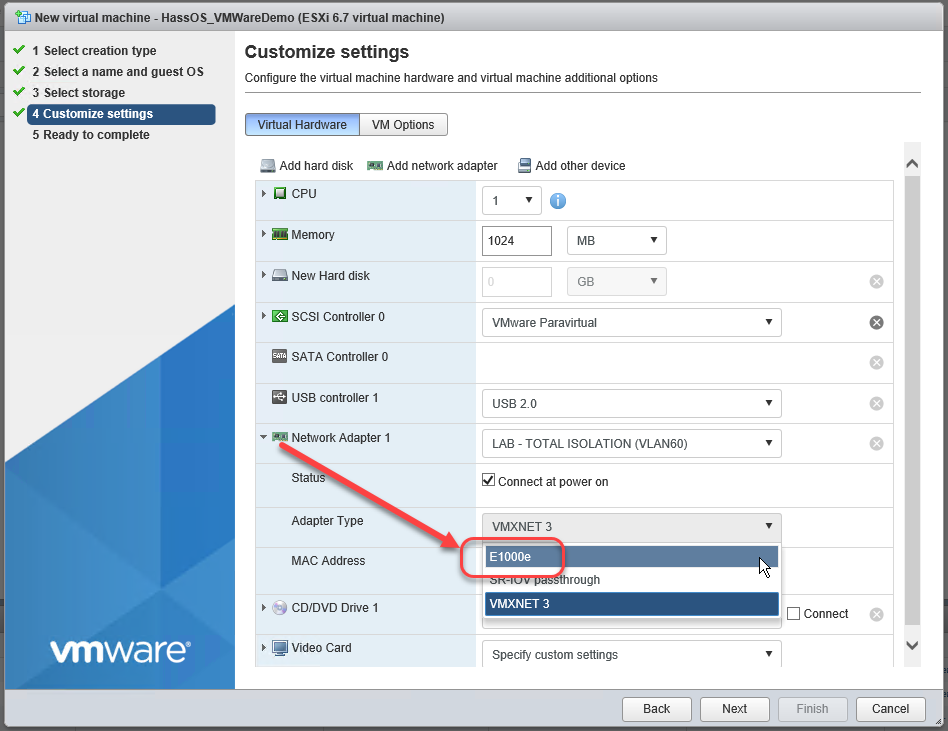
But wait. There’s more. We need the emulated hardware for the VM to suit the drivers and so forth the image comes with. Change the drive you just connected from a SCSI one to an IDE one:
Browse to its IP on port 8123. You’ll have to get that from your DHCP server or router. If you’re creating ESXi VMs I’m picking you know how to do that. At some point fairly early in the automatic setup, it will start hosting this web page:
And then this one - you’re done!
The Hass.io instance is a containerized build with its own internal NAT. For most intents and purposes you can just control and reboot the whole thing through the Home Assistant web interface. One very handy thing I’ve found is the use of VMWare Snapshots, especially when upgrading or making big changes. I take these with the VM off.
There is still setup within Home Assistant that should be done - most notably the Hostname under the “Hass.io” panel > “System” tab.
Nice guide however could you tell me why I need to change to IDE and why I need the E1000 adapter setting? Both of them I do not have (It is running on scsi and with the standard VM adapter). It still works perfectly fine for me (I did a clean install almost 2 weeks ago with ESXI). I just read to this guide to see if I had missed something myself.
Thanks for sharing this will make a lot of people happy I think!
I have an addition to this guide (don’t know if this still applies) but in the past you needed to create a clone of the vmdk otherwise it would bug on snapshots etc. So I created a clone before loading it into the vm. (Like I said I don’t know if this still applies to the newer versions of Hassio, I did it anyway).
It’ll probably depend a little on your underlying tin or the version of the Hass.io VMDK you’ve downloaded.
I couldn’t get it to boot without changing the storage controller over to IDE; no SCSI settings were successful for me.
I couldn’t get it to communicate with the default VMXNET3 adapter - I had to use the E1000e. THe appliance is kinda par-cooked; it downloads and configures itself when you first power it on. If it can’t communicate you don’t even end up with an isolated but built HA instance.
I haven’t tried snapping it in anger; I pretty much built it for the guide as my prod systems are Hyper-V. Might do some snapshots under certain conditionsand see what happens - But theoretically all the snaps are owned by the VM and the VM is brand new, it’s just using a pre-built drive.
I tend to to them whilst it’s turned off. I don’t know how successful a quiesce of the HA database would be as it’s a database in a container in a VM.
Ah I see, well maybe that is what the cloning was meant for. I will try to find that article again. I have used Hyper-V for 10 years. But the one thing that really annoyed me about Hyper-V was: no usb passthrough other than through expensive software. Yes I understand ESXI works in a similar way (USB over ethernet) but at least it is free.
Though, since you use Hyper-V, do you use the free version or do you have a Windows Server key (other than essentials?). If so docker enterprise is free to use with a windows server key. They actually work natively with hyper-v and you would not need an underlying vm or OS to run them (other than the host os obviously). Might be worth looking into. The same is true for ESXI btw where you can use VIC (Virtual Integrated Containers) which does pretty much the same.
The reason I mention this is because many people don’t know this and it will save you some overhead on your ESXI or Hyper-V setup as you don’t need a linux vm.
I already have a Hyper-V host, so for me it was just a convenient place to drop another VM. Otherwise yes, I might have looked at Docker or something on a Synlogy NAS.
One note, before starting the vm the first time, increase the hard disk size… I use 15 GB, the default was not that much… I believe like only 6 gb… Maybe enough for most users though
If you don’t do it the first time before first boot , it’s hard to increase the partitions later, but possible…
I use dhcp server and when I start vm with hassos 2.12 start ok and dhcp find ip addresse. When dhcp expire (I have expire set to 10min), I lose connection with my hassos vm?
After vm reboot is back again for 10mintutes?
Any idea?
I have on same network and server (esxi 6.7), windows vm that works without problem.
maybe a timesyc issue?
what happens if you just restart HA, before the 10 mins? normally on a restart (NOT reboot) it will do the correct sync if you live in another timezone thats not +0
yeah, you need to do it , every cold reboot then
i had it too, but not anymore , no idea why though i changed some timesettings on ILO/BIOS/ESX , then it was resolved
I expect the Hass.io appliance is set up for the desktop VMWare Player - ESXi can fulfill these requirements without conversion of the drive, it just does not default to them.
Hi,
I’ve followed your instruction and created the vm with latest vmdk file of Hassio. Now, the vm is running fine, I can ping it from other machine but I can load the web interface on any of the browsers from any other computers within my network.
I am using esxi 6.7
tried using on Firefox, chrome, IE 11 and edge.
also did use the port number to browse (port 8123).
also have tried changing all vm nic type including E1000.


 however could you tell me why I need to change to IDE and why I need the E1000 adapter setting? Both of them I do not have (It is running on scsi and with the standard VM adapter). It still works perfectly fine for me (I did a clean install almost 2 weeks ago with ESXI). I just read to this guide to see if I had missed something myself.

