RJ12 port option: It may also be possible and even preferrable to use another project which just uses the RJ12 port (if you have one). I have a “yaml only” version of it here. The wiring is simpler and the software interfacing is probably better and safer too, as it uses a higher level API.
This project could void your warranty or cause safety risks. Proceed at your own risk (I did;).
Possible compatibility with other desks:
Lots of desks use the same controllers. There’s a decent chance that if your desk uses a ‘Jiecang controller’ then this solution may work with no/minimal further changes.
It likely won’t work if your desk doesn’t use a Jiecang controller (many don’t)
To confirm if your desk uses a Jiecang controller you could:
Google around the internet to try to find the OEM, especially checking whether your control box looks similar to ones on the Jiecang site
Look at the label on the controller box and see if it mentions Jiecang or if the model number matches others in this thread or on site above.
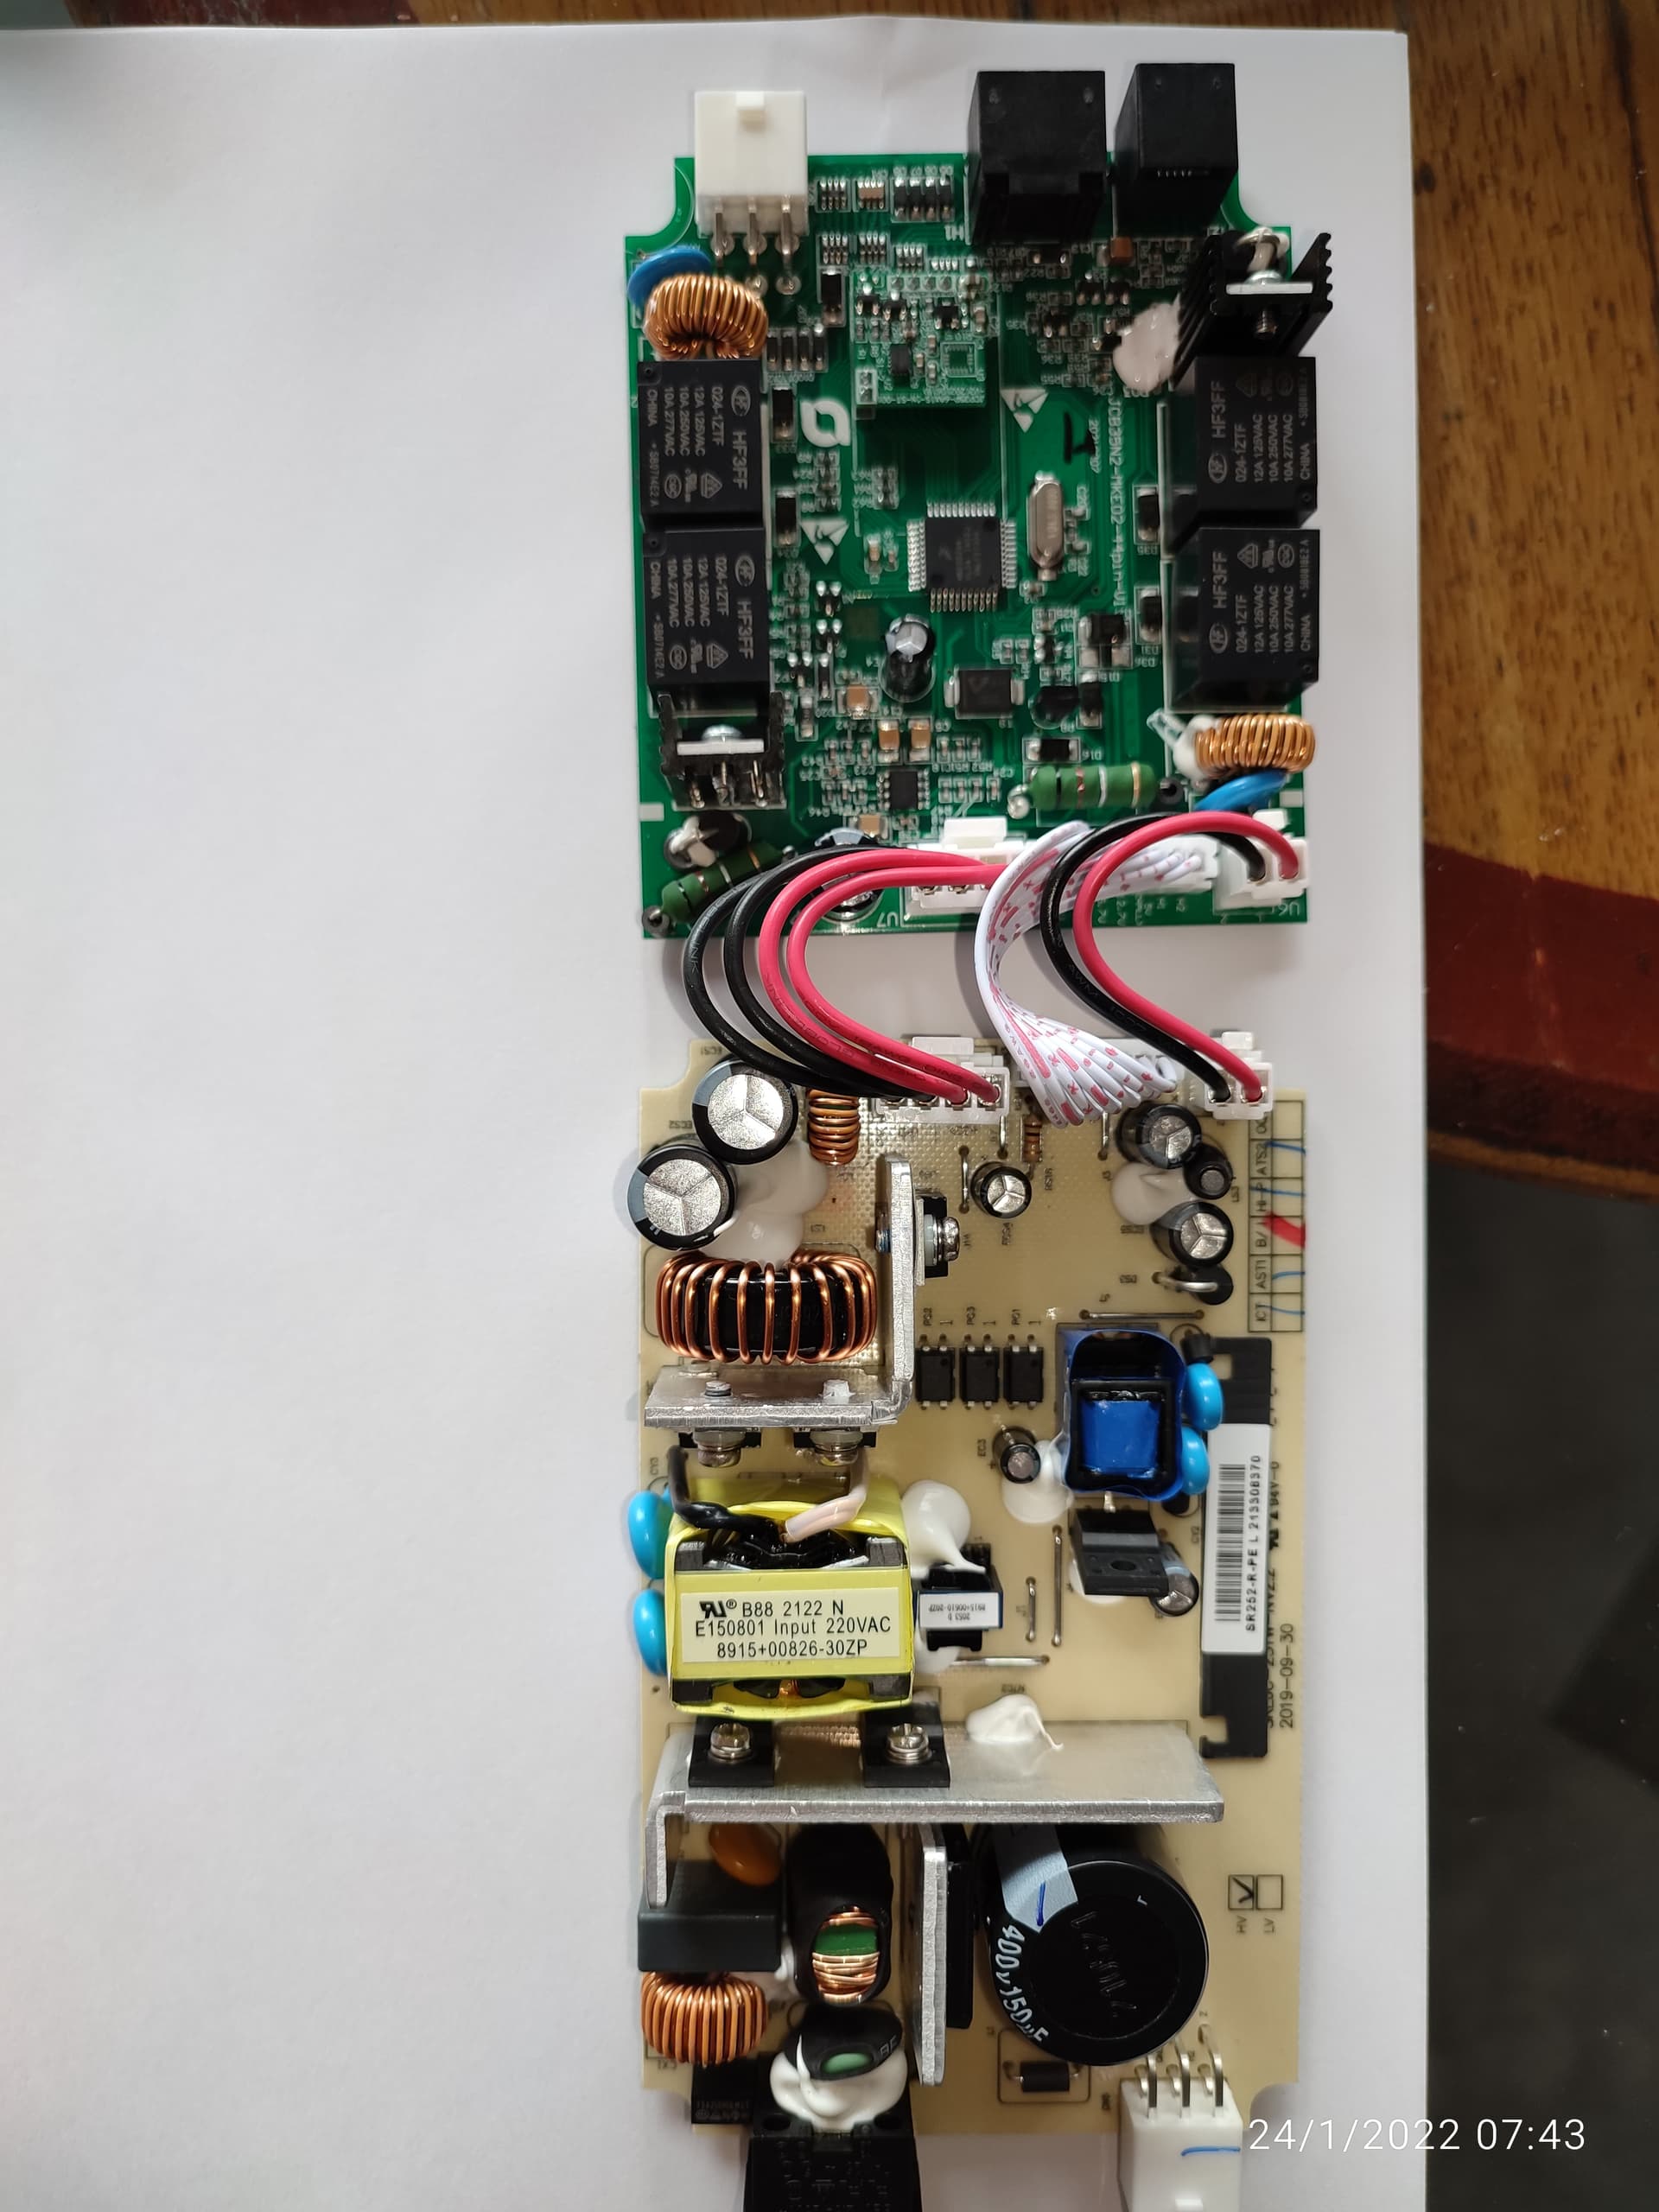
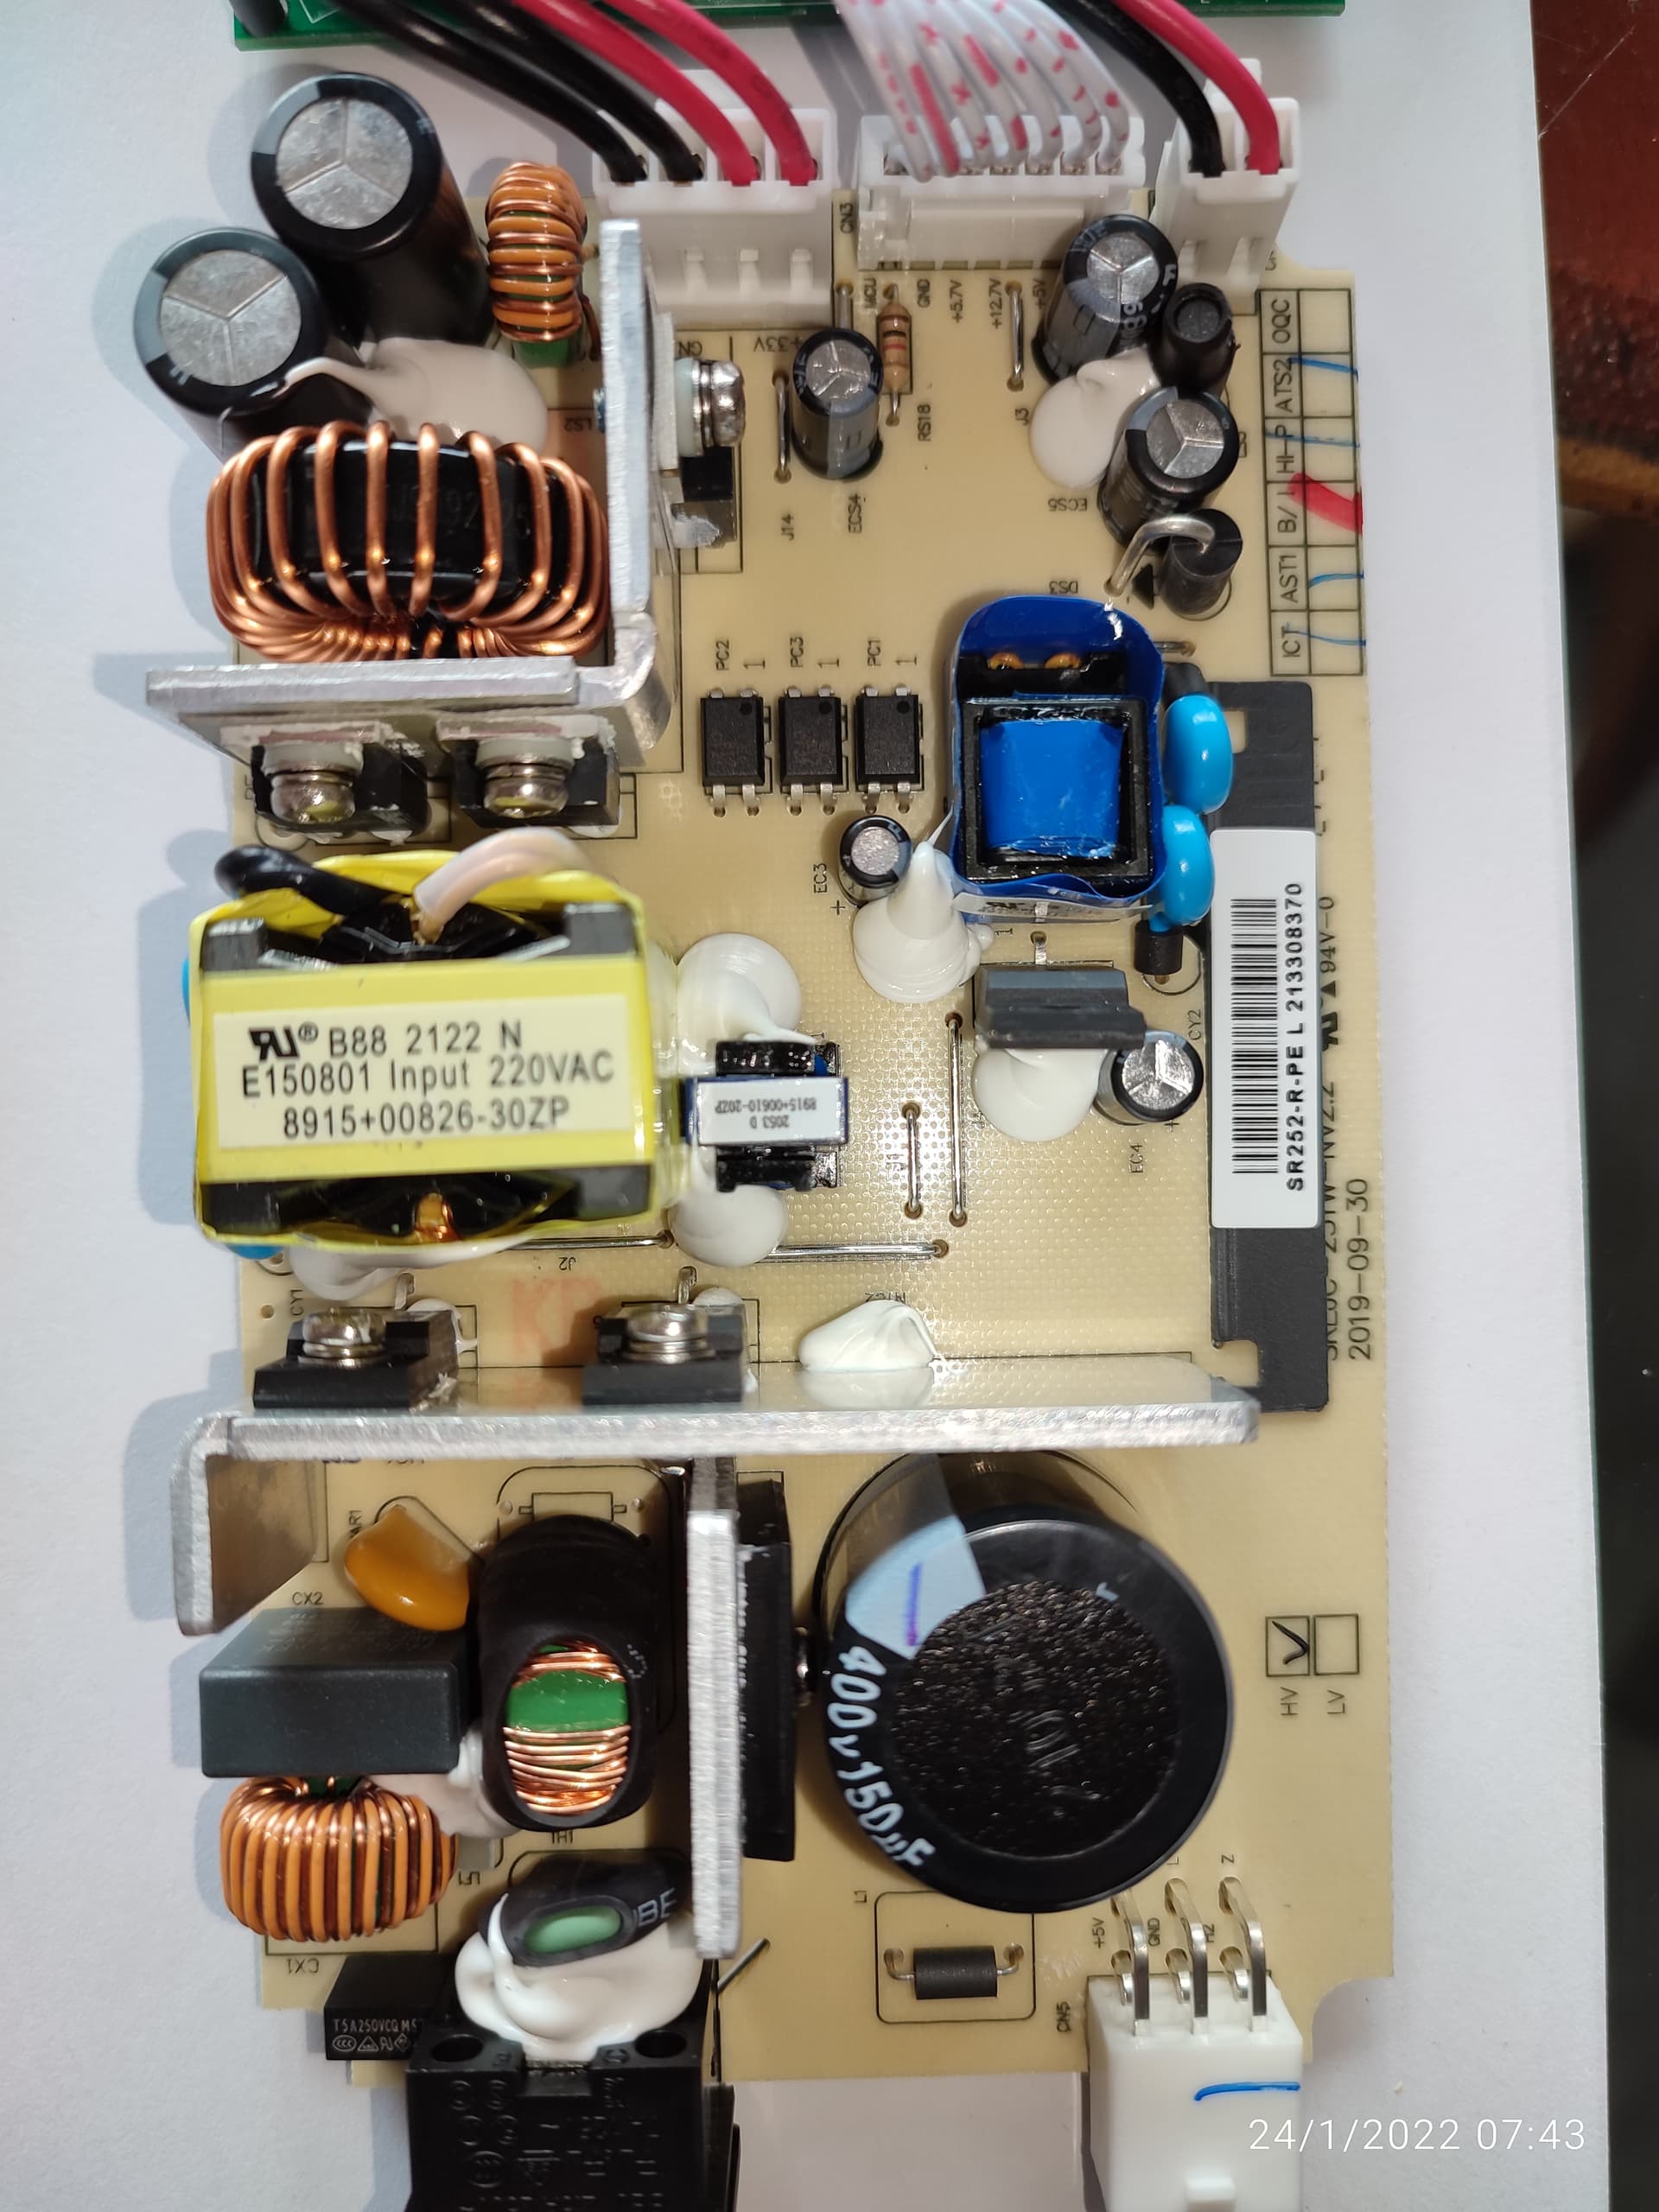
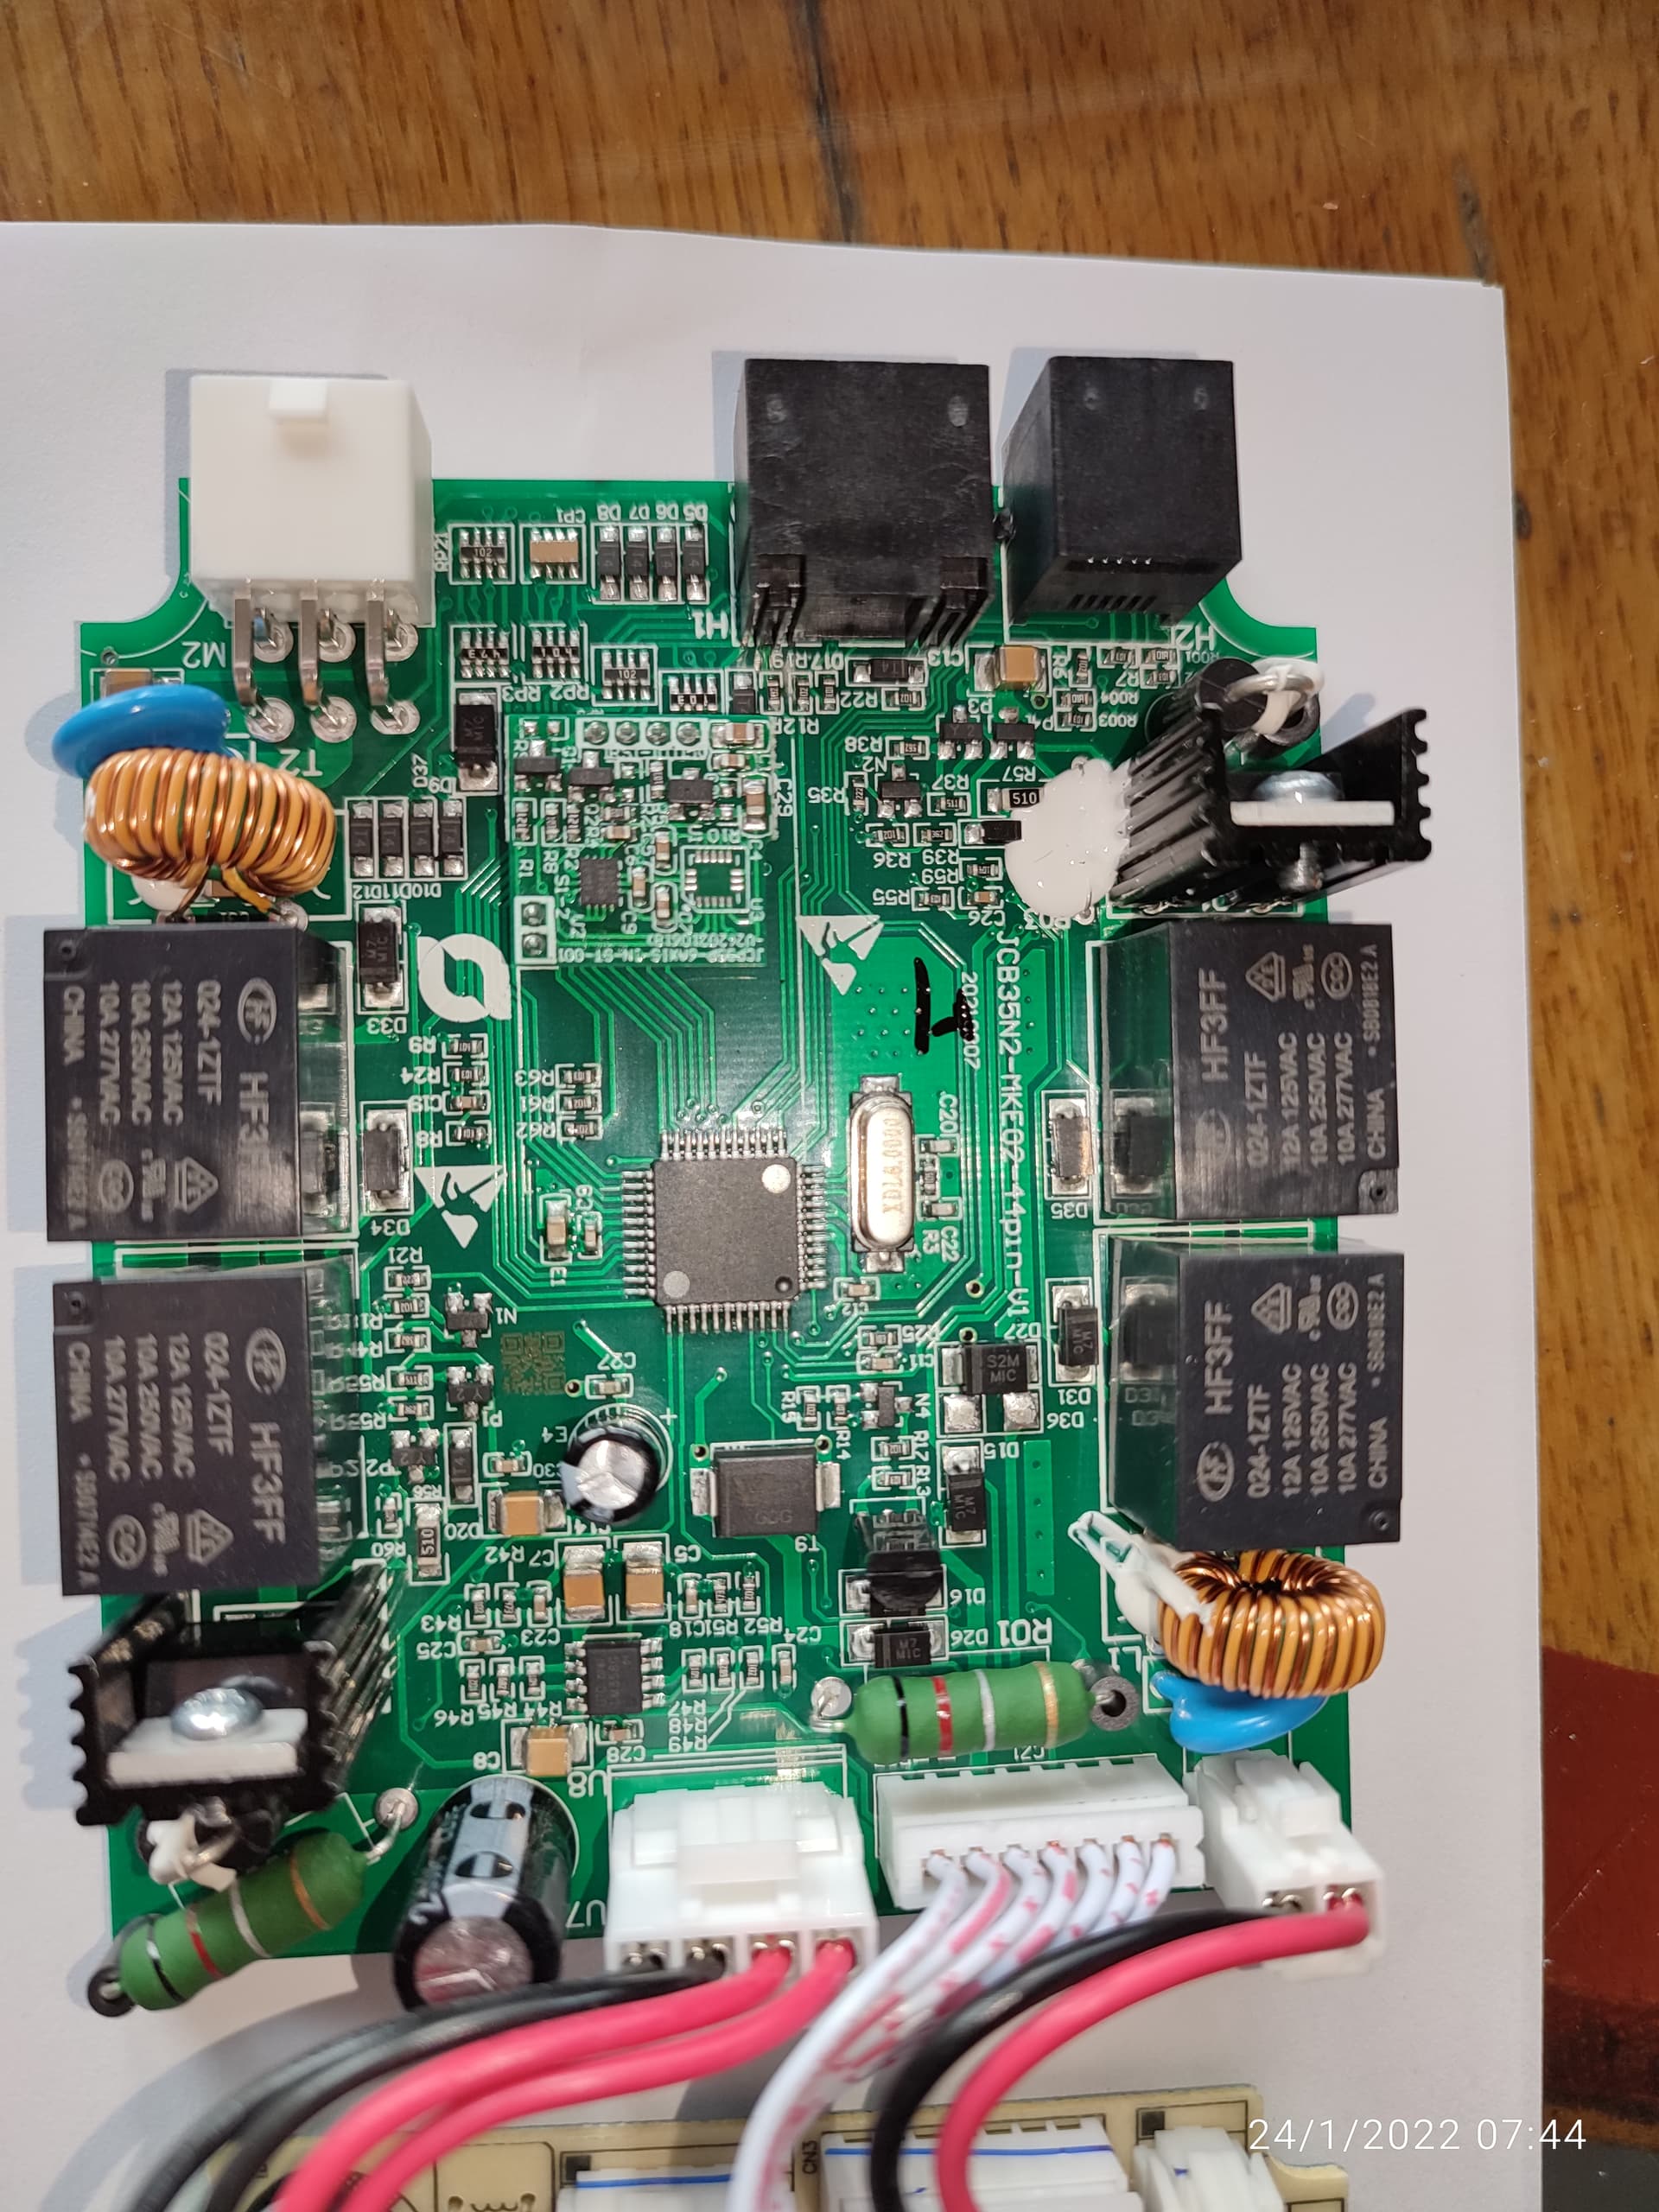
Crack open the controller or control panel and look at the labelling on the boards. (peruse this thread for details)
Here is a rough list (may not be well maintained, or accurate)
Don’t panic too much if you error out your desk during testing (flashing ASr message). It will probably be ok.
Turn the power off and on at the wall and find reset instructions in your manual or online.
A common cause of error is commanding the desk to go lower than its programmed minimum height, so try avoid that. The desk may forget it’s own height and needs to do a special sequence of moves to re-baseline it’s own height.
Triggering the memory preset buttons (which have “soft start/stop”).
The rest of this first post is legacy which I’ve left here for completeness…
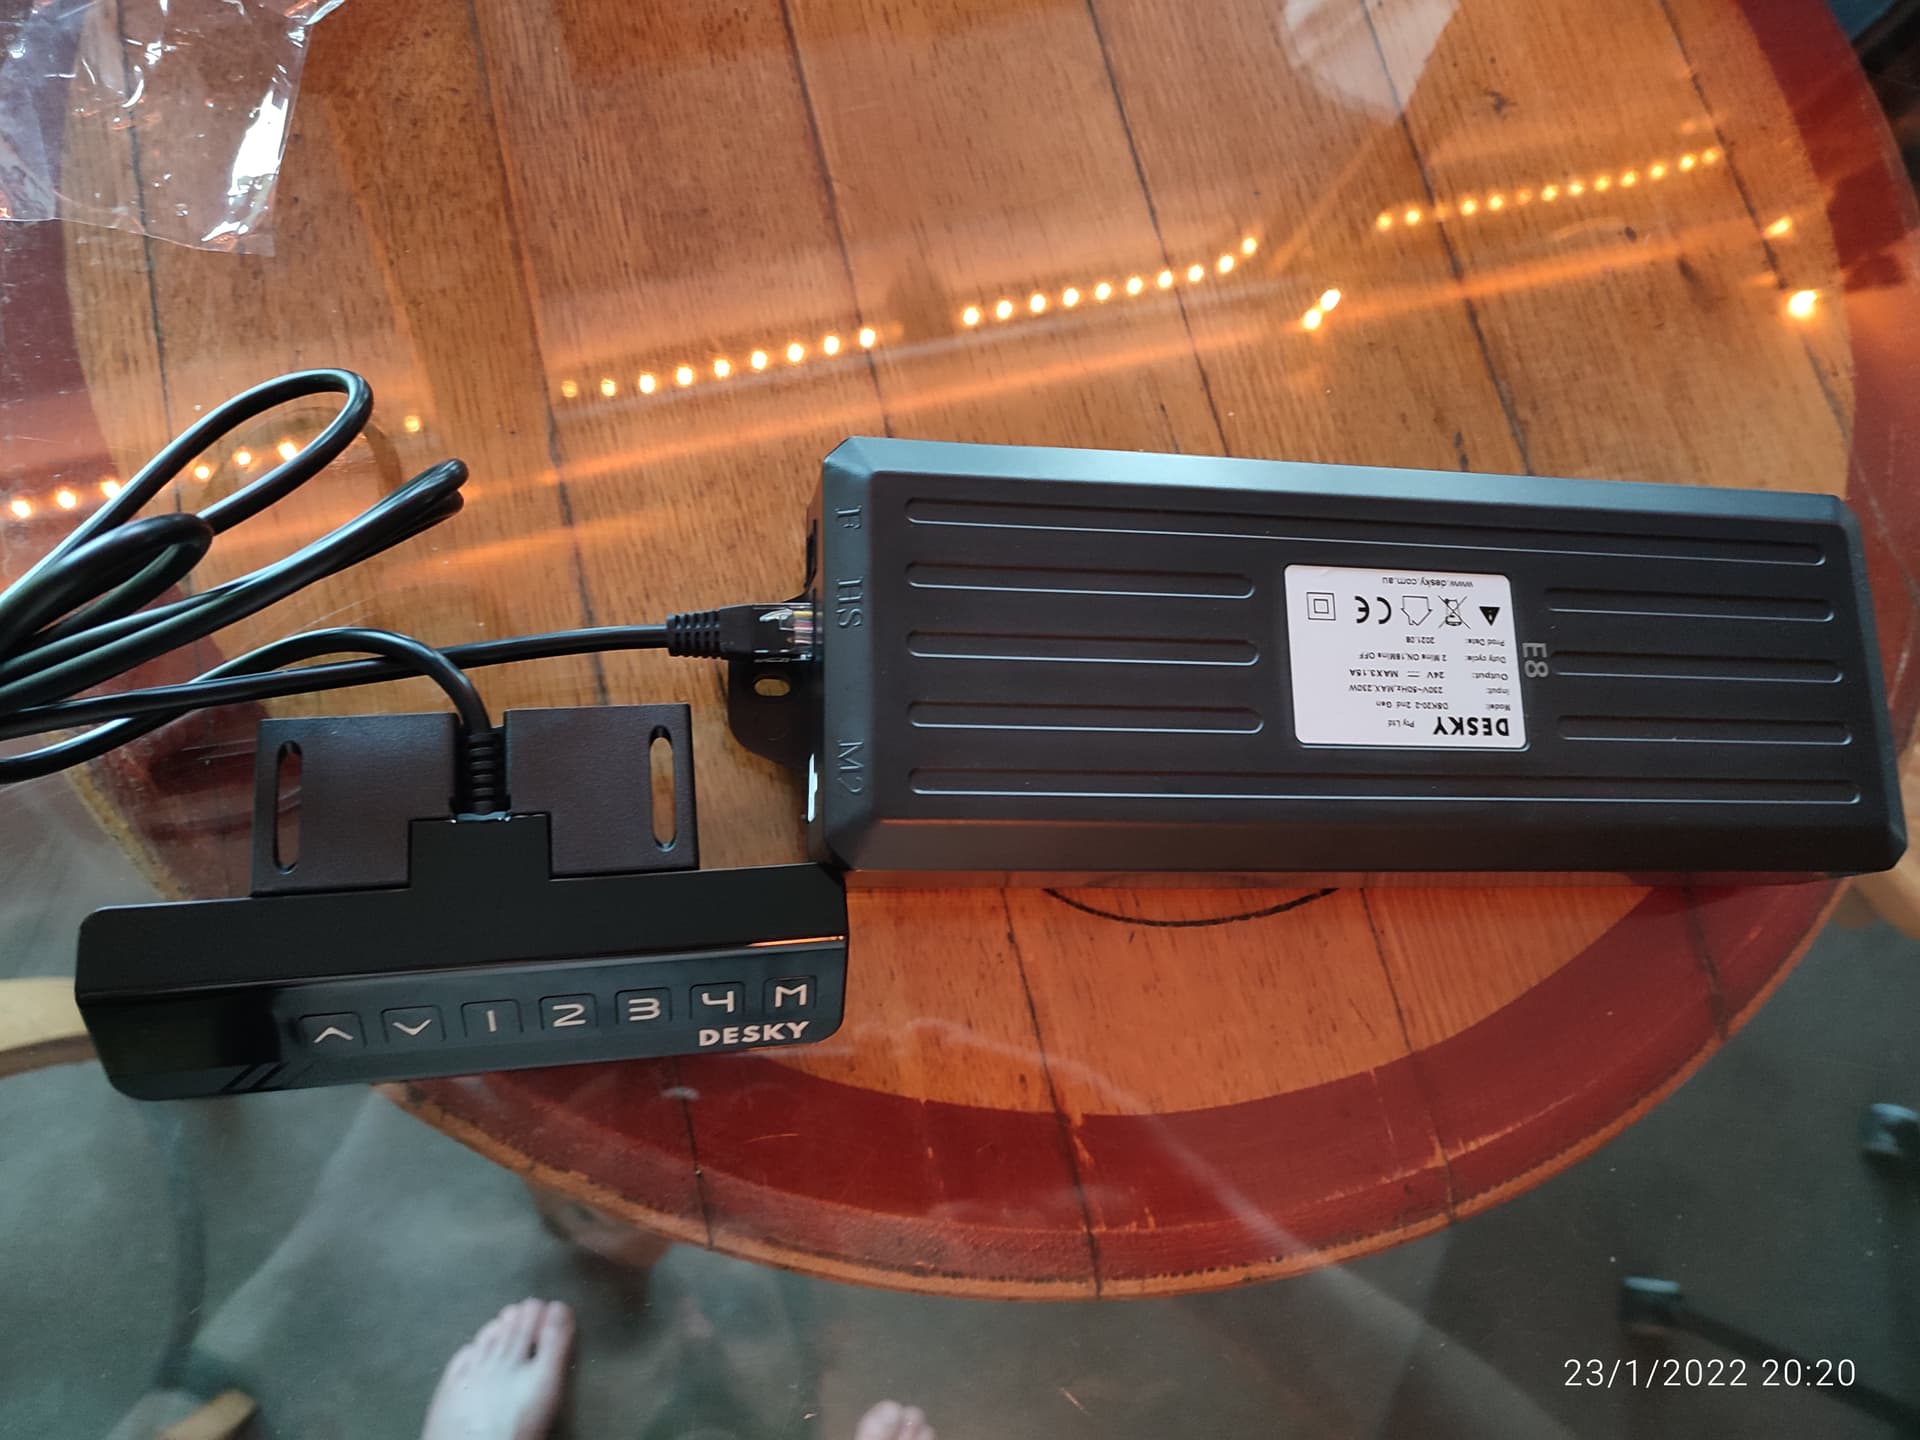
I’ve started work on trying to add an ESPHome based controller to my Desky Dual standing desk (Australian Company).
I’m consolidating my progress (or lack thereof😊) here. I expect I’ll be drawing on the LoctekMotion Hacking Discord group a lot but wanted to keep my stuff consolidated so it doesn’t get lost in big threads.
[11:22:02][V][text_sensor:016]: 'uart_readline': Received new state \xff\xff\xff\xff\xff\xfe\xff\x80\xff\xffa\xff\xff\xff\xff\xff\xff\xff\xff\xff\xff\xff\xff\xff\xff\xff\xff\xff\xff\xff\xff\xff\xff\xff\xff\xff\xff\xff\xff\xff\xff\xff\xff\xfc\xfc\xfc\xf8\xfc\xfc\xfc\xf8\xfc\xfc\xfc\xfc\xc0\xf8\xfc\xf8\xf8\xf8\xfc\xfc\xf0\xfc\xf8\xfc\xf0\xfc\xf8\xfc\xf8\xf8\xfc\xfc\xf8\xfc\xfc
[11:22:02][D][text_sensor:067]: 'uart_readline': Sending state '\xff\xff\xff\xff\xff\xfe\xff\x80\xff\xffa\xff\xff\xff\xff\xff\xff\xff\xff\xff\xff\xff\xff\xff\xff\xff\xff\xff\xff\xff\xff\xff\xff\xff\xff\xff\xff\xff\xff\xff\xff\xff\xff\xfc\xfc\xfc\xf8\xfc\xfc\xfc\xf8\xfc\xfc\xfc\xfc\xc0\xf8\xfc\xf8\xf8\xf8\xfc\xfc\xf0\xfc\xf8\xfc\xf0\xfc\xf8\xfc\xf8\xf8\xfc\xfc\xf8\xfc\xfc'
[11:22:04][V][text_sensor:016]: 'uart_readline': Received new state \xf8@\xf8\x80\xf0@\xc0\xf8E\xf8\xf8 \xfc?\xf8K\xf8\xff\xfc\xff\xf8\xf8\xfc\xfa\xff\xff@\xff@\xff\xff\x80\x80\xa0\xdf \xf74\xf8\xf8\xf8@\xfc\xf8@\xf8\xf8\xf0\xf8=\xf8\xff\xf8\xf0\xf8\xf8\xd8\xf0\xfe@
[11:22:04][D][text_sensor:067]: 'uart_readline': Sending state '\xf8@\xf8\x80\xf0@\xc0\xf8E\xf8\xf8 \xfc?\xf8K\xf8\xff\xfc\xff\xf8\xf8\xfc\xfa\xff\xff@\xff@\xff\xff\x80\x80\xa0\xdf \xf74\xf8\xf8\xf8@\xfc\xf8@\xf8\xf8\xf0\xf8=\xf8\xff\xf8\xf0\xf8\xf8\xd8\xf0\xfe@'
Not sure about how valid these values are yet. First time I’ve done this. Not sure if it’s wiring or how I somehow need to configure the custom UART Text sensor?
[12:12:46][D][text_sensor:067]: 'uart_readline': Sending state '!\xfe!!\xde\xdf!!\xe5\xffK\xa1)\xcb\xffK!\xedK!!\xed!!\xed\xffK!!\x92\xff\xcb!%\xa5\xfbO\xa1i\xdaZ\xcb\xa1N\xfb'
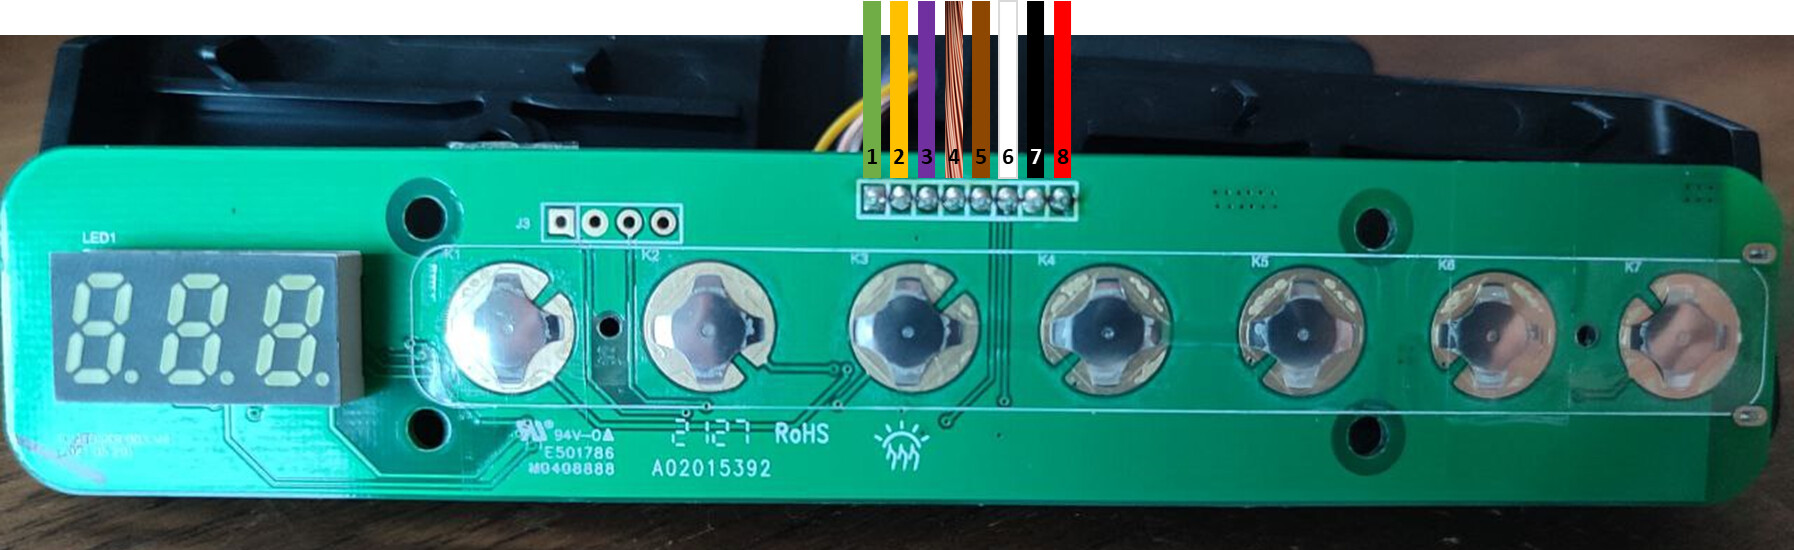
Interested in finding out more too - it looks like most of these units use the same / compatible controllers / keypads - would be great to have the pin-outs fully documented so we can develop our own accessories.
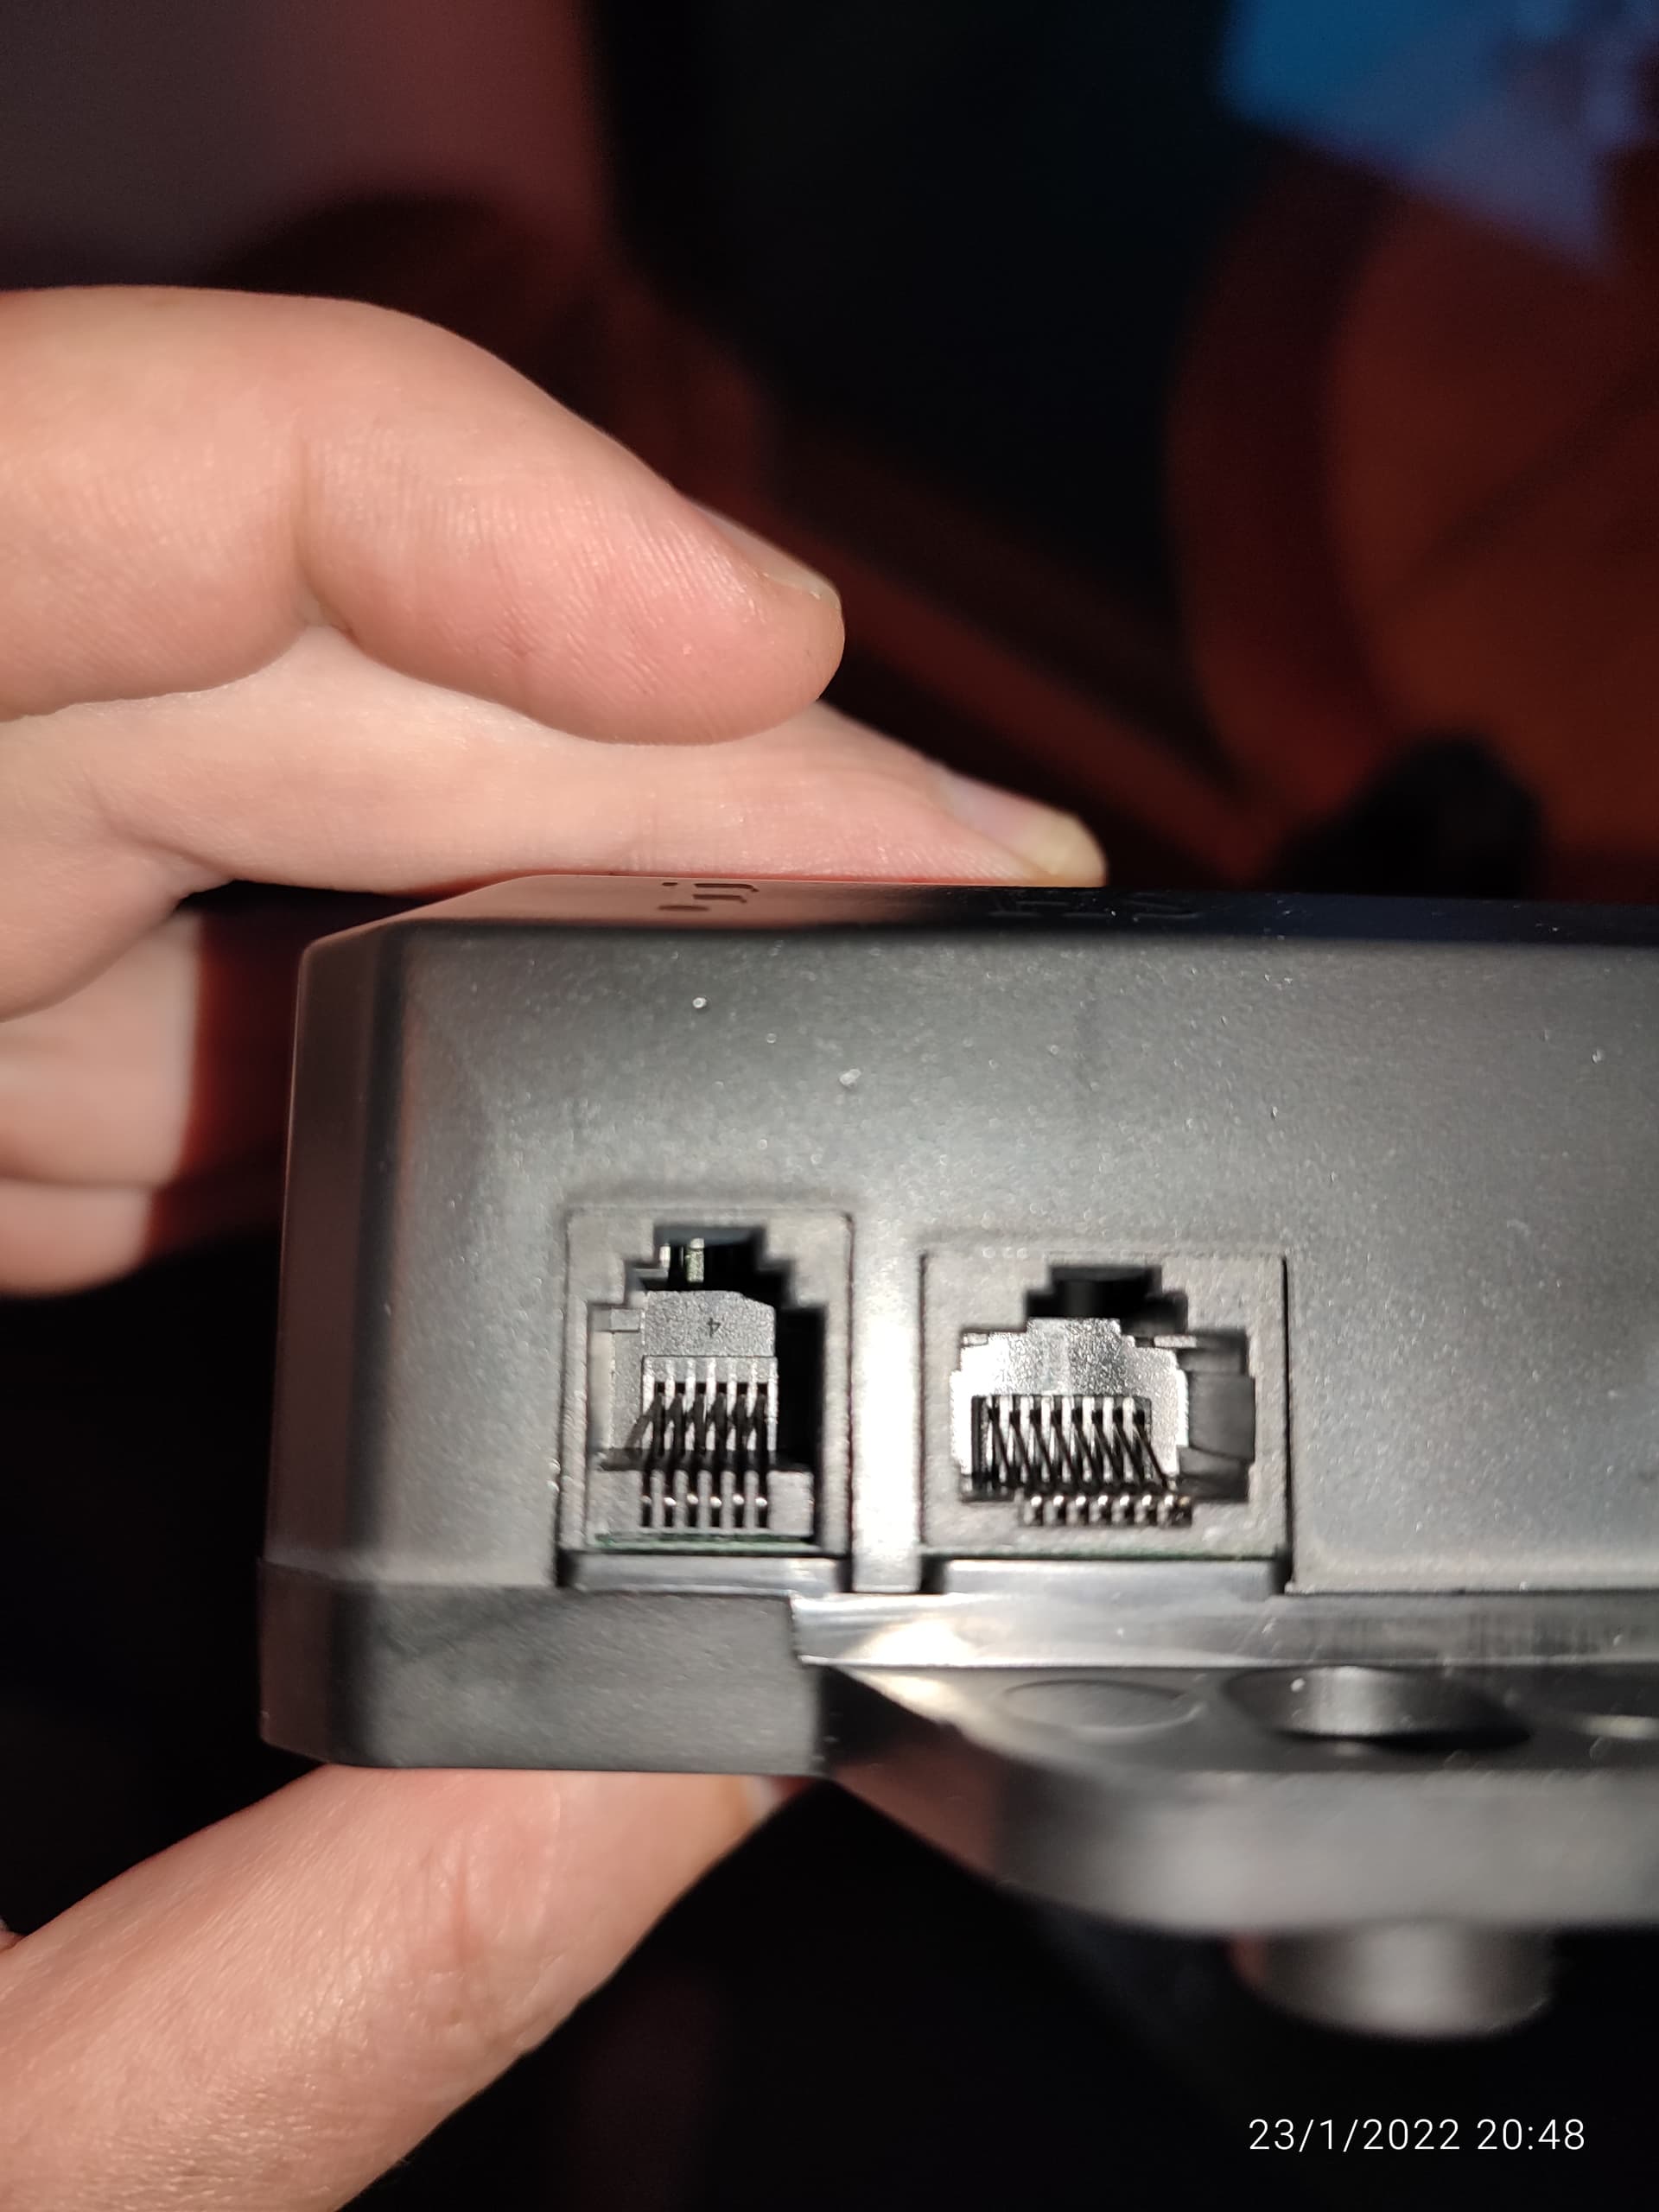
Would be really interested in the alternate port, which appears to be for wifi/bluetooth modules…
Update note 2022-07-03: Might be worth looking over Option #2 config as I’ve made some enhancments/refinements there.
I’m going to keep refining/editing this post as the main ‘how to’.
The majority of credit for the solution so far goes to @ssieb . He generously donated his time and knowledge to decode the UART protocol and write the ESPHome custom component (I don’t know any C++, or much about UART either). He doesn’t have one of these desks. He may be generous enough to add some more features or otherwise collaborate on it’s development if we are nice😉.
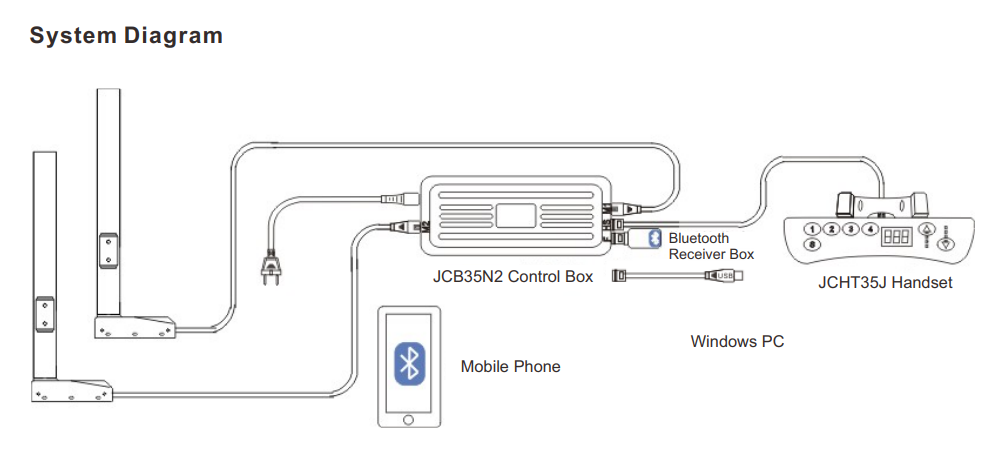
Hardware: We build ourselves a Dongle from the RJ45 port which “passes-through” 8 of 8 wires between the controller and the control panel and fork-off 6 of 8 to a d1 mini (or esp32 etc)
Wire – I really like this silicone wire which is very flexible for routing in small enclosures.
Half an Ethernet cable (just cut a spare one you have laying around?)
Enclosure: The enclosure I designed and 3d printed. It’s here on Thingiverse (added 2022-06-05). But you can mount this thing pretty out of sight under the desk, so you could for example just hot glue or zip tie all the parts to a bit of wood/plastic etc.
Soldering
If you are allergic to soldering (I used to be, but worked through it;) you could do this solder free if you pick an esp with pins already on it and buy some dupont cables.
Software:
Use Sseib’s custom component and some of my config (optional).
You might want to start with just using ssieb’s less bloated config (but make sure you invert the pins). Then maybe read through my config and use what you want.
Also Sseib’s config works in mm, whereas I’ve adjust mine to generally be in cm.
Edit: 2022-06-05 Some of the config is a little dated since ssieb deployed some new features l requested. Look at his base config first.
####################################################################################################
##Notes/Info
####################################################################################################

## Home Assistant Thread: https://community.home-assistant.io/t/desky-standing-desk/383790/3
## ssieb who generously donated his time and knowledge to developing the custom component may offer some support on the Discord thread (please read both threads first).
## https://discord.com/channels/429907082951524364/952464939480645642

#Notes:
# 1. Use this component at own risk. It has not had extensive testing. May void warranty or cause desk faults etc.
# 2. This controller may bypass desk safety features like collision detection.
# 3. This component doesn't know about the values stored in your desk. Values in this config are (and must be) set independently.
# 4. ssieb's solution may be a lot simpler and cleaner for most people. I've cobbled together some more features in this config because I can't programn in C++.


#Troubleshooting Tips:
#If you ever get a flashing ASr message, you might need to reset your desk.
#https://desky.com.au/blogs/news/reset-standing-desk-control-panel#:~:text=When%20ready%2C%20press%20and%20hold,Hooray!


#TODO
#Ask ssieb to make change requests (move logic to component code)
  # Invert pins
  # Get Desk Height On Boot
  # Interlock Up/Down Pins (If not done already)
  # Interrupt/stop movement function (Stop desk motion)

#other
  # Test collision detection
  # Limit external component fetch to just desky?
  # Fix Desk Is moving on Boot.

esphome:
  name: desky-d1mini-v2
  platform: ESP8266
  board: d1_mini #pinout: https://i0.wp.com/randomnerdtutorials.com/wp-content/uploads/2019/05/ESP8266-WeMos-D1-Mini-pinout-gpio-pin.png?quality=100&strip=all&ssl=1
  on_boot:
    priority: -100.0
    then:
    #Request a desk height update after boot.
      - delay: 5s
      - switch.turn_on: wake_desk_and_get_height

wifi:
  ssid: "NotTellingYouThat"
  password: "NopeItsMySecret"

api:
ota:

logger:
  # level: VERY_VERBOSE ##Uncomment to see UART debug messages

external_components:
#Fetch ssieb's custom component# https://github.com/ssieb/custom_components/tree/master/components/desky
  - source:
      type: git
      url: https://github.com/ssieb/custom_components
    components: [ desky ]

uart:
  - id: desk_uart
    baud_rate: 9600
    rx_pin: 1 #Labelled TX on my D1mini clone (mislabelled?)
    ##You can uncomment the debug section below to see UART messages.
    # debug:
      # direction: RX
      # dummy_receiver: true
      # after:
        # bytes: 4
      # sequence:
        # - lambda: UARTDebug::log_int(direction, bytes, ',');

desky:
  id: my_desky
  ####################################################################################
  ##Uncomment this block to use Ssieb's move_to componet function.
  # up:
    # number: 4 #D2
    # inverted: true
  # down:
    # number: 5 #D1
    # inverted: true
  # stopping_distance: 15  # optional distance from target to turn off moving, default 15
  ####################################################################################
  height:  # Sensor publishing the current height
    name: Desky Height
    id: desky_height
    accuracy_decimals: 1
    unit_of_measurement: cm
    #any other sensor options
    filters:
    - delta: 0.05 #Only send values to HA if they change
    - throttle: 200ms #Limit values sent to Ha to 5 per sec.
    - multiply: 0.1 #convert from mm to cm
    on_value:
      then:
          #If the value changes, then the desk is moving
        - binary_sensor.template.publish:
            id: desky_is_moving
            state: ON
        - delay: 300ms
          #Assume it's stopped moving if no height changes after a short time.
        - binary_sensor.template.publish:
            id: desky_is_moving
            state: Off

binary_sensor:
  - platform: template
    id: desky_is_moving
    name: "Desky Is Moving"
    filters:
      - delayed_off: 400ms
    #If the desk isn't moving for a bit we better turn off attempts at movement. It's like poor man's collision detection?
    on_release:
      then:
        - button.press: desky_stop_desk

button:
#Stop movement
  - platform: template
    name: Stop Desk
    id: desky_stop_desk
    on_press:
      then:
        - switch.turn_off: raise_desk
        - switch.turn_off: lower_desk

#Move to function
  - platform: template
    name: Go To Desky Height x
    id: go_to_desky_preset_height_x
    on_press:
      then:
      ##Option 1: Uncomment to use Ssieb's move_to componet functions
        # - lambda: id(my_desky).move_to(id(desky_target_height).state*10);


      ##Option 2: Uncomment to use Mahko's lambda alternative
      #Check if we need to move desk up or down from current position
        if:
          condition:
          #Current height is more than target height, then move desk down
            lambda: |-
              return id(desky_target_height).state < id(desky_height).state;
          then:
            - switch.turn_on: lower_desk
            - wait_until:
              #Run until the difference between current and target state is < stopping distance
                condition:
                  lambda: return abs((id(desky_height).state - (id(desky_target_height).state)))<(id(stopping_distance_cm).state);
            - switch.turn_off: lower_desk
          else:
          #Current height is less than target height, move desk up
            - switch.turn_on: raise_desk
            - wait_until:
                condition:
                  lambda: return abs((id(desky_height).state - (id(desky_target_height).state)))<(id(stopping_distance_cm).state);
                  #Run until the difference between current and target state is <0.3cm
            - switch.turn_off: raise_desk


number:
#Target Height ("Move desk to height x").
    #You should probably limit the range you can move the desk to to within the limits you've set via the control panel, perhaps offset a little within the range.
    #Sending commands higher/lower than this may cause error messages and require desk reset (or worse).
  - platform: template
    id: desky_target_height
    name: "Desky Target Height"
    optimistic: true
    unit_of_measurement: cm
    min_value: 80
    max_value: 130.0
    step: 0.1

#Offset correction - Adjust until you get the best accuracy.
#The desk keeps moving for a little while after the up/down pins are released and we try to account for this.
#1.5cm was about right on mine
  - platform: template
    name: "Desky Stopping Distance cm"
    id: stopping_distance_cm
    unit_of_measurement: cm
    optimistic: true
    min_value: 0
    max_value: 2
    step: 0.1
    restore_value: true
    initial_value: 1.5

###############################################
#Define some preset heights.
###############################################
#You can freely define as many adjustable presets as you like.
#These are all seperate/independant of what you've set via the control panel (we can't retrieve them currently).

#Standing Height #1 - Set a standing height.
  - platform: template
    id: desky_standing_height_1
    name: "Desky Standing Height 1"
    optimistic: true
    unit_of_measurement: cm
    #Limit the range
    min_value: 120
    max_value: 130
    step: 0.1
    restore_value: true
    initial_value: 124

#Sitting Height #1 - Set a sitting height. This is independant of what you've set via the control panel.
  - platform: template
    id: desky_sitting_height_1
    name: "Desky Sitting Height 1"
    optimistic: true
    unit_of_measurement: cm
    #Limit the range
    min_value: 79.7
    max_value: 82
    step: 0.1
    restore_value: true
    initial_value: 79.9


switch:
#wake up ther desk and request it sends its height
  - platform: gpio
    id: wake_desk_and_get_height
    name: "Request Desk Height"
    pin:
      number: D5
      inverted: true
    on_turn_on:
    - delay: 100ms
    - switch.turn_off: wake_desk_and_get_height

#Raise the desk
  - platform: gpio
    id: raise_desk
    name: "Raise Desk"
    pin:
      number: D2
      # mode: INPUT_PULLUP
      inverted: true
    interlock: lower_desk
    on_turn_on:
    #Auto off after 15s just in case
    - delay: 15s
    - switch.turn_off: raise_desk
#Lower the desk
  - platform: gpio
    id: lower_desk
    name: "Lower Desk"
    pin:
      number: D1
      # mode: INPUT_PULLUP
      inverted: true
    interlock: raise_desk
    on_turn_on:
   #Auto off after 15s just in case
    - delay: 15s
    - switch.turn_off: lower_desk
This is looking awesome!
I can’t personally contribute to it, unfortunately, but thanks for having the determination to follow through with this. The Home Assistant and smart home community in general are so inspiring.
Will be sure to give thanks to ssieb!