Preface
If you are a beginner to the HA, you can read this tutorial for beginners first
Enable mqtt discovery for Home assistant in IAMMETER`s energy meter
Which type of electrical meter best fits your needs?
Four ways to integrate the Electricity Usage Monitor (IAMMETER) into the home assistant
Subsequent tutorial: control the EV charging power with regard to the solar PV output and grid power reading
Subsequent tutorial: ESP32 + SCR module: Linearly adjust the power output of resistive loads, such as heaters
Video tutorial: Monitor your solar pv system in Home Assistant
- Energy monitoring Effect in Home Assistant
- Select an energy meter
- Install the energy meter in your solar PV system
- Do the configuration in HA
- Energy management in HA
- what is more
- About WEM3050T
When you want to monitor your solar PV energy in Home Assistant, there are two choices. Use a lovelace with energy dashboard or use the home energy management which has been released recently by HA.
This article is mainly about how to monitor your solar PV system in these two ways.
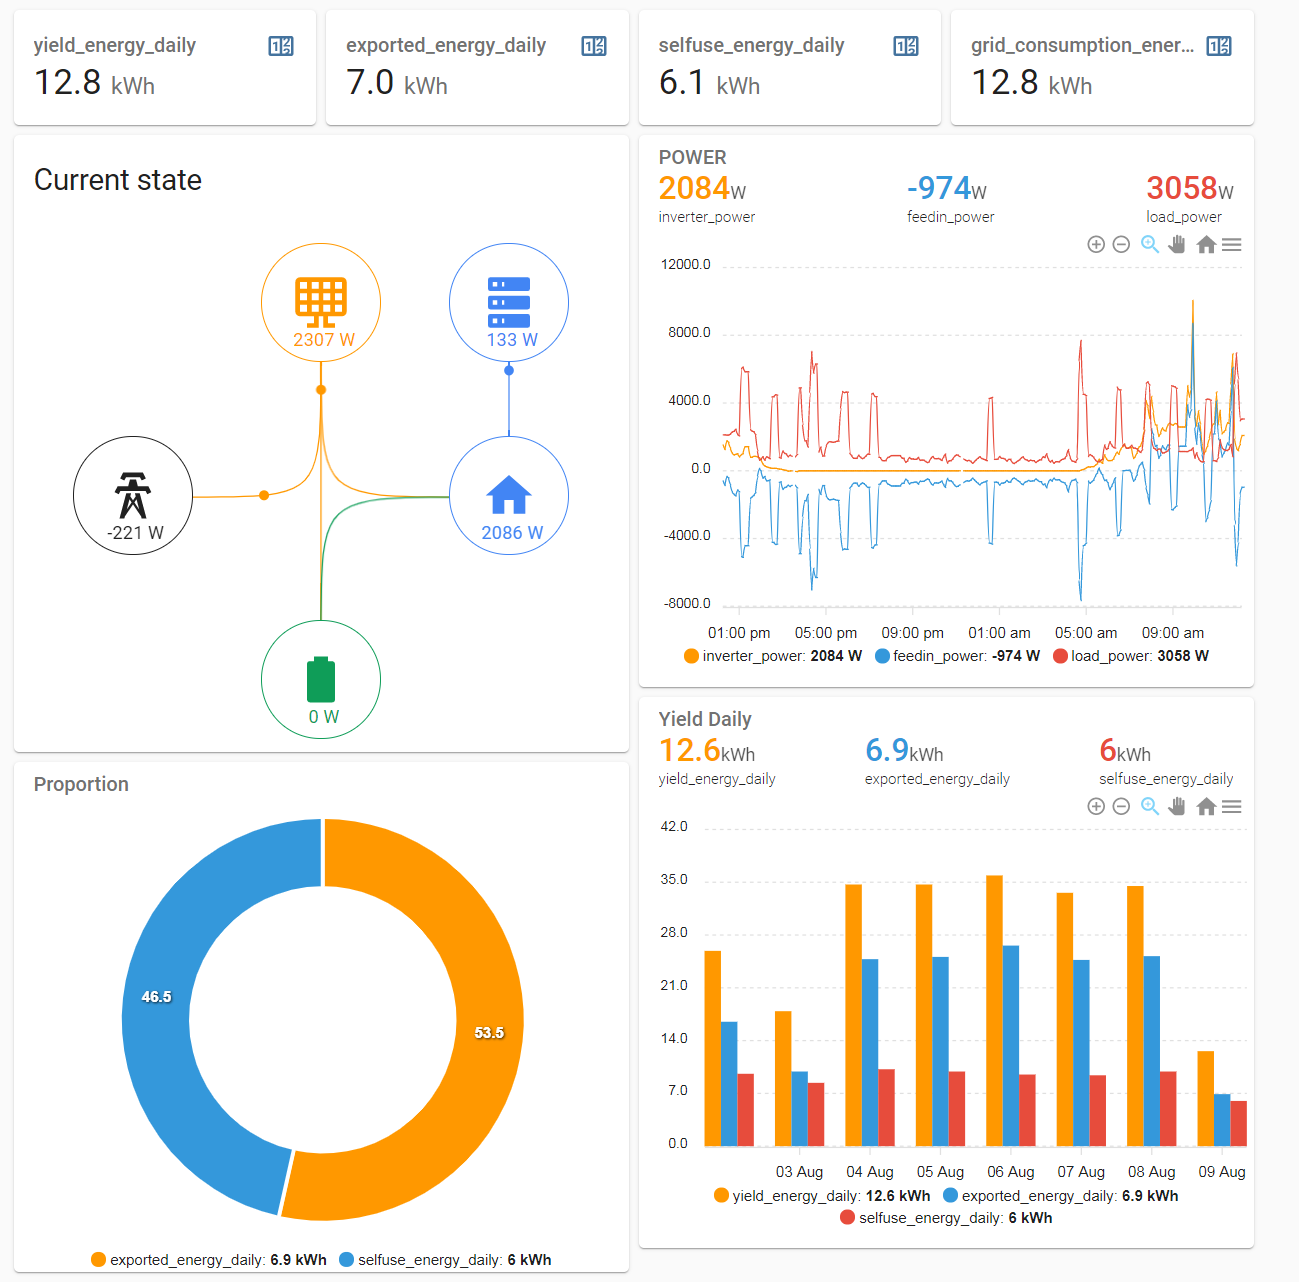
Energy monitoring Effect in Home Assistant
| Lovelace: energy dashboard | Home Energy Management |
|---|---|
| http://ha.iammeter.com:18123/lovelace/Solar username: iammeter pwd: iammeter | http://ha.iammeter.com:18123/energy username: iammeter pwd: iammeter |
If you want to monitor your solar PV system in Home Assistant.
- Select an energy meter that can be integrated into Home Assistant.
- Install the energy meter in the solar PV system.
- Do the configuration in HA: read the parameters into HA, do some calculations (Ex: kwh/hour), select the parameters you are interested to display in the overview.
Select an energy meter
Select an energy meter that can be integrated into Home Assistant easily.
Advertisement time :
Integration of WEM3080T in HA :IamMeter - Home Assistant
Advantage of WEM3080T : Bi-directional measurement, measure both import and export energy simultaneously, REST API provided.
Please note: the solution has nothing to do with a specific brand energy meter, any meter that can report such parameters above to HA will be OK.
Install the energy meter in your solar PV system
After you have select the proper energy meter ,you need to install the energy meter in your solar pv system.
Generally speaking, if you want to monitor yours solar pv system ,at least five key parameters are necessary.
Five key parameters in solar PV system
In a solar PV monitoring system, such five parameters should be necessary.
- inverter output power(w)
- inverter yield energy(kwh)
- feed in power(w)
- import energy from grid(kwh)
- export energy to grid(kwh)
You need to install the energy meter in the proper position that can read out the important parameters in a solar PV system.
Schematic diagram in solar PV system
The following pic is a schematic diagram of wiring.
This pic is use IAMMETER product WEM3080T(3 phase ,split phase,wifi , HA integration) as example. And assuming that the grid and inverter are both single phase, then all above parameters can be measured by one WEM3080T.

Please note: the solution has nothing to do with a specific brand energy meter, any meter that can report such parameters to HA will be OK.
Do the configuration in HA
This section includes two steps
1 “configuration.yaml” :configure the parameter which you want to display in solar pv monitoring system.
2 configure the lovelace display
configuration.yaml
To facilitate the test, we used a “virtual” electricity meter, you can use the HTTP command to get the parameters in solar pv monitoring system.
Command: http get
Url: https://www.iammeter.com/api/v1/site/meterdata/B384789C?token=ec0aeb9c07e24368b5fd9bb3b42a3095
The respond is as below:
{“data”:{“values”:[[237.800,4.700,3202.000,47025.100,0.000],[237.800,4.700,-1825.000,45731.050,25512.490],[0.000,0.000,0.000,0.000,0.000]],“localTime”:“2021/9/30 12:10:03”,“gmtTime”:“2021/9/30 2:10:03”},“successful”:true,“message”:null}

This data is return by the IAMMETER-cloud API interface , the original data is the demo account in IAMMETER-cloud. As below link: Solar PV System - PowerMeter monitoring system .
This data will be refreshed every 5 mins.
This demo data can be used to testing for this solution. After you have been familiar with this solution, you can replace this data from API with the data from your real energy meter.
Generally speaking, the “configuration.yaml” includes two parts content:
- get the five key parameters of solar PV system by Home Assistant
- Calculate the other parameter by Home Assistant
Get the five key parameters of solar PV system by HA
The five key parameters of solar PV system should be able to read out directly from the energy meter.
The relationship is as below:
- inverter output power(w): inverter_power
- inverter yield energy(kwh): yield_energy
- feed in power(w): feedin_power
- import energy from grid(kwh): grid_consumption_energy
- export energy to grid(kwh): exported_energy
Calculate the other parameters by HA
Except the five key parameters need to be read out directly, there are also some important parameters that can be calculated by the five key parameters ,such as :
load_power = inverter_power(always positive) - feedin_power (positive: export energy , negative : import energy)
selfuse_energy = yield_energy-exported_energy
load_energy = selfuse_energy+grid_consumption_energy
You can also get the kwh/period in such format
grid_consumption_energy_daily:
source: sensor.grid_consumption_energy
cycle: daily
This is the whole content of “configuration.yaml”, you can use it directly for testing, then replace the sensor value with your real energy data step by step.
sensor:
#-----SolarMeterSimulation-----
  - platform: rest
    name: solar
    json_attributes:
      - data
      - successful
      - message
    resource: https://www.iammeter.com/api/v1/site/meterdata/B384789C?token=ec0aeb9c07e24368b5fd9bb3b42a3095
    method: GET
    #username: admin
    #password: admin
    #authentication: basic
    #value_template: '{{ value_json.SN }}'
  - platform: template
    sensors:
      solar_voltage_a:
        unit_of_measurement: 'V'
        value_template: '{{ states.sensor.solar.attributes.data["values"][0][0] }}'
      solar_current_a:
        unit_of_measurement: 'A'
        value_template: '{{ states.sensor.solar.attributes.data["values"][0][1] }}'
      solar_power_a:
        unit_of_measurement: 'W'
        value_template: '{{ states.sensor.solar.attributes.data["values"][0][2] }}'
      solar_importenergy_a:
        unit_of_measurement: 'kWh'
        value_template: '{{ states.sensor.solar.attributes.data["values"][0][3] }}'
      solar_exportgrid_a:
        unit_of_measurement: 'kWh'
        value_template: '{{ states.sensor.solar.attributes.data["values"][0][4] }}'

      solar_voltage_b:
        unit_of_measurement: 'V'
        value_template: '{{ states.sensor.solar.attributes.data["values"][1][0] }}'
      solar_current_b:
        unit_of_measurement: 'A'
        value_template: '{{ states.sensor.solar.attributes.data["values"][1][1] }}'
      solar_power_b:
        unit_of_measurement: 'W'
        value_template: '{{ states.sensor.solar.attributes.data["values"][1][2] }}'
      solar_importenergy_b:
        unit_of_measurement: 'kWh'
        value_template: '{{ states.sensor.solar.attributes.data["values"][1][3] }}'
      solar_exportgrid_b:
        unit_of_measurement: 'kWh'
        value_template: '{{ states.sensor.solar.attributes.data["values"][1][4] }}'

      solar_voltage_c:
        unit_of_measurement: 'V'
        value_template: '{{ states.sensor.solar.attributes.data["values"][2][0] }}'
      solar_current_c:
        unit_of_measurement: 'A'
        value_template: '{{ states.sensor.solar.attributes.data["values"][2][1] }}'
      solar_power_c:
        unit_of_measurement: 'W'
        value_template: '{{ states.sensor.solar.attributes.data["values"][2][2] }}'
      solar_importenergy_c:
        unit_of_measurement: 'kWh'
        value_template: '{{ states.sensor.solar.attributes.data["values"][2][3] }}'
      solar_exportgrid_c:
        unit_of_measurement: 'kWh'
        value_template: '{{ states.sensor.solar.attributes.data["values"][2][4] }}'


#-----SolarPVSystem-----
  - platform: template
    sensors:
      inverter_power:
        unit_of_measurement: 'W'
        value_template: "{{ states('sensor.solar_power_a') }}"
      feedin_power:
        unit_of_measurement: 'W'
        value_template: "{{ states('sensor.solar_power_b')|float * (-1.0) }}"
      load_power:
        unit_of_measurement: 'W'
        value_template: "{{ states('sensor.solar_power_a')|float + states('sensor.solar_power_b')|float }}"

      zero_power:
        unit_of_measurement: 'W'
        value_template: '{{ 0 }}'

      grid_consumption_energy:
        unit_of_measurement: 'kWh'
        value_template: "{{ states('sensor.solar_importenergy_b') }}"
      exported_energy:
        unit_of_measurement: 'kWh'
        value_template: "{{ states('sensor.solar_exportgrid_b') }}"
      yield_energy:
        unit_of_measurement: 'kWh'
        value_template: "{{ states('sensor.solar_importenergy_a') }}"

      selfuse_energy:
        unit_of_measurement: 'kWh'
        value_template: "{{ states('sensor.yield_energy')|float - states('sensor.exported_energy')|float }}"
      load_energy:
        unit_of_measurement: 'kWh'
        value_template: "{{ states('sensor.grid_consumption_energy')|float + states('sensor.yield_energy')|float - states('sensor.exported_energy')|float }}"

      self_consumption_rate_daily:
        unit_of_measurement: '%'
        value_template: "{{ states('sensor.selfuse_energy_daily')|float / states('sensor.yield_energy_daily')|float }}"
      self_consumption_rate_monthly:
        unit_of_measurement: '%'
        value_template: "{{ states('sensor.selfuse_energy_monthly')|float / states('sensor.yield_energy_monthly')|float }}"

utility_meter:
  grid_consumption_energy_daily:
    source: sensor.grid_consumption_energy
    cycle: daily
  grid_consumption_energy_monthly:
    source: sensor.grid_consumption_energy
    cycle: monthly

  exported_energy_daily:
    source: sensor.exported_energy
    cycle: daily
  exported_energy_monthly:
    source: sensor.exported_energy
    cycle: monthly

  yield_energy_daily:
    source: sensor.yield_energy
    cycle: daily
  yield_energy_monthly:
    source: sensor.yield_energy
    cycle: monthly

  selfuse_energy_daily:
    source: sensor.selfuse_energy
    cycle: daily
  selfuse_energy_monthly:
    source: sensor.selfuse_energy
    cycle: monthly

  load_energy_daily:
    source: sensor.load_energy
    cycle: daily
  load_energy_monthly:
    source: sensor.load_energy
    cycle: monthly
Configure the lovelace display
we recommend these two cards : tesla-style-solar-power-card apexcharts-card
If you integrate HACS, you can install tesla-style-solar-power-card and apexcharts-card directly, If you do not have HACS installed, you can manually install and load them.
Configure the two cards in lovelace.

You can manually add the following cards:


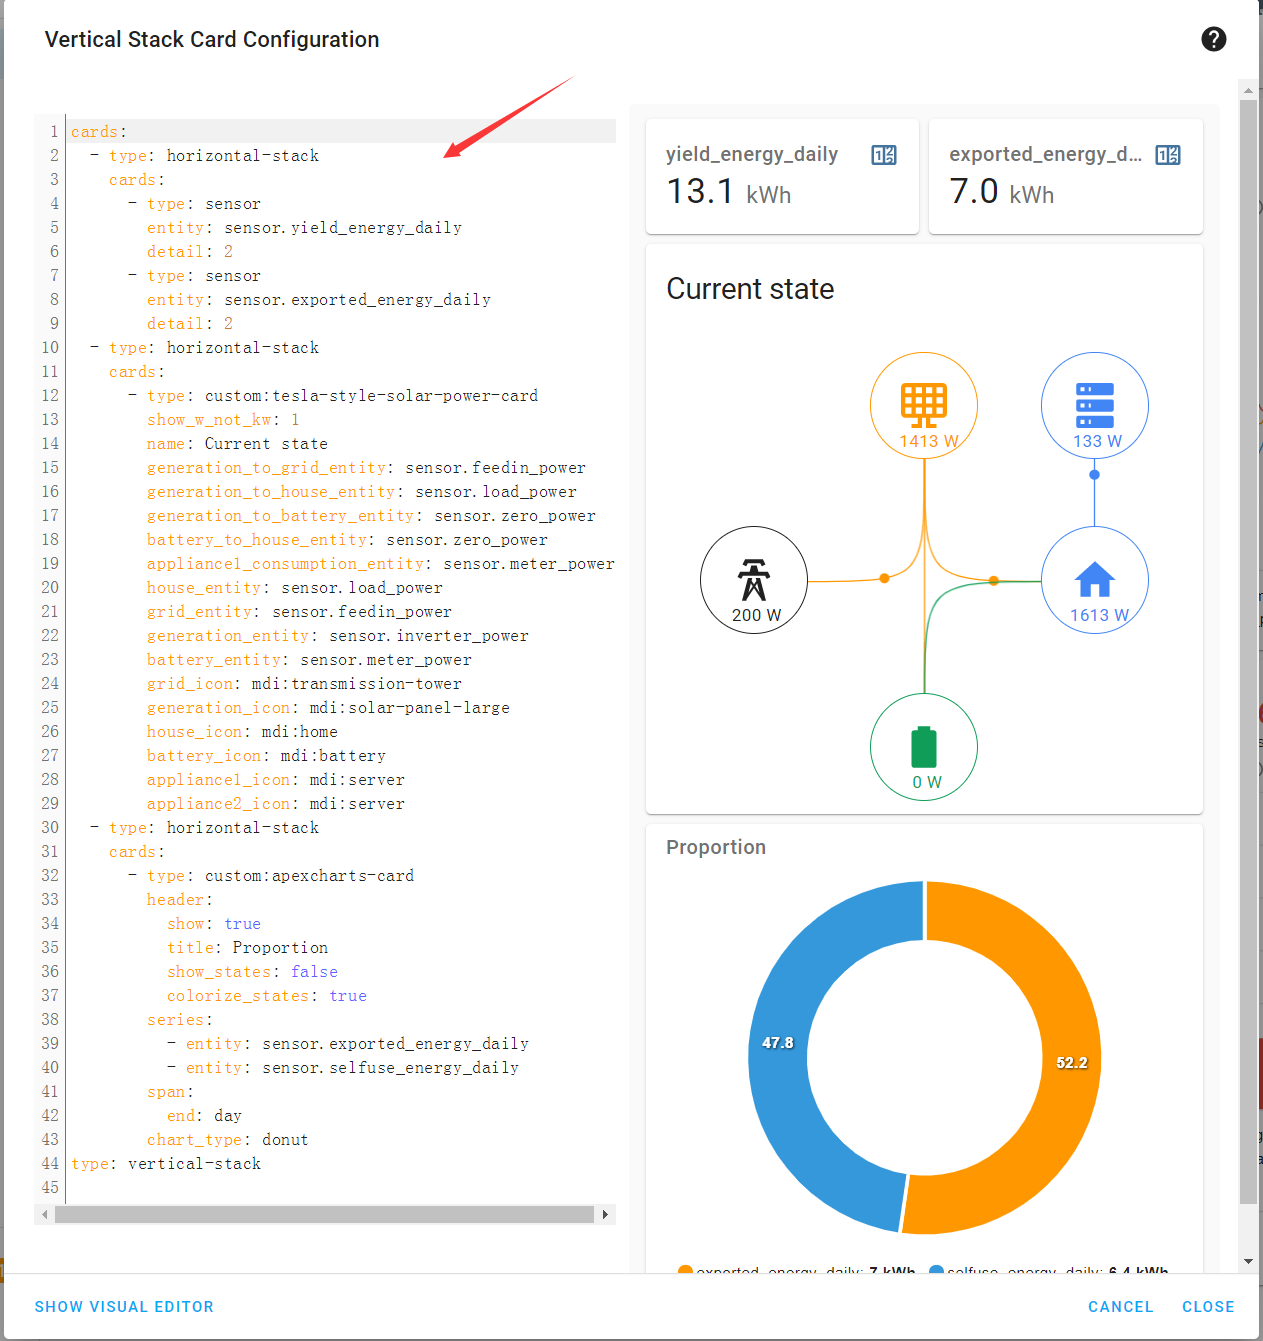
Add and configure “tesla-style-solar-power-card”
Copy and paste the following code :
cards:
  - type: horizontal-stack
    cards:
      - type: sensor
        entity: sensor.yield_energy_daily
        detail: 2
      - type: sensor
        entity: sensor.exported_energy_daily
        detail: 2
  - type: horizontal-stack
    cards:
      - type: custom:tesla-style-solar-power-card
        show_w_not_kw: 1
        name: Current state
        generation_to_grid_entity: sensor.feedin_power
        generation_to_house_entity: sensor.load_power
        generation_to_battery_entity: sensor.zero_power
        battery_to_house_entity: sensor.zero_power
        appliance1_consumption_entity: sensor.meter_power
        house_entity: sensor.load_power
        grid_entity: sensor.feedin_power
        generation_entity: sensor.inverter_power
        battery_entity: sensor.meter_power
        grid_icon: mdi:transmission-tower
        generation_icon: mdi:solar-panel-large
        house_icon: mdi:home
        battery_icon: mdi:battery
        appliance1_icon: mdi:server
        appliance2_icon: mdi:server
  - type: horizontal-stack
    cards:
      - type: custom:apexcharts-card
        header:
          show: true
          title: Proportion
          show_states: false
          colorize_states: true
        series:
          - entity: sensor.exported_energy_daily
          - entity: sensor.selfuse_energy_daily
        span:
          end: day
        chart_type: donut
type: vertical-stack
Add and configure “apexcharts-card”
Continue to copy and paste the following code :
cards:
  - type: horizontal-stack
    cards:
      - type: sensor
        entity: sensor.selfuse_energy_daily
        detail: 2
      - type: sensor
        entity: sensor.grid_consumption_energy_daily
        detail: 2
  - type: horizontal-stack
    cards:
      - type: custom:apexcharts-card
        header:
          show: true
          title: POWER
          show_states: true
          colorize_states: true
        apex_config:
          chart:
            height: 350
            zoom:
              type: x
              enabled: true
              autoScaleYaxis: false
            toolbar:
              show: true
              autoSelected: zoom
            xaxis.type: datetime
          stroke:
            width: 1
            curve: smooth
        series:
          - entity: sensor.inverter_power
            group_by:
              func: avg
              duration: 5min
          - entity: sensor.feedin_power
            group_by:
              func: avg
              duration: 5min
          - entity: sensor.load_power
            group_by:
              func: avg
              duration: 5min
  - type: horizontal-stack
    cards:
      - type: custom:apexcharts-card
        header:
          show: true
          title: Yield Daily
          show_states: true
          colorize_states: true
        apex_config:
          chart:
            height: 350
            zoom:
              type: x
              enabled: true
              autoScaleYaxis: false
            toolbar:
              show: true
              autoSelected: zoom
            xaxis.type: datetime
        series:
          - entity: sensor.yield_energy_daily
            type: column
            group_by:
              func: max
              duration: 24h
          - entity: sensor.exported_energy_daily
            type: column
            group_by:
              func: max
              duration: 24h
          - entity: sensor.selfuse_energy_daily
            type: column
            group_by:
              func: max
              duration: 24h
        graph_span: 8d
        span:
          end: day
type: vertical-stack

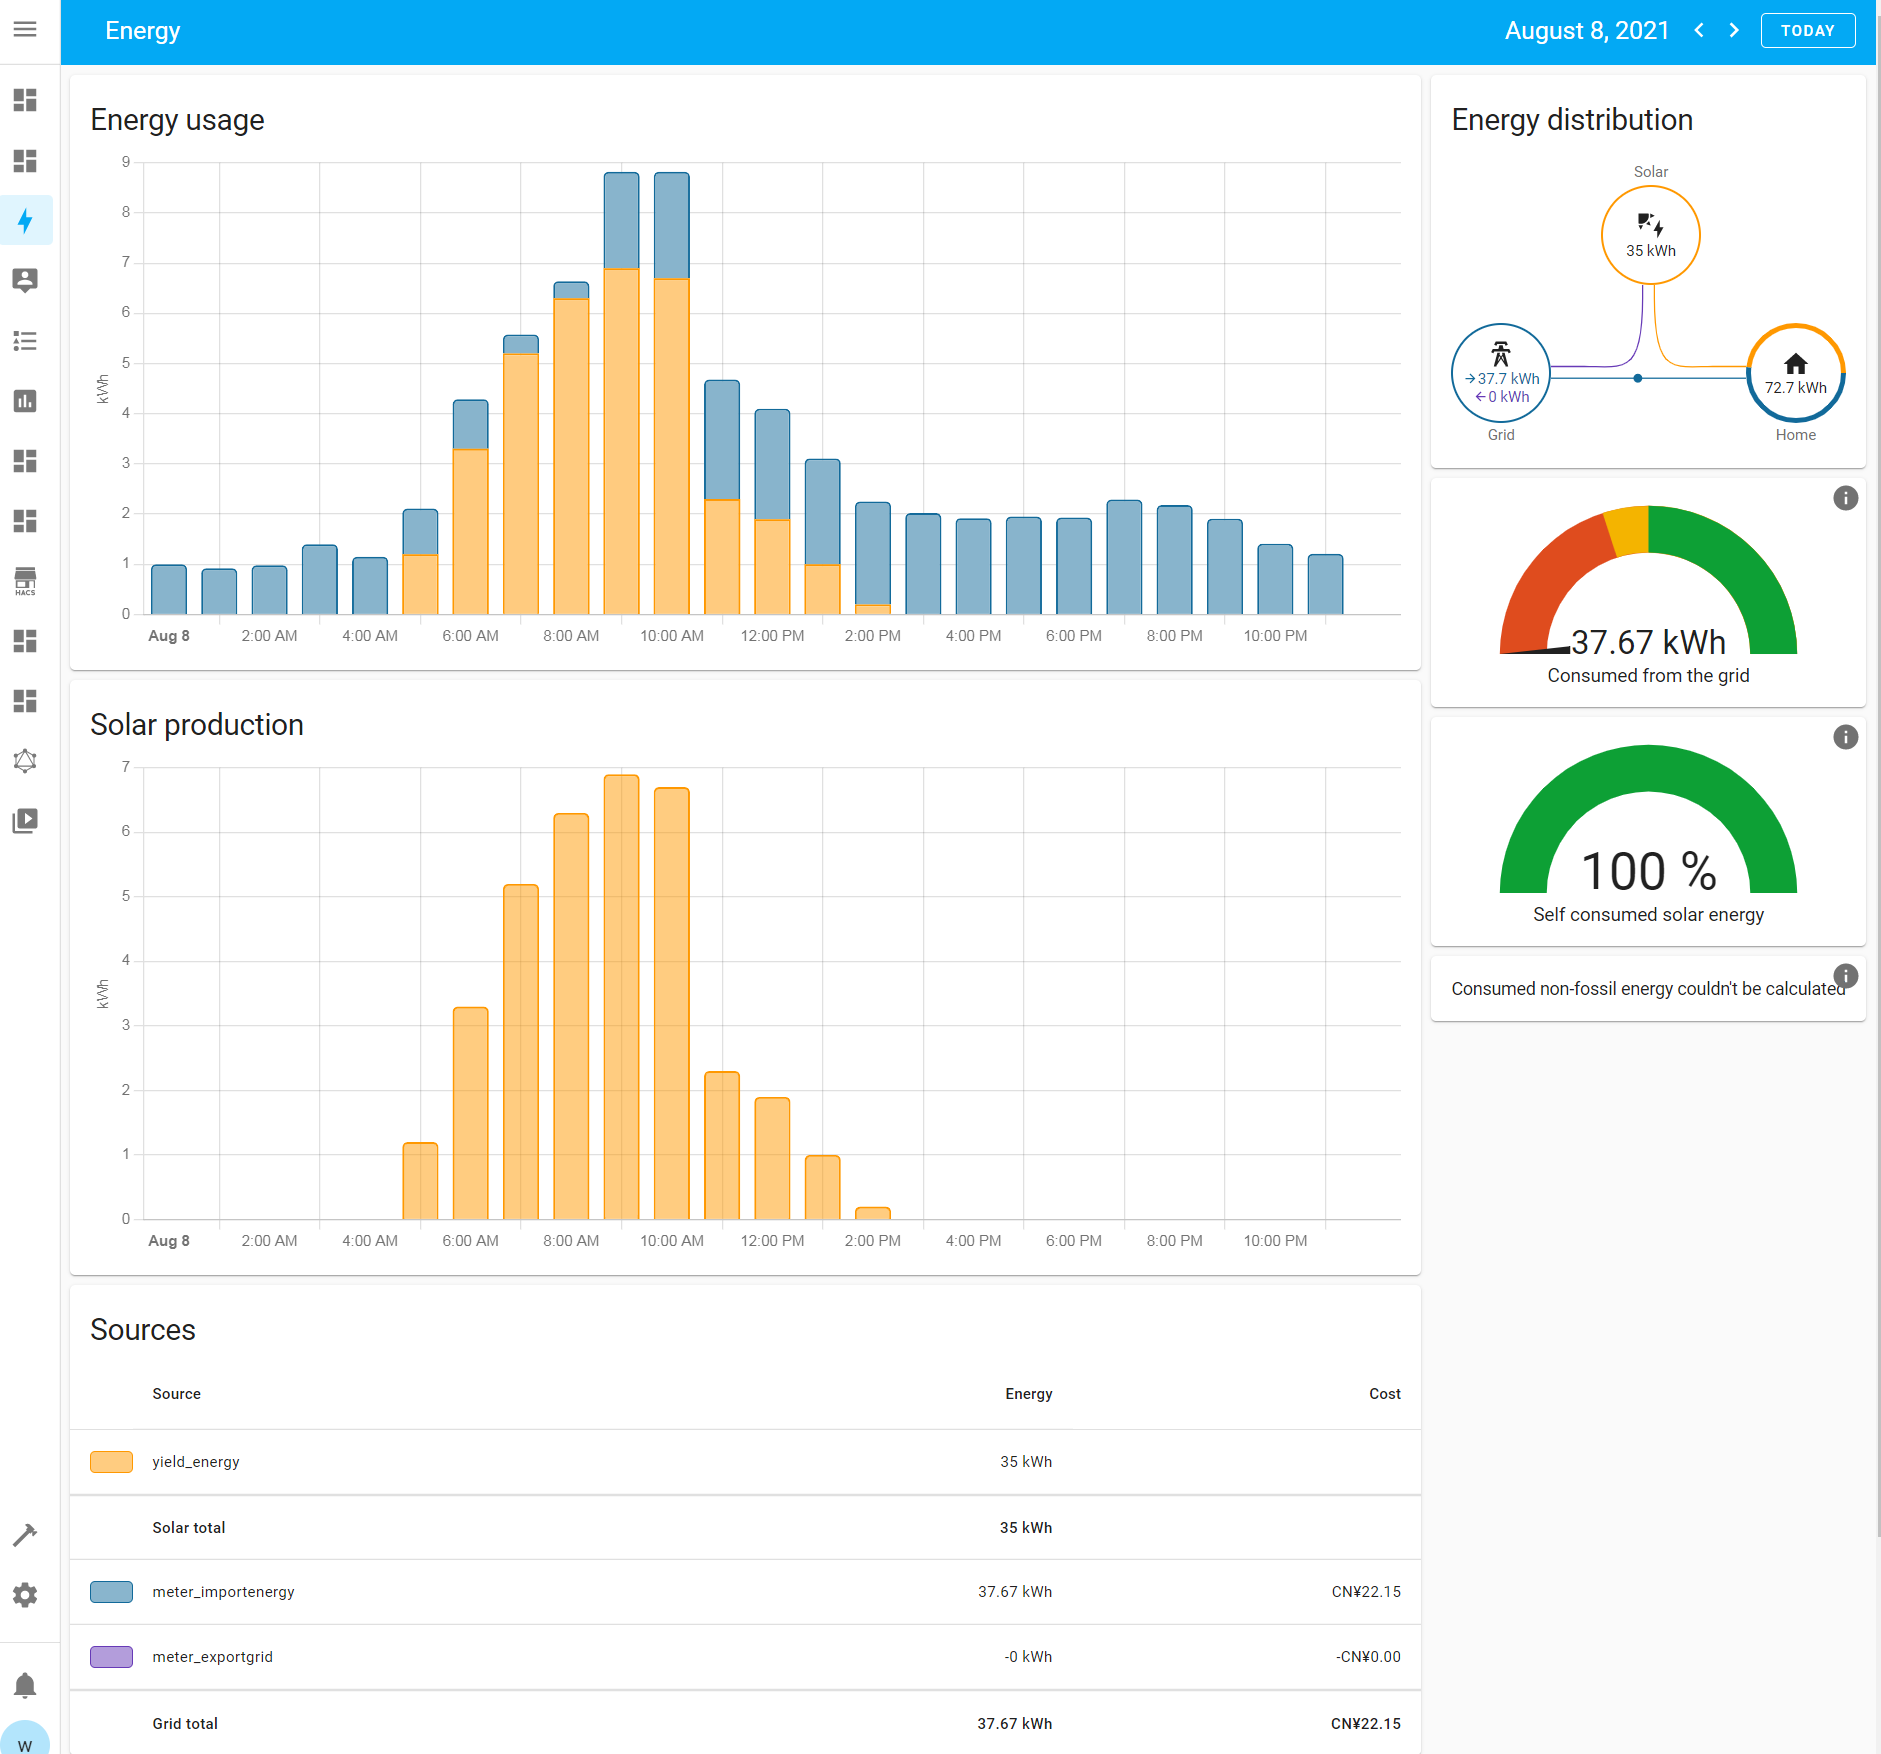
Energy management in HA
Energy management is the new feature that HA released recently.
You can try this effect in this URL
http://ha.iammeter.com:18123/energy
username: iammeter
password: iammeter

Comparing to the classic method(use Lovelace), this method is easier.
Because the energy management is a new feature, if the energy meter you selected has not had time to merge their new code to HA to support such feature(there is so much PR in HA repository now, so the merging is a little difficult), you can try this compromised method.
Add the following code to your configuration.yaml file,
please note,the naming of “energy”, “importenergy” and " exportgrid" are also use the WEM3080T as an example.
If you use other energy meters, please change these according to their definition in HA integration.
# Since HA 2021.09
# Example configuration.yaml entry

homeassistant:
  customize_glob:
    sensor.*_energy:
      last_reset: '1970-01-01T00:00:00+00:00'
      device_class: DEVICE_CLASS_ENERGY
      state_class: total_increasing
    sensor.*_importenergy*:
      last_reset: '1970-01-01T00:00:00+00:00'
      device_class: DEVICE_CLASS_ENERGY
      state_class: total_increasing
    sensor.*_exportgrid*:
      last_reset: '1970-01-01T00:00:00+00:00'
      device_class: DEVICE_CLASS_ENERGY
      state_class: total_increasing
Then you can use the energy management in HA now.


You will see the effect after saving for 2 hours.
what is more
Has someone controlled the ocpp charger to consume the excess solar output?

four ways (MQTT ,modbus/tcp, core integration,HACS) to integrate IAMMETER Energy monitor into the Home assistant
Request the data of energy meter in Home Assistant(modbus/tcp), trigger the Sonoff in realtime
Integrate a three-phase energy meter into Home assistant by Modbus TCP (over Wi-Fi)
Beginner tutorial: how to use a Wi-Fi energy meter in the home assistant
Set the TOU(Time of Use) billing mode in the Home assistant
Set the tiered rate billing in the home assistant
How do find the power meter with regard to your requirements
About WEM3050T
WEM3050T is the latest product of IAMMETER that will be released on Oct 2023.
It is a 2P ,din-rail ,WiFi, 3phase energy meter, which is more compact than WEM3080T(4P,din-rail).
For more details,please refer to
It has nearly all of the features of WEM3080T,but does not have the cloud service of IAMMETER by default.Because there is no IAMMETER-cloud service by default, the price would be cheaper than WEM3080T. If you only use the energy meter in Home assistant ,the WEM3050T would be more properly

