monitor
TL;DR: Bluetooth-based passive presence detection of beacons, cell phones, and any other bluetooth device. The system is useful for mqtt-based home automation.
Script here. Read the README here.
Comparing presence.sh and monitor.sh
Thank you to everyone for helping test and provide input in the original thread. I am very pleased to announce a major major update that many of you already know about… monitor.sh as an alternative to, and in many ways a dramatic improvement over, presence.sh
Here’s a quick comparison chart:
| Feature | presence |
monitor |
|---|---|---|
| Phones/watches/laptops detection |  |
|
| Generic Beacon Detection detection |  |
|
| iBeacons detection | |
|
| RSSI (when available) reporting | |
|
| Raw data bytes of BTLE advertisement reporting | |
|
| Reduced 2.4GHz Wi-Fi Interference | |
|
| Interval-triggered name scanning | |
|
| Advertisement-triggered name scanning | |
|
| MQTT-triggered name scanning | |
|
| MQTT-triggered name scanning ONLY | |
|
| Bash script of ridiculous length | |
|
| HA Forum Discussion | Link | Link |
Why do you care?
Here’s the problem I faced - all presence detection options I tried didn’t work reliably for my family.
The various GPS-based options (e.g., OwnTracks, iOS App, HomeKit, etc.) periodically would stop working if an app on our phones crashed. Plus the minimum radius for ‘home’ or ‘away’ was often way larger than our house. I would register as ‘home’ when I was on a dog walk a few blocks away. Not great.
Similarly, the Wi-Fi options (e.g., nmap, ubiquiti, etc.) were neither fast nor reliable because we have iOS devices that disconnect to save battery. Plus, our ubiquiti APs did not report a disconnect for quite some time - in some cases, fifteen minutes or more. Yes, I know we can configure timeouts, but that was not workable either. Still too slow. Also, the phones would disconnect when charging at night. Bad.
Also, Bluetooth LE options (e.g., Happy Bubbles, built-in bluetooth presence sensor, Radius Networks Script, room-assisant, etc.) either required BTLE tags ($$$ + regular battery changes), were limited to detection within bluetooth’s range, or became expensive to implement (five happy bubbles + btle tags = ~$180). Don’t get me wrong, I love the happy bubbles stuff and that project is awesome. But for us, it did not work reliably enough to justify the cost. Plus, the server spammed the mqtt broker and slowed Home Assistant down. Not good.
In sum, these were the problems I had when implementing the current presence solutions:
- Too slow to respond (wifi)
- Too unreliable (GPS, wifi, btle)
- Too expensive (happy bubbles + btle tags)
- Too big of a radius defining my ‘home’ (GPS, wifi)
- Too small of a radius (happy bubbles)
- False positives and false negatives. Switching from home to away when we are at the house is not ok. Similarly, a false positive when we are not home is a huge problem. (GPS)
I wanted a cheaper solution that would meet these specs:
- Fast to respond. Arrival should be recognized in no more than 5-10 seconds when I’m on the curb or in the garage.
- Reliable without adding anything to my wife’s phone or keychain or purses. Should work without her caring or knowing that it’s working.
- Cheap. Less than $50 for the house would be awesome.
- Tight radius around the house. When I’m at at the curb walking the dog, I should be marked as ‘away’.
- Respond to BTLE devices too
Summary
A JSON-formatted MQTT message is reported to a specified broker whenever a specified bluetooth device responds to a name query. Optionally, a JSON-formatted MQTT message is reported to the broker whenever a public device or an iBeacon advertises its presence. A configuration file defines ‘known_static_addresses’. These should be devices that do not advertise public addresses, such as cell phones, tablets, and cars. You do not need to add iBeacon mac addresses into this file, since iBeacons broadcast their own UUIDs consistently.
Oversimplified Analogy of the Bluetooth Presence Problem
Imagine you’re blindfolded in a large room with other people. We want to find out who of your friends is there and who of your friends isn’t there:

Some of the people in the room periodically make sounds (e.g., eating a chip, sneeze, cough, etc.), others sit quietly and don’t make a sound unless you specifically ask for them by name, and still others periodically announce their own name out loud at regular intervals whether or not you want them to do that:

Here’s the problem. You can’t just shout “WHO’S HERE” because then everyone would say their name at the same time and you couldn’t tell anything apart. That won’t work. Obviously, you also can’t simply ask “WHO ISN’T HERE.” That’s a pretty foolish suggestion…
So, what about taking attendance like in a classroom? Great idea! Everyone in the room agrees beforehand to respond to an attendance call only when their own name is shouted. That way you can actually hear whether someone responds. Neat!
Since you’re blindfolded, you don’t know how big the room is. That means you have take attendance loudly because we don’t want our friends to not hear their name being called - taking attendance quietly simply won’t do.

Ok, now how can you figure out which of your friends are in the room? If your friends say a name out loud randomly (“Alan!”) it’s easy to know if they’re present or absent - all you have to do is listen for them in the din of the crowd. For most of your friends though, you need to take attendance from a list shouting names one at a time. All other sounds you hear in the room are totally anonymous … you have no idea who made what sound.
So, one way to take attendance is to shout for each friend on a list by name, one at a time, repeatedly. Shout, get a response, wait for a moment, and ask again.
Once a friend stops responding (for some period of time), you presume that he or she has left:
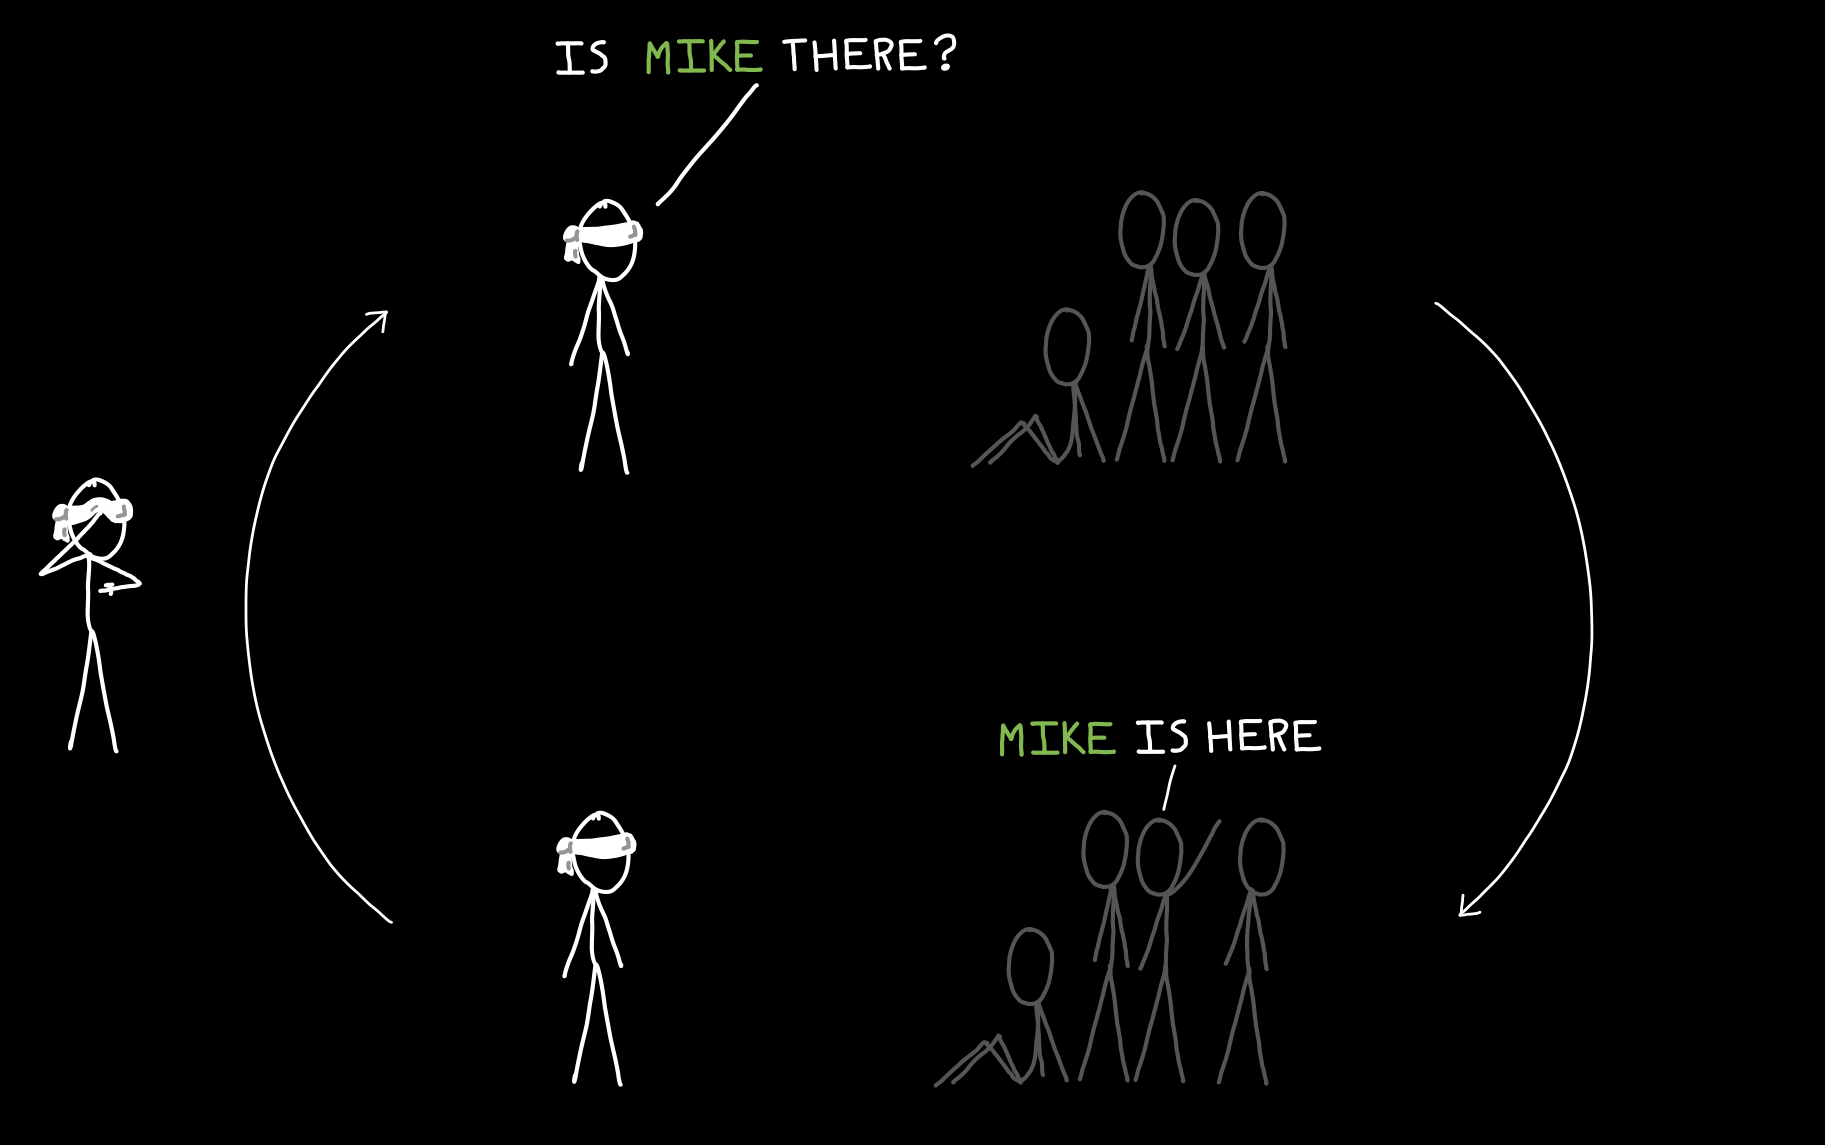
This technique should work just fine, but there’s a problem. You’re constantly shouting into the room, which means that it’s difficult for you to hear quiet responses and it’s difficult for other people to carry on conversations. What else can we do?
A smarter approach is to wait for an anonymous sound, then start asking whether your friend is there:

This technique is a very simplified description of how montior works for devices like cell phones (friends on a list) and beacons (announce a name out loud). This also gives an idea of how monitor uses anonymous sounds to reduce the number of times that it has to send inquiries into the Bluetooth environment.
Background on BTLE
The BTLE 4.0 spec was designed to make connecting bluetooth devices simpler for the user. No more pin codes, no more code verifications, no more “discovery mode” - for the most part.
It was also designed to be much more private than previous bluetooth specs. But it’s hard to maintain privacy when you want to be able to connect to an unknown device without substantive user intervention, so a compromise was made.
The following is oversimplified and not technically accurate in most cases, but should give the reader a gist of how monitor determines presence.
Connectable Devices
BTLE devices that can exchange information with other devices advertise their availability to connect to other devices, but the “mac” address they use to refer to themselves will be random, and will periodically change. This prevents bad actors from tracking your phone via passive bluetooth monitoring. A bad actor could track the random mac that your phone broadcasts, but that mac will change every few moments to a completely different address, making the tracking data useless.
Also part of the BTLE spec (and pre-LE spec) is a feature called a name request. A device can request a human-readable name of a device without connecting to that device but only if the requesting device affirmatively knows the hardware mac address of the target device. To see an example of this, try to connect to a new bluetooth device using your Android Phone or iPhone - you’ll see a human-readable name of devices around you, some of which are not under your control. All of these devices have responded to a name request sent by your phone (or, alternatively, they have included their name in an advertisement received by your phone).
Beacon Devices
The BTLE spec was used by Apple, Google, and others to create additional standards (e.g., iBeacon, Eddystone, and so on). These “beacon” standards didn’t care that the MAC addresses that were periodically broadcast were random. Instead, these devices would encode additional information into the broadcast data. Importantly, most devices that conform to these protocols will consistenly broadcast a UUID that conforms to the 8-4-4-4-12 format defined by IETC RFC4122.
Using Advertisements to Trigger "Name" Scans
So, we now know a little bit more about ‘name’ requests which need a previously-known hardware mac address and ‘random advertisements’ which include ostensibly useless mac addresses that change every few moments.
To see these things in action, you can use hcitool and hcidump. For example, to see your phone respond to a ‘name’ request, you can type this command:
hcitool name 00:00:00:00:00:00
Of course, replace your hardware bluetooth mac address with the 00:00… above.
To see your phone’s random advertisements (along with other random advertisements), you will need to launch a bluetooth LE scan and, separately, monitor the output from your bluetooth radio using hcidump
sudo hcitool lescan &
sudo hcidump --raw
This command will output the raw BTLE data that is received by your bluetooth hardware while the hcidump process is operating. Included in this data are ADV_RAND responses.
Knowing this, we can explain to the differences between presence and monitor.
The presence script, with default settings, requests a name from your owner devices at regular intervals. You can adjust those intervals, but your pi will be regularly ‘pinging’ for each owner device. The longer your intervals, the slower the system will be to respond. The shorter the intervals, the more quickly the system will respond, but the more 2.4GHz bandwidth is used. In other words, the more often presence scans, the more likely it is that presence will interfere with 2.4GHz Wi-Fi. The more devices running presence, the more interference. This is a huge bummer for home with 2.4GHz Wi-Fi and other Bluetooth devices (especially older or cheaper devices). Below is a simplified flowchart showing the operation of presence:

On the other hand, the monitor script, with default settings, will only request a name from your owner device after a new random advertisement is detected. If there are no devices that randomly advertise, monitor will never scan for new devices, clearing 2.4GHz spectrum for Wi-Fi use. The monitor script will also detect and report the UUID of nearby iBeacons. Below is a simplified flowchart showing the operation of monitor, showing the flows for both detection of arrival and detection of departure:

Example with Home Assistant
I have three raspberry pi zero w throughout the house. We spend most of our time on the first floor, so our main ‘sensor’ is the first floor. Our other ‘sensors’ on the second and third floor are set up to trigger only, with option -t.
The first floor constantly monitors for advertisements from generic bluetooth devices and ibeacons. The first floor also monitors for random advertisements from other bluetooth devices, which include our phones. When a “new” random device is seen (i.e., an advertisement is received), the first floor pi then scans for the fixed address of our cell phones. These addresses are are stored in the known_static_addresses file. If one of those devices is seen, an mqtt message is sent to Home Assistant reporting that the scanned phone is “home” with a confidence of 100%. In addition, an mqtt message is sent to the second and third floor to trigger a scan on those floors as well.
When we leave the house, we use either the front door or the garage door to trigger an mqtt trigger of [topic_path]/scan/depart after a ten second delay to trigger a departure scan of our devices. The ten second delay gives us a chance to get out of bluetooth range before a “departure” scan is triggered. Different houses/apartments will probably need different delays.
Home Assistant receives mqtt messages and stores the values as input to a number of mqtt sensors. Output from these sensors can be averaged to give an accurate numerical occupancy confidence.
For example (note that 00:00:00:00:00:00 is an example address - this should be your phone’s address):
- platform: mqtt
  state_topic: 'monitor/first floor/00:00:00:00:00:00'
  value_template: '{{ value_json.confidence }}'
  unit_of_measurement: '%'
  name: 'First Floor'

- platform: mqtt
  state_topic: 'monitor/second floor/00:00:00:00:00:00'
  value_template: '{{ value_json.confidence }}'
  unit_of_measurement: '%'
  name: 'Second Floor'

- platform: mqtt
  state_topic: 'monitor/third floor/00:00:00:00:00:00'
  value_template: '{{ value_json.confidence }}'
  unit_of_measurement: '%'
  name: 'Third Floor'
These sensors can be combined/averaged using a min_max. I use a max sensor, but mean may also be appropriate for certain implementations:
- platform: min_max
  name: "Home Occupancy Confidence of 00:00:00:00:00:00"
  type: max
  round_digits: 0
  entity_ids:
    - sensor.third_floor
    - sensor.second_floor
    - sensor.first_floor
Then I use the entity sensor.home_occupancy_confidence in automations to control the state of an input_boolean that represents a very high confidence of a user being home or not.
As an example:
- alias: Occupancy
  hide_entity: true
  trigger:
    - platform: numeric_state
      entity_id: sensor.home_occupancy_confidence
      above: 10
  action:
    - service: input_boolean.turn_on
      data:
        entity_id: input_boolean.occupancy
Conclusion
Thank you all for your patience and support over the course of this project. Please report all issues on github, but feel free to post here as well.
Extras
Please also see the awesome appdaemon script by @Odianosen25 here and another by @PianSom here and yet another, a hassio add-on by @Limych.
 Cheers