Introduction
This guide describes how to switch from the Z-Wave JS official add-on to the Z-Wave JS UI HA Community add-on, without losing any downtime caused by the re-interviewing of nodes.
In this guide, Z-Wave JS UI will henceforth be abbreviated as ZUI.
Who is this guide for?
This guide is for HAOS add-on users who have already installed the official Z-Wave JS add-on and the companion Z-Wave integration, and desire extra functionality that isn’t provided by HA, such as:
- Adding and removing node associations
- Replace failed nodes
- Network health diagnostics (testing and feature-full route map)
- Testing device config firmware files
- An alternate configuration UI
- Advanced driver code execution
- etc.
If you are not using HAOS, this guide is not for you.
When to use this guide?
The official instructions for switching add-ons are available in the integration documentation (How to switch from Z-Wave JS to the Z-Wave JS UI add-on?) and are good enough for many users. Compare to the official documentation, this is a more detailed step-by-step guide that has an additional benefit of preserving the network information to avoid re-interviewing devices.
This guide is helpful when your network is very large, or you have many battery devices. If your network is small or you have very few battery devices, you can probably skip this and avoid the hassle.
It helps to know a little bit about how the Z-Wave JS driver works: when you add a new device to your network, the driver interviews the device for its identity and functionality. This information is permanently stored in a multiple cache files that are loaded each time the driver restarts. Without these cache files, after a restart the identity and functionality of the devices are lost until they are re-interviewed. During that time HA is unable to control or observe the devices. While mains-powered devices are always interviewed automatically on startup (this the information is recovered quickly), battery devices are only interviewed when they wake up. That could be hours or days depending on their configuration. You might have a battery device in the attic that is difficult to access, or your lock might be unreliable and fail interviews if the distance is too far, etc.
If you don’t want to re-interview the devices when switching add-ons, this guide is for you. When completed, from the perspective of HA there will be no difference.
Prerequisites
- Home Assistant OS (version 16 used in this guide)
- Home Assistant Core 2025.7.4 or newer required
- Z-Wave JS add-on v0.20.0 or newer required
- File editor add-on (v5.8.0 used in this guide)
- Terminal & SSH add-on (v9.18.0 used in this guide)
- You have read the How to switch from Z-Wave JS to the Z-Wave JS UI add-on? instructions in the official integration docs
- You have read the ZUI add-on installation instructions
The guide should work roughly the same on earlier or later versions of HAOS and HA Core, however screenshots and the locations of settings may change. The versions are noted here to mark when this guide was written.
There are no requirement outside of HAOS, but the above indicated add-ons are necessary.
If you do not understand the difference between integration and add-on, please refer to their definitions in the HA glossary.
Guide
Step 0.1: Install File editor add-on
Install the File editor add-on (see installation instructions for details).
The File editor add-on is used to download the Z-Wave JS cache files to your local PC.
Step 0.2: Install Terminal & SSH add-on
Install the Terminal & SSH add-on (see installation instructions)
The Terminal & SSH add-on is used to copy the Z-Wave JS cache files from the official add-on.
![]() In order to see this add-on in the Store to manually install you’ll need to enable Advanced mode in your user profile first. Clicking the link above will take you there regardless of the profile setting.
In order to see this add-on in the Store to manually install you’ll need to enable Advanced mode in your user profile first. Clicking the link above will take you there regardless of the profile setting.
You can also use the Community Add-on: Advanced SSH & Web Terminal (see docs) instead if you already have it installed, but these examples will show the official SSH add-on. The same commands can be used.
Step 0.3: Make a backup
Make a full backup of your installation, or a partial backup of the Z-Wave JS add-on, just in case.
Step 1.0: Save important Z-Wave JS configuration settings
Go to the Z-Wave JS add-on page: ![]()
Or manually go to: Settings → Add-ons → Z-Wave JS
Select the Configuration tab.
In the Options card select ... and Edit in YAML to see the configuration settings:
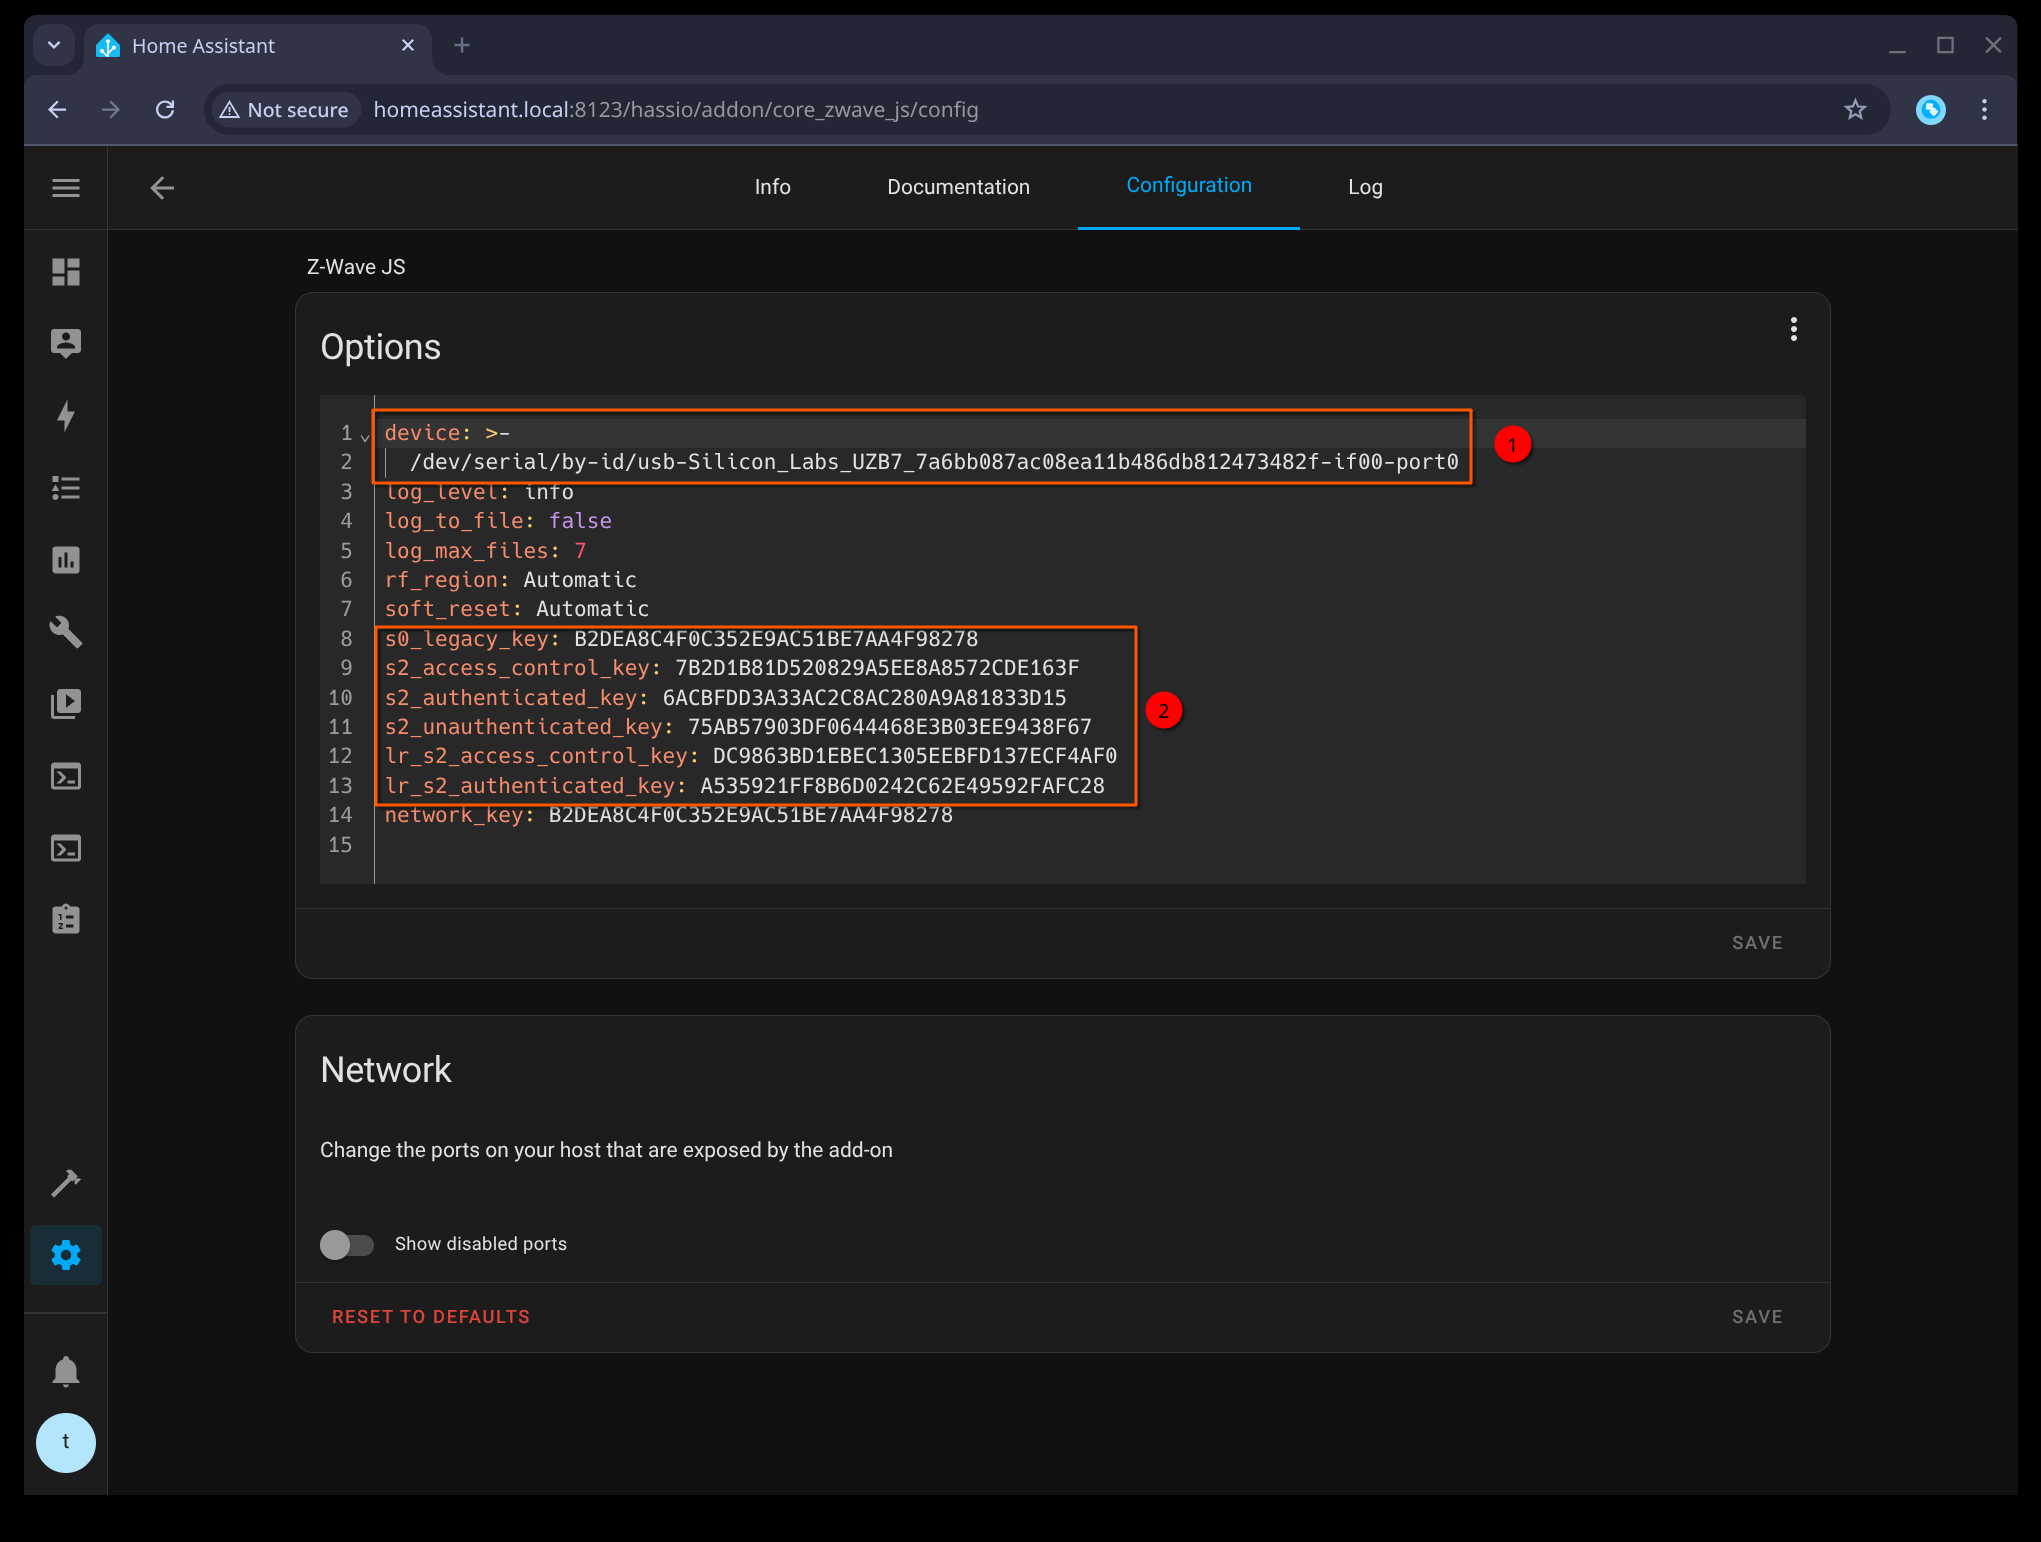
Copy the USB device path (1) and all security keys (can ignore network_key as it is a duplicate of s0_legacy_key) (2) somewhere safe, like a text file. These settings are will be required when configuring ZUI.
Step 1.1: Optionally export device names and locations
Both HA and ZUI have the ability to configure node (device) names and locations (areas). While names and locations in ZUI can affect the names in HA, it is not true in the opposite direction: any custom names and areas in HA will not automatically migrate to ZUI.
If you would like to migrate and name/area customization to ZUI, you’ll need to make a backup file to import into ZUI later.
Even if you skip this step, your device names and areas in HA will not be affected after the migration. This step is purely to import them into ZUI. If you have no interest in settings names/locations in ZUI you can skip this step. You can also perform this anytime in the future.
First, copy and paste this template code into the Dev Tools template editor:
![]()
{%- set ns = namespace(nodes=[], export={}) %}
{%- for dev_id in integration_entities('zwave_js') | map('device_id') | unique %}
  {%- set node_id = (device_attr(dev_id, 'identifiers') | first | last).split('-')[1] %}
  {%- set ns.nodes = ns.nodes + [(node_id | int, dev_id)] %}
{%- endfor %}
{%- for node_id, dev_id in ns.nodes | sort(attribute='0') %}
  {%- set node = {(node_id | string): {}} %}
  {%- set name = device_attr(dev_id, 'name_by_user') %}
  {%- set location = area_name(dev_id) %}
  {%- if name and location %}
    {%- set node = {(node_id | string): {"name": name, "loc": location}} %}
  {%- elif name %}
    {%- set node = {(node_id | string): {"name": name}} %}
  {%- elif location %}
    {%- set node = {(node_id | string): {"loc": location}} %}
  {%- endif %}
  {%- if node[(node_id | string)] | length > 0 %}
  {%- set ns.export = dict(ns.export.items(), **node) %}
  {%- endif %}
{%- endfor %}
{{ ns.export | to_json }}
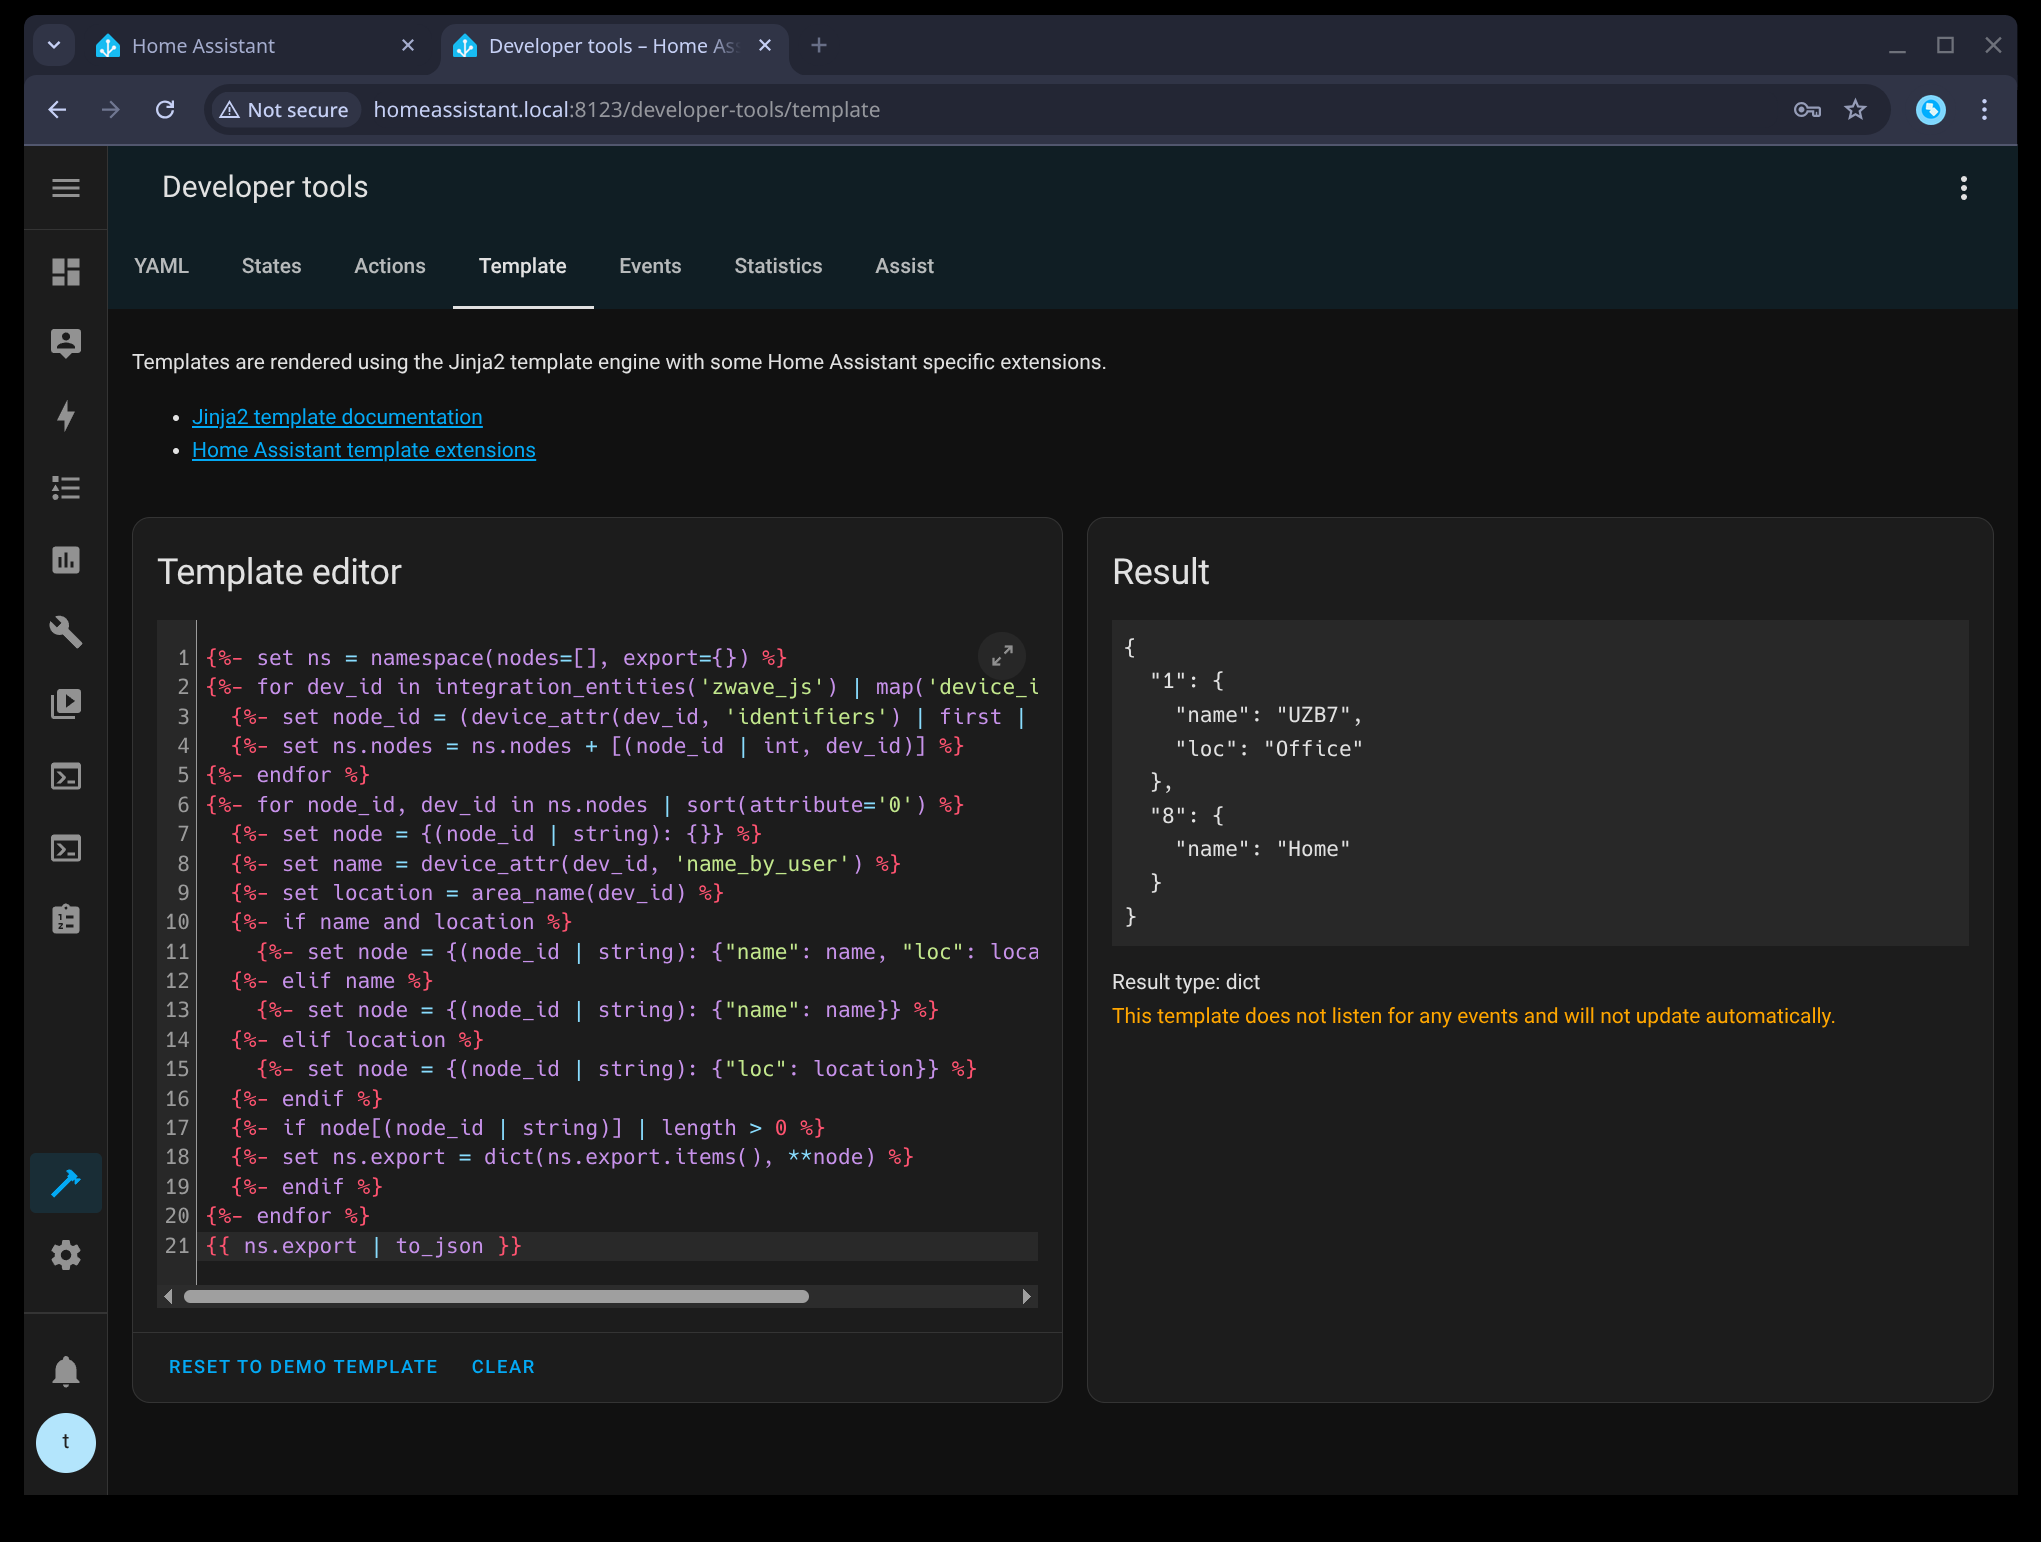
The output will be a JSON document with the node names and locations for the file format supported by ZUI, only for the nodes and fields that have been customized. Copy the resulting JSON text from the Result panel and save the contents into a file named nodes.json. Save this file for restoring into ZUI later.
Step 2: Disable the Z-Wave JS Integration
Open the Z-Wave integration page: ![]()
Or manually navigate the UI to: Settings → Devices & services → Z-Wave
Select ... → Disable, then select DISABLE on the next prompt.
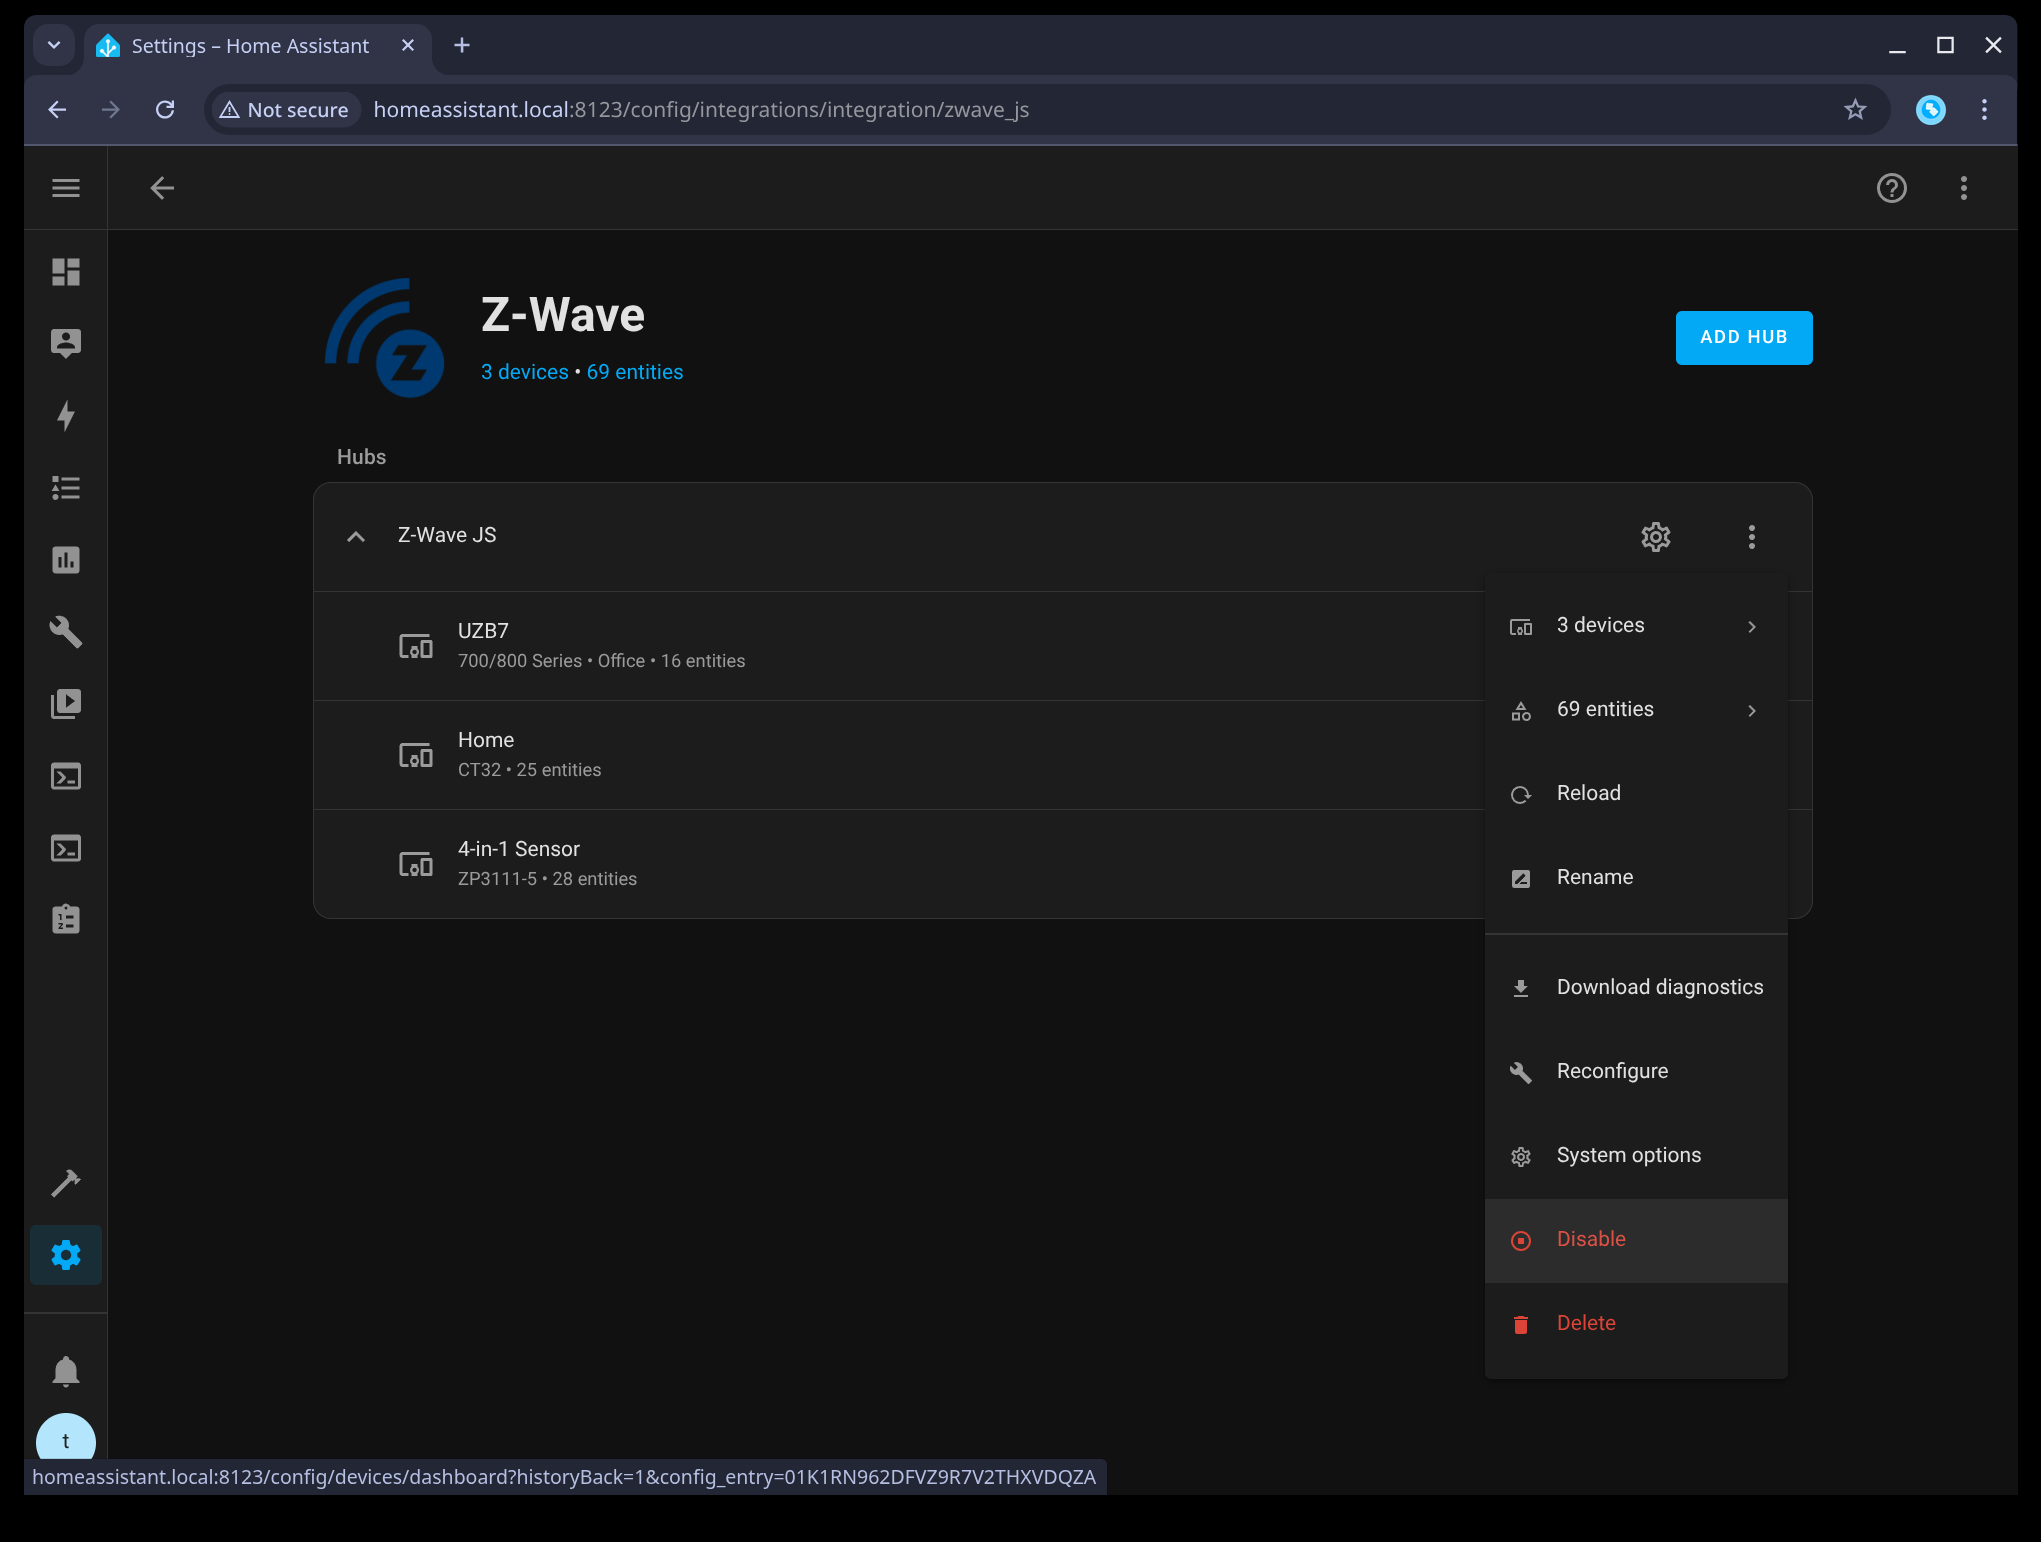
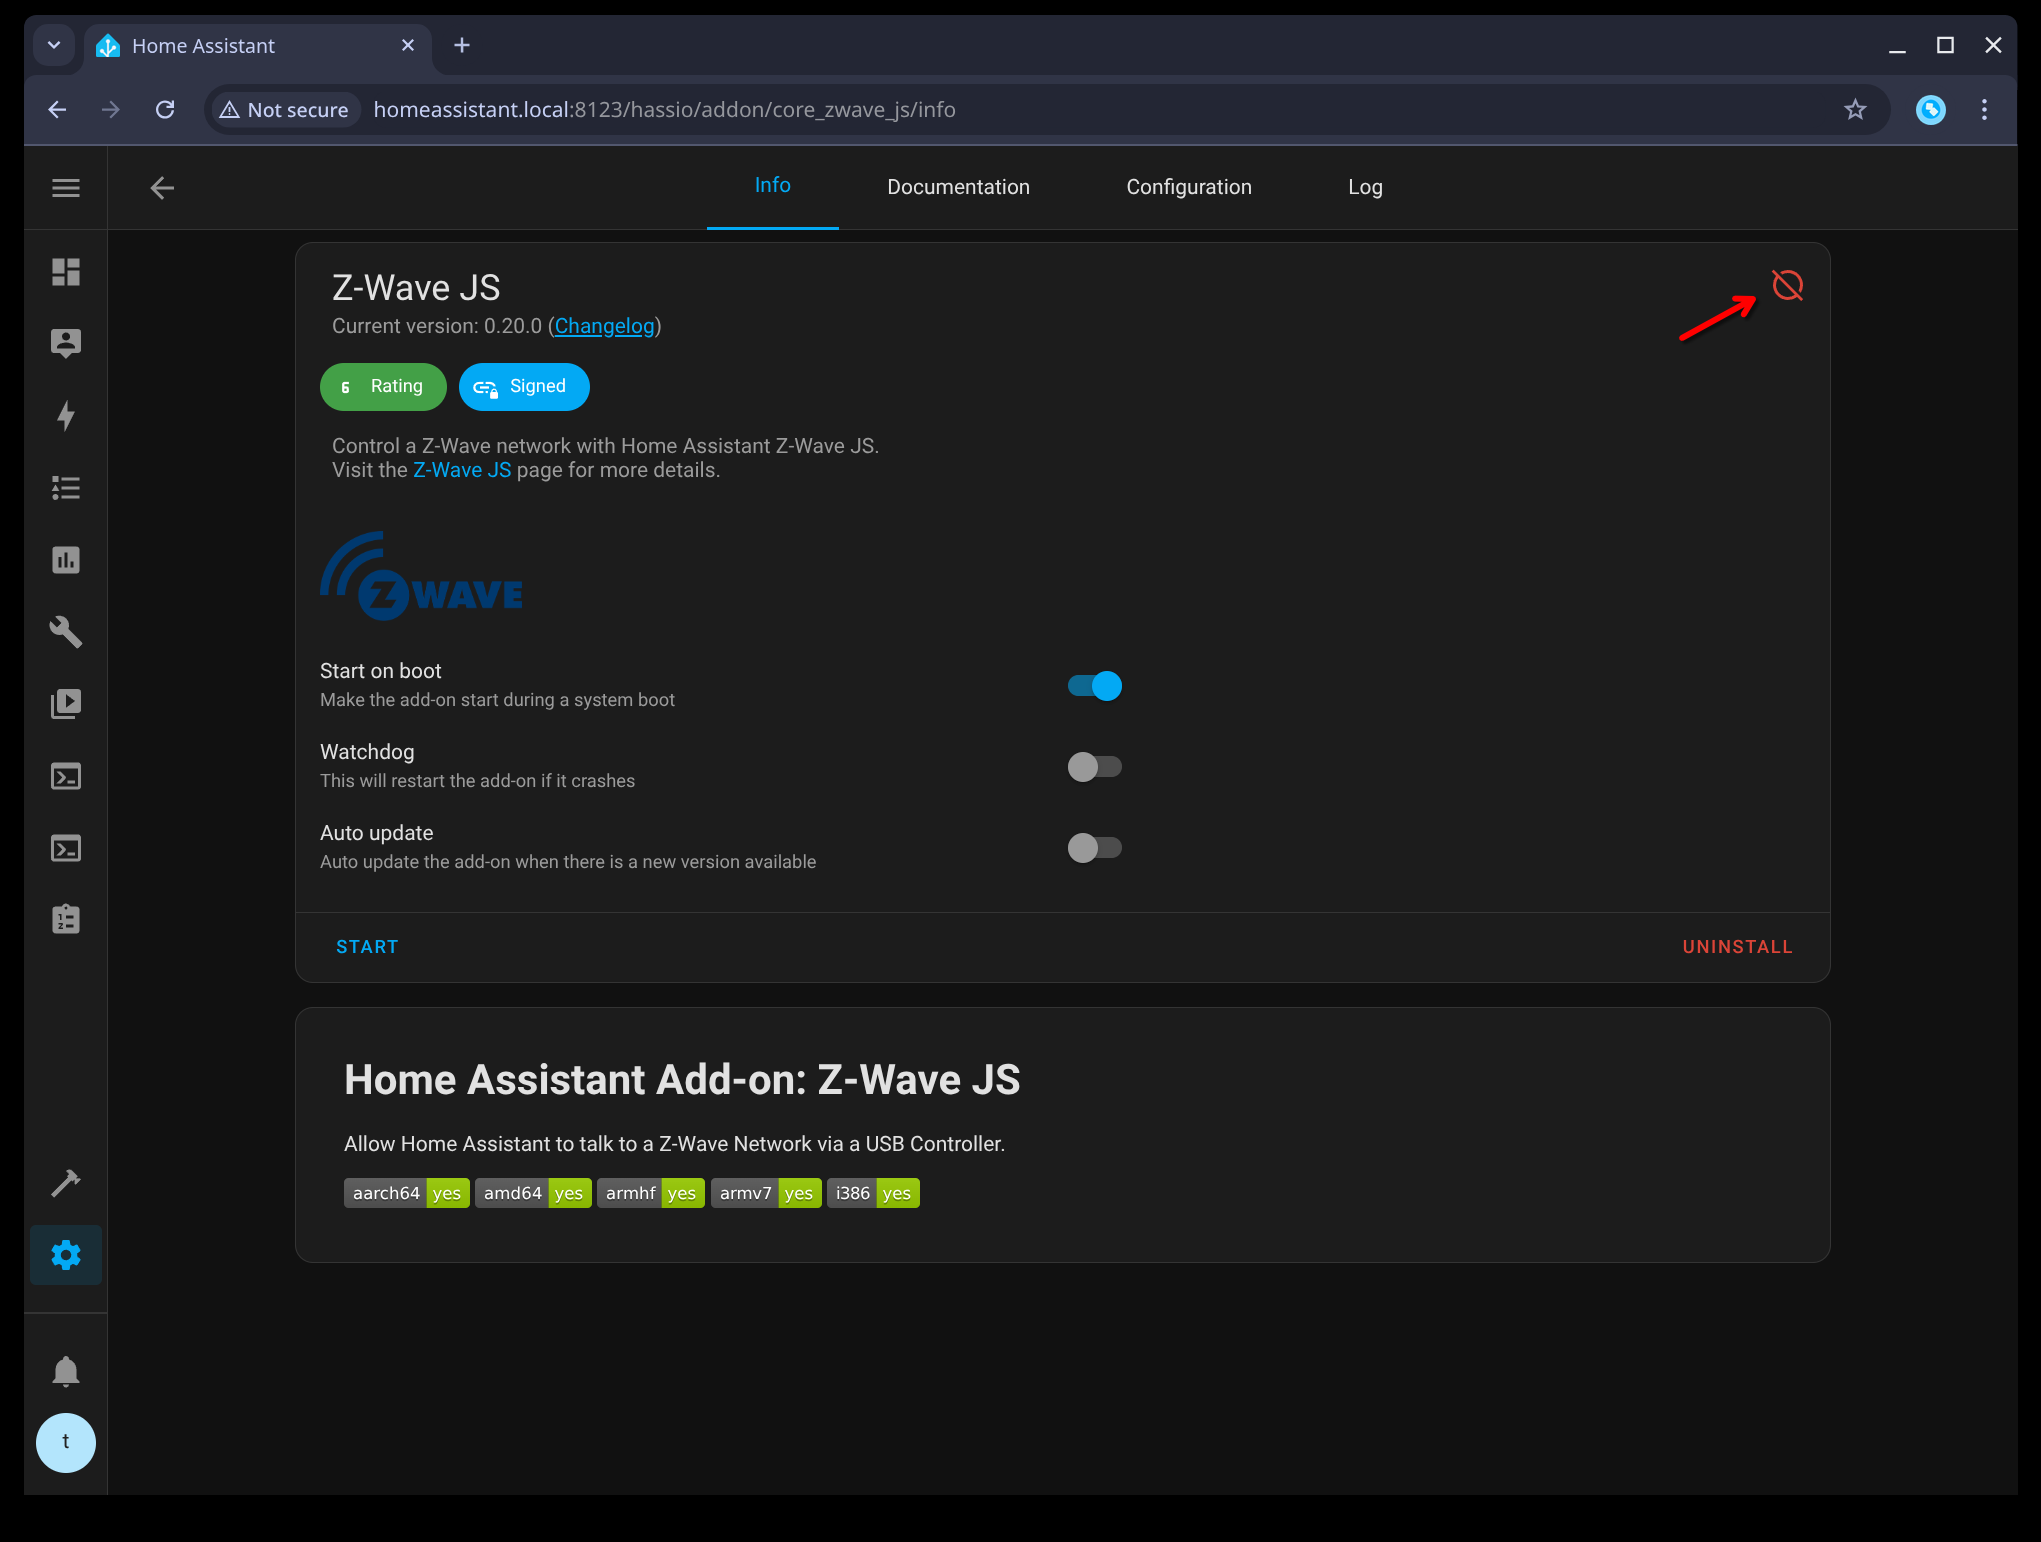
The Z-Wave JS add-on is automatically stopped as a result. Confirm this by going back to the add-on page and make sure it’s stopped, as indicated by the red dot. If it’s still running, click STOP. You may need to refresh the page first to see the correct status.
![]()
Step 3: Copy the Z-Wave JS cache files
Open the SSH web UI: ![]()
Or manually navigate the UI to: Settings → Add-ons → Terminal & SSH, and select OPEN WEB-UI.
You will enter a terminal prompt. Enter the following command (copy text and try using middle-mouse button to paste):
apk add zip && zip -j /homeassistant/zjs.zip /addon_configs/core_zwave_js/cache/*.jsonl
This will create a zjs.zip zip file in your HA config directory which contains the Z-Wave JS cache files.
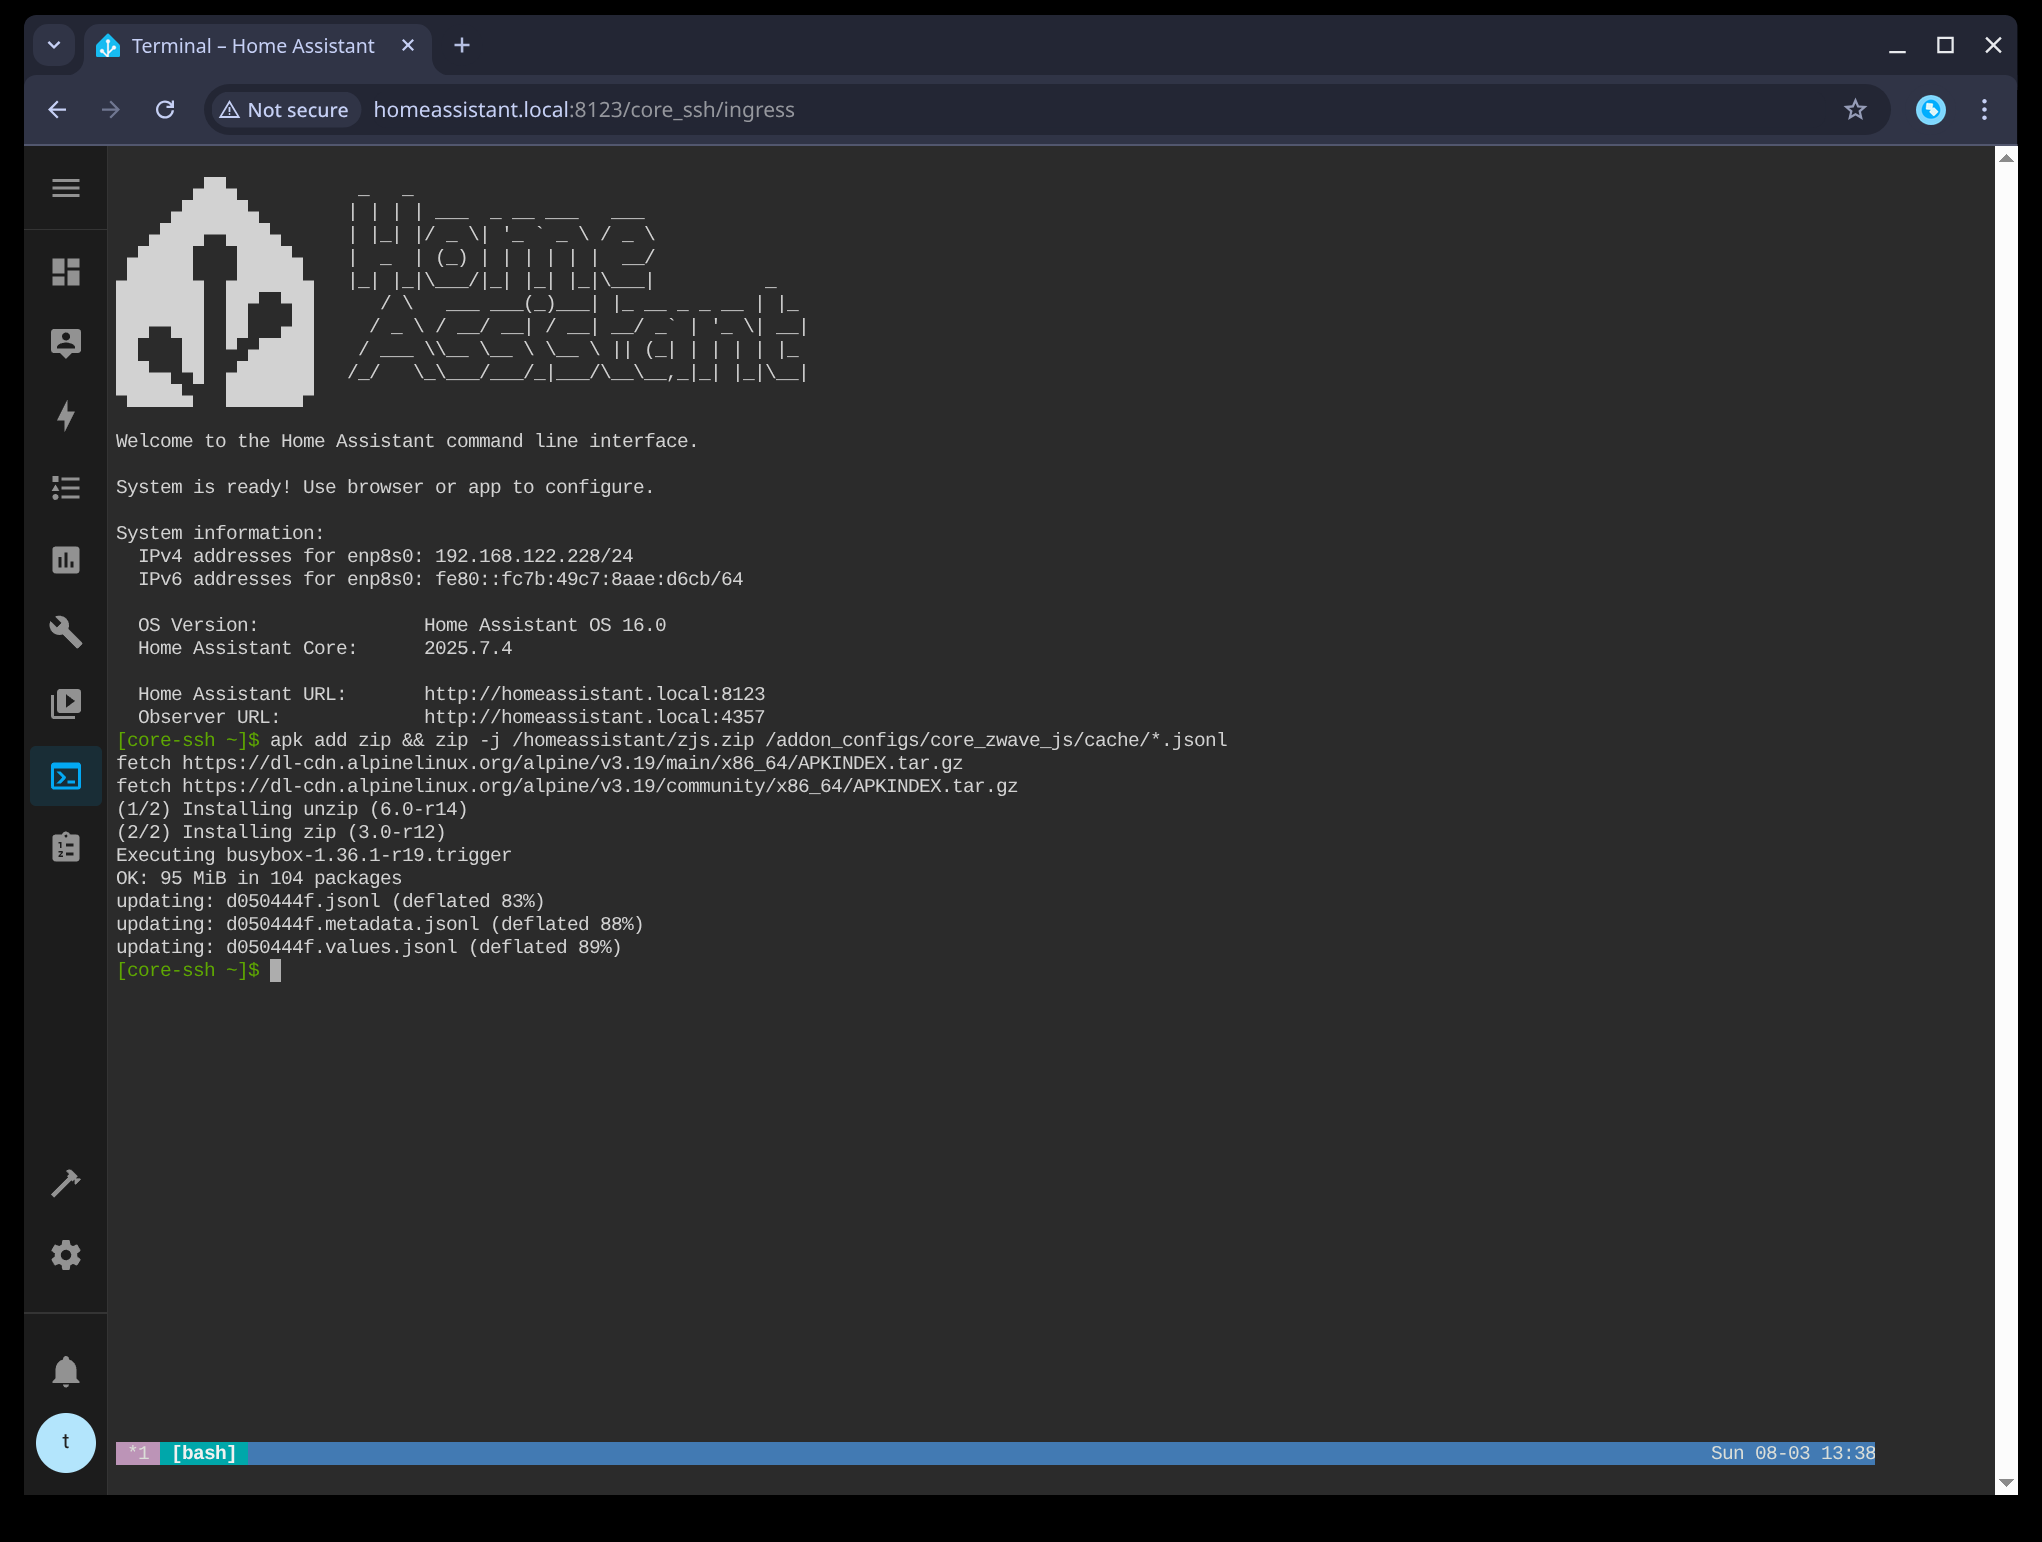
![]() The name of the
The name of the *.jsonl files are unique for every Z-Wave network.
Step 4: Download the Z-Wave JS cache zip file
We need to download the zip file created above to restore to ZUI later. We can use the File editor add-on to do this.
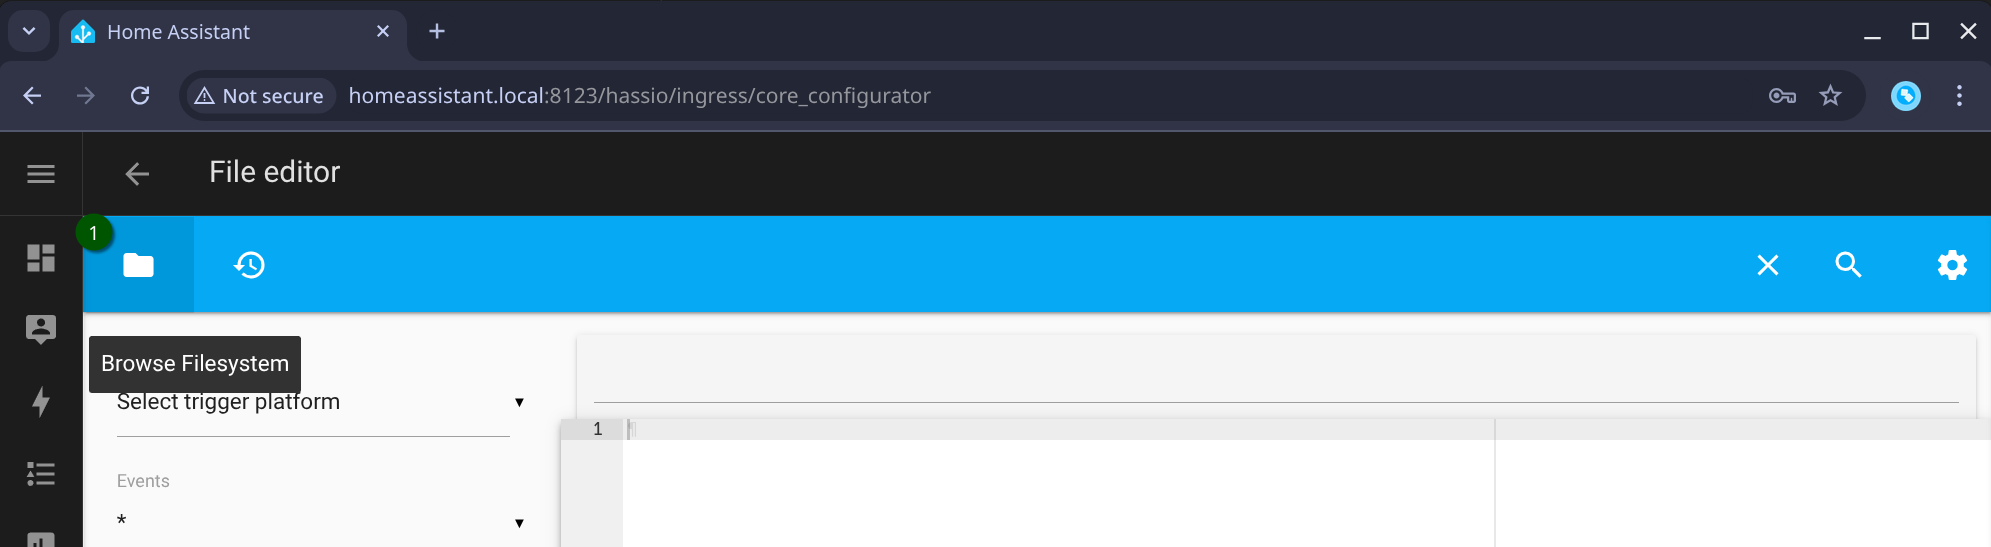
Open the File editor: ![]()
Or manually navigate the UI to: Settings → Add-ons → File editor and select OPEN WEB-UI.
Select the folder icon in the upper left (1) to show the files in your HA config directory.
Scroll down the directory listing and find the zjs.zip file we created previously. Select the ... next to the filename and Download.
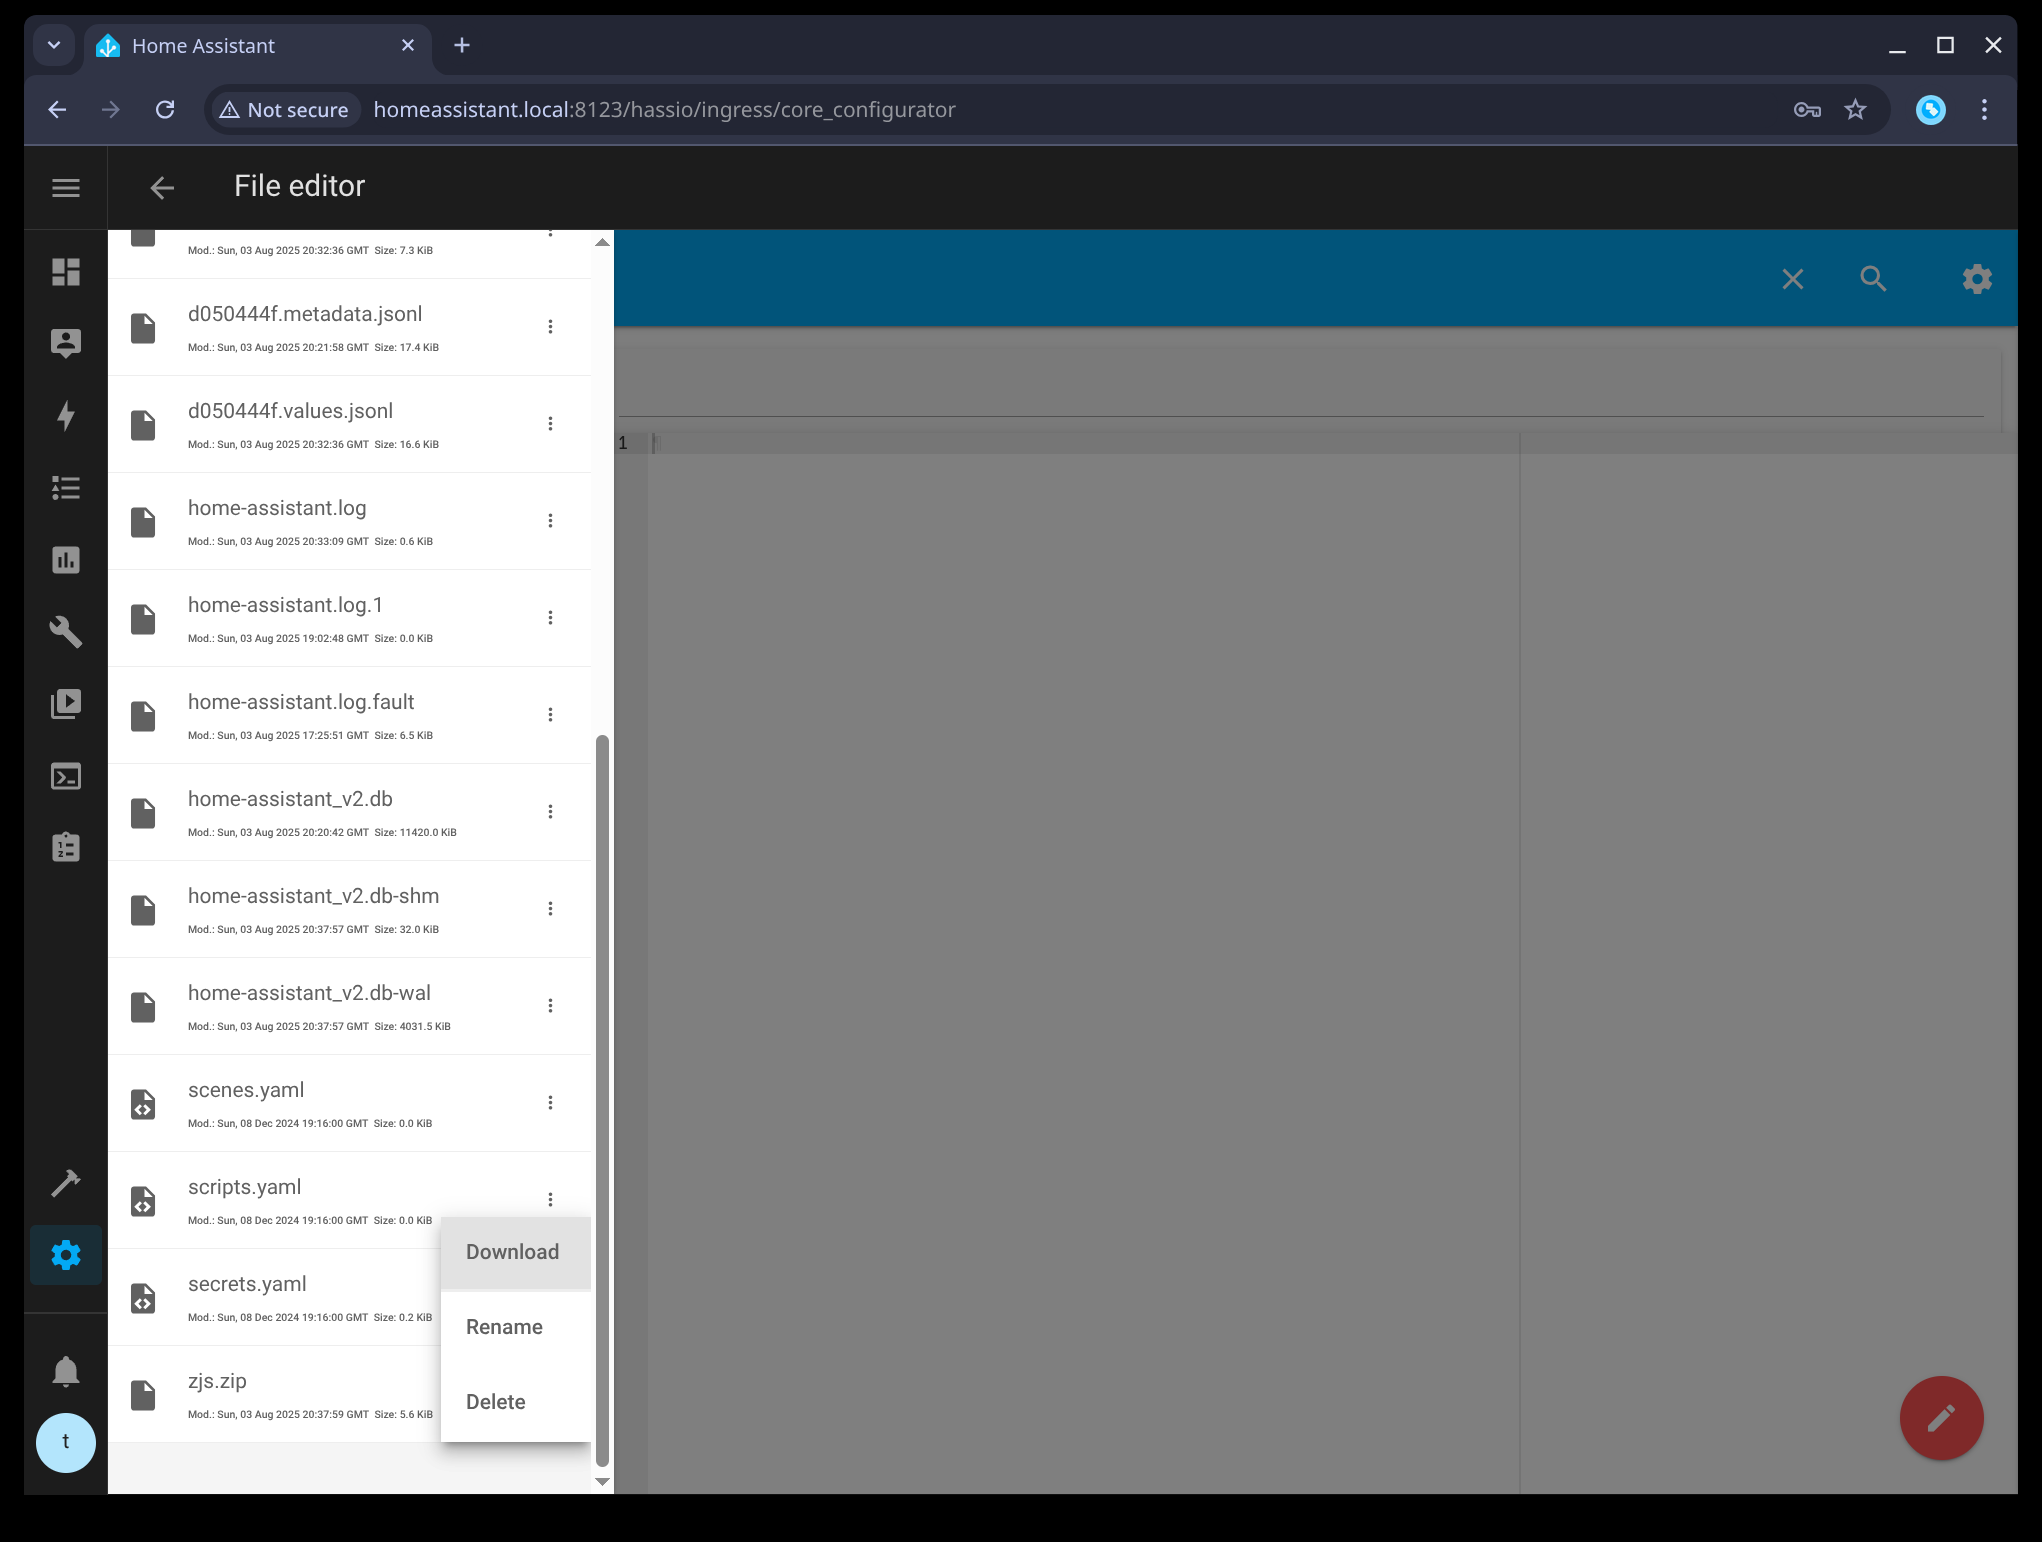
Make note of where you downloaded the zip file as you will need it later.
Step 5: Install ZUI add-on
Install the Z-Wave JS UI add-on but do not configure it yet. The current version of the add-on used here is v4.8.0. ![]()
Or manually go to: Settings → Add-ons → ADD-ON STORE, search for Z-Wave JS UI and select it.
- Select INSTALL to install it, this may take several minutes.
- Select START. You might need to refresh the add-on page to see it started.
- Select OPEN WEB UI to open the ZUI web UI, or click:

You will see an empty Control Panel page. ![]() Do not configure any settings yet!
Do not configure any settings yet!
Step 6: Import cache files into ZUI
We will import the Z-Wave JS cache files we downloaded in step 4. This is the crucial step that restores the Z-Wave network information in order to avoid re-interviewing devices. Make sure you are still in the ZUI web UI from step 5.
- Select the ≡ button at the top to the left of Control Panel
- Select the Store tab (folder icon) to go to Store browser. It will look like a file browser.
- Select the
 button (large blue gear button) at the bottom of the page
 - Select the green Restore button
- Select the Zip file field and pick the
zjs.zipfile downloaded earlier. - Select the RESTORE button.
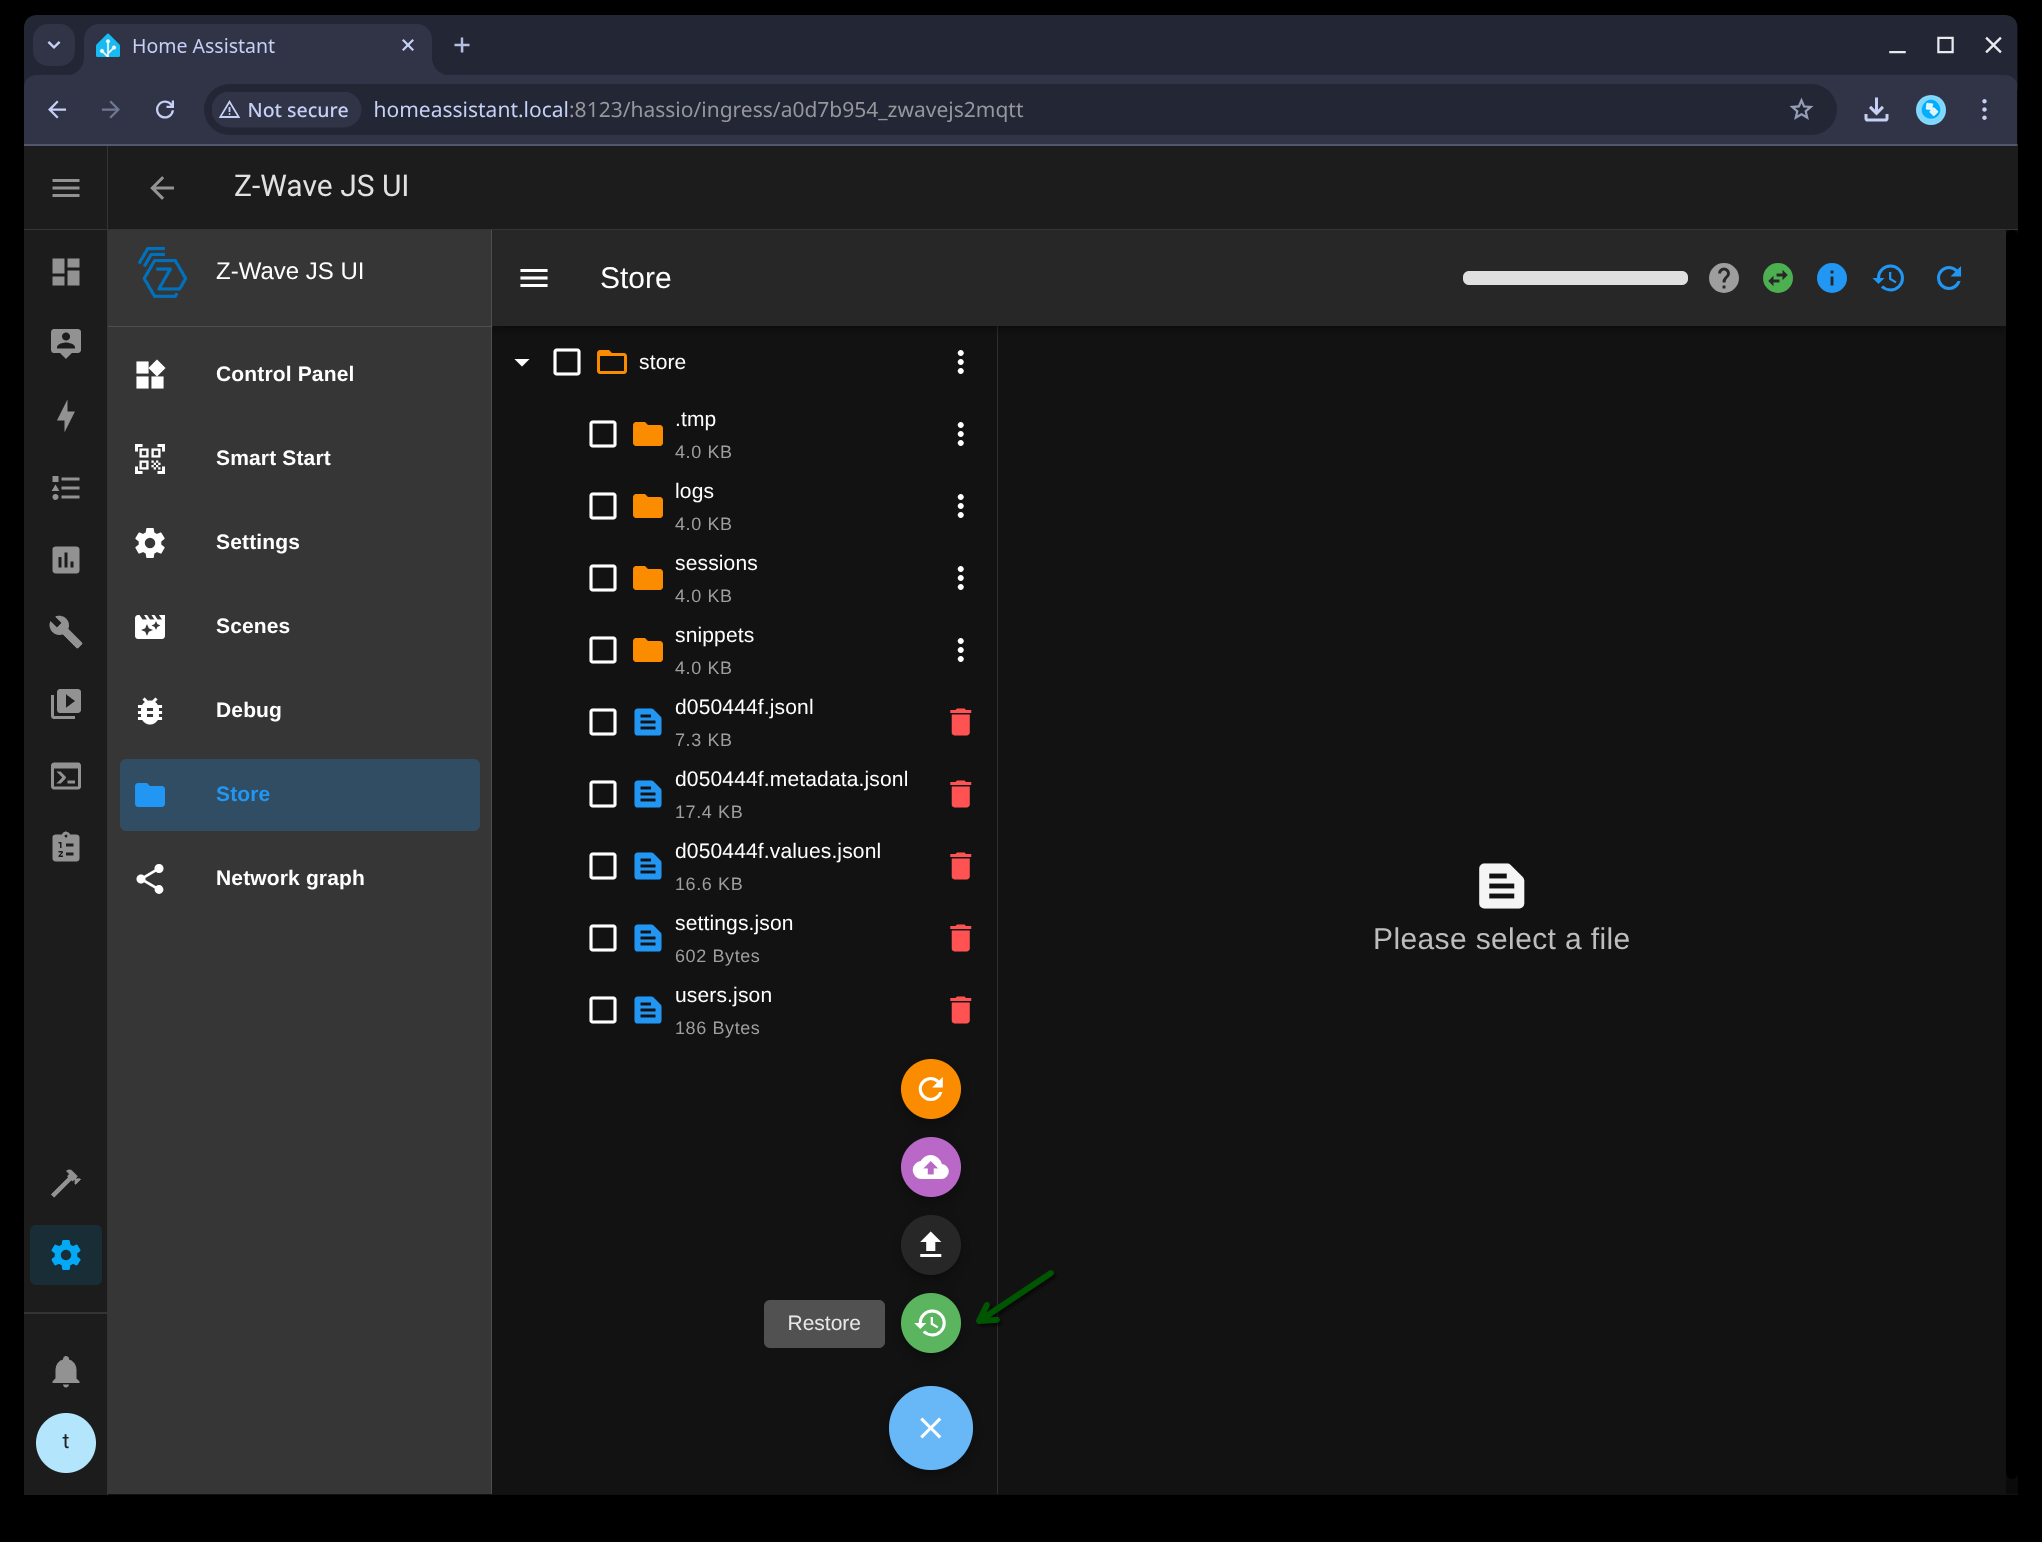

After the restore, you should immediately see all three of the .jsonl cache files in the Store browser.

Make sure this is the case before proceeding. If you want, you can click any file to inspect its contents.
Step 7: Configure ZUI
Make sure you are still in the ZUI web UI from steps 5 and 6.
Go to the Z-Wave settings:
- Select the Settings tab ( Gear icon)
- Expand the Z-Wave panel
Configure the Z-Wave settings:
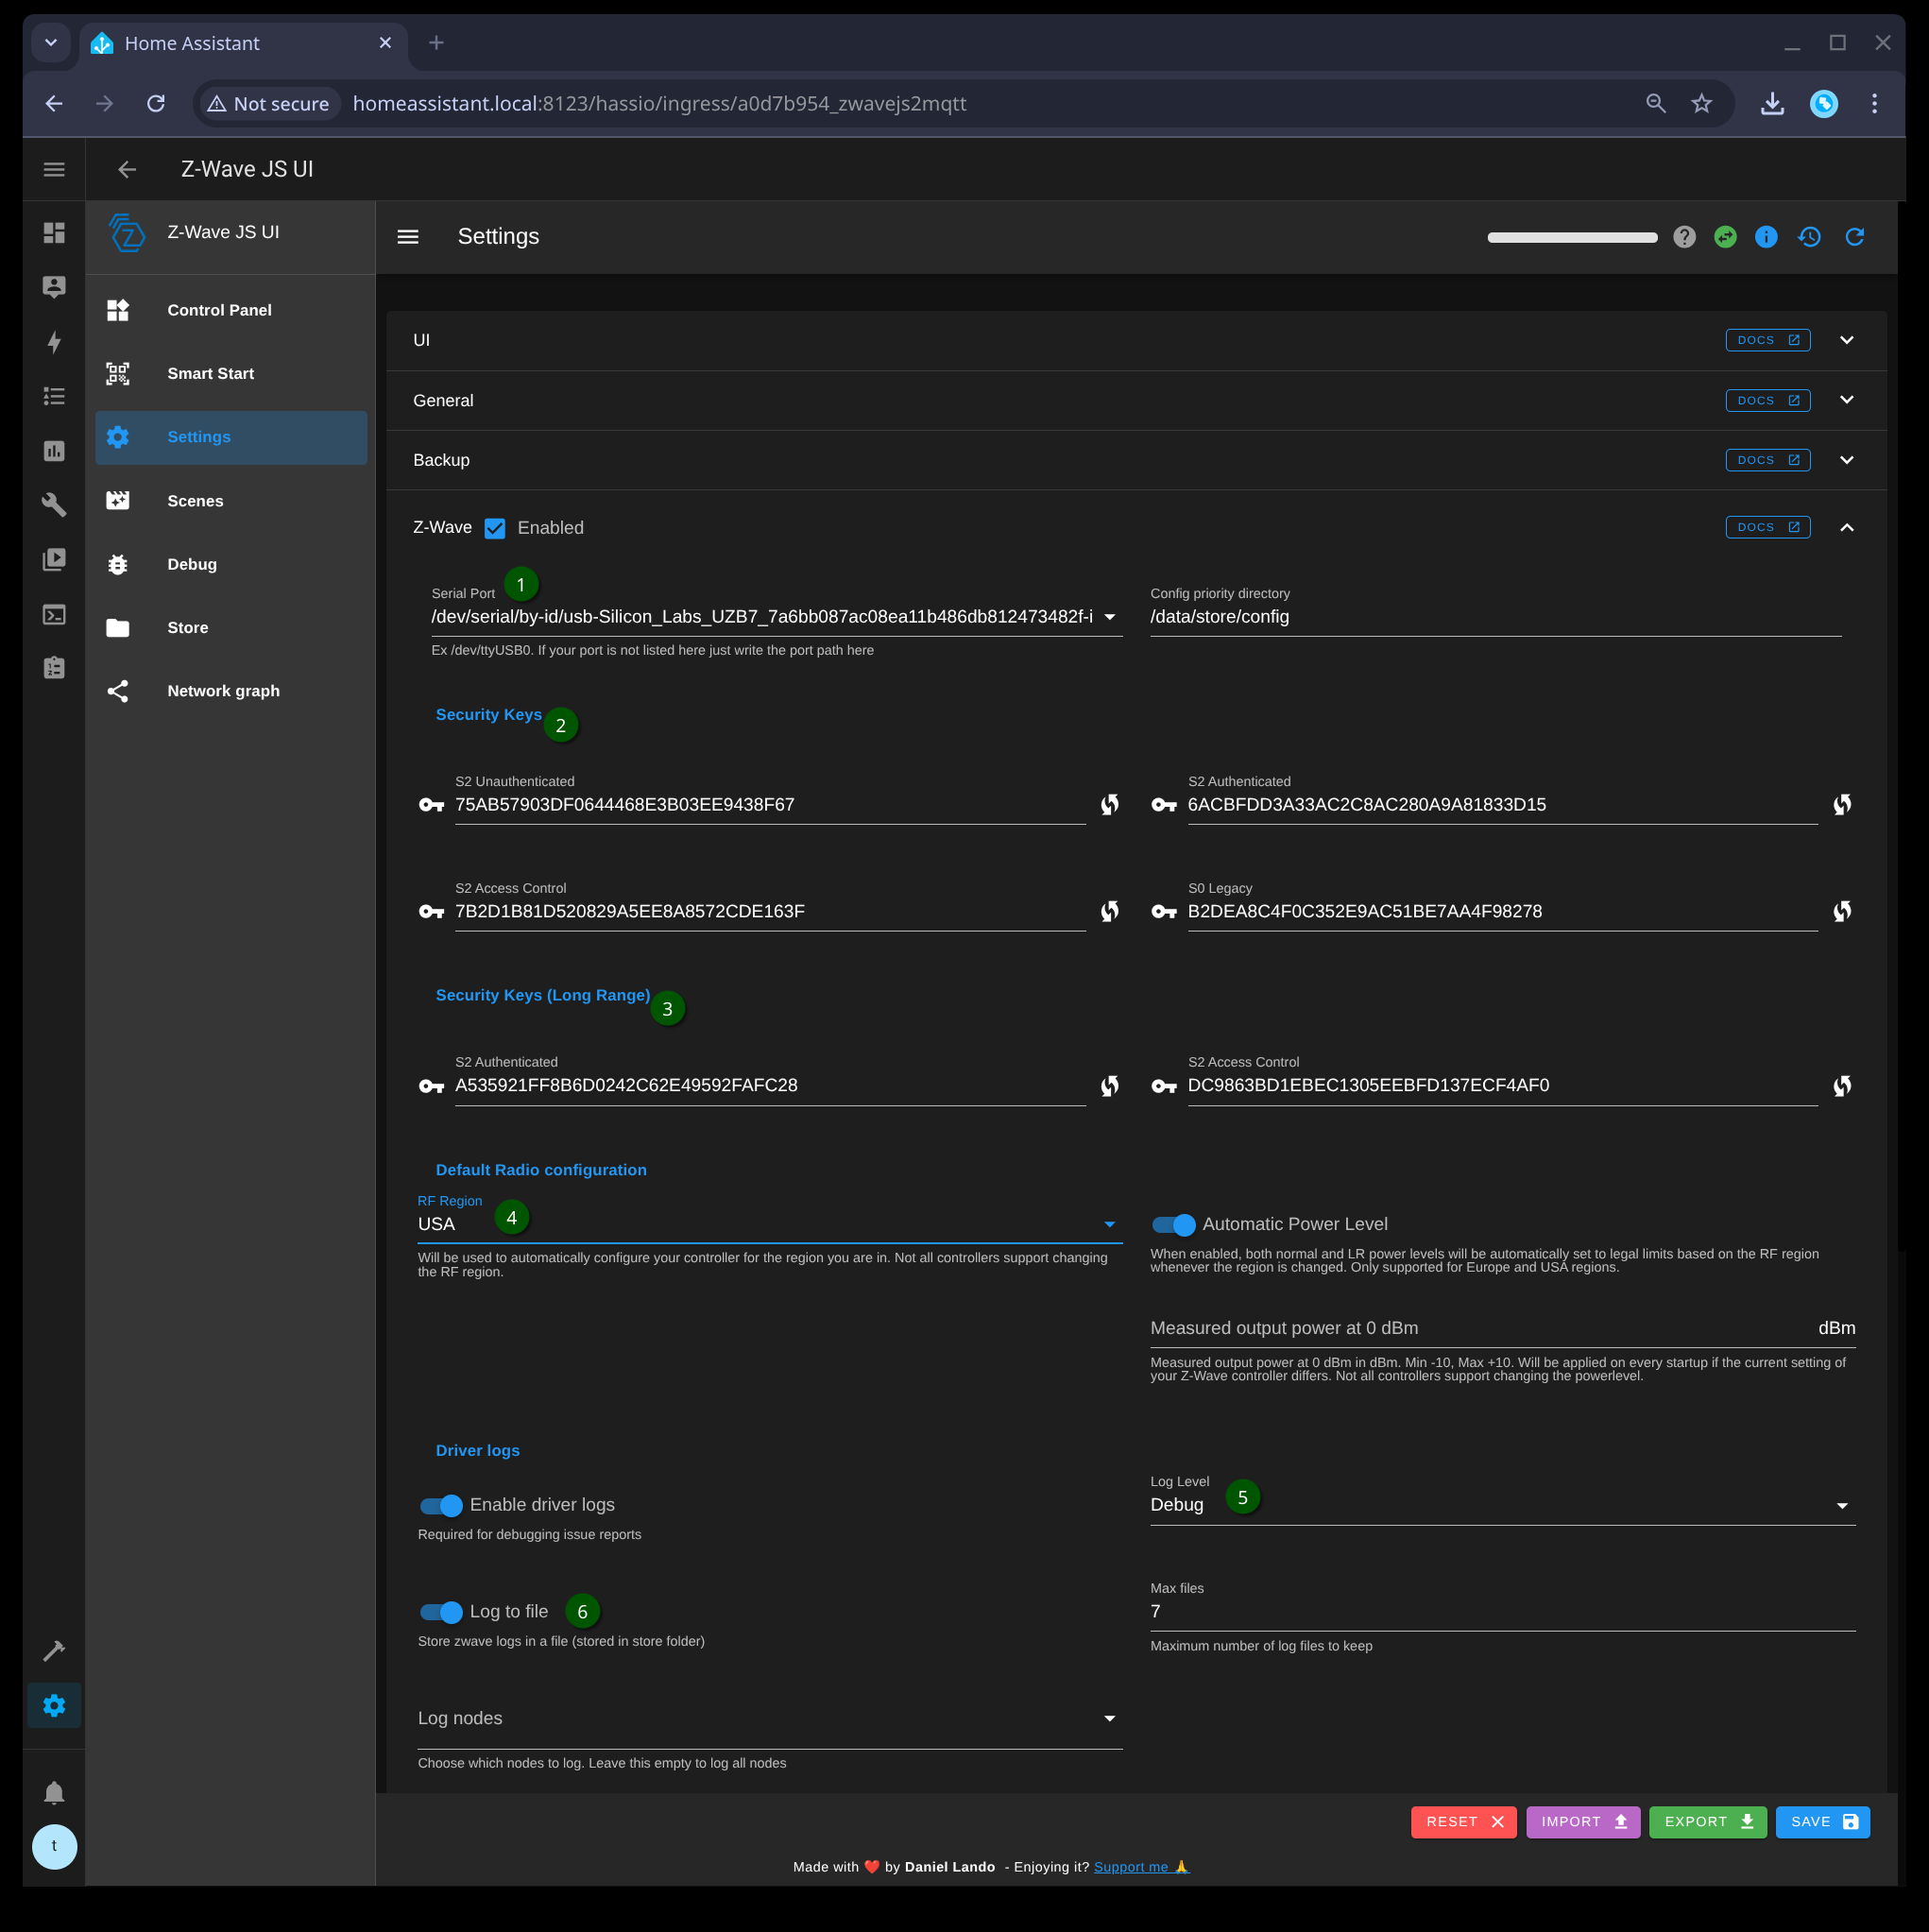
- Set Serial Port (1) by using the same device path from step 1. In most cases should be auto-detected and displayed in the pull-down menu. Tip: always use the
/dev/device/by-idpath to avoid issues with path changes. - Set all the Security Keys (2) and Security Keys (Long Range) (3), via copy and paste from step 1. Be sure to match the keys exactly (S2 Authenticated to S2 Authenticated, etc.).
- Set the RF Region to to the region/frequency your Z-Wave adapter is configured for.
Optional settings:
- Set Log Level to Debug (4)
- Set Log to file to On (5)
The log settings are recommended for future troubleshooting of issues. If your storage is write-sensitive (such as an SD card) you may want to leave them disabled.
If you are using a VM and a 500-series controller, you may need to disable the “Soft Reset” setting. A Soft Reset of a 500-series will cause a USB reset, and the VM will lose connection. If pass-through is not configured for hot-plugging, the USB stick will never re-connect and Z-Wave JS will fail to start. Is is not necessary to disable Soft Reset for 700/800-series controllers, they do not have this issue and the driver will ignore the setting.
![]() Don’t forget to scroll to the bottom of the web UI and click SAVE. Saving will restart ZUI and it may take up to a minute or longer to load depending on the size of your Z-Wave network.
Don’t forget to scroll to the bottom of the web UI and click SAVE. Saving will restart ZUI and it may take up to a minute or longer to load depending on the size of your Z-Wave network.
![]() DO NOT change any of the settings in the Home Assistant settings panel. These are already configured to work with the Z-Wave integration.
DO NOT change any of the settings in the Home Assistant settings panel. These are already configured to work with the Z-Wave integration.
Step 8.0: Verify configuration
Navigate to the Control Panel via the ≡ button. Eventually the node table rows will start filling up with all of the nodes.
A correct migration will show all of the nodes with valid manufacturer, product, and product code fields (1), and there should be no “Unknown” ones. The interview status should also be “Complete” (2).
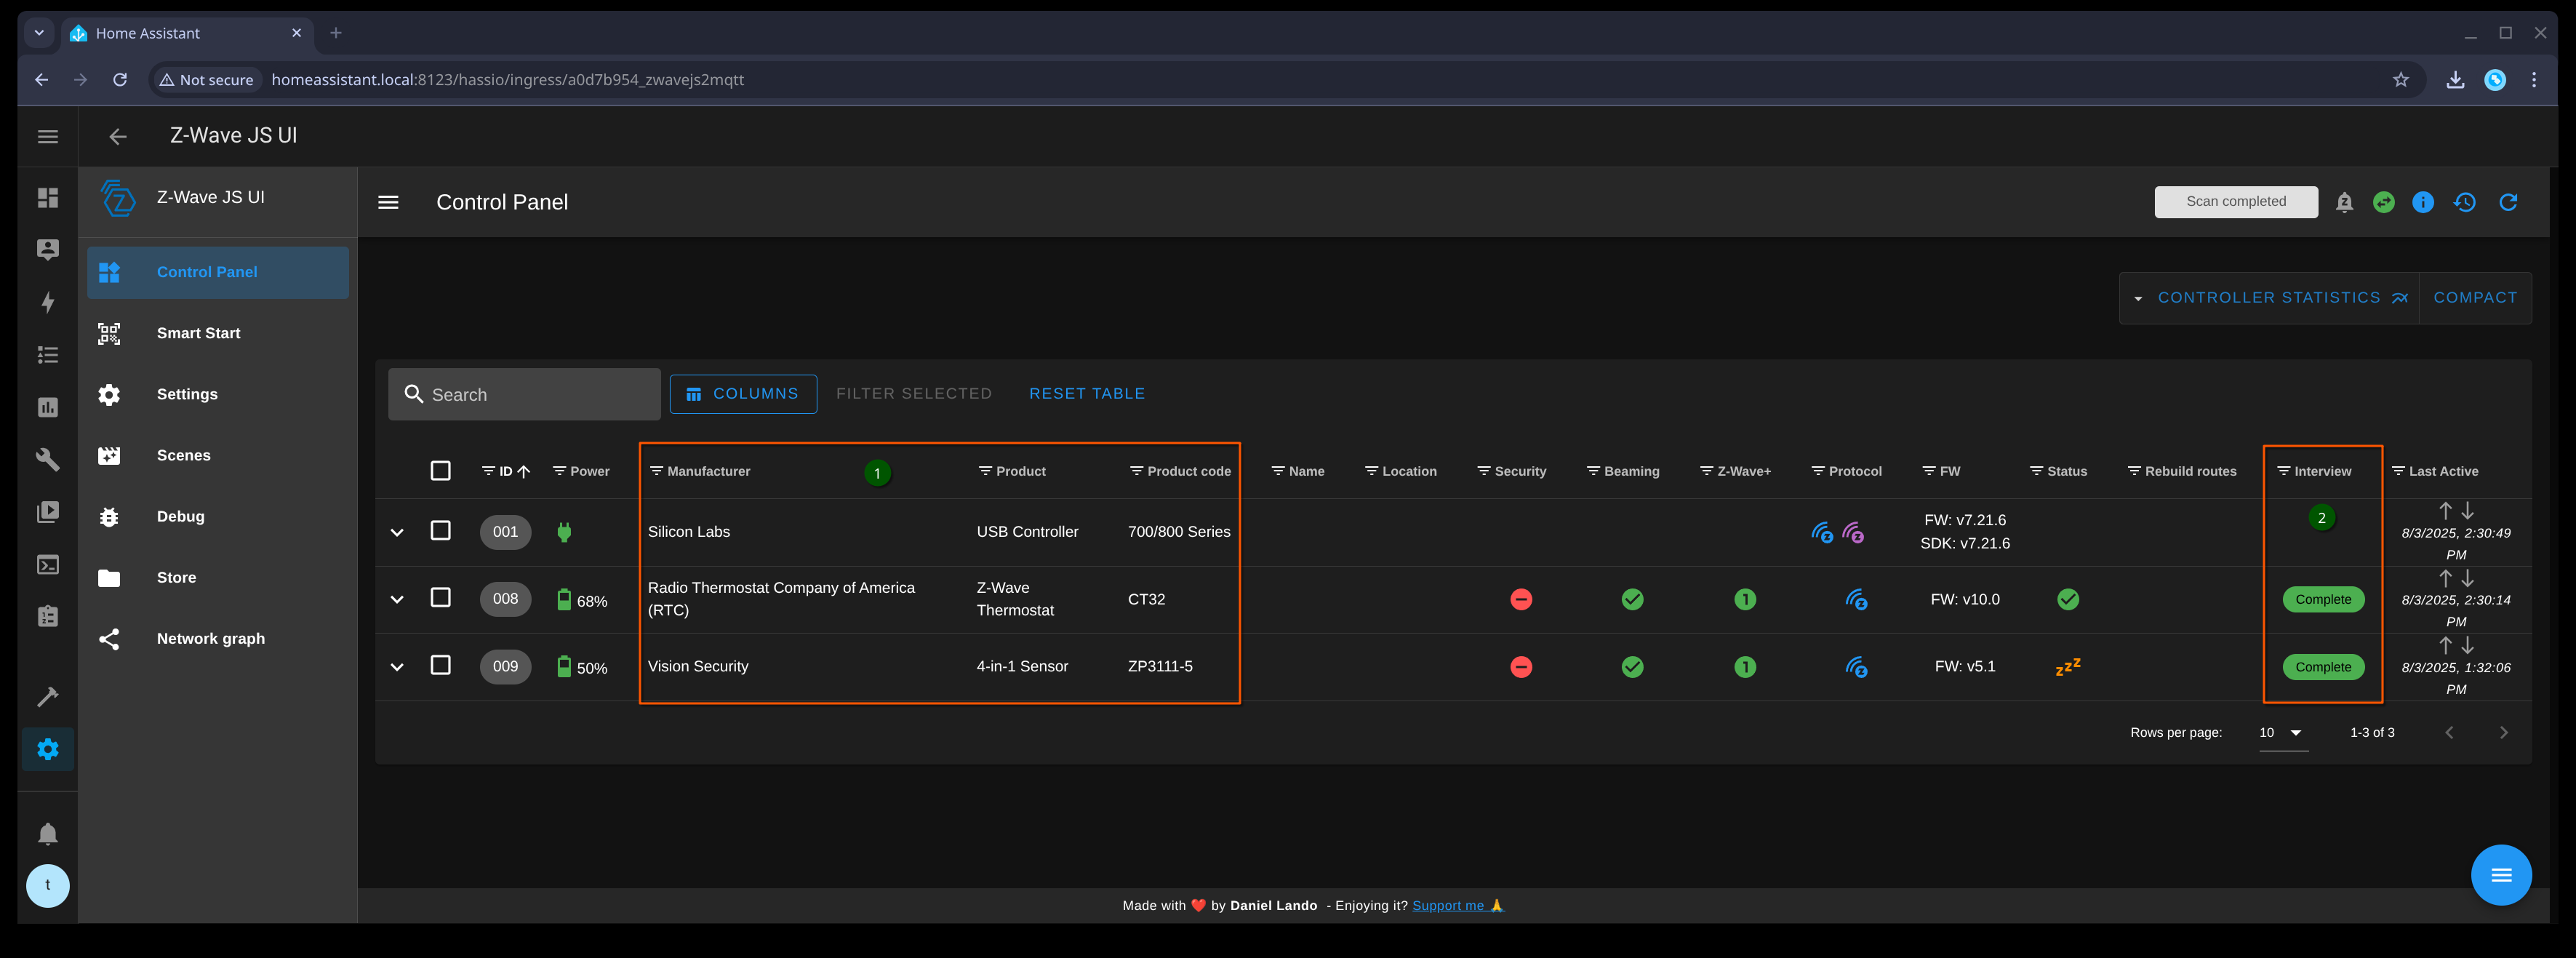
Note that ZUI will switch to a compact mode if the window width is too narrow. Expand the window width to see the table view as shown above.
If you have some devices that are unknown or not Complete, then they would have been in that state before the migration. To fix that, you’ll need to wake up battery devices to complete the interviews, or try manually re-interviewing. While not required, it’s best if you have all the nodes in the Complete interview state before proceeding to the next step, as this is the main point of the guide.
8.1: Import node names and locations
If you exported your HA device (node) names and areas (locations) in step 1.1, now is the time to import them. From the Control Panel page in ZUI:
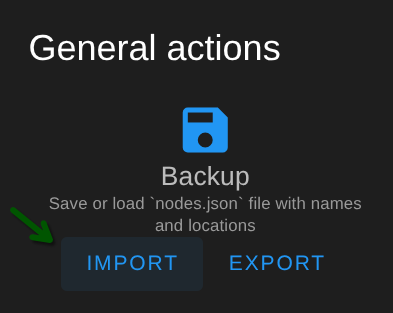
- Select the blue ≡ button (FAB button) at the bottom of the page
- Select the
 (wand) icon, Advanced actions
 - Select IMPORT under Backup
- Select YES when prompted to override existing
- You should see a green “Configuration imported successfully” notification if it was successful
- Exit from the advanced actions
The names and location fields for the nodes should be updated to match the HA device names and areas.
![]() In the future, always add nodes from ZUI to keep it and HA in-sync. When adding a node (either classic inclusion or SmartStart) ZUI allows you to pre-configure names and locations. If set, during inclusion HA will see the pre-configured name and location and assign them as the device name and area. If you include from HA and configure there, ZUI will not see the changes and you will need to repeat this or manually update the node in ZUI.
In the future, always add nodes from ZUI to keep it and HA in-sync. When adding a node (either classic inclusion or SmartStart) ZUI allows you to pre-configure names and locations. If set, during inclusion HA will see the pre-configured name and location and assign them as the device name and area. If you include from HA and configure there, ZUI will not see the changes and you will need to repeat this or manually update the node in ZUI.
Step 9: Reconfigure the Z-Wave JS Integration
Go to the integrations dashboard: ![]()
Or manually navigate the UI to: Settings → Devices & services
- Select + ADD INTEGRATION
- Search for Z-Wave and choose Z-Wave. Avoid “Add Z-Wave device” and choose Z-Wave if prompted a second time.
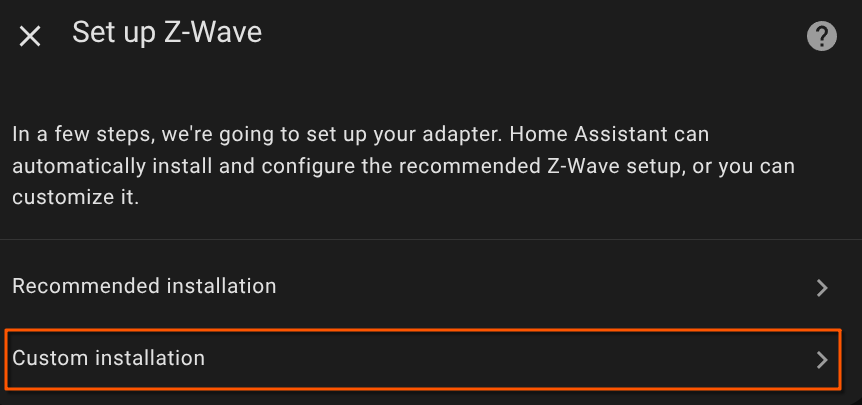
 In the “Set up Z-Wave” dialog, choose Custom installation (!!!CRITICAL STEP!!!)
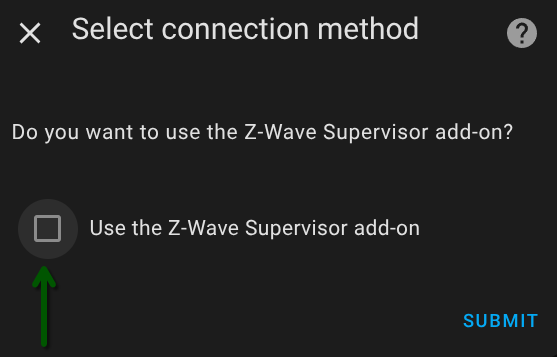
- In the “Select connection method” dialog, UNCHECK “Use the Z-Wave JS Supervisor add-on” (!!!CRITICAL STEP!!!)
- Select SUBMIT
- Enter
ws://a0d7b954-zwavejs2mqtt:3000as the URL (copy and paste the exact URL listed here, do not include any whitespace!) and select SUBMIT.

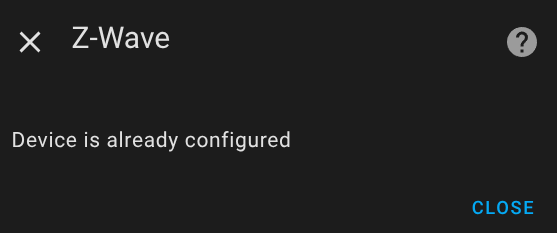
If successful the dialog will respond with “Device is already configured”. This is not an error, it means the existing Z-Wave network has successfully been found. Select CLOSE.
![]() The integration is still disabled though, so we need to turn it back on.
The integration is still disabled though, so we need to turn it back on.
Open the Z-Wave integration page: ![]()
Or manually navigate the UI to: Settings → Devices & services → Z-Wave
Under Hubs it will show disabled by user:
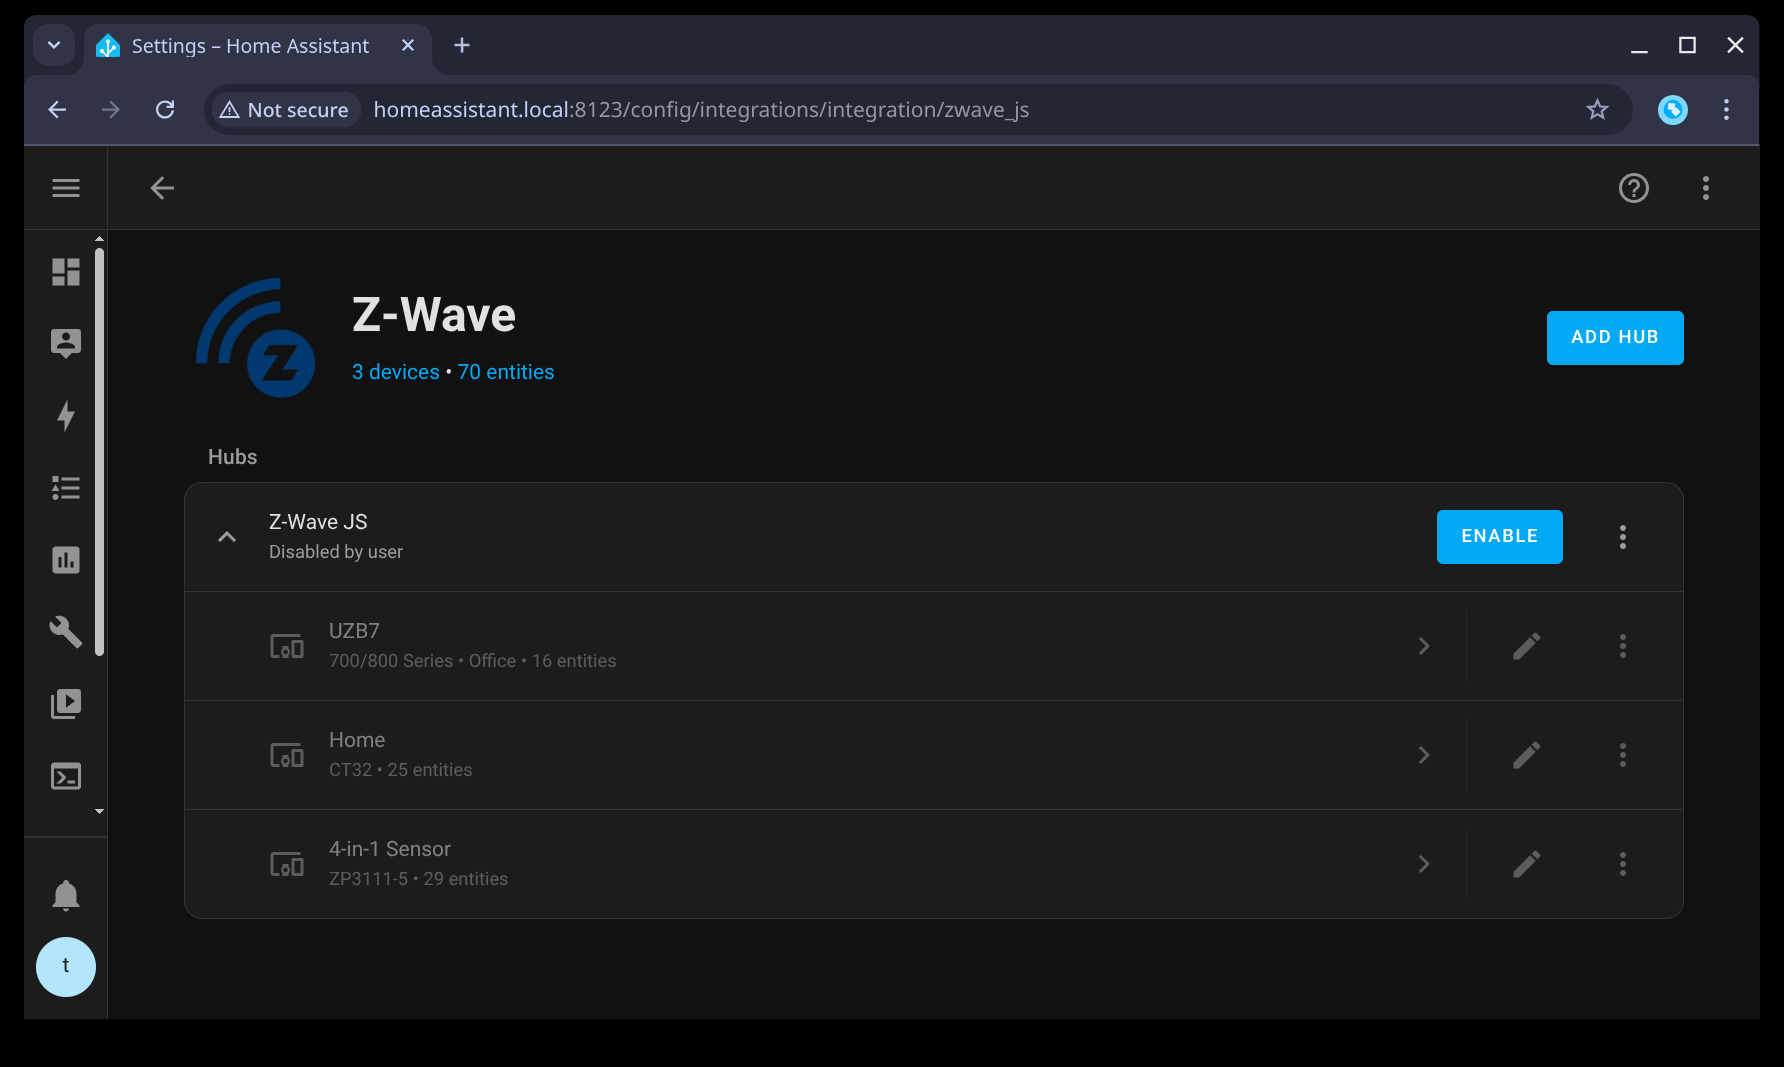
Select the ENABLE button to re-enable it. Wait for the integration to load, but it should be nearly instant. The device names will go from gray to white, signifying they are enabled. If not, try reloading the page.
Click on the ![]() button (Configure) to validate the configuration (or go to Link to Z-Wave JS configuration – My Home Assistant).
button (Configure) to validate the configuration (or go to Link to Z-Wave JS configuration – My Home Assistant).
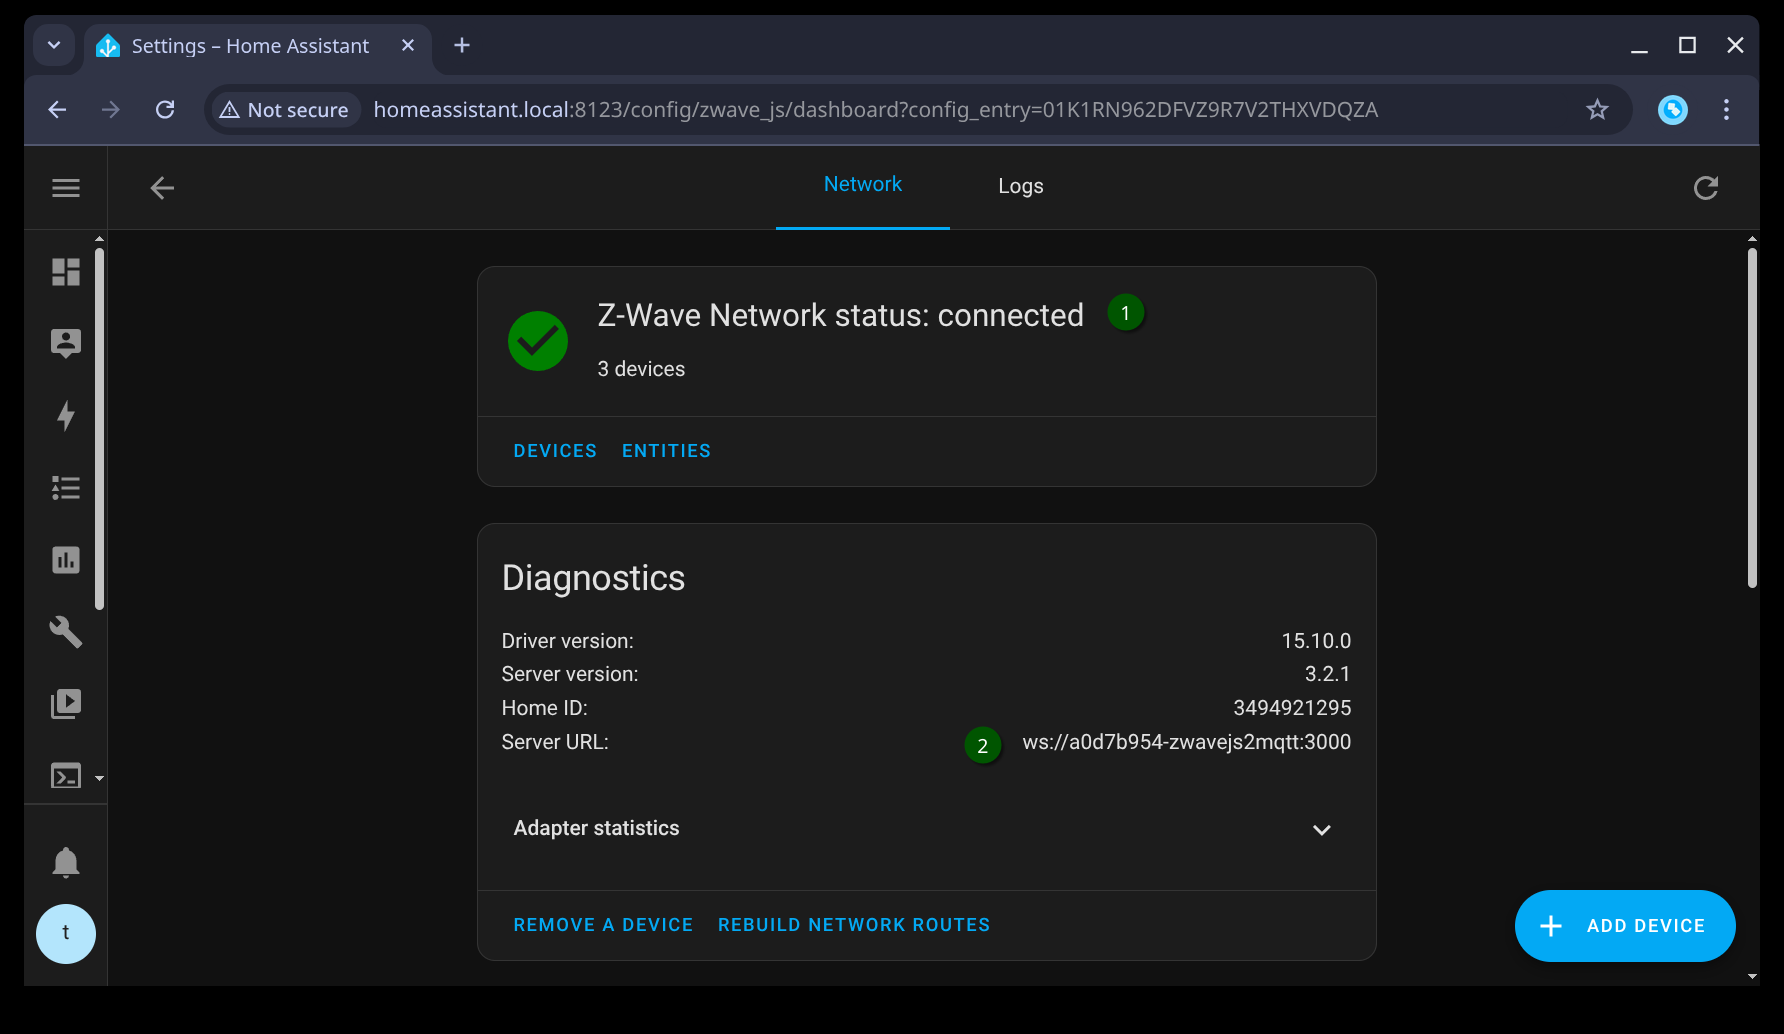
Ensure “Z-Wave Network Connected” (1) is shown and the the Server URL (2) is set to the above ZUI URL.
If you view your devices and entities, you should notice that nothing has changed (e.g. device and entity names).
Step 10: Uninstall the Z-Wave JS add-on
The final step is to remove the official add-on. Both add-ons cannot be running and using the same Z-Wave controller at the same time.
Go to the Z-Wave JS add-on page: ![]()
Or manually go to: Settings → Add-ons → Z-Wave JS
Select UNINSTALL and UNINSTALL again in the popup dialog (enable the option “Also permanently delete this addon’s data” if you want to cleanup the driver cache files permanently).
The official add-on is now completely removed.
The End
Congratulations for making it to the end of this guide! You should now have a fully functioning ZUI add-on, with the ability to perform all the extra things you wanted to do, and nothing should have changed in HA.
If you notice any errors in this guide, please let me know with a comment.
 , now with your tutorial I have been able to migrate successfully to Z-Wave JS to MQTT
  , although it is a bit preliminary to say that it goes better, I have noticed that with the example of the lights, it takes only 3 to 5 seconds to turn on all the lights, another issue that happened to me with ZwaveJS is that when I gave orders to the curtains and wanted to turn on the light of a room, there was also a lag in execution times that reached up to 2 minutes in some opportunities… now that doesn’t happen, everything goes in a matter of seconds…
  but as I mentioned I have just been using Z-Wave JS to MQTT for a couple of hours.


